I6
3
4
G
B
0
9
2
0
3
1
1
0
0
4
7
1
5
MAIN MENU
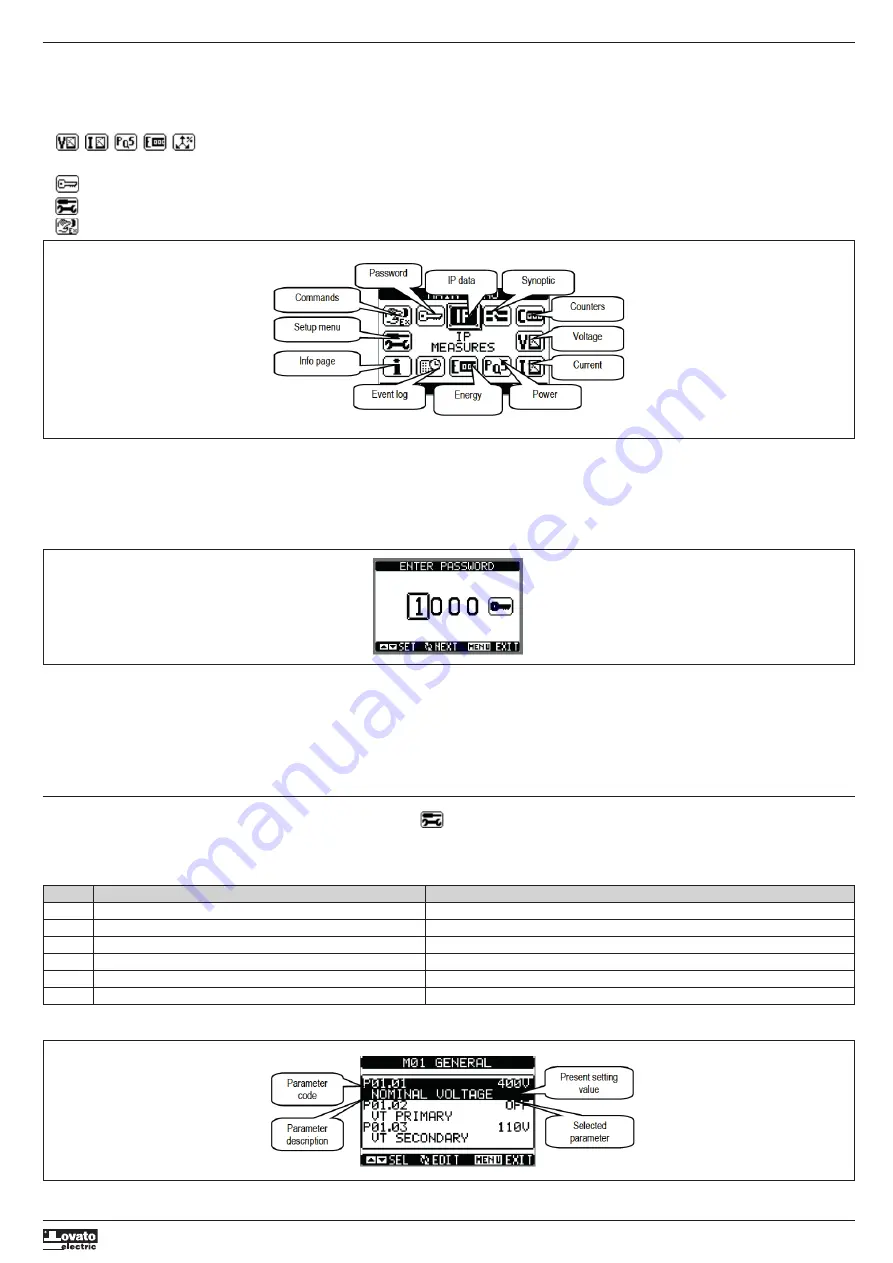
– The main menu consists of a set of graphic icons which allow rapid access to measurements and settings.
– Starting from the normal measurement display, press the
MENU
button. The display shows the quick menu (see figure below).
– Press
s
or
t
to select the desired function. The selected icon is highlighted and the message in the middle of the display indicates the description of the function.
– Press
✔
to activate the selected function.
– If some functions are not available, the corresponding icon will be deactivated, i.e. greyed out.
–
etc. Operate as shortcuts which allow quicker access to pages for displaying measurements, going directly to the selected group of measurements, from which it is possible to
move forwards and backwards as usual.
–
– Setting the numeric code which permits access to protected functions (setting parameters, executing commands).
–
– Parameter programming access point.
–
– Commands Menu access point, where authorised users can perform a number of resetting and restoring operations.
PASSWORD-PROTECTED ACCESS
– For new (default) equipment, the password is enabled with the default 1000 (user access) and 2000 (advanced access) codes.
– To modify the access codes, refer to the Setting Parameters (setup) section.
– There are two access levels, depending on the code entered:
•
User-level access
– permits resetting of the recorded values and modifying of some settings values (see parameter list in Setting Parameters section);
•
Advanced-level access
– the same rights as user, with the addition of being able to change all the settings.
– In the normal measurements display, press
MENU
to recall the main menu, then select the password icon and press
✔
.
– The password setting window shown below will appear:
– Press the
s t
buttons to change the value of the selected digit.
– Press the
✔
button to confirm the digit and cycle to the next ones.
– Enter the password, then go to the key icon. The parameters in italic font can be accessed with advanced password only.
– When the password entered corresponds to the User-level or Advanced-level password, the appropriate unlock message appears.
– After the password is unlocked, access will remain enabled until:
• The equipment is disconnected;
• The equipment is reset after exiting the Setting Parameters (setup) menu;
• 2 minutes elapse without the operator touching any button.
– Press
MENU
button to stop setting the password and exit.
SETTING PARAMETERS (SETUP)
– From the standard measurement display, press
MENU
to call up the main menu, then select the
icon and press
✔
to access the Setting Parameters (setup) menu.
– The table in the figure is displayed, for selecting the set-up sub-menus, in which all the parameters are grouped according to their function.
– Press the
s t
buttons to select the desired menu and press
✔
to confirm.
– Press MENU to exit and return to the measurement display.
– The available sub-menus are listed in the following table :
Code
MENU
DESCRIPTION
M01
GENERAL
Specifications of the system
M02
UTILITY
Language, brightness, display pages, etc.
M03
PASSWORD
Enablement of protected access
M04
IP THRESHOLDS
IP trip thresholds and delays
M05
COMMUNICATION (COMn)
Communication ports
M06
ALARMS
Alarm enable
– Select the sub-menu and press the
✔
button to display the parameters.
– All parameters are displayed with code, description, current value.


