


Page 28
Installation & Use – English Guide
LINDY ELECTRONICS LTD
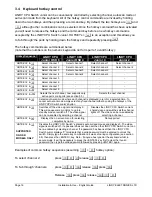
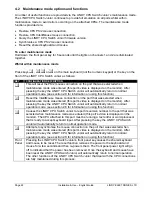
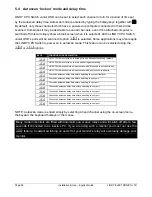
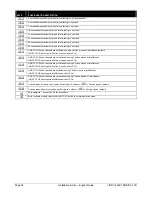
5.6 Keyboard hotkey combination
The keyboard hotkey combination is used to change a channel, set autoscan mode or secure the
product (so that the password needs to be typed before it can be used again). The following
keyboard hotkey combinations can be selected. These hotkey combinations are used together with
the command keys to trigger the required LINDY CPU Switch Junior function. The left and right
shift key combination is particularly suitable for extended keyboards where additional keys can be
programmed to act as a combination of other keys. Such keyboards are supplied with many
Gateway 2000 computers. Programming spare keys to trigger the hotkey combination allows
channels to be selected via a single key stroke.
KEYS
CONFIGURATION DESCRIPTION
+ t
and
s
keys together (left or right hand keys operate) (default)
+ t
and
u
keys together (left or right hand keys operate)
+ s
and
u
keys together (left or right hand keys operate)
+
RIGHT
s
key
+
LEFT
s
and RIGHT
s
keys together
+
LEFT
t
and LEFT
s
keys together
+
RIGHT
t
and RIGHT
s
keys together
+
No hotkey enabled
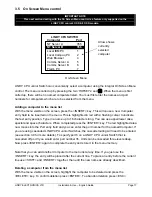
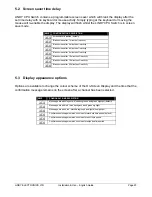
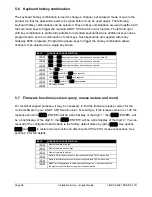
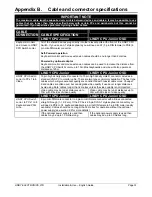
5.7 Firmware functions (version query, mouse restore and reset)
For technical support purposes, it may be necessary to find the firmware release version for the
control software in your LINDY CPU Switch Junior. For example, if the release version is v1.02 the
response shown to
)
<ENTER> will be a brief display of the digit ‘1’, then
)
<ENTER> will
be a brief display of the digit ‘0’, then
)
<ENTER> will be a brief display of the digit ‘2’. You can
reset all of the configured options back to the factory default states by typing
)
. Use options
)
and
)
to restore mouse function on disconnected PS/2 CPU mouse connections. See
section 2.8 for full details
KEYS
CONFIGURATION DESCRIPTION
)
Display firmware first digit
)
Display firmware second digit
)
Display firmware third digit
)
Restore PS/2 mouse function to the currently selected CPU’s mouse port
)
Restore IntelliMouse function to the currently selected CPU’s mouse port
)
RESET all configurations to factory default settings. An ‘r’ will show briefly on
the display to confirm that the reset has been completed


