23
Installation and Operations Guide
Step 4: Attach cable trays
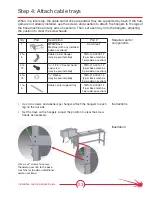
When, in a later step, the cable carrier links are added, they are supported by trays. If the han-
gars are not already installed, use the screws and washers to attach the hangers to the legs of
the base machine and any add-on sections. Then, set each tray onto the hangers, adjusting
the position to clear the screw heads.
Required parts /
components
Instructions
Illustration
Qty
Part
Description
Part #
1
MPMP Base
Machine (with any installed
add-on sections)
From Step 3
2 to
6
Cable Carrier Hanger
(may be pre-installed)
TMS-140-0002-12
(2 per base machine
1 per add on section)
4 to
12
5
⁄
16
"–18 X
3
⁄
4
" Socket head
cap screw
(may be pre-installed)
TMS-410-0014-12
(4 per base machine
2 per add on section)
4 to
12
5
⁄
16
" Washer
(may be pre-installed)
TMS-413-0001-14
(4 per base machine
2 per add on section)
1 to
5
Cable carrier support tray
TMS-140-0002-13
(1 per base machine
1 per add-on section)
Use six
3
⁄
8
"
screws to secure
the add-on section to the base
machine (or to add on additional
add-on sections)
• Use two screws and washers per hanger. Attach the hangers to each
leg on the rail side.
• Set the trays on the hangers. Adjust the position to clear the screw
heads as necessary.
Summary of Contents for MASTERPIPE Mini Profiler
Page 9: ...1 Safety Guide Safety Information ...
Page 19: ...11 Installation and Operations Guide Hardware Installation ...
Page 62: ...54 MASTERPIPE Mini Profiler ...
Page 63: ...55 Driver Software Driver Introduction ...
Page 65: ...57 Driver Software Illustrations screen shots of the TM4 installation pro cess ...
Page 67: ...59 Driver Software Illustrations screen shots of the device driver installa tion process ...
Page 96: ...88 MASTERPIPE Mini Profiler ...
Page 97: ...89 Installation and Operations Guide Parts ...
Page 100: ...92 MASTERPIPE Mini Profiler ...
Page 101: ...93 Installation and Operations Guide Troubleshooting ...


