background image

ENGLISH

33

 CAUTION

 •

Image sticking does not occur when using constantly changing images but may occur when using a fixed image for an 

extended period of time. Therefore, it is recommended that you use the instructions below to decrease the likelihood 

of image sticking occurring when using a fixed image. It is recommended that you change the screen at least once 

every 12 hours at the very minimum; if done more frequently, the prevention of image sticking is more effective.

Recommended operating conditions

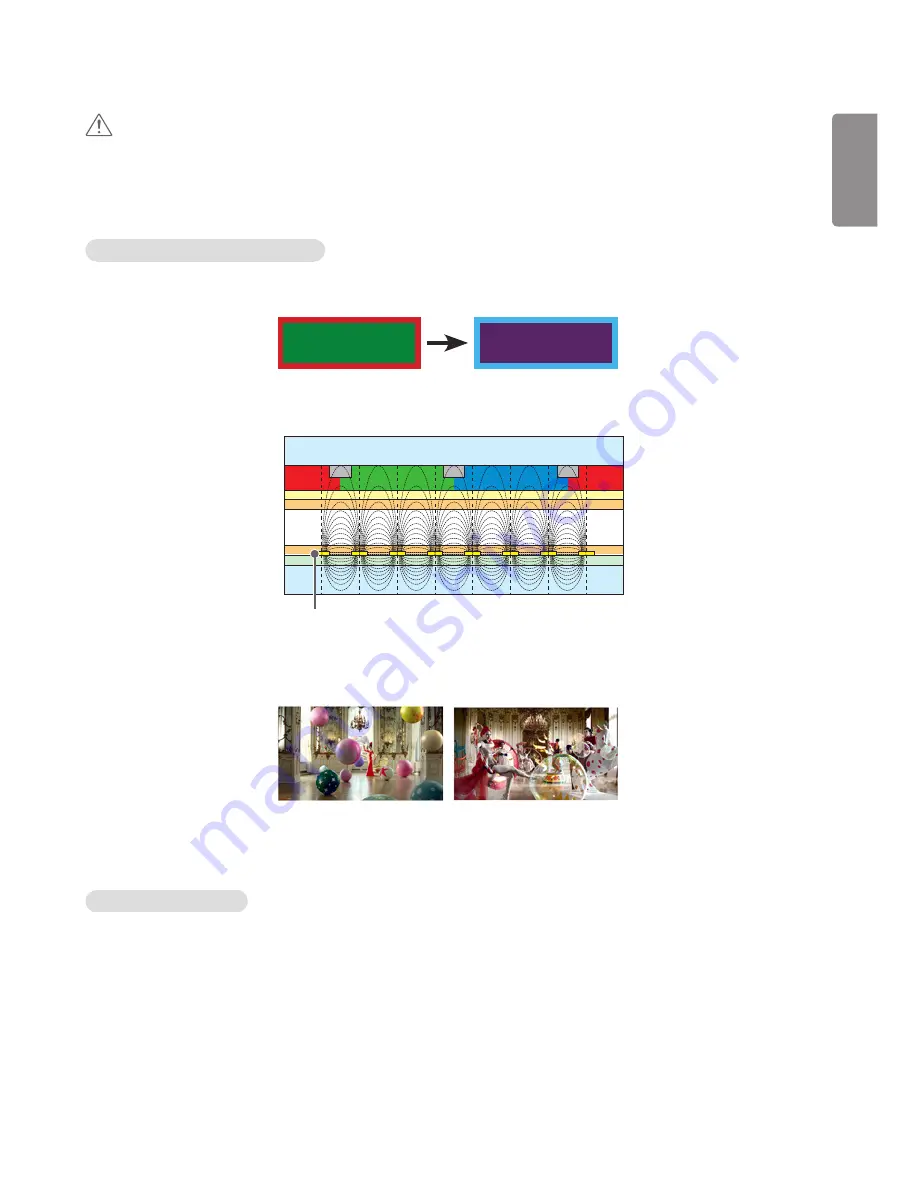
Change the background and the character colors using the same time interval.

ID: UPM 123 

PW: ****

ID: UPM 123 

PW: ****

When changing colors, using complementary colors helps to prevent image sticking.

BM

BM

BM

CF

CF

CF

OC

PI

PI

TFT Layers

Glass

Glass

LC

CF

ITO or MoTi Pixel Layer

Change the image using the same time interval.

Make sure that the characters or images before changing the image remain in the same location after changing the 

image.

What is image sticking?

When the LCD panel displays a static image for an extended period of time, it can cause a voltage difference between 

the electrodes that operate the liquid crystals. When the voltage difference between the electrodes builds up over 

time, liquid crystals have a tendency to remain aligned in one direction. During this process, a previously displayed image 

remains visible. This phenomenon is referred to as image sticking.

Summary of Contents for 32SE3D

Page 1: ...igt af landet En función del país Maan mukaan Selon pays Abhängig vom Land Ανάλογα με τη χώρα Országfüggő Tergantung pada negaranya A seconda del Paese Елге байланысты 지역에 따라 다름 Afhankelijk van het land Avhengig av land Zależnie od kraju Dependendo do país В зависимости от страны Závisí od krajiny Beroende på land 視國家 地區而定 Ülkeye bağlı Залежно від країни Mamlakatga bog liq ravishda 国によって異なります Depe...

Page 2: ...unterladen Schlüsselwort SE3D SE3KD SH7DD Ελληνικά Μπορείτε να κατεβάσετε τα εγχειρίδια web για αυτό το προϊόν στις παρακάτω τοποθεσίες web Λέξη κλειδί SE3D SE3KD SH7DD Magyar A termék internetes útmutatóját a következő weboldalakról töltheti le Kulcsszó SE3D SE3KD SH7DD Bahasa Indonesia Anda dapat mengunduh manual web untuk produk ini di situs web berikut Kata kunci SE3D SE3KD SH7DD Italiano È po...

Page 3: ...ka Du kan hämta produktens onlinehandböcker på följande webbplatser Nyckelord SE3D SE3KD SH7DD 台灣語 您可以於下列網站下載本產品的網頁手冊 關鍵字 SE3D SE3KD SH7DD Türkçe Bu ürünün web kılavuzlarını aşağıdaki web sitelerinden indirebilirsiniz Anahtar sözcük SE3D SE3KD SH7DD Українська Завантажити веб посібники для цього виробу можна на веб сайтах поданих нижче Ключове слово SE3D SE3KD SH7DD O zbekcha Ushbu mahsulot uchun ...

Page 4: ...32SE3D 43SE3D 49SE3D 55SE3D 32SE3KD 43SE3KD 49SE3KD 55SE3KD 43SH7DD 49SH7DD 55SH7DD 32 43 49 55SE3D RS 232C IN ...

Page 5: ......

Page 6: ...65SE3D 65SE3KD 65SE3D RS 232C IN ...

Page 7: ......

Page 8: ...1 3 2 4 2 ...

Page 9: ......

Page 10: ...Y 限用物質含有情況標示聲明書 設備名稱 液晶彩色顯示器 型號 型式 單元 限用物質及其化學符號 鉛 Pb 汞 Hg 鎘 Cd 六價鉻 Cr 6 多溴聯苯 PBB 多溴二苯醚 PBDE 電路板 外殼 支架 玻璃面板 配件 例 纜線 備考1 超出0 1 wt 及 超出0 01 wt 係指限用物質之百分比含量超出百分比含 量基準值 備考2 係指該項限用物質之百分比含量未超出百分比含量基準值 備考3 係指該項限用物質為排除項目 ...

Page 11: ......

Page 12: ......

Page 13: ...ts Reserved OWNER S MANUAL LG Digital Signage MONITOR SIGNAGE Please read this manual carefully before operating your set and retain it for future reference 32SE3D 43SE3D 49SE3D 55SE3D 65SE3D 32SE3KD 43SE3KD 49SE3KD 55SE3KD 65SE3KD 43SH7DD 49SH7DD 55SH7DD ...

Page 14: ...MBLY AND PREPARATION 11 Optional Accessories 12 Parts and Buttons 14 Connecting the Stand 15 Connecting the Speakers 17 Using the IR Receiver 20 Portrait Layout 21 Attaching and removing the LG Logo Bracket 22 Installing on a Wall 24 REMOTE CONTROL 26 Displaying the Device Name Connected to an Input Port 28 White Balance Adjust Menu 28 MAKING CONNECTIONS 29 Connecting to a PC 29 External Device Co...

Page 15: ...take force the patient to vomit and visit the nearest hospital Additionally vinyl packing can cause suffocation Keep it out of the reach of children Do not put heavy objects on the product or sit upon it If the product collapses or is dropped you may be injured Children must pay particular attention Do not leave the power or signal cable unattended on the pathway The passerby can trip or fall whic...

Page 16: ...e more than 100 mm from the wall If you install the product too close to the wall it may be deformed or fire can break out due to internal heat Do not block the ventilation hole of the product by a tablecloth or curtain The product can be deformed or fire can break out due to overheating inside the product Install the product on a flat and stable place that has no risk of dropping the product If t...

Page 17: ...ch may cause electric shock or fire Be careful not to step or place heavy objects electronic appliances clothing etc on the power cord or AC adapter Be careful not to damage the power cord or AC adapter with sharp objects Damaged power cords may cause a fire or electric shock Never disassemble repair or modify the power cord or AC adapter This may cause a fire or electric shock Make sure to connec...

Page 18: ...sconnect device Please make sure the device is installed near the wall outlet to which it is connected and that the outlet is easily accessible As long as this unit is connected to the AC wall outlet it is not disconnected from the AC power source even if the unit is turned off CAUTION Be sure to keep the outlet AC adapter and pins of the power plug clean from dust and etc This may cause a fire Do...

Page 19: ...hands to move If you drop the product the damaged product can cause electric shock or fire Contact an authorized the service center for repair Make sure the product is turned off unplugged and all cables have been removed It may take 2 or more people to carry larger apparatus Do not press against or put stress on the front panel of the apparatus CAUTION Do not shock the product when moving it You ...

Page 20: ...ch as benzene paint thinners or alcohol Take a rest from time to time to protect your vision Keep the product clean at all times Take a comfortable and natural position when working with a product to relax the muscles Take a regular break when working with a product for a long time Do not press strongly upon the panel with a hand or sharp object such as nail pencil or pen or make a scratch on it K...

Page 21: ...may cause staining WATER CHEMICALS Do not use products using high voltage around the Monitor e g a bug zapper Monitor may have malfunction as its electrical shock Mounting on a Wall Do NOT install this product by yourself as you may injure yourself or cause damage to product Please contact service personnel authorised by manufacturer ...

Page 22: ...ivX video To play purchased DivX movies first register your device at vod divx com Find your registration code in the DivX VOD section of your device setup menu DivX Certified to play DivX video up to HD 1080p including premium content DivX DivX Certified and associated logos are trademarks of DivX LLC and are used under license Covered by DivX Patents 7 295 673 7 515 710 RE45 052 and others avail...

Page 23: ...our product may vary depending on the model or region Product specifications or contents in this manual may be changed without prior notice due to upgrade of product functions SuperSign Software Manual Downloading from the LG Electronics website Visit the LG Electronics website http partner lge com and download the latest software for your model The warranty will not cover any damage caused by usi...

Page 24: ...2T 49SE3 49SH7DD 55SE3 55SH7DD ST 652T 65SE3 Stand Spacers 32SE3 43SE3 43SH7DD 49SE3 49SH7DD 55SE3 55SH7DD 65SE3 2 EA Screws Diameter 4 0 mm x Pitch 0 7 mm Model Length including spring washer Quantity 32SE3 10 mm 6 EA 43SE3 43SH7DD 49SE3 49SH7DD 55SE3 55SH7DD 14 mm 8 EA 65SE3 16 mm 8 EA Speaker kit Only for SE3D model Speakers SP 5000 Cable holder Cable Tie Screws Diameter 4 0 mm x Pitch 0 7 mm x...

Page 25: ...m x Pitch 0 5 mm x Length 6mm CD Owner s Manual Cards Wi Fi Dongle kit AN WF500 NOTE Cable holder Cable tie may not be available in some areas or for some models Optional accessories are available for some models If necessary please purchase them separately Before you attach the Media Player connect the cable to the port ...

Page 26: ...rent according to the model Buttons INPUT Changes the input source MENU Accesses the main menus or saves your input and exits the menus Adjust the up and down Moves left and right AUTO SET Displays the current signal and mode I Turns the power on or off ...

Page 27: ...ENGLISH 15 Connecting the Stand For certain models only The image may be different according to the model 32SE3 1 2 ...

Page 28: ...ENGLISH 16 43 49 55 65SE3 43 49 55SH7DD 1 2 3 ...

Page 29: ... The image may be different according to the model 32SE3D 1 Connect an input signal cable before installing the speakers 2 Mount the speakers by using screws as shown below Make sure the power cable is disconnected before making a connection Basic installation ...

Page 30: ...ENGLISH 18 3 Then connect the speaker cable After installing your speakers use holders and cable ties to organize the speaker cables Basic installation ...

Page 31: ...n below Make sure the power cable is disconnected before making a connection 3 Then connect the speaker cable After installing your speakers use holders and cable ties to organize the speaker cables NOTE Please turn off the power before removing the cable Connecting or removing the speaker cable while turned on may result in no sound ...

Page 32: ...able Install the IR receiver towards the front of the set NOTE When you see from the back of the set if the IR receiver cable does not face front the signal reception range may shorten The IR receiver is made with a magnet It is detachable at the bottom typical installation or back wall installation of the set Make sure that you unplug the power cord before connecting or removing the IR Receiver I...

Page 33: ...onitor For more information on installation and use of this system refer to the manual provided with the Kensington security system or visit http www kensington com Connect the Kensington security system cable between the monitor and a table NOTE The Kensington security system is optional You can obtain additional accessories from most electronics retail stores The illustration shows a general exa...

Page 34: ...go Bracket 1 Lay a clean cloth on the floor and then put the monitor on it with the screen face down Using a screwdriver remove the screw that secures the LG Logo Bracket to the bottom rear of the monitor LG Logo Bracket 2 After removing the screw remove the LG Logo Bracket When re attaching the LG Logo Bracket repeat the process in reverse order ...

Page 35: ...d then put the monitor on it with the screen face down Using a screwdriver remove the screw that secures the LG Logo Bracket to the bottom rear of the monitor 2 After removing the screw remove the LG Logo Bracket Attach the LG Logo Bracket with a screw aligning it with the hole on the right side ...

Page 36: ... to the back of the monitor Make sure that the wall mounting bracket is securely fixed to the monitor and to the wall 1 Use only screws and wall mounting brackets that conform to VESA standards 2 Screws which are longer than standard length may damage the inside of the monitor 3 A non VESA standard screw may damage the product and cause the monitor to fall LG Electronics is not liable for any acci...

Page 37: ...at meet the VESA standard Any damage or injuries caused by misuse or use of improper accessories are not covered by the warranty To prevent injury this apparatus must be securely attached to the wall in accordance with the installation instructions This pertains only to Australia and New Zealand NOTE The wall mount kit includes the installation guide and all necessary parts The wall mounting brack...

Page 38: ...f the remote control may not be supported in certain models ID BACK TILE ON OFF EXIT POWER Turns the monitor on or off MONITOR ON Turns the monitor on MONITOR OFF Turns the monitor off ENERGY SAVING Adjusts the brightness of the picture to reduce energy consumption INPUT Selects the input mode 3D Used for viewing 3D videos 1 a A Toggles between numerical and alphabetical Number and Alphabet button...

Page 39: ...ts menus or options and confirms your input BACK Allows you to move back one step in the user interaction function EXIT Quit all OSD tasks and applications Allows you to control various multimedia devices to enjoy multimedia simply by using the remote control through the SimpLink menu TILE Selects the TILE Mode PICTURE ID ON OFF When the Picture ID number matches the Set ID number you can control ...

Page 40: ...y change according to the input label The Just Scan option is available if a PC is connected as an external device White Balance Adjust Menu Press the W BAL button on the remote control R Gain Adjusts the level of red The higher the number the redder the set Decrease the number if the screen looks too red G Gain Adjusts the level of green The higher the number the greener the set Decrease the numb...

Page 41: ...cables are not provided This monitor supports the Plug and Play feature Plug and Play a feature that enables a PC to recognize devices attached by the user without device configuration or user intervention when powering up External Device Connection Connect a HD receiver DVD or VCR player to the monitor and select an appropriate input mode Some of the cables are not provided For the best picture a...

Page 42: ...e please check your PC settings Some PCs require you to manually change the default audio output to HDMI If you want to use HDMI PC mode you must set your PC DTV to PC mode You may experience compatibility issues if you use HDMI PC mode Make sure the power cable is disconnected If you connect a gaming device to the monitor use the cable provided with the gaming device It is recommended to use the ...

Page 43: ... remote control to check the input signal The Unknown Product message appears when the product is connected Problem Action Did you install the driver Check if the Plug and Play function is supported by referring to the graphics card user manual The screen image looks abnormal Problem Action Is the screen position wrong Check if the graphics card resolution and frequency are supported by the produc...

Page 44: ...d Sound is too low Adjust the volume Screen color is abnormal Problem Action Screen has poor color resolution 16 colors Set the number of colors to more than 24 bits true color Select Control Panel Display Settings Color Table in Windows The settings may differ depending on your operating system Screen color is unstable or mono colored Check the connection status of the signal cable Or re insert t...

Page 45: ...M 123 PW ID UPM 123 PW When changing colors using complementary colors helps to prevent image sticking BM BM BM CF CF CF OC PI PI TFT Layers Glass Glass LC CF ITO or MoTi Pixel Layer 2 Change the image using the same time interval Make sure that the characters or images before changing the image remain in the same location after changing the image What is image sticking When the LCD panel displays...

Page 46: ...card types Horizontal frequency RGB 30 kHz to 83 kHz HDMI 30 kHz to 83 kHz Vertical frequency RGB 50 Hz to 75 Hz HDMI 56 Hz to 60 Hz Synchronization Separate Sync Digital Input output ports SE3D HDMI1 IN HDMI2 IN DVI D IN RGB IN Audio IN OUT Speaker OUT EXT IR IN USB RS 232C IN OUT LAN SE3KD SH7DD HDMI1 IN HDMI2 IN DVI D IN RGB IN Audio IN OUT EXT IR IN USB RS 232C IN OUT LAN Embedded battery Appl...

Page 47: ... 5 2 kg Head Stand 729 4 mm x 481 mm x 154 2 mm 6 kg Head Speaker 729 4 mm x 428 9 mm x 95 7 mm 5 7 kg Head Speaker Stand 729 4 mm x 481 mm x 154 2 mm 6 5 kg 32SE3KD LCD screen Pixel pitch 0 36375 mm H x 0 36375 mm V Power Rated power AC 100 240 V 50 60 Hz 0 8 A Power consumption On Mode 45 W Typ Sleep Mode 0 5 W Off Mode 0 5 W Dimensions Width x Height x Depth Weight Head 729 4 mm x 428 9 mm x 55...

Page 48: ...mm 12 6 kg 43SE3KD LCD screen Pixel pitch 0 4902 mm H X 0 4902 mm V Power Rated power AC 100 240 V 50 60 Hz 0 9 A Power consumption On Mode 55 W Typ Sleep Mode 0 5 W Off Mode 0 5 W Dimensions Width x Height x Depth Weight Head 969 6 mm x 563 9 mm x 54 mm 10 kg Head Stand 969 6 mm x 622 2 mm x 193 mm 12 5 kg 43SH7DD LCD screen Pixel pitch 0 4902 mm H X 0 4902 mm V Power Rated power AC 100 240 V 50 ...

Page 49: ...m 17 7 kg 49SE3KD LCD screen Pixel pitch 0 55926 mm H X 0 55926 mm V Power Rated power AC 100 240 V 50 60 Hz 1 0 A Power consumption On Mode 60 W Typ Sleep Mode 0 5 W Off Mode 0 5 W Dimensions Width x Height x Depth Weight Head 1102 2 mm x 638 5 mm x 54 mm 14 3 kg Head Stand 1102 2 mm x 696 8 mm x 219 6 mm 17 6 kg 49SH7DD LCD screen Pixel pitch 0 55926 mm H X 0 55926 mm V Power Rated power AC 100 ...

Page 50: ...mm 20 9 kg 55SE3KD LCD screen Pixel pitch 0 630 mm H x 0 630 mm V Power Rated power AC 100 240 V 50 60 Hz 1 1 A Power consumption On Mode 65 W Typ Sleep Mode 0 5 W Off Mode 0 5 W Dimensions Width x Height x Depth Weight Head 1238 mm x 714 9 mm x 54 mm 17 5 kg Head Stand 1238 mm x 773 4 mm x 219 6 mm 20 8 kg 55SH7DD LCD screen Pixel pitch 0 630 mm H x 0 630 mm V Power Rated power AC 100 240 V 50 60...

Page 51: ... Head Stand 1456 9 mm x 898 1 mm x 293 7 mm 32 9 kg Head Speaker 1456 9 mm x 838 mm x 70 4 mm 28 2 kg Head Speaker Stand 1456 9 mm x 898 1 mm x 293 7 mm 33 4 kg 65SE3KD LCD screen Pixel pitch 0 744 mm H x 0 744 mm V Power Rated power AC 100 240 V 50 60 Hz 1 4 A Power consumption On Mode 90 W Typ Sleep Mode 0 5 W Off Mode 0 5 W Dimensions Width x Height x Depth Weight Head 1456 9 mm x 838 mm x 56 5...

Page 52: ...0 1280 x 720 44 772 59 855 1280 x 960 60 60 1152 x 864 57 717 59 934 1280 x 1024 63 981 60 02 1920 x 1080 67 5 60 HDMI DVI D PC Support mode Resolution Horizontal frequency kHz Vertical frequency Hz 640 x 480 31 469 59 94 800 x 600 37 879 60 317 1024 x 768 48 363 60 1280 x 720 44 772 59 855 1366 x 768 47 7 60 1280 x 1024 63 981 60 02 1680 x 1050 65 29 59 954 1920 x 1080 67 5 60 ...

Page 53: ... x 720 60 Hz 1920 x 1080 60 Hz DTV resolutions 480p 720p 1080p Vertical frequency The product display functions by the screen image changing dozens of times every second like a fluorescent lamp The vertical frequency or refresh rate is the number of image displays per second The unit is Hz Horizontal frequency The horizontal interval is the time taken to display one horizontal line When 1 is divid...

Page 54: ...ERGY STAR guidelines for energy efficiency Refer to ENERGYSTAR gov for more information on the ENERGY STAR program Temporary noise is normal when powering ON or OFF this device Make sure to read the Safety Precautions before using the product The model and serial numbers of the SET are located on the back and one side of the SET Record it below should you ever need service MODEL SERIAL ...

Page 55: ...L15 www lg com Please read this manual carefully before operating your set and retain it for future reference INSTALLATION MANUAL LG Digital Signage MONITOR SIGNAGE ...

Page 56: ...tal Signage Setup Menu 4 USB Cloning 12 Password Change 17 Set ID Setup 18 Configuration Setup 19 Lock Mode 20 External Speaker 21 Fail Over 22 ISM Method 24 Easy Brightness Control 28 SuperSign Server Setup 29 Holiday Schedule 30 No Signal Image 31 Digital Signage Media Player 32 ...

Page 57: ...conds 1 2 3 HDMI DTV No Signal LG Digital Signage Setup USB Cloning Password Change Set ID Setup Configuration Setup Lock Mode External Speaker Fail Over ISM Method Easy Brightness Control S W xx xx xx xx Micom x xx x OK Installation Menu V 3 0 LG Digital Signage Setup S W xx xx xx xx Micom x xx x OK Installation Menu V 3 0 SuperSign Server Setup Holiday Schedule No Signal Image OPTION PICTURE NET...

Page 58: ...tal Signage Setup Stand by Pivot mode OSD Portrait Mode Intelligent Auto Master Slave Mode Time Sync Clock Sync Mode DPM Wakeup Control Still Image Detecting PM Mode Off On Slave OK Previous No Off 10min Analog On OK Previous Off LG Digital Signage Setup USB Cloning Password Change Set ID Setup Configuration Setup Lock Mode External Speaker Fail Over ISM Method Easy Brightness Control S W xx xx xx...

Page 59: ... Operation y y This feature allows you to set how the product operates after receiving a signal from a LG remote control or local key 0 Normal 1 Use PWR Only 2 Block All y y Selecting Block All blocks any signal coming from a LG remote control local key Power On feature is avail able y y Selecting Use PWR Only blocks any signal coming from a LG remote control local key except the Power button y y ...

Page 60: ...when you turn the monitor on again y y Saves video settings Picture Mode DPM Select Smart Energy Saving Backlight Contrast Brightness Sharp ness Color Tint and Color Temp y y Saves audio settings Sound Mode and Balance This feature may not be available with some models Aspect Ratio y y This feature allows you to set the screen aspect ratio applied to your monitor when turned on y y Selecting Disab...

Page 61: ...ure to Off audio output is disabled and you cannot enter the Audio menu y y If you set this feature to On audio output is enabled and the Audio menu is accessible This feature may not be available with some models Power On Delay y y When multiple monitors are connected this feature enables the monitors to turn on at specified time intervals to prevent overload You can choose an interval value betw...

Page 62: ...00 23 00 y y While Time Sync Clock is performed RS 232C control of other commands may not work This feature may not be available with some models y y To synchronize Time Sync Clock be sure to set each slave monitor s clock so that they are at least one minute later than the master monitor s clock y y If the Clock setting is Auto the setting is changed to Manual when Time Sync Clock runs NOTE y y T...

Page 63: ...HDMI s processing of digital signals y y Clock Checks the clock signal of the digital signal and if the clock signal exists releases the DPM status y y Sync Releases the DPM status when both the clock signal and data of the digital signal are entered Still Image Detecting y y This feature detects still images y y If you set this feature to Yes you can use the RS 232C command for detecting still im...

Page 64: ...r This feature may not be supported in certain models Interface Selection y y You can configure serial communication with the connected OPS y y RS 232C Enables communication with external devices via the serial port y y OPS Enables communication via the OPS connected to the product y y Interface Selection is enabled only when the OPS kit is connected This feature may not be supported in certain mo...

Page 65: ...n User 10min Digital Audio Input Analog Digital Digital RGB Analog User Digital RGB Analog Speaker On Off On User On Power On Delay Off 1 250 sec Off User Off Pivot mode On Off Off User User OSD Portrait Mode Off 90 270 Off User Off Intelligent Auto On Off On User On Master Slave Mode Master Slave Slave User Slave Time Sync Clock Off Stand by 0 00 23 00 Stand by User Stand by Sync Mode On Off Off ...

Page 66: ... Log item is disabled if you uncheck the JPG item after wards LG Boot Log item is enabled If both the Global TLL and Model TLL files exist only the Global TLL file is displayed 3 The selected TLL JPG and EPK items are downloaded in that order During the download the Downloading Percent UI for each item is displayed When the download is complete the monitor turns off y y To use the USB function mak...

Page 67: ...9 TLL Select file type Global TLL Model TLL OK Previous USB Cloning Ez Download Receive from USB Send to USB Logo Image Download Send to Daisy Chain OK Previous Ez Download Previous Apply Software Version Current 02 00 00 01 EPK 02 00 00 01 Forced Update Option SPI Boot LG Boot Logo No Signal Image Max Size 1024KB Total Size 0KB ISM Bar Image Max Size 1024KB Total Size 0KB ISM User Image Max Size ...

Page 68: ... TLL Appears under top level folder on your USB drive in the form of a GlobalClonexxxxx TLL The xxxxx refers to a number For example if the model is 43SE3B 5DC its Global TLL file is saved as a file with any name between Global Clone00001 TLL and GlobalClone99999 TLL For a Global TLL file to be cloned the Model TLL file located in the same folder needs to be deleted or moved to a different folder ...

Page 69: ... the monitor turns on you can see your new splash image NOTE y y Only JPEG files 1 MB or smaller can be used as splash images y y Progressively encoded JPEG files are not applicable y y Make sure that splash images have a resolution suitable for the screen resolution of the monitor y y The maximum resolution for a splash image is Full HD 1920 x 1080 and HD 1360 x 768 The minimum resolution for a s...

Page 70: ...t 3 Select Send to DaisyChain then select Yes to transfer the data or select No to go back to the previous menu 4 Repeat this until all monitors that are connected to the current monitor s RS 232C output port turn off After the monitors turn off turn them on and check if the settings have been copied This feature may not be available with some models All user settings will be Send to Daisy Chain S...

Page 71: ...umber again in Confirm Password to confirm the password Password Change Change Password Confirm Password OK Previous LG Digital Signage Setup USB Cloning Password Change Set ID Setup Configuration Setup Lock Mode External Speaker Fail Over ISM Method Easy Brightness Control S W xx xx xx xx Micom x xx x OK Installation Menu V 3 0 Password Change ...

Page 72: ...lly starting with the foremost set y y A Set ID cannot be decreased from its current value Therefore it is recommended that you execute Reset ID before using this feature y y Execution time may vary depending on the installation environment y y If the Auto Set ID operation is not completed normally turn the product off and on and then try again y y The Yes No options only work on the foremost moni...

Page 73: ... If there is no signal for 15 minutes the product turns off y y Off 15 Min Force Off is disabled y y It is recommended that you set this feature to Off if you intend to use the product for long periods of time Automatic Standby y y Set whether to use 4 Hours Off y y This feature can be set to On or Off y y If you set this feature to On the product turns off if there is no input from the remote con...

Page 74: ...is connected to your monitor is blocked y y You cannot enter My Media in the menu y y You cannot enter USB Input in the Input List y y USB Auto Playback is set to No and input is not possible However you can download software updates and Welcome Screens Lock Mode USB Enable OK Previous LG Digital Signage Setup USB Cloning Password Change Set ID Setup Configuration Setup Lock Mode External Speaker ...

Page 75: ...igital audio signals from your monitor to external devices NOTE y y When connecting an external audio device to your monitor be sure to use one with a built in audio amplifier LG Digital Signage Setup USB Cloning Password Change Set ID Setup Configuration Setup Lock Mode External Speaker Fail Over ISM Method Easy Brightness Control S W xx xx xx xx Micom x xx x OK Installation Menu V 3 0 External S...

Page 76: ...his fea ture to Manual a movie is played back when there is no signal from any of the prioritized inputs y y Photo If you set this feature to Auto a photo slideshow is played back when there is no input signal If you set this feature to Manual a photo slideshow is played back when there is no signal from any of the priori tized inputs Fail Over priority when set to Auto Current source 1st change 2...

Page 77: ... the Fail Over USB function to work your USB drive must have a FAIL_OVER or fail_over folder as well as valid contents movies and images y y If your USB drive does not have either a FAIL_OVER fail_over folder or contents the default USB pop up menu ap pears when the Fail Over USB function is performed y y The USB Fail Over function does not work after the distribution of contents or the playback o...

Page 78: ... Wash Alternately displays a white pattern and a color pattern to remove image sticking y y Washing Bar Displays a bar on the screen to make the image move smoothly If you select Washing Bar Bar Image Bar Color or Bar Transparency is enabled y y User Image Plays your photos or movies using a USB storage device LG Digital Signage Setup USB Cloning Password Change Set ID Setup Configuration Setup Lo...

Page 79: ...mote control After the termination of the Orbiter function the period will be calculated again c User Image You can terminate User Image by pressing the EXIT button on your remote control before a specified time passes After termination of the User Image function the period will be calculated again Period y y You can set the period between 1 and 24 hours y y When there is a button input from your ...

Page 80: ... image file 3 Add ISMBAR as a prefix to the name of a file to distinguish the file from others EPK Logo No Signal etc 4 Download ISM photos or movies in Ez Download NOTE y y You can download multiple images up to 5 MB combined y y The total bit size of images must be under 50 MB For example in the case of a 500 KB image with a resolution of 1920 x 1080 its bit size as calculated by image decoding ...

Page 81: ...torage devices are connected to both USB 1 and USB 2 y y While User Image is performed USB 1 and USB 2 must be unoccupied for the playback of contents stored on internal memory y y When there is no valid folder contents no action is performed y y You can store movies and photos on internal memory using Ez Download How to Download an ISM Photo Movie in Ez Download 1 In order to download a user imag...

Page 82: ... a schedule by selecting it from the list and pressing the OK button y y Duplicate schedules are not added However the backlight value is renewed This feature may not be available with some models Easy Brightness Control The backlight is adjusted according to your schedule s Easy Brightness Control Mode Hour Minute Backlight Add Schedule 00 70 On 12 12 00 70 Close Easy Brightness Control Mode Hour...

Page 83: ...cted Your monitor is not connected to the SuperSign server Waiting for Approval Your monitor is connected to the SuperSign server but has not yet been approved Rejected Your monitor is connected to the SuperSign server but has been rejected Connected Your monitor is connected to the SuperSign server and has been approved SuperSign Server Setup Player Name Server IP Setting Server IP Status Press O...

Page 84: ...disabled if the current time is not set y y You can add up to seven schedules y y Duplicate schedules cannot be added S W xx xx xx xx Micom x xx x OK Installation Menu V 3 0 Configuration Setup Lock Mode External Speaker Fail Over ISM Method Easy Brightness Control SuperSign Server Setup Holiday Schedule No Signal Image Holiday Schedule Holiday Schedule January 1 January 1 Close On Add Schedule De...

Page 85: ...e to Full Original or Fit in the Mode option y y You can set Slide Time if you download multiple images 5 10 15 20 sec How to Download a No Signal Image in Ez Download 1 In order to download an image in Ez Download there must be an image file in an lg_sig or LG_SIG folder on your USB drive 2 Delete the existing contents stored in internal memory before downloading a new image file 3 Select the ima...

Page 86: ...een inserted when the main power is turned on executable content in the nor mal folder is played by default If the normal folder does not exist executable content in the AutoPlay folder is played y y If a USB device is inserted some time after the main power has been turned on executable content in the AutoPlay folder is played by default If the AutoPlay folder does not exist executable content in...

Page 87: ......

Page 88: ...www lg com USER GUIDE Please read this manual carefully before operating your set and retain it for future reference LG Digital Signage MONITOR SIGNAGE L15 ...

Page 89: ...will also provide open source code to you on CD ROM for a charge covering the cost of performing such distribution such as the cost of media shipping and handling upon email request to opensource lge com This offer is valid for three 3 years from the date on which you purchased the product USING THE MONITOR 3 Using the Input List 3 Adjusting Aspect Ratio 3 ENTERTAINMENT 5 Using the Network 5 Conne...

Page 90: ...creen for a long period of time it will be imprinted and become a permanent disfigurement on the screen This is image burn or burn in and not covered by the warranty If you don t use your monitor turn the power off or set a screen saver program from the PC or the system to prevent image retention If the aspect ratio is set to 4 3 for a long period of time image burn may occur on the letterboxed ar...

Page 91: ...y Set By Program Depending on the input signal screen aspect ratio changes to 4 3 or 16 9 y y 4 3 This selection will allow you to view a picture with an original 4 3 aspect ratio black bars will appear on both the left and right of the screen y y Zoom This selection will allow you to view the picture without any alteration while filling the entire screen However the top and bottom of the picture ...

Page 92: ...ress the navigation buttons to scroll to NET WORK and press OK 3 Press the navigation buttons to select Net work Setting and press OK 4 If you already set network setting select Resetting The new connection settings resets the current network settings 5 Select IP Auto Setting or IP Manual Setting IP Manual Setting press the navigation and number buttons IP addresses will need to be input manually ...

Page 93: ...work router or cable modem Then power on and or connect the power cable again y y Depending on the internet service provider ISP the number of devices that can receive internet service may be limited by the applicable terms of service For details contact your ISP y y LG is not responsible for any malfunction of the display and or the internet connection feature due to communication errors malfunct...

Page 94: ...rrectly according to the appropriate manual and set the network y y Connection method may differ according to the AP manufacturer Do not turn the display off or remove a USB storage device while MY MEDIA menu is activated as this could result in loss of files or damage to the USB storage device Back up your files saved on a USB storage device frequently as you may lose or damage the files and this...

Page 95: ...es not have an external power source the USB device may not be detected So be sure to connect the external power source Please use a power adaptor for an external power source y y If your USB memory device has multiple parti tions or if you use a USB multi card reader you can use up to 4 partitions or USB memory devices y y If a USB memory device is connected to a USB multi card reader its volume ...

Page 96: ...1 03 Xvid 1 10 beta1 2 AVI DIVX MP4 MKV TS TRP 1080P 30 fps H 264 AVI MP4 MKV TS TRP TP 1080P 60 fps Audio MP3 MP3 8 kbps to 320 kbps Bit rate 16 kHz to 48 kHz Sample rate AC3 AC3 32 kbps to 640 kbps Bit rate 32 kHz 44 1 kHz 48 kHz Sample rate MPEG MP3 32 kbps to 448 kbps Bit rate 16 kHz to 48 kHz Sample rate AAC HEAAC MP4 8 kHz to 48 kHz Sample rate LPCM AVI WAV 64 kbps to 1 5 Mbps Bit rate 8 kHz...

Page 97: ... rate Free Format Sample freq 8 kHz 48 kHz Support MPEG 4 OGG Bit rate Free Format Sample freq 48 kHz Support Vorbis WMA Bit rate 128 kbps 320 kbps Sample freq 8 kHz 48 kHz Support WMA7 8 9 Standard WMA 10 Pro Bit rate 768 kbps Channel Sample freq M0 Up to 2 48 kHz M1 Up to 5 1 48 kHz M2 Up to 5 1 96 kHz Support WMA 10 Pro Content when using SuperSign Manager File Extensions cts sce Movie File Ext...

Page 98: ... model y y Go to root folder Returns to the home screen of My Media y y Go to upper folder Returns to the previous screen y y Exit Exits My Media Remote button Description Stops the playback Plays a video Pauses or resumes the playback Scans backward in a file Scans forward in a file Adjusts the screen brightness to save energy SETTINGS Show the Option menu BACK Hide the menu on the full sized scr...

Page 99: ...types and formats may not work properly y y Max bitrate of playable movie file is 20 Mbps only Motion JPEG 10 Mbps y y We do not guarantee smooth playback of profiles encoded level 4 1 or higher in H 264 AVC y y DTS Audio codec is not supported y y A movie file more than 30 GB in file size is not supported for playback y y A DivX movie file and its subtitle file must be located in the same folder ...

Page 100: ...nnot be selected Subtitle Language Turn on off the subtitle Language Activated for SMI subtitle and can select the language within the subtitle Code Page Can select the font for subtitle When set to default same font as general menu will be used Sync Adjusts the time synchronisation of the subtitle from 10 secs to 10 secs by steps of 0 5 secs during movie play Position Changes the position of the ...

Page 101: ...ia 6 While viewing photos you can access the following settings Menu Description Slideshow Starts or stops a slideshow with selected photos If there are no selected photos all photos saved in the current folder display during a slideshow To set a slideshow speed select Op tion BGM Turns the background music on or off To set the background music folder select Option You can adjust option by SETTING...

Page 102: ... Therefore they are not affected by option values changed in Photo List or Music List y y The option values changed in Photo List and Music List do affect each other Select Setting Photo View to access the following menus Menu Description Slide Speed Select a slideshow speed Options Fast Medium or Slow BGM Selects a music folder for the background music Repeat Plays background music on repeat Rand...

Page 103: ... previous file Skips to the next file Adjusts the brightness of the screen for energy saving Off and Screen Off work only SETTINGS Show the Option menu BACK Hides the option window EXIT Return to Music List or Skips to specific points in a file during playback The time of a specific point will appear on the status bar In some files this function may not work properly 6 During music playback press ...

Page 104: ...usic and the button to select the previous music Tips for playing music files y y This unit cannot support the ID3 Tag embedded MP3 files 1 Press SETTINGS to access the pop up menus 2 Press the navigation buttons to scroll to Set Audio Play or Set Audio and press OK Music options y y The option values changed in Movie List do not affect Photo List or Music List Therefore they are not affected by o...

Page 105: ...st only the BACK EXIT or volume button are available Selecting the BACK or EXIT button stops playing media files and returns to the Contents List y y When you use the distribution feature which utilizes SuperSign Software the storage device used to store contents is determined based on the size of the remaining memory space Note If USB ports 1 and 2 have the same memory space contents will be save...

Page 106: ...ctronics may not be played Extension Codec mkv mp4 ts Video H 264 AVC HEVC Audio Dolby Digital Dolby Digital Plus AAC HE AAC Some codecs can be used after upgrading software Supported Video Codec Extension Codec asf wmv Videos VC 1 Simple and Main Profiles Audio WMA Standard WMA 10 Professional divx avi Videos DivX3 11 DivX4 DivX5 DivX6 XViD H 264 AVC Motion Jpeg MPEG 4 Part2 Audio MPEG 1 Layer I ...

Page 107: ...nd press OK 4 When you are finished press EXIT When you return to the previous menu press BACK y y PICTURE Adjusts the image size quality or effect y y AUDIO Adjusts the sound quality effect or volume level y y TIME Sets the time date or timer feature y y OPTION Customizes the general settings y y NETWORK Sets up the network setting y y MY MEDIA Display and play movie photo and music contents stor...

Page 108: ...n Enables the Smart Energy Saving function to save power consumption as much as the value set in the smart energy saving rate Picture Mode Selects the picture mode optimized for the viewing environment or the programme Mode Vivid Heightens contrast brightness and sharpness to display vivid images Standard Displays images in standard levels of contrast brightness and sharpness APS APS Auto power sa...

Page 109: ...ou can adjust the picture for each Picture Mode or adjust the picture settings according to a specific picture image First select a desired Picture Mode This option is unavailable if Picture Mode is set to Vivid Picture Option Sets additional picture option Picture Reset Restores the options to the default setting Setting Description Screen In RGB Mode Only Customizes the PC display options in RGB...

Page 110: ...brightness of the image Dynamic Color Adjusts color for more natural looking colors Color Gamut Selects the range of colours that can be expressed Skin Color Skin color spectrum can be separately set to implement the skin color as defined by the user Sky Color Sky color is set separately Grass Color Natural color spectrum meadows hills etc can be separately set Gamma Sets the gradation curve accor...

Page 111: ... ll Boosts voice clarity Virtual Surround LG s proprietary audio processing technology allows 5 1ch like surround sound from two speakers If Clear Voice ll is set to On Virtual Surround will not be chosen Equalizer Adjusts the volume to a level of your choice using the Equalizer Balance Adjusts left right audio balance Reset You can reset the settings under the Sound Effects menu AV Sync Adjust Sy...

Page 112: ...ce the on or off time is set these functions operate daily at the preset time y y When the scheduled power on and power off times are the same the power off time has priority over the power on time if the set is turned on and vice versa if the set is turned off y y If port 123 is blocked by a firewall your monitor cannot receive the current time from the network NOTE Setting Description Clock Sets...

Page 113: ...mages Initial Setting Deletes all optional settings and returns to initial default mode Set ID You can assign a unique Set ID NO name assignment to each product when several products are connected for display Specify the number 1 to 255 or 1 to 1 000 using the button and exit Use the assigned Set ID to individually control each product using the Product Control Program Tile Mode Tile Mode To use t...

Page 114: ...has been removed y y The picture size is 1920 x 1080 y y You can use photo and video files only y y You can add up to 50 files photo files video files 50 y y Only photos whose resolution is 1920 x 1080 or below are supported y y The default display time for photos is 1 minute Playback time for movies differs depending on the running time y y You can create up to 7 schedules y y You cannot register...

Page 115: ... ID 9 ID 10 ID 11 ID 4 ID 8 ID 12 ID 13 ID 14 ID 15 ID 16 ID 1 ID 2 ID 6 ID 7 ID 3 ID 8 ID 11 ID 12 ID 13 ID 4 ID 5 ID 9 ID 10 ID 14 ID 15 ID 16 ID 21 ID 17 ID 22 ID 18 ID 23 ID 19 ID 24 ID 20 ID 25 5X5 When using 25 monitors 4X4 When using 16 monitors ID 1 ID 2 ID 3 ID 4 ID 1 ID 2 ID 4 ID 5 ID 3 ID 6 ID 7 ID 8 ID 9 3X3 When using 9 monitors Off When the Tile Mode option is disabled 1X2 When using...

Page 116: ...menu press BACK The available option settings are described in the following Setting Description Network Setting Configure the network settings Network setting When the Wi Fi dongle is connected you can view and connect to any available wireless network Network Status Display the network status Setting Description Setting from the AP list Select an AP to connect to a wireless network Simple settin...

Page 117: ...own below AUDIO RGB DVI REMOTE CONTROL IN RS 232C OUT RS 232C IN RS 232C OUT RS 232C IN RS 232C OUT RS 232C IN IR Light Sensor RS 232C cables PICTURE ID 2 Press the red ON button on the remote control to assign the PICTURE ID 3 Assign the Set ID to the selection of your choice y y A set with a different Set ID from the PICTURE ID cannot be controlled by IR signals NOTE y y If PICTURE ID is set to ...

Page 118: ...TTON 53 1 a A R C BUTTON 2F CLEAR R C BUTTON 02 Volume R C BUTTON 03 Volume R C BUTTON 79 ARC R C BUTTON 99 AUTO R C BUTTON 09 MUTE R C BUTTON E0 BRIGHTNESS Page UP R C BUTTON E1 BRIGHTNESS Page Down R C BUTTON 4D PSM R C BUTTON AA INFO R C BUTTON 5F W BAL R C BUTTON 43 SETTINGS R C BUTTON 40 Up R C BUTTON 41 Down R C BUTTON 07 Left R C BUTTON 06 Right R C BUTTON 3F S MENU R C BUTTON 44 OK R C BUT...

Page 119: ...32 ENGLISH Code Hexa Function Note 8F R C BUTTON 8E R C BUTTON 72 Red Key PICTURE ID ON R C BUTTON 71 Green Key PICTURE ID OFF R C BUTTON 63 Yellow Key R C BUTTON 61 Blue Key R C BUTTON ...

Page 120: ...ut being duplicated Connecting the Cable Connect the RS 232C cable as shown in the picture y y The RS 232C protocol is used for communication between the PC and product You can turn the product on or off select an input source or adjust the OSD menu from your PC Monitor 1 Monitor 2 Monitor 3 Monitor 4 PC RS 232C IN RS 232C OUT RS 232C IN RS 232C OUT RS 232C IN RS 232C OUT RS 232C IN RS 232C OUT RS...

Page 121: ...32C cable PC RS 232C Gender DCD RXD TXD GND DTR DSR RTS CTS DCD TXD RXD GND DSR DTR CTS RTS 1 2 3 5 4 6 7 8 1 3 2 5 6 4 8 7 D Sub 9 D Sub 9 Female Female RS 232C Cable When using three wire connections non standard an IR daisy chain cannot be used If you want to control multiple units simultaneously use 3 5 mm 4 pole cables sold separately 4P Cable 4 Wire Configurations Standard RS 232C cable Set ...

Page 122: ... H size f s 00 to 64 15 Auto Config j u 01 16 Balance k t 00 to 64 17 Sound Mode d y See Sound mode 18 Mute k e 00 to 01 19 Volume k f 00 to 64 20 Clock 1 year month day f a See Clock 1 21 Clock 2 hour minute second f x See Clock 2 22 Off time schedule f c 00 to 01 23 On time schedule f b 00 to 01 24 Off timer repeat mode time f e See Off timer 25 On timer repeat mode time f d See On timer 26 On t...

Page 123: ...patible with SuperSign program COMMAND DATA Hexadecimal 1 2 35 Software version f z FF 36 White balance red gain j m 00 to FE 37 White balance green gain j n 00 to FE 38 White balance blue gain j o 00 to FE 39 Backlight m g 00 to 64 40 Screen off k d 00 to 01 41 Tile Mode d d See Tile Mode 42 Tile Mode Check d z FF 43 Tile ID d i Refer to Tile ID 44 Tile H Position d e 00 to 32 45 Tile V Position ...

Page 124: ...a Data count may increase depending on the command Cr Carriage Return Corresponds to 0x0D in ASCII code White Space Corresponds to 0x20 in ASCII code Acknowledgement Command2 Set ID OK NG Data x The Product transmits an ACK acknowledgement based on this format when receiving normal data At this time if the data is FF it indicates the present status data If the data is in data write mode it returns...

Page 125: ... 9 04 Zoom HDMI DTV 06 Autoratio HDMI DTV 09 Original 720p HDMI DTV 10to1F Cinemazoom1to16 HDMI DTV Availabledatatypesdifferdependingontheinputsignal Formore information seetheaspectratiosectionoftheowner smanual Theaspectratiomaydifferdependingonthemodel sinput configuration Acknowledgement c Set ID OK NG Data x 04 Energy saving Command j q Sets the energy saving function Transmission j q Set ID ...

Page 126: ...0 Tint Command k j Adjusts the screen tint Transmission k j Set ID Data Cr Data 00 to 64 Tint red 50 to green 50 Acknowledgement j Set ID OK NG Data x 11 Color temperature Command x u Adjusts the screen color temperature Transmission x u Set ID Data Cr Data 00 to 64 Warm 50 to cool 50 Acknowledgement u Set ID OK NG Data x 12 H position Command f q Adjusts the horizontal position of the screen This...

Page 127: ... Transmission f s Set ID Data Cr Data 00 to 64 Min 50 small to max 50 large Acknowledgement s Set ID OK NG Data x 15 Auto Config Command j u Automatically corrects position and shaking of the picture Only available in RGB PC input mode Transmission j u Set ID Data Cr Data 01 Execution Acknowledgement u Set ID OK NG Data x 16 Balance Command k t Adjusts the sound balance Transmission k t Set ID Dat...

Page 128: ...minute second Command f x Adjusts the Clock 2 hour minute second value Transmission f x Set ID Data1 Data2 Data3 Cr Data1 00 to 17 00 to 23 hours Data2 00 to 3B 00 to 59 minutes Data3 00 to 3B 00 to 59 seconds Enter fa Set ID ff to view the Clock 2 hour minute second settings This function is only available when Clock 1 year month day is set Acknowledgement x Set ID OK NG Data1 Data2 Data3 x 22 Of...

Page 129: ...1 year month day and Clock 2 hour minute second are set Acknowledgement e Set ID OK NG Data1 Data2 Data3 x 25 On timer repeat mode time Command f d Configures the on time repeat mode time settings Transmission f d Set ID Data1 Data2 Data3 Cr Data1 1 F1 to F7 reading data F1 Read the 1st on timer data F2 Read the 2nd on timer data F3 Read the 3rd on timer data F4 Read the 4th on timer data F5 Read ...

Page 130: ...ple 2 fu 01 f1 ff Read the 1st schedule input data This function is only supported when 1 year month date 2 hour minute second and On Time repeat mode time are set Input may not be supported on some models Acknowledgement u Set ID OK NG Data x u Set ID OK NG Data1 Data2 x 27 Automatic standby Command m n Configures the automatic standby settings Transmission m n Set ID Data Cr Data 00 Off Will not...

Page 131: ... key code for the IR remote control Transmission m c Set ID Data Cr Data IR_KEY_CODE Acknowledgement c Set ID OK NG Data x For key codes see IR Codes Some key codes may not be supported on some models 33 Time elapsed Command d l Checks the elapsed time Transmission d l Set ID Data Cr Data FF Read status Acknowledgement l Set ID OK NG Data x The data received is shown as a hexadecimal value 34 Prod...

Page 132: ...ain 0 to 254 Acknowledgement o Set ID OK NG Data x 39 Backlight Command m g Adjusts the back light brightness Transmission m g Set ID Data Cr Data 00 to 64 Back light brightness 0 to 100 Acknowledgement g set ID OK NG Data x This may not be supported on some models 40 Screen off Command k d Turns the screen on or off Transmission k d Set ID Data Cr Data 00 Turns the screen on 01 Turns the screen o...

Page 133: ...the model Acknowledgement e Set ID OK NG Data x 45 Tile V Position Command d f To adjust the Tile Vertical position This function is available only when the Natural option of the Tile Mode is set to Off while the Tile Mode set to On Transmission d f Set ID Data Cr Data 0 to 32 0 Bottom to 50 Top Bottom Top values depend on Tile Vertical size It may not be supported depending on the model Acknowled...

Page 134: ...e Mode Command d j To display the image naturally the part of the image that would normally be displayed in the gap between the monitors is omitted Transmission d j Set ID Data Cr Data 00 Off 01 On Acknowledgement j Set ID OK NG Data x ...

Page 135: ......

Reviews: