background image

NAVIGATION SYSTEM: DESTINATION SEARCH

71

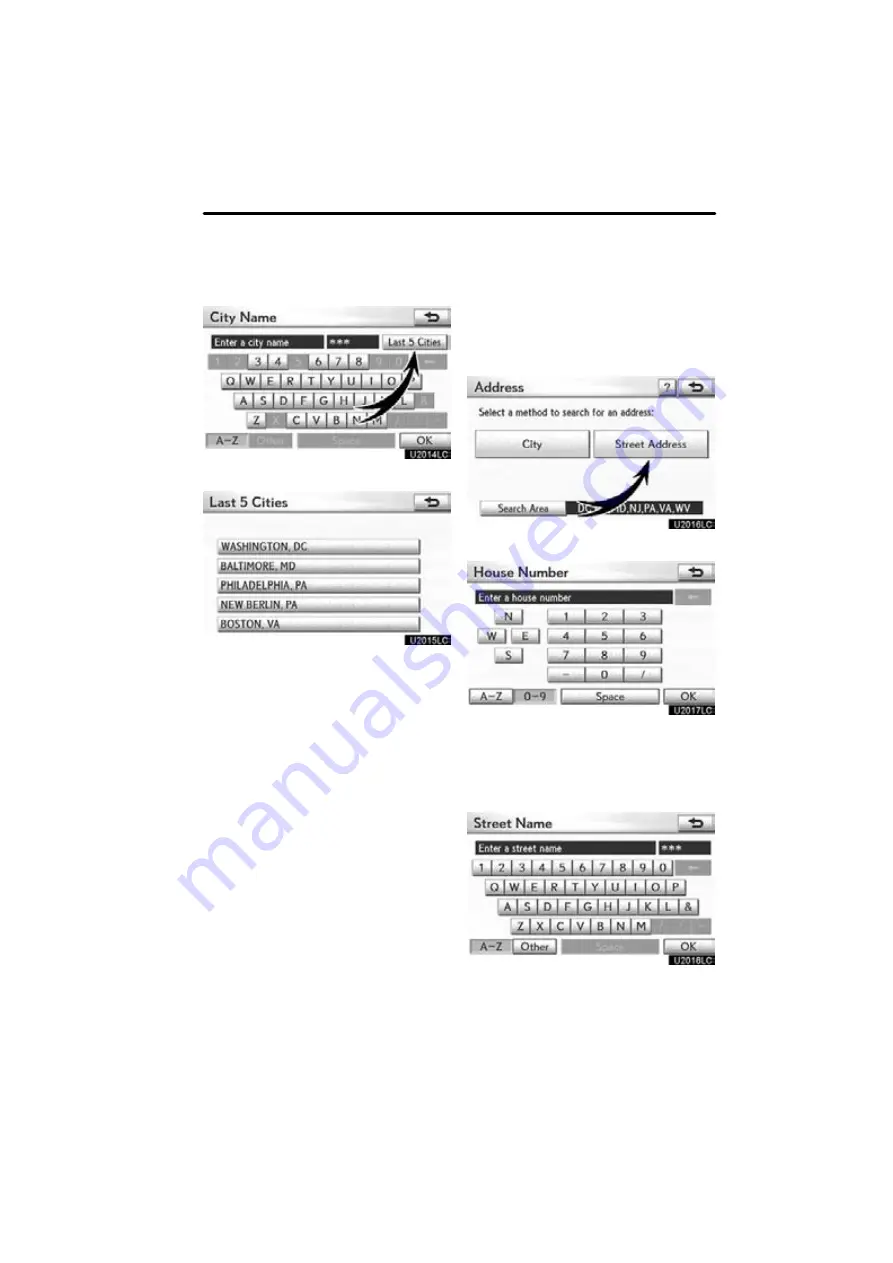
SELECTING FROM THE LAST 5 CITIES

1. Select “Last 5 Cities”.

2. Select the button of the desired city
name.

If the navigation system has never been

used, this function will not be available.
The current screen changes to the screen

for inputting a street name.  (See “(a) Se-

lecting a city to search” on page 69.)

(b) Search by street address

1. Push the “MENU” button and select
“Destination”.

2. Select “Address” on the “Destina-
tion” screen.

3. Select “Street Address”.

4. Select numbers directly on the
screen to input a house number.

After inputting a house number, select

“OK”

 to display the screen for inputting a

street name.

5. Input the street name and select
“OK”.

Summary of Contents for OM48A84U

Page 1: ...ce Information screen 21 1 Navigation System Basic Functions Basic information before operation Initial screen 30 How to use the Remote Touch 31 Inputting letters and numbers List screen operation 33...

Page 2: ...cy 81 Destination search by Intersection Freeway 82 Destination search by Map 85 Destination search by Coordinates 86 Deleting set destinations 86 Starting route guidance 87 3 Navigation System Route...

Page 3: ...e and information Telephone Hands free system for cellular phone 134 Enter a Bluetooth phone 138 Call on the Bluetooth phone 143 Receive on the Bluetooth phone 150 Talk on the Bluetooth phone 150 Fuel...

Page 4: ...ertainment system features 264 Using the radio 270 Using the DVD player 271 Playing an audio CD CD text 271 Playing WMA MP3 discs 272 Playing DVD video audio 272 Using the video mode 285 Changing othe...

Page 5: ...the phonebook 368 Speed dials setting 377 Deleting call history 383 Setting the voice tag 385 BluetoothR 389 Details 393 Audio settings 396 Select portable player 396 Setting BluetoothR audio 399 Veh...

Page 6: ...a destination that is unfamiliar to you in an efficient manner The system uses DENSO maps The calculated routes may not be the shortest nor the least traffic congested Your own personal local knowl e...

Page 7: ...tations that may affect their ability to perform properly The accuracy of the vehicle s position depends on the satellite con dition road configuration vehicle condition or other circumstan ces For mo...

Page 8: ...ach ing the destination and if used properly can do so The driver is solely responsible for the safe operation of your vehicle and the safety of your passengers Do not use any feature of this system t...

Page 9: ...ne the current vehicle position correctly there is a possibility of incorrect late or non voice guidance The data in the system may occasionally be incomplete Road conditions including driving restric...

Page 10: ...5 U0026LC Quick guide Remote Touch...

Page 11: ...Push this button to repeat a guidance voice cancel the map scroll start guid ance and display the current position 38 4 Remote Touch knob Move this knob in the desired direction to select a function...

Page 12: ...dicates the map scale 47 3 Zoom out button Select this button to reduce the map scale 47 4 Off Select this button to obtain a broader view Some of the buttons on the screen are not displayed They are...

Page 13: ...n to display the foot print map and the building information 47 10 Screen configuration button Select this button to change the screen mode 44 11 Distance and time to destination Displays the distance...

Page 14: ...sh the MENU button 2 Select Destination and push the ENTER button 3 Select Go Home and push the ENTER button If home has not been registered you can register it by selecting Go Home 4 Select Yes and p...

Page 15: ...Select Enter and push the EN TER button The Edit Home screen is displayed 7 Select OK and push the EN TER button Registration of home is complete You can also register home by selecting Setup See a R...

Page 16: ...nation and push the ENTER button 3 Select one of the preset destina tion buttons and push the EN TER button You can set a preset destination to any pre set destination button that has not yet been set...

Page 17: ...Select OK and push the EN TER button Registration of preset destinations is com plete You can also register preset destinations by selecting Setup See a Registering preset destinations on page 118 Yo...

Page 18: ...elect Destination and push the ENTER button 3 There are 11 different methods to search destinations See Destination search on page 66 4 Select Go to and push the ENTER button The navigation system per...

Page 19: ...K and push the EN TER button and start driving Routes other than the one recommended can also be selected See Starting route guidance on page 87 6 Guidance to the destination is given via voice and on...

Page 20: ...he ENTER button 3 Select Go Home and push the ENTER button Go Home can be used if your home has been registered To register Home see a Registering home on page 115 4 Select Go to and push the ENTER bu...

Page 21: ...K and push the EN TER button and start driving Routes other than the one recommended can also be selected See Starting route guidance on page 87 6 Guidance to the destination is given via voice and on...

Page 22: ...Phone Select this button to operate the hands free system and display fuel economy in formation etc 21 133 3 Setup Select this button to adjust settings of the navigation audio and hands free sys tems...

Page 23: ...f Interest that have already been stored in the sys tem s database 73 3 Destination Assist Provides you with live assistance finding destinations via the Lexus Enform re sponse center 159 4 Previous D...

Page 24: ...ap 85 11 Coordinates A destination can be set using latitudes and longitudes as coordinates 86 12 Preset destination buttons One of 5 preset destination points can be selected by selecting the screen...

Page 25: ...idance can be set 345 4 Navi Settings are available for average cruising speed displayed screen contents POI icon categories etc 348 5 Other Settings are available for Lexus Insider XM Sports and Stoc...

Page 26: ...ormation 138 2 Fuel Consumption Fuel consumption is displayed 153 3 Map Data Displays information regarding the map data disc version or coverage area 426 4 Calendar To view calendar 154 5 XM NavWeath...

Page 27: ...te Touch 31 Inputting letters and numbers List screen operation 33 Screen adjustment 36 Help icon 38 Map screen operation 38 Current position display 38 Screen scroll operation 39 Switching the screen...

Page 28: ...perating CAUTION When the vehicle is stopped with the hybrid system operating always ap ply the parking brake for safety After a few seconds the CAUTION screen will be displayed After about 5 seconds...

Page 29: ...This Message Again To register Maintenance information see Maintenance on page 404 This navigation system can be operated by the Remote Touch when the POWER switch is in ACCESSORY or ON mode A pointer...

Page 30: ...may cause an injury Be careful when touching the Remote Touch in extreme tempera tures as it may become very hot or cold due to the temperature inside the vehicle NOTICE Do not allow the Remote Touch...

Page 31: ...39 To input letters and numbers To display the alphabet keys select A Z Enter letters by selecting the keys directly Selecting this button erases one letter By holding this button let ters will contin...

Page 32: ...nue to be erased To display the list To search for an address or a name select OK Matching items from the database are listed even if the entered address or name is incomplete If the number of matches...

Page 33: ...ect to scroll to the end of the name Select to scroll to the beginning of the name INFORMATION The or buttons on the Remote Touch can be used to scroll up and down on list screens Sorting The order of...

Page 34: ...display off 1 Push the DISP button Contrast and brightness adjustment 2 Select the desired button to adjust contrast and brightness Contrast Strengthens the contrast of the screen Contrast Weakens th...

Page 35: ...rear screen turns on or off when Rear is se lected The screen goes off when Screen Off is selected To turn the display screen back on push the DISP button again INFORMATION When you do not select any...

Page 36: ...turn to this map screen that shows your current position at any time from any screen by pushing the MAP VOICE button While driving the current vehicle position mark is fixed on the screen and the map...

Page 37: ...led the map re mains centered at the selected location until another function is activated The cur rent vehicle position mark will continue to move along your actual route and may move off the screen...

Page 38: ...ark When you select Mark the following screen appears for a few seconds and then the map screen returns The registered point is shown by on the map To change the icon or name etc see b Editing address...

Page 39: ...een Select Info Information such as the name address and phone number are displayed If Enter is selected the position of the cursor is set as a destination If there is already a set destination Go to...

Page 40: ...e desired Point of Interest can be displayed on the map screen See Display POI icons on page 106 ADDRESS BOOK ENTRY INFORMATION When the cursor is set on an address book entry icon the name and Info a...

Page 41: ...To add a destination To edit an address book entry select Edit See b Editing address book en tries on page 122 To delete an address book entry select Delete If is selected the registered tele phone n...

Page 42: ...the upper part of the screen Select Info Traffic information is displayed on the screen Select Detail to display detailed traffic event information Any one of the screen configurations can be selected...

Page 43: ...e compass mode screen See page 46 To display the freeway screen See page 92 To display the turn list screen See page 94 To display the arrow screen See page 94 To display the intersection guid ance sc...

Page 44: ...the map Select OK when you complete edi ting The screen returns to the dual map screen COMPASS MODE Current vehicle position is indicated with a compass While on a different screen selecting will disp...

Page 45: ...range of 250 miles 400 km is not shown When the map scale is at the minimum range of 150 feet 50 m is not shown In areas where the foot print map is available the map scale changes from to when at th...

Page 46: ...detailed POI information select the building name You can see details of the selected POIs The orientation of the map can be changed from North up to Heading up by selecting the orientation symbol at...

Page 47: ...olf The voice command system enables you to operate the navigation system audio system and hands free system by giving a command 1 Push the talk switch After a beep sounds the Voice Menu screen is dis...

Page 48: ...re available say Go back or select Go Back to return to the previous screen To cancel voice command recognition say Cancel select Cancel or push and hold the talk switch If the navigation system does...

Page 49: ...ccents or speech patterns may be diffi cult for the system to recognize There are some noises such as wind noise etc Voice command example Search ing for a route to your home 1 Push the talk switch 2...

Page 50: ...the phone menu Audio Audio menu please Information Let me see the infor mation menu Give us the informa tion menu please Command List Show me the voice command list Expression examples for each func t...

Page 51: ...call to 123 456 789 I want to buzz 123 456 789 please EXPRESSION EXAMPLES WITH THE Information Menu SCREEN Normal command recognition Information XM Nav Weather Los An geles California The weather inf...

Page 52: ...st 1 Push the talk switch 2 Say Command list 3 Say the command of your choice to operate the system To confirm commands on the screen se lect or to scroll through the com mand list This function is av...

Page 53: ...not moving When or is selected push the talk switch again and say the command The screen shows the dual map Voice command example Changing map scale 1 Push the talk switch 2 Say Command list 3 Say Zo...

Page 54: ...zoom out Zooms right map out Change map orientation Command Action North up Changes map bearing to north up Heading up Changes map bearing to heading up Map direction Changes map bearing to another di...

Page 55: ...rt route Changes route to short route Alternate route Changes route to alternate route Detour Calculates detour route Detour entire route Calculates detour entire route Review route Command Action Rou...

Page 56: ...Traffic information Displays traffic information Show POI icons Command Action SHOW GAS Displays GAS STATION icons SHOW PARKING Displays PARKING icons SHOW SERVICE AND MAINTENANCE Displays SERVICE MAI...

Page 57: ...ays GREEK RESTAURANT icons SHOW INDIAN DINING Displays INDIAN RESTAURANT icons SHOW ICE CREAM AND CANDY Displays ICE CREAM CANDY icons SHOW ITALIAN DINING Displays ITALIAN RESTAURANT icons SHOW JAPANE...

Page 58: ...OW BOOK STORES Displays BOOK STORE icons SHOW CLOTHING AND SHOE STORES Displays CLOTHING SHOES STORE icons SHOW HOBBY AND CRAFTS Displays HOBBY CRAFT icons SHOW JEWELRY Displays JEWELRY icons SHOW SPO...

Page 59: ...W BOWLING CENTERS Displays BOWLING icons SHOW GOLF COURSES Displays GOLF COURSE icons SHOW HORSE RACING Displays HORSE RACING icons SHOW HEALTH AND FITNESS CLUBS Displays HEALTH FITNESS CLUB icons SHO...

Page 60: ...ects audio mode to FM2 Satellite radio Selects audio mode to satellite radio Satellite radio 1 Selects audio mode to satellite radio 1 Satellite radio 2 Selects audio mode to satellite radio 2 Satelli...

Page 61: ...ck down Tracks down for a track number Previous track Selects previous track Disc up Disc up Disc down Disc down Climate command Command Action Automatic climate control Turns air conditioner on and o...

Page 62: ...NAVIGATION SYSTEM BASIC FUNCTIONS 64 INFORMATION The function that cannot be used according to the vehicle is pro vided Voice recognition language can be changed See Selecting a lan guage on page 338...

Page 63: ...eset destinations 68 Destination search by Address 69 Destination search by Point of Interest 73 Destination search by Destination Assist 80 Destination search by Previous Destinations 80 Destination...

Page 64: ...Change the selected region in order to set a destination from a different region by us ing Address Point of Interest or Inter section Freeway 1 Select Search Area to display a map of the United States...

Page 65: ...xas US6 Illinois Indiana Kentucky Michigan Ohio Wisconsin US7 Arkansas Alabama Louisiana Mississippi Tennessee US8 Connecticut Massachusetts Maine New Hampshire New Jersey New York Rhode Island Vermon...

Page 66: ...while driving 1 Push the MENU button and select Destination U0003LS 2 Select any of the preset destination buttons on the Destination screen The screen changes and displays the map location of the pr...

Page 67: ...nd select Destination 2 Select Address on the Destina tion screen 3 Select the button for the desired method a Selecting a city to search 1 Push the MENU button and select Destination 2 Select Address...

Page 68: ...is found select the corresponding but ton The screen changes and displays the map location of the selected destination and the route preference See Starting route guidance on page 87 8 Input a house n...

Page 69: ...creen changes to the screen for inputting a street name See a Se lecting a city to search on page 69 b Search by street address 1 Push the MENU button and select Destination 2 Select Address on the De...

Page 70: ...eference See Starting route guidance on page 87 If the same address exists in more than one city the current screen changes input ting the city name or to the address list screen 7 Input a city name 8...

Page 71: ...int of Interest on the Destination screen 3 Select Name on the Point of In terest screen 4 Input the name of the Point of Inter est 5 Select the button of the desired des tination The screen changes a...

Page 72: ...gory See Selecting a city to search on page 74 and Selecting from the categories on page 75 INFORMATION The desired Point of Interest can be displayed on the map screen See Display POI icons on page 1...

Page 73: ...destination can be set by selecting the search point and the POI category 1 Push the MENU button and select Destination 2 Select Point of Interest on the Destination screen 3 Select Category on the Po...

Page 74: ...page 78 SETTING THE SEARCH POINT FROM ALONG MY ROUTE Select Along My Route The search point is set and the POI Cate gory screen will be displayed See page 78 SETTING THE SEARCH POINT FROM NEAR CITY C...

Page 75: ...the button of the desired city center name The search point is set and the POI Cate gory screen will be displayed See page 78 SETTING THE SEARCH POINT FROM NEAR A DESTINATION 1 Select Near a Destinat...

Page 76: ...nd displays the map location of the selected destination and the route preference See Starting route guidance on page 87 c Search by Phone 1 Push the MENU button and select Destination 2 Select Point...

Page 77: ...on 1 Push the MENU button and select Destination 2 Select Point of Interest on the Destination screen 3 Select eDestination on the Point of Interest screen U2002LS With the eDestination feature you ca...

Page 78: ...avigation system See Destination Assist on page 159 1 Push the MENU button and select Destination 2 Select Previous Destinations on the Destination screen The previous starting point and up to 100 pre...

Page 79: ...nce See Starting route guidance on page 87 1 Push the MENU button and select Destination 2 Select Emergency on the second page of the Destination screen The display changes to a screen to select polic...

Page 80: ...nce on page 87 INFORMATION The navigation system does not guide in areas where route guidance is unavailable See page 416 There are 2 ways to search a Search by intersection b Search by Freeway Entran...

Page 81: ...screen 4 Input the name of the first intersect ing street which are located near the destination to be set 5 Select OK 6 Select the button of the desired item 7 Input the name of the second inter sect...

Page 82: ...87 b Search by Freeway Entrance Exit 1 Push the MENU button and select Destination 2 Select Intersection Freeway on the second page of the Destination screen 3 Select Freeway Entrance Exit on the Int...

Page 83: ...and the route preference See Starting route guidance on page 87 1 Push the MENU button and select Destination 2 Select Map on the second page of the Destination screen The screen changes and displays...

Page 84: ...A set destination can be deleted 1 Push the MENU button and select Destination 2 Select Del Dest on the Destina tion screen When more than one destination is set a list will be displayed on the scree...

Page 85: ...just Location To adjust the position in smaller increments When an arrow facing the desired point is selected the map scrolls in that di rection The scroll stops when the selection of the arrow is rel...

Page 86: ...VOICE button to finish Demo mode The route for returning may not be the same as that for going The route guidance to the destina tion may not be the shortest route nor a route without traffic conges t...

Page 87: ...oute This route is indicated by an orange line Alt Alternative route This route is indicated by a purple line Short A route by which you can reach the destination in the shortest distance This route i...

Page 88: ...ences A number of choices are provided on the conditions which the sys tem uses to determine the route to the des tination See page 103 INFORMATION Even if the Freeways indicator is dimmed the route c...

Page 89: ...guidance prompts 95 Distance and time to destination 97 Setting and deleting destinations 98 Adding destinations 98 Reordering destinations 98 Deleting destinations 99 Setting route 100 Detour setting...

Page 90: ...na tion the destination name will be displayed on the top of the screen Selecting Off clears the display When the head up display is on turn by turn guidance arrows will be displayed on the windshield...

Page 91: ...on freeway disappears and the map screen appears When selecting or push ing the MAP VOICE button the guid ance screen on freeway reappears When approaching an intersection When the vehicle approaches...

Page 92: ...st 1 Next street name or destination name 2 Turn direction 3 Distance between turns 4 Current street name ARROW SCREEN On this screen information about next turns on the guidance route can be viewed S...

Page 93: ...ORMATION The street names may not be pro nounced correctly or clearly due to text to speech function On freeways interstates or other highways with higher speed limits the voice guidance will be made...

Page 94: ...head 3 Beep sound only The system announces the approach to the final destination 1 Your destination is ahead 2 You have arrived at your des tination The route guidance is now finished INFORMATION If...

Page 95: ...ination The distance the estimated travel time and the estimated arrival time from the cur rent position to the selected destination are displayed Estimated travel time is dis played Estimated arrival...

Page 96: ...ine the arrival order of the additional destination When more than one destination is set you can change the arrival order of the destinations 1 Select Route 2 Select Reorder 3 Select the desired dest...

Page 97: ...letion Select All To select all destinations on the list Unselect All To unselect all of the se lected destinations A message appears to confirm the request to delete 4 To delete the destination s sel...

Page 98: ...stance 1 mile km 3 miles km or 5 miles km Select one of these buttons to start the detour process After detouring the system returns to the original guidance route Whole Route By selecting this button...

Page 99: ...em INFORMATION When your vehicle is on a freeway the detour distance selections are 5 15 and 25 miles km The system may not be able to cal culate a detour route depending on the selected distance and...

Page 100: ...t that runs through two or more cities the name change will not appear on the list The street names will be displayed in order from the starting point along with the dis tance to the next turn These m...

Page 101: ...o review the route to the previous destination or starting point To review the route to the previous destination or starting point in fast forward mode To indicate the previous destina tion or startin...

Page 102: ...choices are provided on the conditions which the system uses to deter mine the route to the destination 1 Select Route 2 Select Preferences to change the conditions that determine the route to the des...

Page 103: ...iven parallel along the freeway 1 Select Route 2 Select Preferences 3 Select Start from Adjacent Road When there is no adjacent road this button will not be displayed To pause guidance 1 Select Route...

Page 104: ...map screen You can also set their location as a destination and use them for route guid ance 1 Select Show on Map 2 Select Select POI to display a par ticular type of Point of Interest on the screen W...

Page 105: ...n Find Local POI When searching for the nearest Point of Interest select this button Then choose one of the categories The system will list the points within 200 miles 320 km See page 108 Select Other...

Page 106: ...return to the POI category selection screen select More To display the local POI list Points of Interest that are within 200 miles 320 km of the current position will be listed from among the selected...

Page 107: ...e it for route guidance 1 Directly select the Point of Interest icon that you want to set as a destina tion The map will shift so that the icon is cen tered on the screen and overlaps with the cursor...

Page 108: ...screen will be displayed with the POI icons hidden To display the POI icons again select POI Icons on the Show on Map screen It is possible to store the traveled route up to 124 miles 200 km and retra...

Page 109: ...oute Trace Route Trace indicator is highlighted To stop recording the route trace 1 Select Show on Map 2 Select Route Trace The following screen will be displayed Selecting Yes stops recording and the...

Page 110: ...NAVIGATION SYSTEM ROUTE GUIDANCE 112...

Page 111: ...IGATION SYSTEM MEMORY POINTS Navigation system memory points Navigation settings 114 Setting up the Home 115 Setting up the Preset Destinations 117 Setting up the Address Book 120 Setting up the Areas...

Page 112: ...y Address Book on page 81 Registered areas are avoided at the time of route search U4001LS 1 Push the MENU button and select Setup U4002LS 2 Select Navi On this screen the following operations can be...

Page 113: ...Setup 2 Select Navi on the Setup screen 3 Select Home Registering home See page 115 Editing home See page 116 Deleting home See page 117 a Registering home 1 Push the MENU button and select Setup 2 S...

Page 114: ...MENU button and select Setup 2 Select Navi on the Setup screen 3 Select Home on the Navigation Settings screen 4 Select Edit 5 Select Edit for the item you want to change Name To edit home name The na...

Page 115: ...If preset destination has been registered that information can be recalled by using Preset Destinations on the Destina tion screen See Destination search by Preset Destinations on page 68 1 Push the M...

Page 116: ...vigation Settings screen 4 Select Set 5 Enter the location in the same way as for a destination search See Des tination search on page 66 6 Select a position for this preset des tination When registra...

Page 117: ...ettings screen 4 Select Edit 5 Select the button of the desired pre set destination 6 Select Edit for the item you want to change Name To edit preset destination names The names can be displayed on th...

Page 118: ...preset destina tions on the list Unselect All To unselect all of the se lected preset destinations 6 Select Delete 7 To delete preset destination select Yes To cancel the deletion select No Points or...

Page 119: ...n Settings screen 4 Select New 5 Enter the location in the same way as for a destination search See Des tination search on page 66 After the address book entry has been reg istered the Edit Address Bo...

Page 120: ...een 3 Select Address Book on the Nav igation Settings screen 4 Select Edit 5 Select the button of the desired ad dress book entry 6 Select Edit for the item you want to change Name To edit address boo...

Page 121: ...k entries When the vehicle ap proaches the location of the address book entry the selected sound will be heard 1 Select With Sound on the Ad dress Book Entry Icon screen 2 Select the desired sound ico...

Page 122: ...the alphanu meric keys Up to 32 characters can be entered 3 Select OK The previous screen will be displayed DISPLAYING MEMORY POINT NAMES The name of an address book entry can be set to display on the...

Page 123: ...elect one of the 8 directional but tons to move the cursor to the de sired point on the map 3 Select OK The previous screen will be displayed To change Phone telephone number 1 Select Edit of Phone 2...

Page 124: ...lect All To unselect all of the se lected addresses 6 Select Delete 7 To delete the address book entry se lect Yes To cancel the deletion se lect No Areas you want to avoid because of traffic jams con...

Page 125: ...ea to be avoided See Destination search on page 66 6 Scroll the map to the desired point Adjust Location To adjust the position in smaller increments 7 Select Enter 8 Select either or to change the si...

Page 126: ...4 Select Edit 5 Select the desired area button 6 Select Edit for the item you want to change Name To edit the name of the area to avoid The names can be displayed on the map See page 129 Location To e...

Page 127: ...hanumeric keys Up to 32 characters can be entered 3 Select OK The previous screen will be displayed DISPLAYING NAMES OF AREAS TO BE AVOIDED The name of an area to be avoided that may be displayed on t...

Page 128: ...Select the 8 directional button to move the cursor to the desired point on the map 3 Select OK The previous screen will be displayed To change Size 1 Select Edit of Size 2 Select either or to change t...

Page 129: ...m Unselect All To unselect all registered areas to avoid in the system 6 Select Delete 7 To delete the area select Yes To cancel the deletion select No The previous destination can be deleted 1 Push t...

Page 130: ...NAVIGATION SYSTEM MEMORY POINTS 132 6 To delete the destination select Yes To cancel the deletion select No...

Page 131: ...D INFORMATION Telephone and information Telephone Hands free system for cellular phone 134 Enter a Bluetooth phone 138 Call on the Bluetooth phone 143 Receive on the Bluetooth phone 150 Talk on the Bl...

Page 132: ...t the Bluetooth phone NOTICE Do not leave your cellular phone in the car The temperature indoor may be high and damage the phone INFORMATION In the following conditions the sys tem may not function Th...

Page 133: ...HFP you cannot enter the Bluetooth phone and take OPP or PBAP service individually Please go to http www lexus com to find approved Bluetooth phones for this system By pushing the telephone switch ab...

Page 134: ...an is loud There is an effect from the net work of the cellular phone 1 Indicates the condition of Bluetooth connection Blue indicates an excellent connection to Bluetooth Yellow indicates a bad conne...

Page 135: ...x Your cellular phone touches or is covered with metal materials Leave the Bluetooth phone on the place where Blue indication is displayed About the phonebook in this system The following data is stor...

Page 136: ...e Guidelines in Supplement C to OET65 This equipment has very low levels of RF energy that it deemed to comply without maximum permis sive exposure evaluation MPE But it is desirable that it should be...

Page 137: ...into the phone For the operation of the phone see the manual that comes with your cellular phone If you want to cancel it select Cancel 5 When the connection is completed this screen is displayed You...

Page 138: ...he POWER switch is in AC CESSORY or ON mode a nearby cellu lar phone you have registered is searched for Next the system automatically con nects with the latest of the phones con nected to in the past...

Page 139: ...ually 1 Push the MENU button and select Info Phone 2 Select Phone 3 Select Connect Phone 4 Select Handsfree Power or select the phone to connect 5 The Connect Bluetooth screen is displayed 6 When the...

Page 140: ...connected with a poor reception from the Bluetooth network when the POWER switch is in ACCESSORY or ON mode the system automatically reconnects the Bluetooth phone In this case the connection result i...

Page 141: ...er This cannot be operated while driving 1 Push the MENU button and select Info Phone You can also push of the steering wheel to display the Phone screen U5002LS 2 Select Phone 3 Select the desired ke...

Page 142: ...our cellular phone The system has one phonebook for each telephone You can register up to 1000 numbers in total of phonebooks This cannot be operated while driving 1 Select Contacts 2 Select the desir...

Page 143: ...you want to edit the phonebook By speed dial You can call using registered phone numbers which can be selected from a phonebook See Registering the speed dial on page 378 for registering the speed di...

Page 144: ...d Missed calls which you missed Incoming calls which you received Outgoing numbers which you called You can call using the latest 5 call history items shown by All while driving 1 Select Call History...

Page 145: ...ll the same number continuously only the newest number is registered When a phone number registered in the phonebook is received the name and the number are displayed Unnoticed phone number such as a...

Page 146: ...stered in the phonebook For setting the voice recognition see Registering the phonebook data on page 371 Example Call MIKE You Push the talk switch System After the beep please say a command Such as G...

Page 147: ...the entry number is displayed you can also call by pushing of the steering wheel or selecting Dial Cancelling the voice recognition The voice recognition will be cancelled when you do the following Ke...

Page 148: ...below on the screen To adjust the volume of the other party s voice Select or or use the volume switch of the steering wheel To hang up the phone Select or push of the steering wheel To mute your voi...

Page 149: ...number displayed on the screen and select Send The number before marked sign will be sent When you select Exit this function will be finished and normal tone screen ap pears To hang up the phone Sele...

Page 150: ...s similar to other voice recognition For the operation of voice recognition see Voice command system on page 49 Interrupt call When the call is interrupted by the third party while talking this screen...

Page 151: ...phone is not accepted for HFP Ver 1 5 this function can not be used INFORMATION Interrupt call operation may differ depending on your phone company and cellular phone Fuel consumption such as shown b...

Page 152: ...1 Push the MENU button and select Info Phone U5003LS 2 Select Calendar On this screen the current date is high lighted in yellow or To change month or To change year Today To display the current month...

Page 153: ...ECT 155 LEXUS ENFORM WITH SAFETY CONNECT Lexus enform with safety connect 156 159 162 165 170 174 176 Lexus Enform with Safety Connect Overview Destination Assist eDestination XM Sports and Stocks XM...

Page 154: ...exus Enform subscription the following features are available Safety Connect features See your vehicle Owner s Manual Section 3 for details Automatic collision notification 1 Stolen vehicle location E...

Page 155: ...er than Canada The XM NavTraffic XM NavWeather and XM Sports and Stocks services are available in the contiguous 48 U S states and Canada For details about the XM service coverage areas refer to www...

Page 156: ...ign of Lexus Enform with Safety Connect complies with the FCC guidelines in addition to those standards INFORMATION Available beginning Fall 2009 on select Lexus models Contact with the Lexus Enform r...

Page 157: ...ants gas stations shopping centers or other points of interest POI After you tell the agent your choice of des tination its coordinates are sent wirelessly to your vehicle s navigation system Make a c...

Page 158: ...you determine your location of choice he or she will place you on hold briefly and wirelessly send the POI to your vehicle s navigation system The agent will then instruct you to either select Go to o...

Page 159: ...Select Destination Assist on the Destination screen U12002LS 3 Select Dest Assist History U12004LS 4 Select the desired location in order to display its data and be able to be set it as a destination...

Page 160: ...www lexus com and go to the Owners section where you will need to register and log in After this you can create your personalized folders containing the locations you wish to send to your vehicle See...

Page 161: ...naviga tion system for guidance 1 Push the MENU button on the side of the Remote Touch and then select Destination 2 Select Point of Interest 3 Select eDestination U12009LS 4 Select the desired eDest...

Page 162: ...ination You can also select Info to display more information about the POI U12041LS Mark To mark the POI on the navigation map Go to To set the POI as a destination with route directions Add to Route...

Page 163: ...rts settings See page 166 b XM Stocks Receive stock data See page 168 XM Stocks settings See page 168 a XM Sports You must first add your desired teams prior to receiving information See page 166 Rece...

Page 164: ...ing pages for each setting You can also input your personalized XM Sports team from the Setup screen See Other settings on page 412 ADD SPORTS TEAM U12027LS 1 Select Add Sports Team Up to 5 teams can...

Page 165: ...s to confirm or No to cancel DELETE SPORTS TEAMS U12027LS 1 Select Delete Sports Teams U12031LS 2 Select the sports team that you would like to delete or select Select All to delete all teams 3 Select...

Page 166: ...e verbal data or select Read All The available chosen data will be read in its entirety Stock data may be delayed by up to 15 minutes XM Stocks settings Add or delete stocks To input your personalized...

Page 167: ...can enter and save up to 10 individual stock symbols for which you would like to receive data Stocks must be input one at a time You must know the symbol of the stock you wish to enter DELETE STOCKS U...

Page 168: ...n is displayed on the map See page 170 Weather information Weather information for the selected city is displayed See page 172 Weather warnings Weather warnings issued within an approximately 15 5 mil...

Page 169: ...informa tion Weather information of the selected city will be displayed See page 172 4 Current Location button When the Current Location button is selected a map of the vehicle s current location wil...

Page 170: ...t weather 5 Current temperature 6 Today s weather 7 Tomorrow s weather 8 Day after tomorrow s weather 9 Observed time 10 Specified day s weather When this button is selected weather in formation for a...

Page 171: ...the XM NavWeather screen will be displayed OK When this button is selected the screen will return to the map of the current location This severe weather warning will display again if the severe weath...

Page 172: ...ou to select another route offered by the system See page 352 Traffic Voice Guidance Traffic information is provided using voice guidance See page 347 Show Free Flowing Traffic Freely flowing traffic...

Page 173: ...t voice guidance for the traffic informa tion See page 44 INFORMATION When the XM NavTraffic icon is se lected voice guidance for the traffic information will start even if Off for Traffic Voice Guida...

Page 174: ...Orange Congestion information on the guidance route has been received screen button Selecting the XM NavTraffic indicator will start voice guidance Lexus Insider is an optional service that can send a...

Page 175: ...Select LEXUS Insider LEXUS Insider screen is displayed on the screen U12012LS 3 Select the desired article title from the Lexus Insider menu to play that broadcast or select Read All to listen to all...

Page 176: ...ividual article you can then select Next Article or Previous Article to listen to another article You can also use the or switch on the steering wheel to move to the pre vious or next article Some Lex...

Page 177: ...available a no tification will appear on the navigation screen The notice will appear for only approxi mately 6 seconds unless you choose one of the options listed U12016LS When the new article notifi...

Page 178: ...tion and opt in or out of article receipt U4001LS 1 Push the MENU button on the side of the Remote Touch and then select Setup U10007LS 2 Select Other U12017LS 3 Select LEXUS Insider LEXUS Insider set...

Page 179: ...nsider 2 Select Yes to receive Lexus Insid er articles or No to opt out of receiv ing articles 3 Select Save NEW ARTICLE NOTIFICATION Automatic notification of new Lexus Insid er articles is available...

Page 180: ...LEXUS ENFORM WITH SAFETY CONNECT 182 RESTORE THE DEFAULT LEXUS INSIDER SETTINGS U12021LS 1 Select Default U12022LS 2 Select Yes to confirm or No to cancel...

Page 181: ...DVD changer operation 220 Bluetooth audio operation 246 USB memory iPod operation 254 Audio video remote controls 262 Rear seat entertainment system features 264 Using the radio 270 Using the DVD pla...

Page 182: ...er Bluetooth audio player AUX USB memory or iPod select the screen tabs For details see page 189 2 Function menu display screen To control the radio DVD changer Bluetooth audio player AUX USB memory o...

Page 183: ...the DVD changer on For details see pages 189 and 225 10 SAT button Push this button to choose an SAT station For details see pages 189 and 200 11 SEEK TRACK button Push either side of this button to...

Page 184: ...e page 189 3 Disc slot Insert discs into the slot after pushing LOAD button For details see page 206 4 LOAD button Push this button to insert the discs For details see page 206 5 TUNE FILE knob Turn t...

Page 185: ...udio video system works when the POWER switch is turned to ACCESSO RY or ON mode FCC ID AJDK021 IC 775E K021 This device complies with Part 15 of the FCC Rules and RSS Gen and RSS 210 of IC Rules Oper...

Page 186: ...er try to dis assemble the player or alter any of its parts since you may be ex posed to laser rays and danger ous voltages This product utilizes a laser Use of controls or adjustments or performance...

Page 187: ...mode used You can select the function that enables automatic return to the previous screen from the audio screen See page 337 for details c Switching between functions DVD changer image Push the AM FM...

Page 188: ...one mode to another If the disc is not set the CD changer DVD changer does not turn on You can turn off the CD changer DVD changer by ejecting all the discs If the au dio system was previously off th...

Page 189: ...hanger Bluetooth au dio player AUX USB memory and iPod operation are displayed on the screen when the audio control mode is selected Select the tab to select the desired mode when the audio control mo...

Page 190: ...em adjusts to the optimum volume and tone quality according to the speed of car wind noise or other noise e Tone and balance Tone How good an audio program sounds to you is largely determined by the m...

Page 191: ...l ance between the front and rear speakers L or R Adjusts sound balance be tween the left and right speakers 3 Select OK The tone of each mode for such as AM FM CD changer and DVD changer can be adjus...

Page 192: ...en returns 6 Select OK g Your CD or DVD changer When you insert a disc push the LOAD button and gently push the disc in with the label side up This CD or DVD changer can store up to six discs The chan...

Page 193: ...tails refer to the Owner s Manual a Listening to the radio Push the AM FM button to display au dio screen and select AM or FM tabs to choose either an AM or FM sta tion AM FM1 or FM2 appears on the sc...

Page 194: ...extremely weak the radio switches from stereo to mono recep tion In this case ST disappears from the screen b Presetting a station 1 Tune in the desired station 2 Select one of the buttons 1 6 you wa...

Page 195: ...and stay there for a few seconds and then scan again To select a station Push the SCAN button or select SCAN again To scan the preset stations Push the SCAN button or select SCAN on the screen for lo...

Page 196: ...wing ROCK MISC Miscellaneous INFORM Information EASY LIS Easy listening CLS JAZZ Classical music and Jazz R B Rhythm and Blues RELIGION ALART Emergency message TypeSeek When a program is set Type Seek...

Page 197: ...the dis play returns e Traffic announcement Traffic A station that regularly broadcasts traffic information is automatically located When you select Traffic Traf Seek appears on the display and the r...

Page 198: ...ntent of the satellite radio services provided which are subject to the terms and condi tions of the XM Satellite Radio customer service agreement Customers should have their radio ID ready the radio...

Page 199: ...elect SAT tab to choose a SAT channel SAT1 SAT2 or SAT3 appears on the screen Turn this knob to select the next or pre vious channel If you turn continuously you can rapidly scroll forward or down thr...

Page 200: ...want The button 1 6 is highlighted and chan nel number appears on the display To select channel within the current category Push the or button of SEEK TRACK The radio will step up or down the channel...

Page 201: ...tle and name When you select Text the song pro gram title and the artist name feature are displayed Up to 16 alphanumeric characters can be displayed Some information will not be fully displayed When...

Page 202: ...ed is not authorized Wait for about 2 seconds until the radio returns to the previous channel or CH001 If it does not change au tomatically select another channel If you want to listen to the premium...

Page 203: ...ion re ception which can be determined by turning the equipment off and on the user is encouraged to try to correct the interference by one or more of the following measures Reorient or relocate the r...

Page 204: ...nger can store up to 6 discs You can set a disc at the lowest empty disc number Setting a single disc 1 Push the LOAD button briefly The orange indicators at both ends of the slot start blinking After...

Page 205: ...s after pushing the LOAD button a beep will sound and the operation will be canceled automatically If you need to insert the next disc repeat the same procedure to insert another disc Setting all the...

Page 206: ...pushing the LOAD button the beep will sound and the operation will be canceled automatically NOTICE Do not insert one disc stacked on top of another one or feed them in contin uously to prevent discs...

Page 207: ...utton for the disc until you hear a beep At this time the orange indicators of the slot start blinking and a disc is ejected 2 After the blinking indicators stay on remove the disc The indicators star...

Page 208: ...e discs set in the changer are played continuously starting with the last disc you inserted The disc number of the disc cur rently being played the track number and the time from the beginning of the...

Page 209: ...ghted The changer will start playing the selected disc from the first track On the audio panel Push the or button of CH DISC When you release the button the changer will start playing the selected dis...

Page 210: ...selecting this button the list moves up by 5 track groups If this button is selected when the top page of the list is displayed the last page is displayed By selecting this button the list moves down...

Page 211: ...hanger reaches the end of the disc it will continue scanning at track 1 After all the tracks are scanned in one pass normal play resumes Searching for a desired disc Select SCAN on the screen or push...

Page 212: ...the beginning of the disc and play the disc again To cancel it select RPT once again RAND Use it for automatic and random selection Playing the tracks on one disc in ran dom order Select RAND briefly...

Page 213: ...st This function is available only when the vehicle is not mov ing Select Select The folder list is dis played Select the desired folder number The changer will start playing the first file of the sel...

Page 214: ...forward Push side of the SEEK TRACK button and hold it to fast forward the disc When you release the button the changer will resume playing from that position Reverse Push side of the SEEK TRACK butto...

Page 215: ...red file number The chang er will start playing the selected file from the beginning By selecting this button the list moves up by 5 file groups If this button is selected when the top page of the lis...

Page 216: ...the end of the fold er it will continue scanning from file 1 After all the files are scanned in one pass normal play resumes SEARCHING FOR A DESIRED FOLDER Select SCAN on the screen or push the SCAN...

Page 217: ...k to the beginning of the folder and play the folder again To cancel it select RPT once again RAND Use it for automatic and random selection of the folder or the disc which you are currently listening...

Page 218: ...ture Remove the disc from the changer to cool it If the changer still does not operate have it checked by your dealer If an MP3 WMA disc contains CD DA files only CD DA files are played If an MP3 WMA...

Page 219: ...ur DVD changer can store up to 6 discs You can set a disc at the lowest empty disc number Setting a single disc 1 Push the LOAD button briefly The orange indicators at both ends of the slot start blin...

Page 220: ...ds after pushing the LOAD button a beep will sound and the operation will be canceled automatically If you need to insert the next disc repeat the same procedure to insert another disc Setting all the...

Page 221: ...pushing the LOAD button the beep will sound and the operation will be canceled automatically NOTICE Do not insert one disc stacked on top of another one or feed them in contin uously to prevent discs...

Page 222: ...utton for the disc until you hear a beep At this time the orange indicators of the slot start blinking and a disc is ejected 2 After the blinking indicators stay on remove the disc The indicators star...

Page 223: ...the changer are played continuously starting with the last disc you inserted The disc number of the disc cur rently being played the track or title and chapter number and the time from the be ginning...

Page 224: ...not work properly Be sure to read the instruction manual for the DVD disc separately provided For the detailed information about DVD video discs see h DVD player and DVD video disc information on page...

Page 225: ...repre sent the maximum volume level that the DVD will play you may be startled by louder sound effects or when you change to a different audio source The louder sounds may have a signif icant impact o...

Page 226: ...CD DVD screen and select Wide on Settings screen The screen mode can be changed If you select Full Screen when the ve hicle is completely stopped and the park ing brake is applied the video screen re...

Page 227: ...ppears See page 236 Search The group search screen ap pears Return Selecting this will display the predetermined scene and start playing from there Audio The audio changing screen ap pears See page 23...

Page 228: ...u select any of the above controls the menu screen for DVD video appears For the operation see the manual that come with the DVD video disc provided separately The menu control key appears on the scre...

Page 229: ...ll stop the disc Selecting this will resume normal play during pause Selecting this will fast forward dur ing playback and forward frame by frame during pause SELECTING A MENU ITEM Enter the menu item...

Page 230: ...hapter If you enter the wrong numbers select to delete the numbers When you select the previous screen returns SEARCHING BY GROUP DVD audio only Enter the group number and select OK The player starts...

Page 231: ...nter the number of the group you want to play select the group number If you enter the wrong numbers select to delete the numbers When you select the previous screen returns Select OK on the screen Th...

Page 232: ...ones stored in the discs and changed When you select Hide the subtitle can be hidden When you select the previous screen returns CHANGING THE AUDIO LANGUAGE DVD video only Each time you select Change...

Page 233: ...is se lected When you select the previous screen returns CHANGING THE ANGLE The angle can be selected for discs that are multi angle compatible when the angle mark appears on the screen Each time you...

Page 234: ...UDIO LANGUAGE CODE To return to the Setup Menu screen se lect Subtitle language You can change the subtitle language 1 Select Subtitle Language 2 Select a language you want to read on the Subtitle Lan...

Page 235: ...le is in motion will automatically start playing Certain discs may not play 1 Select Auto Start 2 Select On or Off Sound dynamic range if equipped The difference between the lowest volume and the high...

Page 236: ...9 Finnish 0610 Fiji 0615 Faroese 0625 Frisian 0701 Irish 0704 Scots Gaelic 0712 Galician 0714 Guarani 0721 Gujarati 0801 Hausa 0809 Hindi 0818 Croatian 0821 Hungarian 0825 Armenian 0901 Interlingua 09...

Page 237: ...nda 1901 Sanskrit 1904 Sindhi 1907 Sangho 1908 Serbo Croatian 1909 Sinhalese 1911 Slovak 1912 Slovenian 1913 Samoan 1914 Shona 1915 Somali 1917 Albanian 1918 Serbian 1919 Siswati 1920 Sesotho 1921 Sun...

Page 238: ...ondition the rear pas senger can cancel the setup operation from the front seat To lock the operation of the player from the rear seat see Rear system lock on page 339 f Operating a video CD PLAYING A...

Page 239: ...creen If you select this while the player is playing video the previous track is searched and played Next Page When you select this while the disc menu is displayed the next page appears on the displa...

Page 240: ...D controls will ap pear If appears on the display when you se lect a control the operation is not per mitted DESCRIPTION OF VIDEO CD CONTROLS Use this to pause the video screen Select this to fast rev...

Page 241: ...nserted upside down Clean the disc or insert it correctly If a disc which is not playable is inserted Check disc will also appear on the screen For appropriate discs for this changer see Audio video s...

Page 242: ...L or 1 you cannot use it on this DVD player If you attempt to play an inappropriate DVD video disc on this player Region code error appears on the screen Even if the DVD video disc does not have a reg...

Page 243: ...of the subtitle and audio Region codes The region codes are pro vided on DVD players and DVD discs If the DVD video disc does not have the same region code as the DVD player you cannot play the disc o...

Page 244: ...ction INFORMATION Portable players must correspond to the following specifications in order to be connected to the Bluetooth au dio system However please note that some functions may be limited depend...

Page 245: ...yer is not con nected The portable player has a low bat tery It may take time the phone connec tion is carried out during Bluetooth audio play 1 Indicates the condition of the Bluetooth connection Blu...

Page 246: ...Rules Operation is sub ject to the following two conditions 1 This device may not cause harmful inter ference and 2 this device must accept any interference received including in terference that may c...

Page 247: ...truction manual that comes with it When the connection method is From Vehicle When the auto connection is on When the portable player is standby for the connection it will be automatically connected w...

Page 248: ...ystem This screen will appear when the connec tion has been successfully established Reconnecting the portable player If the portable player is disconnected with a poor reception from the Bluetooth ne...

Page 249: ...will start playing Select and the music will pause Select and the music will start playing again Depending on the portable player that is connected to the system the music may start playing when sele...

Page 250: ...the play er When you release the button the porta ble player will resume playing from that position Reverse Push and hold the button of SEEK TRACK to reverse the player When you release the button th...

Page 251: ...repeat se lect RPT once again RAND Use this for automatic and ran dom selection of tracks on the album that you are currently listening to Playing the tracks in the album in ran dom order While the tr...

Page 252: ...tures inside the vehicle may dam age the portable player Do not push down on or apply un necessary pressure to the portable player while it is connected as this may damage the portable player or its t...

Page 253: ...SYSTEM 255 4 Open the cover and connect a USB memory or iPod using an iPod cable Routing portable audio device cables When the cover is slide open portable au dio device cables can be pulled through...

Page 254: ...tart playing again INFORMATION When an iPod is connected and the audio source is changed to iPod mode the iPod will resume play from the same point in which it was last used When the USB memory is con...

Page 255: ...s folder Select for Folder The desired folder can be selected in a list This function is available only when the vehicle is not mov ing Select Select The folder list is dis played Select the desired f...

Page 256: ...side of the SEEK TRACK button and repeat it until the desired file or track appears on the screen As you release the button the USB memory or iPod will start playing the selected file or track from th...

Page 257: ...TUNE FILE knob to step up or down all the files or tracks in the player you are currently listening to USB memory iPod Select for File or Track The desired file or track can be selected in a list This...

Page 258: ...r track groups If this button is selected when the last page of the list is displayed the top page is dis played Searching for a desired file USB memory only Select SCAN on the screen or push the SCAN...

Page 259: ...he SCAN button a second time After all the folders are scanned in one pass normal play resumes Other function USB memory iPod RPT Use this control to automatic re play the file or track you are curren...

Page 260: ...files in all files in random or der Select RAND for longer than a second while the music is playing FLD RAND appears on the screen The system se lects a file in all files To cancel it select RAND onc...

Page 261: ...itch until the track file or chapter you want to play is set If you want to return to the beginning of the current track file or chapter push the side of the switch once quickly To select a desired di...

Page 262: ...rear passengers to enjoy audio and DVD video 1 Front audio system 2 Displays 3 Rear seat entertainment system con troller 4 Power outlet 5 A V input adapter 6 Headphone volume control dials and headp...

Page 263: ...de on page 285 Rear seat entertainment system controller Use the controller to operate both the left and right side displays Some controller buttons are shared between the left and right side displays...

Page 264: ...ating sheet is set to prevent the batteries from being discharged Remove the insulating sheet before using the re mote control Replacing the controller batteries Necessary item for replacing 2 AA bat...

Page 265: ...cording to the local laws Headphone jacks 1 To use the headphones connect them to the jack 2 To adjust the volume 1 Push the knob 2 Turn the knob clockwise to increase the volume Turn the knob counter...

Page 266: ...a few seconds when the POWER switch is in ACCES SORY or ON mode Changing the source 1 Turning on the audio source selection screen 2 Inputting the selected icon 3 Selecting an icon Push SOURCE to dis...

Page 267: ...vent of an acci dent or sudden braking Conversational speech on some DVDs is recorded at a low volume to emphasize the impact of sound effects If you adjust the volume assuming that the conversations...

Page 268: ...c ing the battery observe the follow ing precautions to prevent acci dents Always work with dry hands Moisture may cause the battery to rust Do not touch or move any other components inside the remote...

Page 269: ...he desired disc number appears on the screen Audio CD CD text 271 MP3 WMA disc 272 DVD video audio 272 Video CD 282 Selecting a track Push or of TUNE until the de sired track number appears on the scr...

Page 270: ...older Push or of TUNE until the de sired file number appears on the screen Selecting a folder Push or of FOLDER until the desired folder number appears on the screen Fast forwarding or reversing a fil...

Page 271: ...10 Push to select a chapter track Push and hold to fast forwarding or reversing a chapter track DVD video and DVD audio Push OPTION if no icons are shown while watching a DVD video or DVD audio and f...

Page 272: ...video screen Selecting this will fast forward dur ing playback and forward frame by frame during pause DESCRIPTION OF DVD AUDIO CON TROLS Top Menu If you select this button the menu screen for DVD au...

Page 273: ...DVD VIDEO SET TINGS Setup The initial set up screen ap pears See page 280 Search The title search screen ap pears See page 276 Return Selecting this will display the predetermined scene and start pla...

Page 274: ...e verse the pages Next Page Select this button to forward the pages Subtitle The subtitle changing screen appears See page 278 Angle The angle selection screen ap pears See page 280 When you select th...

Page 275: ...you select the previous screen returns SELECTING THE BONUS GROUP DVD audio only Select Search on the settings screen Enter the bonus group number on the searching group screen and select OK The Enter...

Page 276: ...the wrong numbers select to delete the numbers When you select the previous screen returns CHANGING THE SUBTITLE LANGUAGE Select Subtitle on the settings screen Each time you select Subtitle the lan...

Page 277: ...dio the lan guage is selected from the ones stored in the discs and changed When you select the previous screen returns CHANGING THE AUDIO FORMAT DVD audio only Select Audio on the control icon screen...

Page 278: ...s selected from the ones stored in the discs and changed When you select and the previous screen returns SETUP MENU Select Setup on the settings screen There are initial setting buttons on the Setup M...

Page 279: ...video menu 1 Select DVD Language 2 Select the language you want to read on the DVD Language screen If you cannot find the language you want to read on this screen select Other and enter a language co...

Page 280: ...e See page 237 1 Enter the 4 digit language code If you enter the wrong numbers select to delete the numbers 2 Select OK Video CD Push OPTION if no icons are shown while watching a video CD and follow...

Page 281: ...layback Selecting this will stop the video screen Use this to pause resume the vid eo screen Select this to fast forward during the playback and start playing frame by frame during pause VIDEO CD SETT...

Page 282: ...Page When you select this while the disc menu is displayed the next page appears on the display If you select this while the player is playing video the next track is searched and played MAIN SUB A m...

Page 283: ...ellow Image input adapter White Left channel audio input adapter Red Right channel audio input adapter The rear seat entertainment system plays videos and sound when audio video equipment is connected...

Page 284: ...video does not appear turn PAL VIDEO on PAL VIDEO will be displayed when PAL format equipment is connected to the A V input adapter Setting the display mode Pushing SIZE changes the display modes seq...

Page 285: ...engthens the green color of the screen Tone Strengthens the tone of the screen Tone Weakens the tone of the screen Contrast Strengthens the contrast of the screen Contrast Weakens the contrast of the...

Page 286: ...ing which increase with the distance from the radio transmit ter They are often accompanied by distor tion Multi path FM signals are reflective making it possible for two signals to reach your antenna...

Page 287: ...emory that can be used for MP3 and WMA playback USB communication formats USB 2 0 FS 12 MBPS File formats FAT 16 32 Windows Correspondence class Mass storage class CARING FOR YOUR CD CHANGER DVD CHANG...

Page 288: ...products may not be playable on your changer SACD Copy protected CD CD ROM DVD changer Audio CDs DVD video discs Video CDs DVD audio discs Use only discs marked as shown abo ve The following products...

Page 289: ...ed discs such as those shown in the illustrations The use of such discs may damage the player or changer or it may be impossible to eject the disc This system is not designed for use of Dual Disc Do n...

Page 290: ...ip or to repeat a section of a track To see a pin hole hold the disc up to the light Remove discs from the players when you are not using them Store them in their plastic cases away from moisture heat...

Page 291: ...information such as track title artist name The emphasis function is available only when playing MP3 WMA files re corded at 32 44 1 and 48 kHz Sampling frequency MP3 files for MP3 player MPEG 1 LAYER...

Page 292: ...up to 8 levels deep can be played However the start of playback may be delayed when using discs containing numerous lev els of folders For this reason we rec ommend creating discs with no more than tw...

Page 293: ...te This is a general term that describes the process of writing data on demand to CD R etc in the same way that data is written to floppy or hard discs ID3 Tag This is a method of embedding track re l...

Page 294: ...d by a working group MPEG of the ISO International Standard Organiza tion MP3 compresses audio data to about 1 10 the size of that on conventional discs WMA WMA Windows Media Audio is an audio compres...

Page 295: ...SECTION 8 AIR CONDITIONING 297 AIR CONDITIONING Air conditioning Automatic air conditioning controls 298...

Page 296: ...Outside temperature display In degrees Fahrenheit or Centi grade 308 3 DUAL Temperature setting mode change button 301 302 4 Air flow control buttons 302 5 Passenger side temperature dis play In degre...

Page 297: ...mati cally adjusted according to the temper ature setting The POWER switch must be in ON mode U7001LS Push the MENU button and select Climate to display the air condition ing control screen INFORMATIO...

Page 298: ...yed for a short peri od of time immediately after the air conditioning system is started in automatic operation mode NOTICE To prevent the 12 volt battery from being discharged do not leave the air co...

Page 299: ...on TEMP to in crease the temperature and to de crease the temperature DUAL button is used to set the tempera tures independently for the driver s seat and front passenger seat When the DUAL indicator...

Page 300: ...F button Using the screen 1 Fan speed at low 2 Fan speed at high Setting the vehicle interior tempera ture To adjust the temperature setting push the button on TEMP to increase the temperature and pus...

Page 301: ...r 4 Floor windshield The air flow shown on the display indicates the following Air flows to the upper body Panel Air flows to the upper body and feet Bi level Air flows to the feet Floor Air flows to...

Page 302: ...conditioning system operates automatically Recirculated air mode will automatically switch to outside air mode It is not pos sible to return to recirculated air mode when the switch is on CAUTION To...

Page 303: ...Rear outlets 1 Direct air flow to the left or right up or down 2 Turn the knob to open or close the vent INFORMATION Using automatic mode Fan speed is adjusted automatical ly according to the temperat...

Page 304: ...ition ing system off and have it in spected by your Lexus dealer Automatic air intake change mode In automatic mode the system au tomatically switches between re circulated air and outside air modes a...

Page 305: ...nd burn you The defoggers will automatically turn off after 15 to 60 minutes The operation time changes according to the ambient temper ature and vehicle speed If further defrosting or defogging is de...

Page 306: ...If the temperature shows or E take your vehicle to your Lexus dealer In the following situations the correct out side temperature may not be displayed or the display may take longer than normal to cha...

Page 307: ...AIR CONDITIONING 309...

Page 308: ...SECTION 9 REAR VIEW MONITOR SYSTEM 310 REAR VIEW MONITOR SYSTEM Rear view monitor system Rear view monitor system 311...

Page 309: ...ually CAUTION Never depend on the rear view monitor system entirely when backing up Always make sure your intended path is clear Use caution just as you would when backing up any vehicle Never back up...

Page 310: ...system may not operate normally Do not allow organic solvent car wax window cleaner or glass coat to adhere to the camera If this hap pens wipe it off as soon as pos sible When replacing the tires pl...

Page 311: ...the following cases it may become diffi cult to see the images on the screen even when the system is functioning In the dark for example at night When the temperature near the lens is high or low When...

Page 312: ...up by the camera the smear effect peculiar to the camera may occur Smear effect A phenomenon that oc curs when a bright light for example sun light reflected off the vehicle body is picked up by the...

Page 313: ...REAR VIEW MONITOR SYSTEM 315...

Page 314: ...SECTION 10 SIDE MONITOR 316 SIDE MONITOR Side monitor Side monitor 317...

Page 315: ...ever drive while looking only at the screen as the image on the screen is different from actual conditions If you drive while look ing only at the screen you may hit a person or an object resulting in...

Page 316: ...s on the camera lens or when humid ity is high for example when it rains When foreign matter such as mud is stuck to the side camera When the sun or the beam of headlights is shining directly into the...

Page 317: ...Side camera capture range The front passenger side of the vehicle is displayed on the screen When a 3 dimensional object is near the vehicle If a 3 dimensional object such as an over hanging wall is p...

Page 318: ...on the display On the display it appears that the vehicle will not hit the wall In reality the overhang ing part of the wall is in the way and the ve hicle may collide with it When the course is close...

Page 319: ...ganic solvent car wax window cleaner or glass coating agent to adhere to it If this hap pens wipe clean as soon as pos sible Do not expose the side camera to sudden temperature changes such as by pour...

Page 320: ...pears to have a vertical streak above and below it To display the side view push the side camera button with the POWER switch in ACCESSORY or ON mode and vehicle speed at 7 mph 12 km h or less Pushing...

Page 321: ...side camera button is pushed When the shift lever is shifted to R Any of the mode buttons around the dis play such as MENU is pushed The image captured by the side camera is displayed on the screen Th...

Page 322: ...mode In addition to being able to display the side view using the side camera button auto matic display mode is available In auto matic display mode the side monitor is ac tivated automatically accor...

Page 323: ...lay area modes Select the display area button Each time the button is selected the mode will change as follows Overall display mode Enlarged front view mode When the outside rear view mirrors are fold...

Page 324: ...lines until the ve hicle passes the object as this may result in a collision In the following situations be sure to per form the initialization procedure When the 12 volt battery is discon nected When...

Page 325: ...returns to the original dis play correction is complete NOTICE If the initialization screen remains on after performing initialization proce dures have the vehicle inspected by your Lexus dealer Selec...

Page 326: ...SECTION 11 INTUITIVE PARKING ASSIST 328 INTUITIVE PARKING ASSIST Intuitive parking assist Intuitive parking assist 329...

Page 327: ...n using this sys tem Types of sensors 1 Front corner sensors 2 Rear corner sensors 3 Rear center sensors Setting the intuitive parking assist mode 1 Push the menu switch The multi information display...

Page 328: ...detect an obstacle the graphic is shown on the multi information display and navigation display according to position and distance to the obstacle Multi information display 1 Front corner sensors ope...

Page 329: ...Fast Continuous Detection level and approximate distance to an obstacle Level 1 2 3 4 Front corner sensors 2 0 to 1 6 ft 60 to 47 5 cm 1 6 to 1 2 ft 47 5 to 35 cm 1 2 ft 35 cm or less Rear corner sens...

Page 330: ...remely bumpy road on an incline on gravel or on grass The vicinity of the vehicle is noisy due to vehicle horns motorcycle engines air brakes of large ve hicles or other loud noises produc ing ultraso...

Page 331: ...es within the sensor range NOTICE Notes when washing the vehicle Do not apply intensive bursts of wa ter or steam to the sensor area Doing so may result in the sensor malfunctioning System malfunction...

Page 332: ...sensor is malfunctioning Multi information display If this message appears have the intuitive parking assist sensor checked by your Lexus dealer As the intuitive parking assist sensor might be malfunc...

Page 333: ...INTUITIVE PARKING ASSIST 335 Certification For vehicles sold in Canada This ISM device complies with Cana dian ICES 001 Cet appareil ISM est conforme a la norme NMB 001 du Canada...

Page 334: ...vigation settings 348 Home and Preset Destinations can be set and edited Detailed navigation settings 349 Average cruising speed displayed screen contents and POI icon categories can be set Telephone...

Page 335: ...operation sounds and automat ic screen change U4001LS 1 Push the MENU button and select Setup U10001LS 2 Select General 3 Select the items to be set 4 Select Save SCREENS FOR GENERAL SETTINGS On this...

Page 336: ...anged See Unit of measurement on page 340 6 On or Off can be selected for selection sounds 7 On or Off can be selected for pointer sounds 8 On or Off can be selected for error sounds 9 The strength of...

Page 337: ...the Setup screen 3 Select On or Off and then select Save On The rear passengers cannot oper ate the rear seat entertainment system Only front passengers can operate the system Off Both the front and r...

Page 338: ...be changed 1 Push the MENU button and select Setup 2 Select General on the Setup screen 3 Select Unit of Measurement 4 Select Kilometer or Mile 5 Select Save INFORMATION This function is available onl...

Page 339: ...n 3 Select Feedback Force 4 Select or 5 Select OK Selecting the pointer shape Pointer shape can be changed 1 Push the MENU button and select Setup 2 Select General on the Setup screen 3 Select Pointer...

Page 340: ...te personal data The following personal data can be de leted or returned to their default settings Maintenance conditions Maintenance information off setting Address book Areas to avoid Previous point...

Page 341: ...tup screen 3 Select Delete Personal Data 4 Select Delete 5 Select Yes Used for changing time zones and the on off settings of daylight saving time U4001LS 1 Push the MENU button and select Setup U1000...

Page 342: ...On or Off can be selected for daylight savings time 3 On or Off can be selected for automatic adjustment of the clock Time zone A time zone can be selected and GMT can be set 1 Push the MENU button a...

Page 343: ...et the time forward one hour and to set the time back one hour Minutes Select to set the time forward one minute and to set the time back one minute Minutes 00 Rounds to the nearest hour e g 1 00 to 1...

Page 344: ...to On or Off 4 Voice recognition talkback can be set to On or Off 5 When On is selected the voice command system can be oper ated without pressing the talk switch more than once 6 When using the traff...

Page 345: ...ic voice guidance You can receive congestion information through voice guidance while being guided to your destination To turn the Traffic Voice Guidance on 1 Push the MENU button and select Setup 2 S...

Page 346: ...eaker 4 Select Center or Driver 5 Select Save Points or areas on the map can be register ed On this screen the following operations can be performed No Function 1 Sets home See page 115 2 Sets preset...

Page 347: ...isplayed screen contents and POI icon categories can be set U4001LS 1 Push the MENU button and select Setup U4002LS 2 Select Navi 3 Select Detailed Navi Settings 4 Select the items to be set 5 Select...

Page 348: ...or seasonally restricted roads 5 When On is selected freely flowing traffic can be shown with the arrow No Function 6 Displayed POI icon categories can be set See POI category change Select POI icons...

Page 349: ...eds for Residential Main Streets and Freeways To set the default speeds select De fault 6 After setting of the desired speeds is completed select Save INFORMATION The displayed time to the destina tio...

Page 350: ...Select On of the Auto Avoid Traf fic 5 Select Save When congestion information about the guidance route has been received a screen will appear to ask you whether to reroute to avoid the congestion If...

Page 351: ...the Traffic Information indi cator is dimmed Auto Avoid Traf fic Traffic Voice Guidance and Show Free Flowing Traffic will not operate POI category change Select POI icons Select from among the 6 ico...

Page 352: ...ayout function Off function Each screen buttons and current street name on the map screen can be displayed or hidden 1 Push the MENU button and select Setup 2 Select Navi on the Setup screen 3 Select...

Page 353: ...elect Calibration 5 Select the desired button INFORMATION For additional information on the ac curacy of a current vehicle position see Limitations of the navigation system on page 415 POSITION DIRECT...

Page 354: ...on will adjust the miscalculation caused by the circumference difference between the old and new tires If this procedure is not performed when the tires are replaced the current vehicle position mark...

Page 355: ...3 Select Detailed Navi Settings on the Navigation Settings screen 4 Select Pop up Information 5 Select On or Off 6 Select Save When the Pop up Information is turned off the following messages will no...

Page 356: ...wing pages for each setting You can adjust the voice and ring vol ume 1 Select Volume 2 Change each setting according to the following procedures 3 When you complete all settings se lect Save Automati...

Page 357: ...oice Volume 2 Select or to adjust the voice volume 3 Select OK Ring volume setting 1 Select Ring Volume 2 Select or to adjust the ring volume 3 Select OK Initializing the settings You can initialize t...

Page 358: ...o the following pages for each setting Registering a Bluetooth phone 1 Select add new to register your cellular phone to the system 2 When this screen is displayed input the passcode displayed on the...

Page 359: ...n the screen to try again When another Bluetooth device is connected When another Bluetooth device is cur rently connected this screen is displayed If you want to disconnect it select Yes INFORMATION...

Page 360: ...lowing way 1 Push the MENU button and select Setup 2 Select Phone 3 Select Manage Phone 4 Select Options 5 Select New Phone 6 Select empty to register your cellular phone to the system The following o...

Page 361: ...have not registered a Bluetooth phone yet Although you can register up to 4 Bluetooth phones in the system only one Bluetooth phone can function at a time 1 Select the phone to connect The Bluetooth m...

Page 362: ...ooth device is connected When another Bluetooth device is cur rently connected this screen is displayed If you want to disconnect it select Yes Setting the handsfree power You can select the state of...

Page 363: ...you change a device name the name registered in your cellular phone is not changed Device Address The address peculiar to the system You cannot change it If you have registered two Bluetooth phones w...

Page 364: ...SETUP 366 5 Use the software keyboard to input the device name 6 Confirm the device name and select OK Deleting a Bluetooth phone 1 Select Options 2 Select Remove Phones...

Page 365: ...ill be deleted at the same time By voice recognition You can operate Connect Phone by giv ing a command Connect Phone includes Select Phone Add New Phone and Handsfree Power Off On The operating proce...

Page 366: ...onebook Settings screen 1 Push the MENU button and select Setup 2 Select Phone 3 Select Phonebook Please do each setting from this screen Setting the phonebook is accessed from the Contacts screen 1 P...

Page 367: ...r You can transfer the phone numbers in your Bluetooth phone to the system The phonebook manages a maximum of 4 phonebooks in all Up to 1000 per son s data up to 3 numbers a person can be registered i...

Page 368: ...PP service you can not use this function If your phone supports PBAP service you can transfer the phonebook data without operating your phone If your phone does not support PBAP ser vice you must tran...

Page 369: ...oth audio will disconnect during transfer on phonebook data In this case it will reconnect auto matically when data transfer finish es It will not be reconnected de pending the phone you are using Reg...

Page 370: ...ou want to use the tone signal after the phone number input the tone signal too 4 Select the phone type 5 When two or less numbers in total are registered to this contact this screen is displayed When...

Page 371: ...ber in Phone 1 Phone 2 and Phone 3 separately 1 Select Edit Contacts 2 Select the data you want to edit 3 Select Edit for the desired name or number 4 Edit the name or the number See Registering the p...

Page 372: ...4 Select the desired data from the list 5 Select Options 6 Select Edit Contact From Call History screen 1 Push the MENU button and select Info Phone 2 Select Phone 3 Select Call History 4 Select the...

Page 373: ...n delete the data When you release your car delete all your data on the system 1 Select Delete Contacts 2 Select the desired data or select Select All then select Delete You can select multiple data a...

Page 374: ...he MENU button and select Info Phone 2 Select Phone 3 Select Contacts 4 Select the desired data from the list 5 Select Options 6 Select Delete Contact 7 Select Yes INFORMATION When you delete a Blueto...

Page 375: ...Setup 2 Select Phone 3 Select Phonebook 4 Select Manage Speed Dials Please refer to the following pages for each setting You can also display the Speed Dials screen in the following way 1 Push the MEN...

Page 376: ...can register the desired phone number from phonebook Up to 18 numbers per phone can be registered 1 Select New Speed Dial 2 Select the data you want to register 3 Select the desired phone number 4 Se...

Page 377: ...you want to replace it 6 When this screen is displayed the operation is complete You can also register the speed dial in the following ways From Speed Dial screen 1 Push the MENU button and select Inf...

Page 378: ...ant to register 7 Select the desired phone number From Contact Data screen 1 Push the MENU button and select Info Phone 2 Select Phone 3 Select Contacts 4 Select the desired data from the list 5 Selec...

Page 379: ...splayed The following operations are the same as the operation when you operate it from Setup screen Editing the speed dial You can edit the speed dial 1 Select Edit Speed Dials 2 Select the button yo...

Page 380: ...input the name 5 Select Save Deleting the speed dial You can delete the speed dial 1 Select Delete Speed Dials 2 Select the desired data or select Select All then select Delete You can select multipl...

Page 381: ...SETUP 383 3 Select Yes You can delete the call history 1 Select Delete Call History 2 Select the desired history to delete Deleting call history...

Page 382: ...e 4 Select Yes You can also delete the call history in the following way 1 Push the MENU button and select Info Phone 2 Select Phone 3 Select Call History 4 Select Delete 5 This screen is displayed Th...

Page 383: ...Select Phone 3 Select Phonebook 4 Select Manage Voice Tags Please refer to the following pages for each setting You can also display Voice Tags screen in the following way 1 Push the MENU button and s...

Page 384: ...Select REC and record a voice tag 4 Select Play to play the voice tag When you complete the voice tag registra tion select OK INFORMATION When you use the voice tag do not change the language setting...

Page 385: ...h the MENU button and select Info Phone 2 Select Phone 3 Select Contacts 4 Select the desired data from the list 5 Select Options 6 Select Set Voice Tag 7 This screen is displayed The following operat...

Page 386: ...screen is displayed The following operations are the same as the operation when you register the voice tag Deleting the voice tag 1 Select Delete Voice Tags 2 Select the desired data or select Select...

Page 387: ...wing items Device Name The name in the Bluetooth network You can change it Passcode The password when you regis ter your cellular phone in the system You can change it Device Address The address pecul...

Page 388: ...Bluetooth phone is automatically connected when the POWER switch is turned to ACCESSORY or ON mode When Handsfree Power is Off The Bluetooth phone is disconnected and the system will not connect to i...

Page 389: ...is screen is displayed and the Bluetooth audio will stop temporarily Editing the device name 1 Select Edit of Device Name 2 Use the software keyboard to input the device name INFORMATION The device na...

Page 390: ...Edit of Passcode 2 Input a passcode and select OK Initializing the Bluetooth settings You can initialize the settings 1 Select Default 2 Select Yes If the state of Handsfree Power is changed from Off...

Page 391: ...en is displayed and the Bluetooth audio will stop temporarily You can do the detail settings 1 Push the MENU button and select Setup 2 Select Phone 3 Select Details 4 Do each setting according to the...

Page 392: ...lect Incoming Call Display Mode 2 Select Full Screen or Drop Down Full Screen mode When a call is received the Hands free screen is dis played and you can operate it on the screen Drop Down mode The m...

Page 393: ...is in ACCESSORY or ON mode and the Bluetooth is automatically connected the connection check is displayed When Display Phone Status is On this status is displayed When Display Phone Status is Off thi...

Page 394: ...onnect can be selected The registered audio informa tion can be confirmed and edited Selecting a portable player If you register a second portable player either one can be selected for connec tion U40...

Page 395: ...n at a time Displaying Bluetooth information You can see or change the information of the portable player on the system Device Name The name of Bluetooth portable player which is displayed on the scre...

Page 396: ...ftware keyboard to input the device name Selecting Connection method The connection method can be se lected From Vehicle Connect the audio sys tem to the portable player From Portable Player Connect t...

Page 397: ...hen this screen is displayed enter the passcode displayed on the screen into the portable player For the operation of the portable player see the manual that comes with it If you want to cancel the en...

Page 398: ...ster and connect the Bluetooth phone first or a connection failure may occur when registering the Bluetooth audio a Removing a Bluetooth audio 1 Select Remove of Bluetooth Audio on BT Audio Settings s...

Page 399: ...TOMATICALLY Select On for Auto Bluetooth Connect to activate the automatic connection for the Bluetooth Always set it to this mode and leave the Bluetooth portable player in a condition where connecti...

Page 400: ...urned off you have to connect Bluetooth manu ally For the manual operation see page 249 c Changing the passcode The passcode for registering your por table player on the system You can change this to...

Page 401: ...ngs screen 2 Enter the new device name and se lect OK INFORMATION The device names are common Bluetooth audio and Bluetooth phone If you change the device name of the audio the device name of the phon...

Page 402: ...isplays when it is time to replace a part or certain compo nents See page 31 U4001LS 1 Push the MENU button and select Setup U10006LS 2 Select Vehicle 3 Select Maintenance Setting maintenance informat...

Page 403: ...setting on page 406 Reminder When this button is se lected the indicator is illuminated The system is set to give maintenance informa tion with the Information screen See page 31 When the vehicle nee...

Page 404: ...ance Depending on driving or road con ditions the actual date and dis tance may differ from the stored date and distance in the system b Dealer setting It is possible to register a dealer in the sys t...

Page 405: ...8 Phone To set a telephone number See page 408 Delete Dealer To delete the dealer in formation displayed on the screen Enter To set the displayed dealer as a destination See Starting route guid ance o...

Page 406: ...8 directional button to move the cursor to the desired point on the map 3 Select OK The previous screen will be displayed To edit Phone telephone num ber 1 Select Edit of Phone 2 Enter the number usi...

Page 407: ...m any other operations while this message is displayed CAUTION When performing the customization procedure ensure that there is suffi cient ventilation in the vehicle and surrounding area If there is...

Page 408: ...Park Assist 4 Select the desired button 5 Select Save Setting an alert volume The alert volume can be adjusted 1 Push the MENU button and select Setup 2 Select Vehicle on the Setup screen 3 Select LEX...

Page 409: ...obstacle is detected during the intuitive parking as sist monitoring the warning appears on the right top of the screen Setting a display and tone indica tion Back sensors display and tone indication...

Page 410: ...M Sports and Stocks 1 Push the MENU button and select Setup U10007LS 2 Select Other On this screen the following functions can be performed No Function 1 Sets Lexus Insider See page 176 2 Sets XM spor...

Page 411: ...SETUP 413...

Page 412: ...SECTION 13 APPENDIX 414 APPENDIX Appendix Limitations of the navigation system 415 Map database information and updates 417 13...

Page 413: ...in a few seconds When your vehicle is receiving signals from the satellites the GPS mark ap pears at the top left of the screen The GPS signal may be physically ob structed leading to inaccurate vehic...

Page 414: ...tion see page 355 b Inappropriate route guidance may occur in the following cases When turning at an intersection off the designated route guidance If you set more than one destination but skip any of...

Page 415: ...orrect This system uses the maps of DENSO 2008 DENSO CORPORATION 2007 NAVTEQ All rights reserved 2007 Tele Atlas North America Inc All rights reserved This material is pro prietary and the subject of...

Page 416: ...ATABASE according and subject to the terms and conditions of this Agreement You shall not alter obscure or remove any copyright notices trademark notices or other restrictive legends relating to the D...

Page 417: ...S AGREEMENT OR YOUR USE OF THE DATABASE INCLUDING WITHOUT LIMITATION LOST PROFITS OR COSTS OF COVER LOSS OF USE OR BUSINESS INTERRUPTION OR THE LIKE REGARDLESS OF WHETHER THE PARTY WAS ADVISED OF THE...

Page 418: ...0330 The DATA BASE is 1984 2007 by Tele Atlas North America Inc ALL RIGHTS RE SERVED For purpose of any public disclosure provision under any federal state or local law it is agreed that the DATABASE...

Page 419: ...Post al Service The following trademarks and registrations are owned by the USPS United States Postal Service USPS and ZIP 4 TERMS AND CONDITIONS Personal Use Only You agree to use this Data together...

Page 420: ...ility fitness for a particular purpose usefulness use or results to be obtained from this Data or that the Data or server will be uninterrupted or error free Disclaimer of Warranty DENSO AND ITS LICEN...

Page 421: ...sing from or in connection with the Data provided to you hereunder Government End Users If the Data is being acquired by or on behalf of the United States government or any other entity seeking or app...

Page 422: ...ersonal Use Only You agree to use this information for solely personal non commercial purposes and not for service bureau time sharing or other similar purposes You may not modify the information or r...

Page 423: ...USER NOTICE The marks of companies displayed by this product to indicate business loca tions are the marks of their respective owners The use of such marks in this product does not imply any sponsor...

Page 424: ...button and select Info Phone U11001LS 2 Select Map Data Make sure the version of the database on this screen To display the disc coverage area select Map Data Coverage Confirm the cov ered area on the...

Page 425: ...APPENDIX 427...

Reviews: