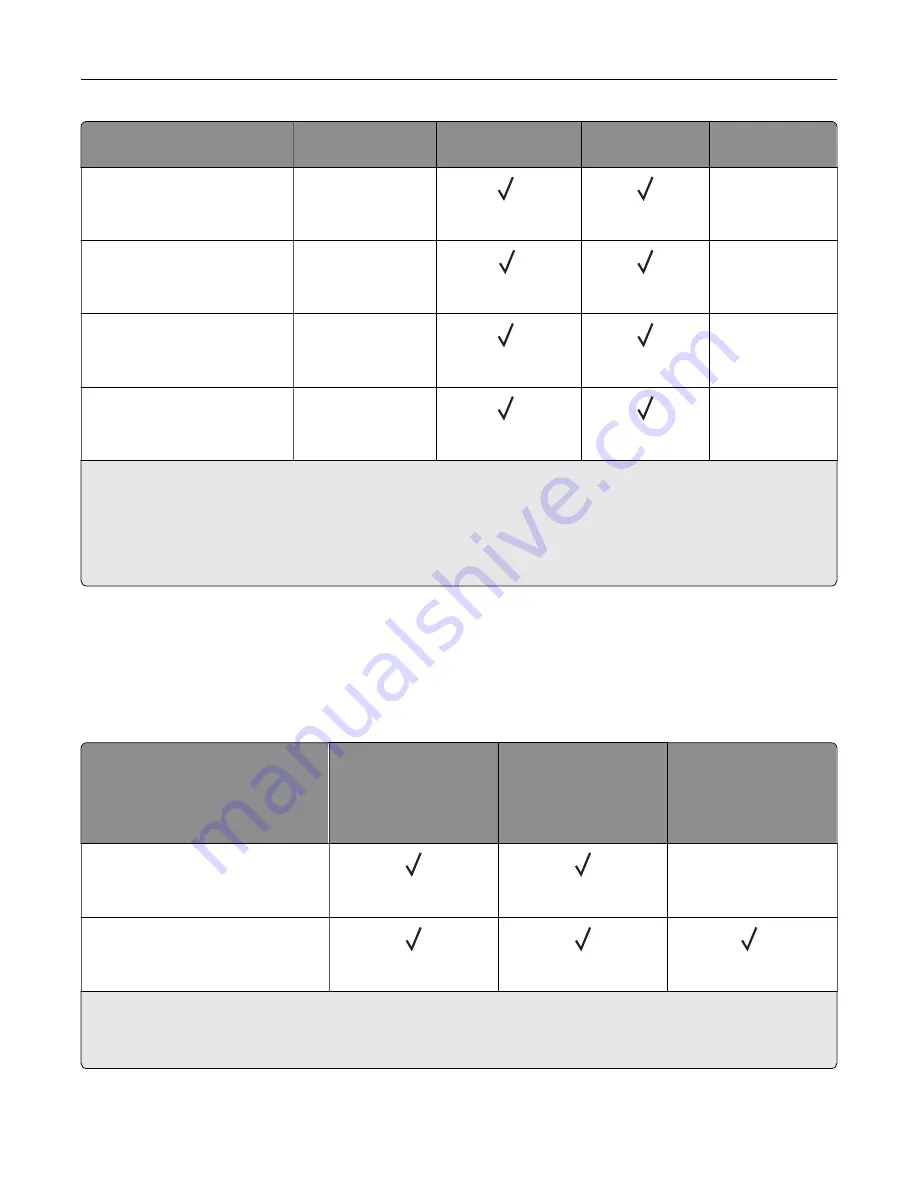
Paper size
Standard
520
‑
sheet tray
Multipurpose
feeder
Envelope tray
Two
‑
sided
printing
10 Envelope
104.8 x 241.3 mm
(4.12 x 9.5 in.)
X
2
X
B5 Envelope
176 x 250 mm
(6.93 x 9.84 in.)
X
1
X
C5 Envelope
162 x 229 mm
(6.38 x 9.01 in.)
X
2
X
DL Envelope
110 x 220 mm
(4.33 x 8.66 in.)
X
2
X
1
Loads only in short
‑
edge orientation.
2
Loads only in long
‑
edge orientation.
3
Supports paper sizes ranging from 139.7 x 181.86 mm (5.5 x 7.16 in.) to 296.93 x 431.8 mm (11.69 x 17 in.).
4
Supports paper sizes ranging from 88.9 x 98.38 mm (3.5 x 3.87 in.) to 296.93 x 482.6 mm (11.69 x 19 in.).
5
Supports paper sizes ranging from 128 x 139.7 mm (5 x 5.5 in.) to 296.93 x 482.6 mm (11.69 x 19 in.).
Notes:
•
The ADF supports paper sizes ranging from 125 x 85 mm (4.92 x 3.35 in.) to 297 x 431.8 mm (11.69 x
17 in.).
•
The flatbed scanner supports maximum paper size of 297 x 431.8 mm (11.69 x 17 in.).
Paper sizes supported by the optional trays
Paper size
Optional 520-sheet
tray, optional 520-
sheet tray with cabinet,
and optional 3 x 520-
sheet tray
Optional 2520-sheet
tandem tray
Optional 2000-sheet
tray
A3
1
297 x 420 mm
(11.69 x 16.54 in.)
X
A4
210 x 297 mm
(8.27 x 11.7 in.)
2
1
Loads only in short
‑
edge orientation.
2
Loads only in long
‑
edge orientation.
3
Supports paper sizes ranging from 139.7 x 181.86 mm (5.5 x 7.16 in.) to 296.93 x 431.8 mm (11.69 x 17 in.).
Learn about the printer
18
Summary of Contents for XC9325
Page 86: ...Set up install and configure 86 ...
Page 87: ...6 Remove the standard tray Set up install and configure 87 ...
Page 90: ...11 Secure the rear part of the optional tray to the printer Set up install and configure 90 ...
Page 94: ...Set up install and configure 94 ...
Page 95: ...6 Remove the standard tray Set up install and configure 95 ...
Page 98: ...11 Secure the rear part of the optional tray to the printer Set up install and configure 98 ...
Page 102: ...Set up install and configure 102 ...
Page 103: ...6 Remove the standard tray Set up install and configure 103 ...
Page 106: ...11 Secure the rear part of the optional tray to the printer Set up install and configure 106 ...
Page 110: ...6 Install the optional tray Set up install and configure 110 ...
Page 111: ...7 Connect the tray connector to the printer Set up install and configure 111 ...
Page 125: ...Installing the working shelf 1 Turn off the printer Set up install and configure 125 ...
Page 134: ...Set up install and configure 134 ...
Page 142: ...12 Close the front door 13 Attach the finisher to the printer Set up install and configure 142 ...
Page 270: ...10 Insert the waste toner bottle until it clicks into place Maintain the printer 270 ...
Page 274: ...7 Insert the new waste toner bottle until it clicks into place Maintain the printer 274 ...
Page 278: ...Maintain the printer 278 ...
Page 282: ...11 Insert the waste toner bottle until it clicks into place Maintain the printer 282 ...
Page 283: ...12 Lock the waste toner bottle 13 Close the door Maintain the printer 283 ...
Page 285: ...3 Insert the new tray insert Maintain the printer 285 ...
Page 287: ...3 Unlock the used fuser Maintain the printer 287 ...
Page 289: ...7 Lock the new fuser 8 Close the door 9 Turn on the printer Maintain the printer 289 ...
Page 291: ...3 Remove the used transfer roller 4 Unpack the new transfer roller Maintain the printer 291 ...
Page 293: ...Replacing the transfer module 1 Turn off the printer Maintain the printer 293 ...
Page 296: ...5 Unlock and then pull out the used transfer module Maintain the printer 296 ...
Page 299: ...10 Insert the waste toner bottle until it clicks into place Maintain the printer 299 ...
Page 300: ...11 Lock the waste toner bottle 12 Turn on the printer Maintain the printer 300 ...
Page 301: ...Replacing the tray roller kit 1 Turn off the printer Maintain the printer 301 ...
Page 303: ...4 Unpack the new tray roller kit Maintain the printer 303 ...
Page 306: ...s 3 Remove the separator roller cover Maintain the printer 306 ...
Page 311: ...4 Insert the new printhead wiper 5 Close the door Maintain the printer 311 ...
Page 312: ...Replacing the 2000 sheet tray roller kit 1 Turn off the printer Maintain the printer 312 ...
Page 314: ...4 Locate and remove the used roller kit 5 Unpack the new roller kit Maintain the printer 314 ...
Page 328: ... ADF glass Scanner glass 3 Close the scanner cover Maintain the printer 328 ...
Page 329: ...Cleaning the tray roller kit 1 Turn off the printer Maintain the printer 329 ...
Page 333: ...Cleaning the ADF roller kit 1 Turn off the printer Maintain the printer 333 ...
Page 334: ...2 Open the ADF top cover 3 Remove the separator roller cover Maintain the printer 334 ...
Page 338: ...Cleaning the 2000 sheet tray roller kit 1 Turn off the printer Maintain the printer 338 ...
Page 379: ...Troubleshoot a problem 379 ...


