Print Quality Test Pages
Cleaning the Scanner
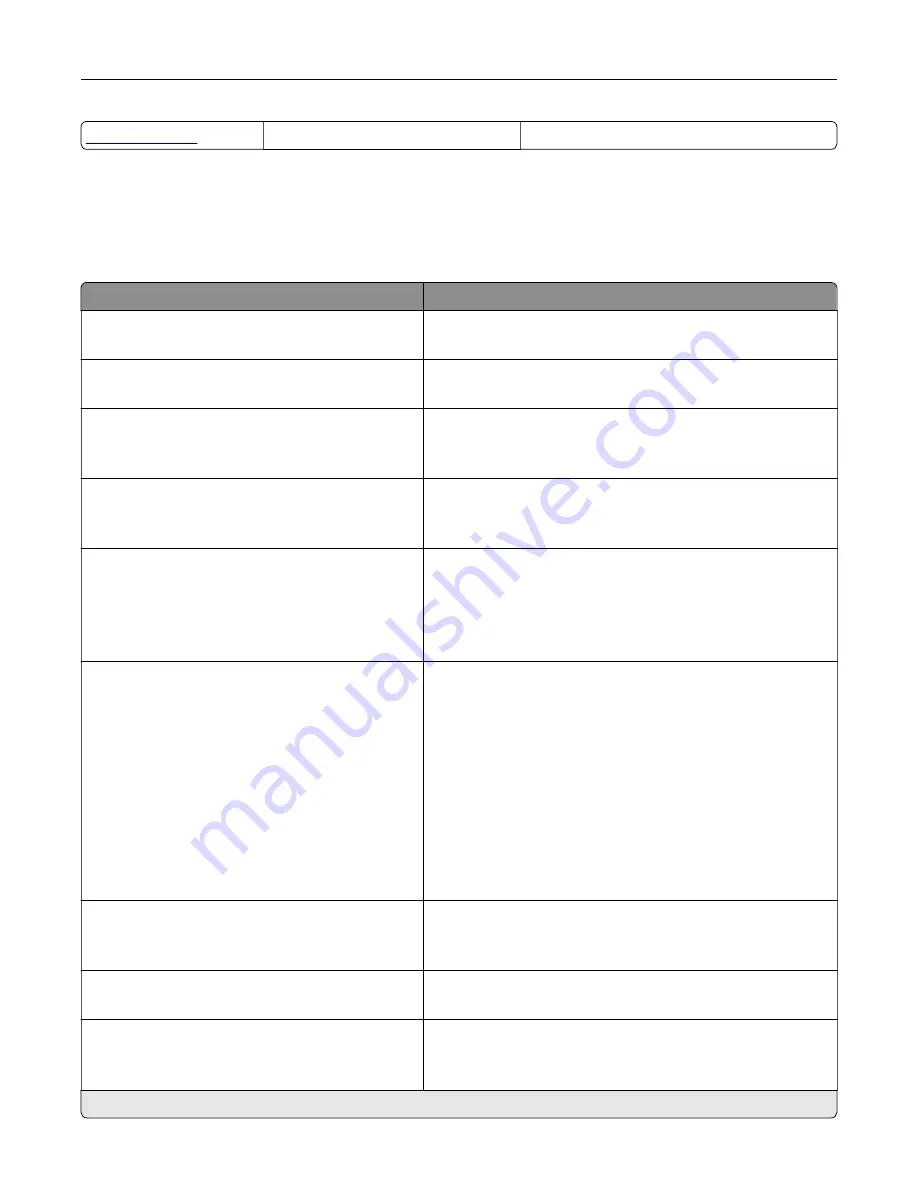
Device
Preferences
Menu item
Description
Display Language
[List of languages]
Set the language of the text that appears on the display.
Country/Region
[List of countries or regions]
Identify the country or region where the printer is configured
to operate.
Run initial setup
Off*
On
Run the setup wizard.
Keyboard
Keyboard Type
[List of languages]
Select a language as a keyboard type.
Note:
All the Keyboard Type values may not appear or may
require special hardware to appear.
Displayed information
Display Text 1 (IP Address*)
Display Text 2 (Date/Time*)
Custom Text 1
Custom Text 2
Specify the information to appear on the home screen.
Date and Time
Configure
Current Date and Time
Manually Set Date and Time
Date Format (MM
‑
DD
‑
YYYY*)
Time Format (12 hour A.M./P.M.*)
Time Zone (UTC
‑
5:00*)
Network Time Protocol
Enable NTP (On*)
NTP Server
Enable Authentication (None*)
Configure the printer date and time and network time protocol.
Paper Sizes
U.S.*
Metric
Specify the unit of measurement for paper sizes.
Note:
The country or region selected in the initial setup
wizard determines the initial paper size setting.
Screen Brightness
20–100% (100*)
Adjust the brightness of the display.
Flash Drive Access
Disabled
Enabled*
Enable access to the flash drive.
Note:
An asterisk (*) next to a value indicates the factory default setting.
Use printer menus
177
Summary of Contents for XC9325
Page 86: ...Set up install and configure 86 ...
Page 87: ...6 Remove the standard tray Set up install and configure 87 ...
Page 90: ...11 Secure the rear part of the optional tray to the printer Set up install and configure 90 ...
Page 94: ...Set up install and configure 94 ...
Page 95: ...6 Remove the standard tray Set up install and configure 95 ...
Page 98: ...11 Secure the rear part of the optional tray to the printer Set up install and configure 98 ...
Page 102: ...Set up install and configure 102 ...
Page 103: ...6 Remove the standard tray Set up install and configure 103 ...
Page 106: ...11 Secure the rear part of the optional tray to the printer Set up install and configure 106 ...
Page 110: ...6 Install the optional tray Set up install and configure 110 ...
Page 111: ...7 Connect the tray connector to the printer Set up install and configure 111 ...
Page 125: ...Installing the working shelf 1 Turn off the printer Set up install and configure 125 ...
Page 134: ...Set up install and configure 134 ...
Page 142: ...12 Close the front door 13 Attach the finisher to the printer Set up install and configure 142 ...
Page 270: ...10 Insert the waste toner bottle until it clicks into place Maintain the printer 270 ...
Page 274: ...7 Insert the new waste toner bottle until it clicks into place Maintain the printer 274 ...
Page 278: ...Maintain the printer 278 ...
Page 282: ...11 Insert the waste toner bottle until it clicks into place Maintain the printer 282 ...
Page 283: ...12 Lock the waste toner bottle 13 Close the door Maintain the printer 283 ...
Page 285: ...3 Insert the new tray insert Maintain the printer 285 ...
Page 287: ...3 Unlock the used fuser Maintain the printer 287 ...
Page 289: ...7 Lock the new fuser 8 Close the door 9 Turn on the printer Maintain the printer 289 ...
Page 291: ...3 Remove the used transfer roller 4 Unpack the new transfer roller Maintain the printer 291 ...
Page 293: ...Replacing the transfer module 1 Turn off the printer Maintain the printer 293 ...
Page 296: ...5 Unlock and then pull out the used transfer module Maintain the printer 296 ...
Page 299: ...10 Insert the waste toner bottle until it clicks into place Maintain the printer 299 ...
Page 300: ...11 Lock the waste toner bottle 12 Turn on the printer Maintain the printer 300 ...
Page 301: ...Replacing the tray roller kit 1 Turn off the printer Maintain the printer 301 ...
Page 303: ...4 Unpack the new tray roller kit Maintain the printer 303 ...
Page 306: ...s 3 Remove the separator roller cover Maintain the printer 306 ...
Page 311: ...4 Insert the new printhead wiper 5 Close the door Maintain the printer 311 ...
Page 312: ...Replacing the 2000 sheet tray roller kit 1 Turn off the printer Maintain the printer 312 ...
Page 314: ...4 Locate and remove the used roller kit 5 Unpack the new roller kit Maintain the printer 314 ...
Page 328: ... ADF glass Scanner glass 3 Close the scanner cover Maintain the printer 328 ...
Page 329: ...Cleaning the tray roller kit 1 Turn off the printer Maintain the printer 329 ...
Page 333: ...Cleaning the ADF roller kit 1 Turn off the printer Maintain the printer 333 ...
Page 334: ...2 Open the ADF top cover 3 Remove the separator roller cover Maintain the printer 334 ...
Page 338: ...Cleaning the 2000 sheet tray roller kit 1 Turn off the printer Maintain the printer 338 ...
Page 379: ...Troubleshoot a problem 379 ...


