Lexmark x9350 User Manual Download Page 33

Learning about the printer

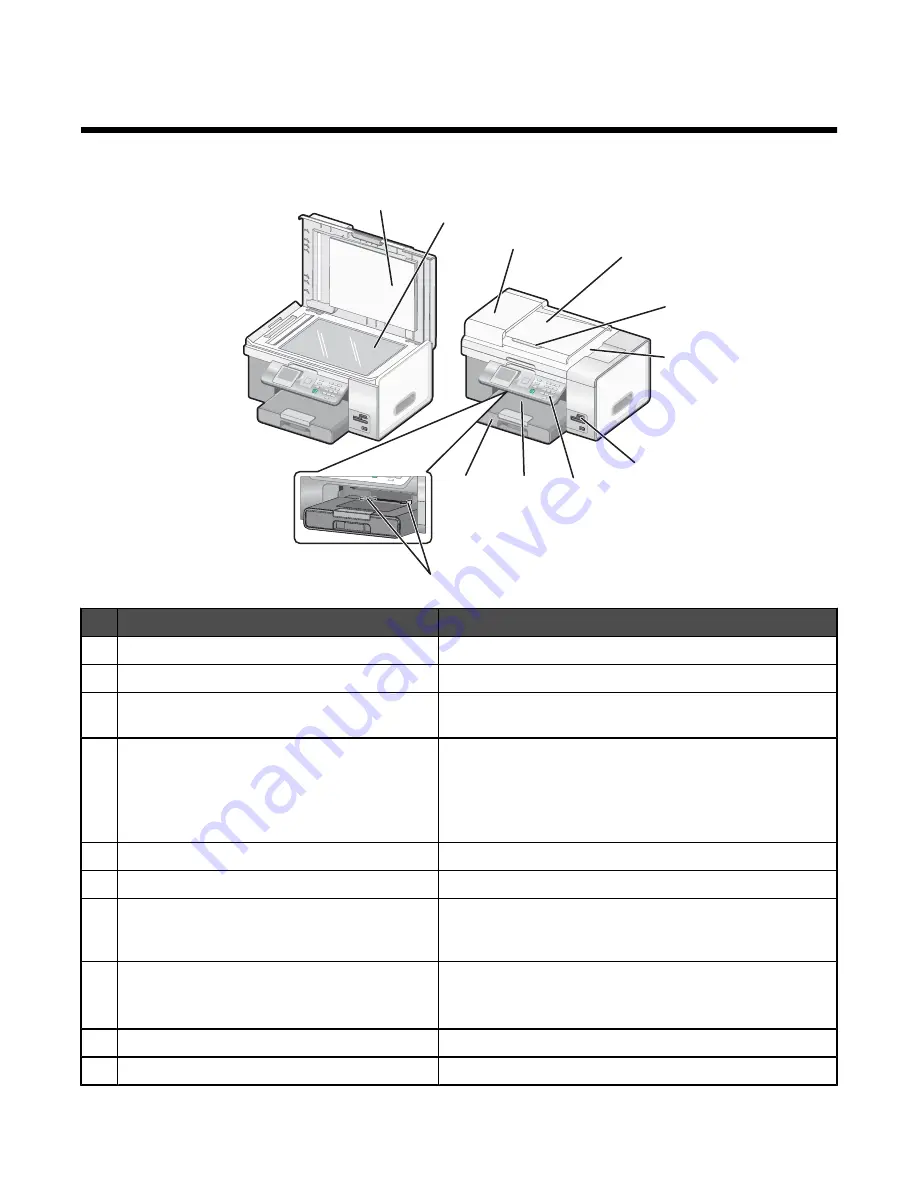
Understanding the parts of the printer

1

2

3

5

7

8

9

4

10

6

11

Use the

To

1

Top cover

Access the scanner glass.

2

Scanner glass

Copy, scan, fax, or remove an item.

3

Automatic Document Feeder (ADF)

Scan, copy, or fax multiple-page letter-, legal-, and A4-size
documents.

4

Automatic Document Feeder (ADF) tray

Load original documents in the ADF. Recommended for
scanning, copying, or faxing multiple-page documents.

Note: 

Do not load postcards, photos, small items, or thin

media (such as magazine clippings) into the ADF. Place
these items on the scanner glass.

5

Automatic Document Feeder (ADF) paper guide Keep paper straight when feeding into the ADF.

6

Automatic Document Feeder (ADF) output tray

Hold documents as they exit from the ADF.

7

Memory card slots and PictBridge port

Insert a memory card or connect a PictBridge-enabled digital
camera. For more information on memory card slots and the
PictBridge port, see the following illustration.

8

Control panel

Operate the printer.

For more information, see “Using the control panel” on
page 37.

9

Paper exit tray

Hold paper as it exits.

10

Paper tray (Tray 1)

Load paper.


33

Summary of Contents for x9350

Page 1: ...k with diamond design are trademarks of Lexmark International Inc registered in the United States and or other countries All other trademarks are the property of their respective owners 2006 Lexmark International Inc All rights reserved 740 West New Circle Road Lexington Kentucky 40550 ...

Page 2: ...global safety standards with the use of specific Lexmark components The safety features of some parts may not always be obvious Lexmark is not responsible for the use of other replacement parts CAUTIONS Do not place or use this product near water or wet locations Do not set up or use this product or make any electrical or cabling connections such as the power cord or telephone during a lightning s...

Page 3: ...odem 26 Networking the printer 28 Installing network printers 28 Networking the printer 28 Installing the printer on a network 28 Installing the printer on additional network computers 28 Using a wireless network connection 28 Using an Ethernet connection 29 Shared printing 29 Tips for installing a network printer 30 Assigning an IP address 30 Finding your MAC address 31 Finding a printer print se...

Page 4: ...ubmenu 59 Using the Change Bluetooth Default Settings submenu 59 Using the Change PictBridge Default Settings submenu 59 Printing the Print Settings List 60 Using the Network Setup submenu 60 Using the Maintenance menu 62 Learning about the software 64 Using the printer software 64 Using the Productivity Suite 64 Using the All In One Center 65 Opening the All In One Center 65 Using the Scanning Co...

Page 5: ...96 Working with photos 98 Retrieving and managing photos 98 Inserting a memory card 98 Inserting a flash drive 99 Transferring photos from a memory device to a computer using Fast Pics 100 Transferring photos from a memory device to the computer using the control panel 100 Printing photos using the control panel 101 Viewing or printing photos 101 Editing a photo before printing 102 Viewing a slide...

Page 6: ...ges for e mailing 121 Scanning text for editing 121 Scanning images for editing 122 Scanning clear images from magazines or newspapers 122 Scanning to a computer over a network 122 Canceling a scan job 123 Faxing 125 Sending a fax 125 Entering a fax number 125 Sending a fax using the control panel 127 Sending a fax using the computer 128 Sending a broadcast fax at a scheduled time 128 Sending a fa...

Page 7: ...ving print quality 144 Aligning print cartridges 144 Cleaning the print cartridge nozzles 145 Wiping the print cartridge nozzles and contacts 145 Preserving the print cartridges 146 Cleaning the scanner glass 147 Ordering supplies 147 Removing the printer from the Tray 2 base 147 Using genuine Lexmark print cartridges 148 Refilling a print cartridge 148 Recycling Lexmark products 148 Troubleshooti...

Page 8: ... not receive faxes 163 Can receive but not send faxes 164 Printer receives a blank fax 165 Received fax has poor print quality 165 Caller ID information is not displayed 166 Jams and misfeeds troubleshooting 166 Paper jam in the printer 166 Paper jam in the Automatic Document Feeder ADF 167 Paper jam in the duplex unit 168 Paper jam in Tray 1 or optional Tray 2 169 Paper jam in the small media fee...

Page 9: ...Notices 186 Edition notice 186 Power consumption 192 Index 193 9 ...

Page 10: ...10 ...

Page 11: ...ng up hardware and software on Windows operating systems and some basic instructions for using the printer Note If your printer supports Macintosh operating systems see the Mac Help 1 From the Finder desktop double click the Lexmark 9300 Series folder 2 Double click the printer Help icon The Setup Solutions booklet tells you how to solve printer setup problems Note These documents do not ship with...

Page 12: ...nstalled 1 Click Start ª Programs or All Programs ª Lexmark 9300 Series 2 Click View Lexmark s User s Guide If the link to the User s Guide is not on your desktop follow these instructions 1 Insert the CD The installation screen appears Note If necessary click Start ª Run and then type D setup where D is the letter of your CD ROM drive 2 Click User s Guide You can also find this document on the Le...

Page 13: ...pport varies by country or region and may not be available in some instances Visit our Web site at www lexmark com Select a country or region and then select the Customer Support link Note For additional information about contacting Lexmark see the printed warranty that shipped with your printer Limited Warranty Description Where to find US Where to find rest of world Limited Warranty Information ...

Page 14: ... the back of the printer Your power cord may look differently from the one shown 5 Temporary wireless configuration cable Use for wireless setup of the printer Note If you are connecting the printer using a wired network setup you use a network cable that you purchase separately A network cable is sometimes called an Ethernet cable 6 Setup Guides Instructions on setting up the printer for Windows ...

Page 15: ...tions apply only if you received one or more additional language control panels with the printer 1 Lift the scanner unit 2 Grasp the control panel at the front Lift and rotate it back to remove it if one is installed 1 2 3 Choose the correct control panel for your language 4 Align the tabs on the control panel with the holes on the printer The control panel is at an angle 15 ...

Page 16: ...ou can tilt the control panel display to adjust it for easier viewing 1 Place your finger in the finger groove to grasp the display from its underside 2 Rotate the display forward to a comfortable viewing position Installing the optional Tray 2 You can purchase and install an optional Tray 2 to increase the paper loading capacity of the printer 16 ...

Page 17: ...o allow enough space 1 Make sure the printer is turned off and disconnect the power cord from the wall outlet 2 Remove Tray 2 from its packaging 3 Remove any packaging tape from the base and tray 4 Grasp the printer by its handholds to lift it 5 Align the printer above the base 6 Set the printer on top of the base 17 ...

Page 18: ... following table to determine the best way to set up the printer Equipment Benefits See this section The printer A telephone cord Send and receive faxes without using a computer Connecting directly to a telephone wall jack on page 22 The printer A telephone Two telephone cords Use the fax line as a normal telephone line Send and receive faxes without using a computer Connecting to a telephone on p...

Page 19: ...edly until you reach Your Fax Name 10 Use the keypad to enter your name Spell out a name using the numbers associated with each letter as you would on a telephone or cell phone 11 Press to save the information and exit Using an RJ11 adapter Country region United Kingdom Ireland Finland Norway Denmark Italy Sweden Netherlands France Portugal To connect your printer to an answering machine telephone...

Page 20: ...pment 1 Remove the plug from the EXT port on the back of the printer Note Once this plug is removed any country or region specific equipment you connect to the printer by the adapter as shown will not function properly 2 Connect your telecommunications equipment directly to the EXT port on the back of the printer Warning Do not touch cables or the printer in the area shown while actively sending o...

Page 21: ...nter 1 Remove the plug from the back of the printer 2 Connect your telecommunications equipment directly to the EXT port on the back of the printer Note Once this plug is removed any country or region specific equipment that you connect to the printer by the adapter as shown will not function properly Country region Germany Austria Switzerland There is a plug installed in the EXT port of the print...

Page 22: ... LINE port of the printer 3 Connect the other end of the telephone cord into an active telephone wall jack Connecting directly to a telephone wall jack in Germany Connect the printer directly to a telephone wall jack to send and receive faxes without using a computer Note In Germany and some other countries the printer ships with a special RJ 11 plug in the EXT port Do not remove the RJ 11 plug It...

Page 23: ...hone line not provided between the answering machine and the other N slot of the telephone wall jack Connecting to a telephone Connect a telephone to the printer to use the fax line as a normal telephone line Then set up the printer wherever your telephone is located to make copies or to send and receive faxes without using a computer Note Setup steps may vary depending on your country or region F...

Page 24: ... wall jack 3 Remove the protective plug from the EXT port of the printer 4 Connect the other telephone cord to a telephone and then plug it into the EXT port of the printer Connecting to an answering machine Connect an answering machine to the printer to receive both incoming voice messages and faxes 24 ...

Page 25: ...e 19 1 Make sure you have the following A telephone An answering machine Three telephone cords A telephone wall jack 2 Connect one telephone cord into the LINE port of the printer and then plug it into an active telephone wall jack 3 Remove the protective plug from the EXT port of the printer 4 Connect a second telephone cord from the telephone to the answering machine 25 ...

Page 26: ...plication Note Setup steps may vary depending on your country or region For more information on connecting the printer to telecommunications equipment see Using an RJ11 adapter on page 19 1 Make sure you have the following A telephone A computer with a modem Three telephone cords A telephone wall jack 2 Connect a telephone cord into the LINE port of the printer and then plug it into an active tele...

Page 27: ...protective plug from the EXT port of the printer 4 Connect a second telephone cord from the telephone to the computer modem 5 Connect a third telephone cord from the computer modem to the EXT port of the printer 27 ...

Page 28: ...twork printer for use with multiple computers on the network you must repeat the connection steps for each computer you want to print to the printer Repeat the steps for Using an Ethernet connection on page 29 Using a wireless network connection on page 28 or Shared printing on page 29 depending on the networking method you have chosen Notes You do not need to reconnect the printer with the USB ca...

Page 29: ...tallation Note If your printer is already installed you need to uninstall and then reinstall it Using an Ethernet connection 1 Make sure the printer is turned off 2 Connect the Ethernet cable from the printer to the network router and then turn the printer on 3 Insert the printer software CD 4 Select the Network Installation option 5 Select I agree to the terms of this License Agreement and then c...

Page 30: ...ick Finished j From the computer access the Printers folder k Right click the printer icon l Click Properties m Click the Ports tab n Click Add Ports o From the list click Local Port p Click New port and enter the shared name of the printer as server share q Click OK on any screens shown until you exit Properties r Disconnect the USB cable from the printer and client computer Move the printer back...

Page 31: ...he computer If the printer and print server are located on another network called a subnet you must manually enter an IP address during printer software installation Wireless troubleshooting Network key is invalid on page 31 Printer is unable to join the network on page 31 Printer is configured correctly but cannot be found on the network on page 31 Network printer does not print on page 32 Networ...

Page 32: ... page 32 The printer to be configured does not appear in the list of printers found on your network Check power Make sure the printer is connected to a power source and is turned on For more information see Power button is not lit on page 151 Check Ethernet connection If you are using a print server 1 Check the Ethernet cable for any obvious damage 2 Firmly plug one end of the Ethernet cable into ...

Page 33: ... small items or thin media such as magazine clippings into the ADF Place these items on the scanner glass 5 Automatic Document Feeder ADF paper guide Keep paper straight when feeding into the ADF 6 Automatic Document Feeder ADF output tray Hold documents as they exit from the ADF 7 Memory card slots and PictBridge port Insert a memory card or connect a PictBridge enabled digital camera For more in...

Page 34: ... purchased separately MS XD SD MMC CF MD PictBridge 1 2 3 4 5 Slot name 1 Memory Stick MS 2 xD Picture Card 3 Secure Digital MultiMedia card SD MMC 4 CompactFlash Microdrive CF MD 5 PictBridge port for connecting a PictBridge enabled digital camera a flash drive or a Bluetooth adapter to the printer If you purchased and installed the optional Tray 2 your fully assembled printer appears as follows ...

Page 35: ...1 2 1 Tray 2 base 2 Optional Tray 2 3 4 5 6 8 1 2 7 Use the To 1 Scanner unit Access the print cartridges 2 Print cartridge carrier Install replace or remove the print cartridges 35 ...

Page 36: ...nect additional devices such as a data fax modem telephone or answering machine to the printer This connection method may not be available in all countries or regions Note Remove the plug to access the port 5 Ethernet port Connect your computer to another computer a local network or an external DSL or cable modem 6 USB port Connect the printer to a computer using a USB cable 7 Duplex unit Print on...

Page 37: ...uttons and menus Using the control panel The control panel contains Power on off button 60 96 mm 2 4 inch display capable of showing color graphics 22 buttons The following diagrams explain the sections of the control panel 37 ...

Page 38: ...the printer has wireless mode enabled 2 Display Shows Printer status Messages Menus 3 Finger groove Lets you reach under the display in order to adjust it to a comfortable viewing position 4 Use to Turn the printer on and off Stop the print copy scan or fax process 38 ...

Page 39: ...e display Increase a number within the setting displayed In Photo mode right scroll to the next photo In Photo mode or Scan mode move the Region of Interest box to the right 4 Move downward through a submenu listing within a menu In Photo mode decrease the number copies of a photo you want to print In Photo mode or Scan mode move the Region of Interest box down 5 Scroll through menus submenus or s...

Page 40: ...te You must press to save the values you specified in the control panel menus before the printer timeouts and looses any value changes you made 3 Cancel a print copy scan or fax job in progress Clear a fax number or end a fax transmission and return to the fax default screen Exit a menu or submenu and return to the default copy scan fax or photo card screen Clear current settings or error messages...

Page 41: ...ax mode Press to redial the last number entered Display the last number dialed Press or to view the last five numbers dialed Insert a three second pause in the number to be dialed to wait for an outside line or get through an automated answering system Enter a pause only when you have already begun entering the number Navigating the control panel menus The main menu consists of these items Copy Ph...

Page 42: ...opy Mode menu to make additional changes Press repeatedly to return to previous menus Pressing in some submenus such as the Change Default Settings submenu causes the values you selected to be saved For more information see Understanding and using default settings on page 42 Understanding and using default settings Saved settings are called user default settings because you the user selected the v...

Page 43: ...avigation buttons and 5 If needed press repeatedly to return to the previous menu 6 Press to start the copy job The following table explains the function of each submenu or menu item in the Copy Mode menu Use this To Color Specify to print in Color or in Black White Copies Specify how many copies to print Reduce Enlarge Specify the percentage for enlarging or reducing a copy Quality Adjust the qua...

Page 44: ...is chosen press to save the values as default settings and exit this submenu Paper Handling submenu Use this To Size Specify the size of the paper loaded Appears when Tray 2 is not installed Type Specify the type of paper loaded Appears when Tray 2 is not installed Size Tray 1 Specify the size of the paper loaded in Tray 1 Appears when Tray 2 is installed Type Tray 1 Specify the type of paper load...

Page 45: ... settings or see a print preview To go into other submenus menu items and values to make additional changes continue to use the navigation buttons and Press repeatedly to return to the previous menu if needed 4 Press to start printing the photo job The following table explains the function of submenus menu items and values in the Photo Card Mode menu Menu item How to View Slideshow Press to start ...

Page 46: ...t of photo paper Thumbnails Prints an index page Press to adjust print settings for any of these menu items See Using print settings on page 46 for information on print settings Save Photos to Computer Save photos stored on a memory card or flash drive to the computer Press to start saving photos to your computer and follow more instructions on your computer screen Using print settings Print setti...

Page 47: ...see Editing photos on page 47 View Full Screen The photo previously selected appears on the full screen of the control panel display Change Print Settings Press for the Photo Print Settings menu For more information see Using print settings on page 46 Print Preview Lets you preview the photos before you print them It also shows the photos based on your choice of 1 Per Page through Thumbnails Press...

Page 48: ...ng Set tray linking off or to automatic on Copy Source1 Specify the source Tray 1 or Tray 2 for the job Photo Source1 Specify the source Tray 1 or Tray 2 for the job Print Files Source1 Specify the source Tray 1 or Tray 2 for the job Fax Source1 Specify the source Tray 1 or Tray 2 for the job PictBridge Source1 Specify the source Tray 1 or Tray 2 for the job Bluetooth Source1 Specify the source Tr...

Page 49: ...nal Tray 2 is installed See Paper Handling submenu on page 49 for more information Press to access menu items for the Change Default Settings submenu This submenu lets you specify values you want for each of the menu items in the Print Files Mode menu Once each value is chosen press to save the values as default settings and exit this submenu Menu items within Change Default Settings are Quality L...

Page 50: ...installed Using Fax and the Fax Mode menu To access and navigate 1 From the control panel press or repeatedly until Fax is highlighted 2 You can Enter the fax number in the open field and then press to send the fax or Press to access the Fax Mode menu to use more fax options or functions The Fax Mode menu appears 3 From the Fax Mode menu you can Press or repeatedly to scroll through the submenus o...

Page 51: ... for sending a fax Block faxes from the numbers you specify Once each value is chosen press to save the values as user default settings and exit Note The user default setting remains in effect until you access the menu again choose another value and save it An asterisk appears next to the user default setting Using Scan and the Scan Mode menu To access and navigate 1 From the control panel press o...

Page 52: ... for the Color Quality and Original Size menu items Press to enter the Scan Default Settings menu The menu items available are Color Quality and Original Size Once each value is chosen press to save the values as user default settings and exit Note The user default setting remains in effect until you access the menu again choose another value and save it An asterisk appears next to the user defaul...

Page 53: ...The Print Files Mode menu is automatically selected if you insert a device containing documents with no photos The Photo Card Mode menu is automatically selected if you insert a device containing photos The device may also contain documents but must contain photos Change Fax Default Settings Specify the values you want for each of the fax settings and save the values as the new user default settin...

Page 54: ...fy the size of the paper loaded in Tray 2 Type Tray 22 Specify the type of paper loaded in Tray 2 Tray Linking2 Set tray linking off or to automatic on Copy Source2 Specify the source Tray 1 or Tray 2 for the job Photo Source2 Specify the source Tray 1 or Tray 2 for the job Print Files Source2 Specify the source Tray 1 or Tray 2 for the job Fax Source2 Specify the source Tray 1 Tray 2 or Auto for ...

Page 55: ...on page 131 Speaker Volume Set the volume of the speaker during a call Values are Off Low and High Using the Change Copy Default Settings submenu 1 From the Setup menu press or repeatedly until Change Copy Default Setting is highlighted 2 Press 3 After changing values press to save these values and exit this submenu Use this To Color Specify to print in color or black and white Quality Specify to ...

Page 56: ...ality Specify a print quality For more information see Quality on page 55 Paper Handling Change settings related to the loading of paper in the paper tray or trays For more information see Using the Paper Handling submenu on page 54 Change Default Settings View the Print File Default Settings menu from which you can change the values for print quality and paper handling and save them as settings U...

Page 57: ...using the keypad numbers You spell out a name using the numbers associated with each letter as you would on a telephone or cell phone Group Search Search for a previously defined group and add it to a fax list Add Group Create a Group Name and select previously defined names to be added to the group Print List Print a list which has the name the fax number and the Speed Dial number of each person ...

Page 58: ...e Enter the name of the printer using the keypad This name is shown on the cover page of outgoing faxes Cover Page Choose whether or not to send a cover page with the outgoing fax Color Choose from values of Black White or Color Quality Choose from values of Standard Fine Superfine or Ultrafine Dial Method Choose from values of Touch tone Pulse or Behind PBX Dial Tone Detect Off Redial Time Choose...

Page 59: ...cknowledge that a Bluetooth enabled device is connected to the printer Choose between values of On or Off Security Choose low or high security Pass Key Define a pass key number similar to a password for the device Use the keypad numbers to enter the number Trusted Devices Clear All Clear all devices Press to clear the device table Device Name Enter the current device name value Use the keypad numb...

Page 60: ...List 1 From the Setup menu press or repeatedly until Print Settings List is highlighted 2 Press 3 Press to print a user default settings list which lists the setting in the printer the value it is set to and its factory default Using the Network Setup submenu The Network Setup submenu is listed only if an internal print server is installed 1 From the Setup menu press or repeatedly until Network Se...

Page 61: ...nt Note The Named value shown is based on current signal strength valued returned from the internal print server You cannot change the value TCP IP Menu Internet Protocol IP specifies the format of packets also called datagrams and the addressing scheme Most networks combine IP with a higher level protocol called Transmission Control Protocol TCP TCP enables two hosts to establish a connection and...

Page 62: ...aintenance is highlighted 2 Press The Maintenance menu appears The following table explains the function of each menu item in the Maintenance menu Use this To View Ink Levels See the current ink levels for both print cartridges a Press to start this task The Ink Levels screen appears to show you the ink levels of both cartridges b Press to return to the Maintenance menu Clean Cartridges Clean the ...

Page 63: ...unctioning properly The Test Page lists some information about the printer a Press to start this task The Test Page screen appears Wait for the Test Page to print or Press to stop printing b Use the Test Page to reference the information and then discard the sheet Reset Defaults Reset all of your previously defined user default settings to the factory default settings a Press to start this task Th...

Page 64: ...ridge enabled digital camera to the computer You can also print photos using the computer The Fax Solutions Software Adjust fax settings Using the Productivity Suite To open the Productivity Suite software use one of these methods Method 1 Method 2 From the desktop double click the Productivity Suite icon 1 Click Start ª Programs or All Programs ª Lexmark 9300 Series 2 Select Productivity Suite Cl...

Page 65: ...ve it on your computer as a PDF Learn more about what you can do with this software Find maintenance and troubleshooting information and tools to keep the printer working properly View a Web based tutorial Using the All In One Center Opening the All In One Center Use the All In One Center software to scan copy and fax documents or to print saved photos To open the All In One Center use one of thes...

Page 66: ... Lighten or darken copies Enlarge or reduce copies Note Click See More Copy Settings to view all settings Productivity Tools Print Repeat an image several times on one page Enlarge or reduce an image Print an image as a multiple page poster Print more than one page on a sheet of paper Share Fax an image or document E mail an image or document Save Save an image on the computer Save multiple photos...

Page 67: ...ail an image or document Edit Edit text found in a scanned document OCR Modify an image with a photo editor Note For more information about using the Saved Images tab click Help in the top center of the screen Using the Maintain Troubleshoot link The Maintain Troubleshoot link provides you with direct links to the Solution Center and the Fax Setup Utility 1 Click Start ª Programs or All Programs ª...

Page 68: ...int cartridges Troubleshooting Learn tips about the current status Solve printer problems View ink levels and order new print cartridges Maintenance Install a new print cartridge Note Wait until scanning is complete before installing a new print cartridge View shopping options for new cartridges Print a test page Clean to fix horizontal streaks Align to fix blurry edges Troubleshoot other ink prob...

Page 69: ...abs of the Printing Preferences software Print Setup and Advanced Tab Choices Print Setup Select a Quality Speed setting of Automatic Quick Normal or Best Select the Paper Options for paper size paper type and paper source Select portrait or landscape orientation Select to print in black and white instead of color Select to print a borderless copy Specify the number of copies to print Select to co...

Page 70: ...er of the screen You can reverse multiple changes 7 Click File ª Save as 8 Enter a file name and file type and then click Save From here You can Quick Fixes Reduce the red eye effect caused by light reflection Fix the photo with one click Colorize the image using antiquing or sepia tones Crop the image Rotate the image Flip the image Image Adjust Adjust the color depth Adjust the color balance Col...

Page 71: ... friendly versions of Web pages Note The Toolbar launches automatically when you browse the Web using Microsoft Windows Internet Explorer version 5 5 or later Click To Select Page Setup options Select Options to customize the toolbar appearance or select a different setting for printing photos Access links to the Lexmark Web site Access Help for additional information Uninstall the Toolbar Normal ...

Page 72: ...Save photos from a memory card or flash drive to the computer For more information see Transferring photos from a memory device to a computer using Fast Pics on page 100 Using the Fax Solutions Software Use this utility to adjust how faxes are sent and received When you save the settings they apply to every fax you send or receive You can also use this utility to create and edit the Speed Dial lis...

Page 73: ... To menu click on the item 4 If needed click the toolbar items to Click To Fax Send a fax Forward a fax View print or modify a fax Delete a fax Retry to send a fax Tools Access and use the Phonebook View several sample cover pages you can choose from View a fax history Change software preferences for fax lists Adjust fax settings Help Locate information on faxing fax settings and so on For informa...

Page 74: ...e when you adjust the paper guides 1 Pull Tray 1 completely out of the printer 2 Move the paper guides to the sides of Tray 1 1 2 3 Note If you are loading A4 or legal size paper squeeze the lever and pull to extend the tray It is unnecessary to extend the tray for paper sizes shorter in length than A4 or legal such as letter size paper When you pull the extension out the first stop accommodates A...

Page 75: ...1 2 A 4 L e g a l A 4 L e g a l 3 Load the paper 4 Adjust the paper guides to rest gently against the left right and bottom edges of the paper 2 3 1 5 Insert Tray 1 75 ...

Page 76: ...or legal size paper Do not try to force the tray in further 6 Flip up the paper exit tray stop to catch the paper as it exits Note If you loaded A4 or legal size paper pull the paper exit tray stop to extend it fully Loading envelopes or 10 x 15 cm 4 x 6 in photo paper in Tray 1 1 Pull Tray 1 completely out of the printer 76 ...

Page 77: ...osition envelopes or photo cards in the tray Note Do not mix paper types in the tray You can load either envelopes or photo cards but not both 4 Load envelopes or photo cards Note Load envelopes or photo cards with the print side facing down If you are not sure which side is the printable side see the instructions that came with the envelopes or photo cards 77 ...

Page 78: ...e envelopes or photo cards as they exit Note Envelopes and photos require more drying time Remove each envelope or photo as it exits and allow it to dry to avoid ink smudging Loading various paper types in Tray 1 Load up to Make sure 150 sheets of plain paper The paper is designed for use with inkjet printers The paper guides rest against the left right and bottom edges of the paper 78 ...

Page 79: ...gainst the left right and bottom edges of the paper 10 envelopes The envelopes are designed for use with inkjet printers The print side of the envelopes faces down with the flap to the left as shown You load the envelopes in the center of the tray as indicated by the icon Load them vertically and all the way to the back of Tray 1 You print the envelopes in landscape orientation The paper guides re...

Page 80: ...able strip each strip faces down toward Tray 1 The paper guides rest against the left right and bottom edges of the transparencies Note Transparencies require more drying time Remove each transparency as it exits and allow it to dry to avoid ink smudging 10 iron on transfers You follow the loading instructions that came with the iron on transfers The print side of the transfers faces you The paper...

Page 81: ...the paper guides as though you were loading legal size paper 4 Squeeze the lever and pull to extend the tray to legal size 5 Tear off only the number of pages needed to print the banner 6 Set the stack of pages in front of the printer 7 Slide the first sheet from the banner stack of pages over the Tray 1 handle Slide it all the way into the back of Tray 1 8 Send the job to print Using the small me...

Page 82: ...rect loading position for cards and envelopes 2 Load one card or envelope at a time between the paper guides Make sure the print side of the item faces down For envelopes place the flap side of an envelope faceup and on the left side as shown Loading the optional Tray 2 You can load Tray 2 with letter A4 or legal size paper You can load plain or photo paper types Note Do not load any other paper s...

Page 83: ...1 2 3 Note If you are loading A4 or legal size paper squeeze the lever and pull to extend the tray 1 2 A 4 L e g a l A 4 L e g a l 3 Load the paper 83 ...

Page 84: ...tly against the left right and bottom edges of the paper 2 3 1 5 Insert Tray 2 6 Flip up the paper exit tray stop to catch the paper as it exits Note If you loaded A4 or legal size paper pull the paper exit tray stop to extend it fully 84 ...

Page 85: ...ocument Feeder tray against the edges of the paper Automatic Document Feeder paper capacity Load up to Make sure 50 sheets of Letter paper A4 paper Legal size paper The document is loaded text side up The paper guide is against the edge of the paper 50 sheets of Custom paper Pre punched paper Reinforced edge copier paper Preprinted forms Letterhead paper The document is loaded text side up The pap...

Page 86: ... postcards small items thin items such as magazine clippings and three dimensional objects on the scanner glass instead of in the Automatic Document Feeder The maximum scan area for the scanner glass is 216 x 297 mm 8 5 x 11 7 in 1 Make sure the computer and the printer are on 2 Open the top cover 3 Place the original document facedown on the scanner glass in the upper left corner The arrows which...

Page 87: ...The paper sizes you can load are letter A4 or legal You can load plain or photo paper Notes If both trays do not have the same type of paper when they are linked a job could mistakenly print on the wrong paper type Never mix paper sizes or types in a tray Enabling tray linking 1 Load Tray 1 and Tray 2 with the same size and type of paper 2 From the control panel press or repeatedly until Setup is ...

Page 88: ...opy Source submenu is highlighted 15 Press or to specify the tray you want as the copy source 16 Press or repeatedly until the Photo Source submenu is highlighted 17 Press or to specify the tray you want as the photo source 18 Press or repeatedly until the Print Files Source submenu is highlighted 19 Press or to specify the tray you want as the source for printing files 20 Press or repeatedly unti...

Page 89: ... until Copy is highlighted 4 Press The Copy Mode menu appears 5 Press or repeatedly until you reach the Copies menu item 6 Press or repeatedly until the number of copies you want to print appears Note You can press at this point to start the copy job however if your document contains more than one page it is best to collate the printed pages so continue with the following steps 7 Press or repeated...

Page 90: ...t text and images or text only c Click Print or Close and continue to step 5 5 If needed select a print option from the Toolbar Normal Quick Black and White Text Only Printing photos or images from a Web page 1 Load paper For best results use photo or heavyweight matte paper with the glossy or printable side facing down If you are not sure which side is the printable side see the instructions that...

Page 91: ...he computer are on 2 Insert a memory card into a card slot or a flash drive into the PictBridge port The printer automatically switches to Print Files mode if there are only Microsoft Office files stored on the memory card or thumbdrive Only Microsoft Office files that have filename extensions DOC XLS and PPT are recognized Note The printer automatically switches to Photo Card mode if there are ph...

Page 92: ...er 2 With a document open click File ª Print 3 Click Properties Preferences Options or Setup 4 From the Print Setup tab select Print Last Page First 5 Click OK 6 Click OK or Print Printing multiple pages on one sheet 1 Load paper 2 With a document open click File ª Print 3 Click Properties Preferences Options or Setup 4 Click the Advanced tab 5 From the Layout drop down menu select N up 6 From the...

Page 93: ...ter or A4 6 Click OK 7 Click OK or Print Note To prevent smudging remove each transparency as it exits and let it dry before stacking Transparencies may require up to 15 minutes to dry Printing envelopes 1 Load envelopes in Tray 1 or one envelope in the small media feeder 2 From the software application click File ª Print 3 Click Properties Preferences Options or Setup The Print Setup tab appears ...

Page 94: ...rds and Normal for other types of cards Note If you are unsure select Automatic 5 Click the Advanced tab 6 From the Media Type list select Card Stock or one of the photo paper types listed 7 From the Paper Size list select the card size loaded 8 Select Portrait or Landscape orientation 9 Click OK 10 Click OK or Print Note To prevent smudging remove each card as it exits and let it dry before stack...

Page 95: ...ray 1 8 With your document open click File ª Print 9 Click Properties Preferences Options or Setup 10 Click the Advanced tab 11 From the Layout drop down menu select Banner 12 From the Banner Paper Size drop down menu select Letter Banner or A4 Banner 13 Click OK 14 Click OK or Print Printing on both sides of the paper duplexing When you select two sided printing duplexing the printer prints on bo...

Page 96: ...urn to single sided printing make sure 2 Sided printing is not selected Canceling a print job To cancel a print job using the control panel You must have started a print job from your computer to complete this task 1 Wait for the Printing screen to appear 2 Press The print job stops printing and the page ejects into the paper exit tray Note If the print job contained multiple pages loaded into the...

Page 97: ... a job to print the printer icon for the selected printer appears on the desktop 1 Double click the printer icon on the desktop A list of print jobs appears in the printer window 2 Select the print job requiring cancellation 3 Press the trash can button Canceling a job from a Macintosh computer running Mac OS X 1 Open ApplicationsªUtilities and then double click Print Center or Printer Setup 2 Dou...

Page 98: ...ere is an arrow on the card make sure it points toward the printer Make sure you connect the memory card to the adapter that came with it before inserting it into the slot 4 3 2 1 XD S D MMC 1 M S MS XD SD MMC CF MD PictBridge CF MD Slot Memory card 1 Memory Stick 2 xD Picture Card 3 Secure Digital Multi Media Card 4 Compact Flash Microdrive 2 Wait for the light located near the top memory slot on...

Page 99: ...ter may be necessary if your flash drive does not fit directly into the port 2 Wait for the printer to recognize that a flash drive is installed When the flash drive is recognized the message Storage Device Detected appears If the printer does not read the flash drive remove and reinsert it Warning Do not touch cables any network adapter the flash drive or the printer in the area shown while activ...

Page 100: ... data can occur Also do not remove a memory card or flash drive while actively printing reading or writing from a memory card or flash drive MS XD SD MMC CF MD PictBridge 5 Follow the instructions on the computer screen to specify where you want to save the images Transferring photos from a memory device to the computer using the control panel If the printer is connected directly to a computer you...

Page 101: ...Mode menu appears with View Slideshow highlighted 3 Press or repeatedly until Browse and Print Photos is highlighted 4 Press 5 Press or repeatedly to scroll through the photos on the memory card or flash drive 6 Press to select a photo for printing 7 Press or repeatedly until the number of copies you want to print appears 8 Press Note Only photos in JPG format can be directly printed from the memo...

Page 102: ...rint Photos is highlighted 5 Press 6 Press or repeatedly to scroll to the photo you want to edit 7 Press 8 Press The Photo Menu appears with Edit Photo highlighted 9 Press The menu items appear beside the photo you want to edit 10 Press or to highlight a menu item 11 Edit the photo settings Menu item To select an option Brightness a Press repeatedly to lighten the photo or press repeatedly to dark...

Page 103: ...ons that came with the paper 2 Insert a memory card or flash drive The message Memory Card Detected or Storage Device Detected appears briefly on the display 3 From the main menu make sure Photo is highlighted and then press The Photo Card Mode menu appears with View Slideshow highlighted 4 Press or repeatedly until Print All Photos is highlighted 5 Press 6 Press or repeatedly until the number of ...

Page 104: ... Press or repeatedly until Print Camera Selections is highlighted 5 Press 6 Press to display the DPOF selection you specified A preview of the print job appears 7 Press Using a PictBridge enabled digital camera to control printing photos You can connect a PictBridge enabled digital camera to the printer and use the buttons on the camera to select and print photos 1 Insert one end of the USB cable ...

Page 105: ...tos or images from a Web page see Printing photos or images from a Web page on page 90 Use advanced photo editing options see Using the Photo Editor on page 70 Printing photos stored on a memory device using Fast Pics 1 Load a stack of photo paper in Tray 1 or one sheet in the small media feeder Note Make sure to load the paper with the glossy or printable side facing down If you are not sure whic...

Page 106: ...anage Photos 5 Click Show Folders 6 From the directory select the folder where your photos are stored The photos contained on your memory card or flash drive appear on the Saved Images tab 7 From the Saved Images tab click each photo that you want to print 8 Click Hide Folders 9 Print an album page or print each photo on a separate sheet of photo paper To print an album page a From the Productivit...

Page 107: ...ect a page layout 10 Drag the photos onto the page Note Right click the photo on the page for editing options 11 Click Print Now Note To prevent smudging remove each sheet of paper as it exits and let it dry before stacking Adding text captions to a photo page 1 Load paper For best results use photo or heavyweight matte paper Make sure to load the paper with the glossy or printable side facing dow...

Page 108: ...Inserting a flash drive on page 99 The Fast Pics software launches automatically on your computer 3 From the Fast Pics dialog click Save Photos to PC 4 Select the photos you want to save 5 Click Next 6 Specify a folder location to save your photos 7 Click either Yes or No to erase files from the card after saving files to your computer 8 Click Save Now Wait for the photos to download to your compu...

Page 109: ...cify the number of copies the paper size the image position on page and whether to rotate the photo for a better fit 20 Click View All Printer Settings to make additional print adjustments if needed 21 Click OK 22 Click Print 109 ...

Page 110: ... information appears 3 If the printer does not read the Bluetooth adapter remove and reinsert it Warning Do not touch cables the Bluetooth adapter or the printer in the area shown while actively printing from the Bluetooth enabled device A loss of data can occur Also do not remove the Bluetooth adapter while actively printing from the Bluetooth enabled device MS XD SD MMC CF MD PictBridge Note The...

Page 111: ...pter 1 Load photo paper with the glossy or printable side facing down If you are not sure which side is the printable side see the instructions that came with the paper 2 Make sure that the Bluetooth Enable and Discovery Mode menu items on your printer control panel are set to On For more information see Setting the Bluetooth mode on page 110 3 Insert a Bluetooth adapter into the PictBridge port o...

Page 112: ...inted surface with your fingers or sharp objects For best results remove each printed sheet individually from the paper exit tray and allow the prints to dry at least 24 hours before stacking displaying or storing If a Bluetooth adapter is removed the printer detects that it is missing and the following message appears on the printer display for five seconds Bluetooth Dongle Disconnected 112 ...

Page 113: ...d the Copy Mode menu on page 43 Making a copy 1 Load paper 2 Load an original document faceup into the Automatic Document Feeder ADF or facedown on the scanner glass Note Do not load postcards photos small items transparencies photo paper or thin media such as magazine clippings into the Automatic Document Feeder ADF Place these items on the scanner glass 3 From the control panel press or repeated...

Page 114: ...ke the copy Note An asterisk next to a value for a menu item indicates a default setting Creating defaults for copying If you want to create a default setting or change an existing one 1 Press or repeatedly until the Change Default Settings submenu is highlighted 2 Press The Copy Default Settings menu appears This menu contains the same menu items as the Copy Mode menu but if you choose values in ...

Page 115: ...the number of copies Note To quickly enter the number of copies you can use the keypad numbers 7 Press to reach the Reduce Enlarge menu item Press or repeatedly until you reach the size you want for the copied photo 8 Press repeatedly to reach the Quality menu item 9 Press or repeatedly until Photo appears 10 Press repeatedly to reach the Content Type menu item 11 Press or repeatedly until Photo a...

Page 116: ...e copies as groups of pages not collated Collated Not collated 1 Load paper 2 Load an original document faceup into the Automatic Document Feeder ADF or facedown on the scanner glass Note Do not load postcards photos small items transparencies photo paper or thin media such as magazine clippings into the Automatic Document Feeder ADF Place these items on the scanner glass 3 From the control panel ...

Page 117: ...u are copying photos use photo or heavyweight matte paper with the glossy or printable side facing down If you are not sure which side is the printable side see the instructions that came with the paper 2 Load an original document faceup into the Automatic Document Feeder ADF or facedown on the scanner glass Note Do not load postcards photos small items transparencies photo paper or thin media suc...

Page 118: ...epeatedly to adjust the slider 7 Press Note If you are using the scanner glass a message appears prompting you for additional pages Adjusting copy quality Quality specifies the resolution used for the copy job Resolution involves a dots per inch dpi count the higher the dpi count the higher the resolution and copy quality 1 Load paper 2 Load an original document faceup into the Automatic Document ...

Page 119: ... such as magazine clippings into the Automatic Document Feeder ADF Place these items on the scanner glass 3 From the control panel press or repeatedly until Scan is highlighted Press for a Quick Scan Press if you want to specify information about the scan job The message Downloading scan applications list from your computer Please wait appears for a few seconds The Scan Mode menu appears with the ...

Page 120: ...ns a Click Display Advanced Scan Settings b Customize the scan settings using the tabs listed in the following table c Click OK 11 Click Scan Now Advanced Scan Settings tabs Options Scan Select the color depth Select the scan resolution Select Optical Scan settings Select an auto crop setting Select an exact area to be scanned Choose to convert the scanned item to text for editing Choose to scan m...

Page 121: ...th a word processing application 1 Make sure The printer is connected to a computer and both the printer and the computer are on ABBYY Fine Reader is installed 2 Load an original document faceup into the Automatic Document Feeder ADF or facedown on the scanner glass Note Do not load postcards photos small items transparencies photo paper or thin media such as magazine clippings into the Automatic ...

Page 122: ...rom images scanned from magazines or newspapers 1 Make sure the printer is connected to a computer and both the printer and the computer are on 2 Load an original document faceup into the Automatic Document Feeder ADF or facedown on the scanner glass Note Do not load postcards photos small items transparencies photo paper or thin media such as magazine clippings into the Automatic Document Feeder ...

Page 123: ... Adobe Acrobat From the desktop click Cancel Scan Clipboard From the control panel press Email From the desktop when the Internet Connect Wizard screen appears click Cancel File From the desktop when the Save as screen appears click Cancel PageManager From the desktop when the Save as screen appears click Cancel Photo Edit From the desktop when a screen appears click Cancel Scan Acrobat Reader Fro...

Page 124: ...Destination To cancel WordPad From the control panel press From the desktop when a screen appears click Cancel Scan 124 ...

Page 125: ...hin media such as magazine clippings Note If you want to customize fax settings Using the control panel see Using Fax and the Fax Mode menu on page 50 Using the computer see Customizing settings using the Fax Setup Utility on page 136 Sending a fax Entering a fax number 1 Make sure the printer is on and it is connected to a working phone line 2 From the control panel press or repeatedly until Fax ...

Page 126: ... highlighted e Press f Press to start the fax job Phone Number Search a Press or repeatedly until Phone Book is highlighted b Press The Phone Book menu appears with Name Search highlighted c Press or repeatedly until Phone Number Search is highlighted d Press e Press or repeatedly until you reach the phone number you need f Press g Press to start the fax job Group Search a Press or repeatedly unti...

Page 127: ... to add entries from the control panel using Add Entry and add groups using Add Group see Using the Phone Book on page 133 Both of these are available in the Phone Book menu You can set a Speed Dial Number in both Add Entry and Add Group For instructions on how to add Speed Dial or Group Dial numbers using the computer see Setting up Speed Dial numbers on page 132 Sending a fax using the control p...

Page 128: ...reen to complete the task Note If you are scanning individual pages using the scanner glass after each page is scanned the message Place next page on Flatbed Scanner and press to continue appears to prompt you on how to scan each page of your document Sending a broadcast fax at a scheduled time You can send a fax to a combination of up to 30 people or groups at a time you choose 1 Make sure the pr...

Page 129: ...stening to a call On Hook Dial The manual dialing feature lets you dial a telephone number while listening to the call through a speaker on the printer It is useful when you must navigate an automated answering system or enter a calling card number before sending your fax 1 Make sure the printer is on and connected to a working phone line 2 From the control panel press or repeatedly until Fax is h...

Page 130: ...er is on 2 Make sure you have set the number of times the telephone rings before receiving a fax automatically See Setting the number of rings before receiving a fax automatically on page 135 When a telephone ring is detected the answering machine picks up the call If the printer detects a fax it receives the fax and disconnects the answering machine If the printer does not detect a fax the answer...

Page 131: ...nel press or repeatedly until Fax is highlighted 3 Press 4 Press or repeatedly until the Fax Setup submenu is highlighted 5 Press 6 Press or repeatedly until the Ringing and Answering submenu is highlighted 7 Press 8 Press or repeatedly until you reach the Caller ID Pattern menu item 9 Press or repeatedly until the setting you want appears 10 Press to save the setting and exit Forwarding faxes Use...

Page 132: ...to save and exit Printing fax activity reports You can print reports of faxes sent and or received 1 From the control panel press or repeatedly until Fax is highlighted 2 Press The Fax Mode menu appears 3 Press or repeatedly until the Fax Setup submenu is highlighted 4 Press 5 Press or repeatedly until the History and Reports submenu is highlighted 6 Press 7 Press or until you reach Report 8 Press...

Page 133: ...nes 91 99 as necessary 8 Click OK to save the entries Notes You can include a calling card number as part of the fax number A fax number can include up to 64 numbers commas periods and or these symbols Using the Phone Book The Phone Book is a directory of Speed Dial entries 1 89 and Group Dial entries 90 99 To access the Phone Book submenu 1 From the control panel press or repeatedly until Fax is ...

Page 134: ...low the instructions on the display 7 Press to exit and save any entries you made Note For instructions on how to add Speed Dial or Group Dial entries to the Phone Book using the computer see Setting up Speed Dial numbers on page 132 Customizing dial settings Setting up a dialing prefix You can add a prefix of up to eight characters to the beginning of each number dialed Characters can include num...

Page 135: ...tern you want appears 9 Press to save and exit Setting the number of rings before receiving a fax automatically 1 Make sure that Auto Answer is on For more information see Setting Auto Answer to On on page 132 Note An indicator resembling a telephone handset with the word FAX under it is shown in the top left corner of the display when Auto Answer is on 2 From the control panel press or repeatedly...

Page 136: ...tedly until Fax is highlighted 2 Press 3 Press or repeatedly until the Fax Setup submenu is highlighted 4 Press 5 Press or repeatedly until the Dialing and Sending submenu is highlighted 6 Press 7 Press or repeatedly until you reach the Dial Method menu item 8 Press or repeatedly until Behind PBX Dial Tone Detect Off appears 9 Press to save and exit Customizing fax settings Customizing settings us...

Page 137: ... of 64 digits in a fax number Select the number of times you want the machine to redial and the time between those attempts if the fax cannot be sent on the first try Choose whether to scan the entire document before dialing the number Note Select After Dial if you are sending a large fax or a multiple page color fax Select a maximum send speed and print quality for outgoing faxes From the Automat...

Page 138: ...rom the Speed Dial list including Group Dial entries 6 Click OK after you finish customizing the settings 7 Close the Fax Setup Utility Setting up a fax footer 1 From the control panel press or repeatedly until Fax is highlighted 2 Press 3 Press or repeatedly until the Fax Setup submenu is highlighted 4 Press 5 Press or repeatedly until the Fax Printing submenu is highlighted 6 Press 7 Press or re...

Page 139: ...ark 9300 Series b Select Productivity Suite 2 Click Fax 3 Click Change fax settings The Run the Printer Setup Wizard Query screen appears 4 Click Yes 5 Following the prompts on the computer screen complete the screens named Step 1 through Step 7 in the wizard 6 Fill out information for the blank fields for the Step 8 Cover Pages screen 7 Click Next 8 Click Finished Blocking unwanted changes to fax...

Page 140: ...Fax is highlighted b Press c Press or repeatedly until the Fax Setup submenu is highlighted d Press e Press or repeatedly until the Fax Blocking submenu is highlighted f Press g Press or repeatedly until you reach Blocked Fax Add Entry h Press i Use the keypad numbers to enter the name of the person associated with the fax number in the Name field j Press once k Use the keypad numbers to enter the...

Page 141: ...peatedly until Fax is highlighted b Press c Press or repeatedly until the Fax Setup submenu is highlighted d Press e Press or repeatedly until the Fax Blocking submenu is highlighted f Press g Press or repeatedly until you reach Print Blocked Fax List h Press to print the list Note This feature is only available when blocked fax entries exist 141 ...

Page 142: ...ding position unless the printer is busy 3 Press down on the cartridge carrier latch to raise the cartridge carrier lid 4 Remove the used print cartridge Note If you are removing both cartridges repeat step 3 and step 4 for the second cartridge Installing print cartridges 1 If you are installing new print cartridges remove the sticker and tape from the back and bottom of the cartridges 142 ...

Page 143: ...zzles on the bottom of the cartridges 2 Lift the scanner unit 3 Press down on the cartridge carrier latches to raise the cartridge carrier lids 4 Insert the black cartridge or photo cartridge in the left carrier Insert the color cartridge in the right carrier 5 Close the lids 143 ...

Page 144: ...ality If the document still does not have the print quality you want follow these steps 1 Align the print cartridges For more information see Aligning print cartridges on page 144 If print quality has not improved continue to step 2 2 Clean the print cartridge nozzles For more information see Cleaning the print cartridge nozzles on page 145 If print quality has not improved continue to step 3 3 Re...

Page 145: ...hlighted 3 Press 4 Press or repeatedly until Clean Cartridges is highlighted 5 Press A page prints forcing ink through the print cartridge nozzles to clean them 6 Print the document again to verify that the print quality has improved 7 If print quality has not improved try cleaning the nozzles up to two more times Wiping the print cartridge nozzles and contacts 1 Remove the print cartridges 2 Damp...

Page 146: ...the print nozzles For more information see Cleaning the print cartridge nozzles on page 145 10 Repeat step 9 up to two more times 11 If print quality is still not satisfactory replace the print cartridges Preserving the print cartridges Keep a new cartridge in its packaging until you are ready to install it Do not remove a cartridge from the printer except to replace clean or store it in an airtig...

Page 147: ...tridge 43 Photo cartridge 40 USB cable 1021294 Optional second paper tray Tray 2 30B0199 Paper Paper size Lexmark PerfectFinish Photo Paper Letter A4 4 x 6 in L Lexmark Photo Paper 4 x 6 in 10 x 15 cm Letter A4 Removing the printer from the Tray 2 base If you need to move the printer to a different location be sure you first remove the printer from the Tray 2 base This helps to avoid damaging the ...

Page 148: ...ted cartridge s Replace your cartridge s with new Lexmark print cartridge s If you are printing from a computer click Learn more on the message select the check box and click Close If you are using the printer without a computer press Cancel Lexmark s warranty does not cover damage caused by non Lexmark ink or print cartridges Refilling a print cartridge The warranty does not cover repair of failu...

Page 149: ... Page does not print on page 152 Cannot print from digital camera using PictBridge on page 153 Printer does not recognize optional Tray 2 on page 153 Duplex unit does not operate correctly on page 153 Incorrect language appears on the display Correcting a language selection during initial setup 1 Press or repeatedly until the option for Language is highlighted 2 Press or repeatedly until the langu...

Page 150: ... repeatedly until Set Date and Time is highlighted 2 Press The Set Date and Time menu appears 3 Use the keypad or to enter the current time by hour minutes and AM PM or 24 hours 4 Press or to advance from box to box after you have entered the appropriate time 5 Use the keypad or to enter the day month and year 6 Press or to advance from box to box after you have entered the appropriate date 7 Pres...

Page 151: ...connected 1 Check the USB cable for any obvious damage 2 Firmly plug the square end of the USB cable into the back of the printer 3 Firmly plug the rectangular end of the USB cable into the USB port of the computer The USB port is marked with the USB symbol Use these steps to install the printer software 1 Turn off and then restart your computer 2 Click Cancel on all New Hardware Found screens 3 I...

Page 152: ...ter model e Select your operating system f Select the file you want to download and then follow the directions on the computer screen Page does not print Check messages If an error message is displayed see Error messages on page 175 Check power If the light is not on see Power button is not lit on page 151 Paper may not be loaded correctly Remove and then load paper Check ink Check the ink levels ...

Page 153: ...ional Tray 2 and the printer is secure Make sure the printer is aligned properly with the Tray 2 base For more information see Installing the optional Tray 2 on page 16 Tray 2 does not operate correctly Duplex unit does not operate correctly Duplex unit may not be installed correctly 1 Remove the duplex unit 2 Reinstall the duplex unit For more information see Paper jam in the duplex unit on page ...

Page 154: ... 1 Depending on your print job press or repeatedly until Copy or Scan is highlighted 2 Press 3 Press or repeatedly until you reach Quality 4 Press or repeatedly until the quality you want appears 5 Press to save Select a higher photo quality 1 Press or repeatedly until Photo is highlighted 2 Press 3 Press or repeatedly until the Change Default Settings submenu is highlighted 4 Press 5 Press or rep...

Page 155: ...t Check ink Check the ink levels and install new print cartridges if necessary Review steps to improve print quality See Improving print quality on page 144 Remove sheets as they are printed To avoid ink smudging when you are working with the following media remove each sheet as it exits and allow it to dry Documents with graphics or images Heavyweight matte or glossy paper Transparencies Labels E...

Page 156: ...s Options or Setup 3 Click Print Setup 4 From the Paper Size drop down menu select the paper size Print speed is slow Maximize computer processing speed Close all applications not in use Try minimizing the number and size of graphics and images in the document Remove as many unused fonts as possible from your system Add memory Consider purchasing an optional memory card to have more random access ...

Page 157: ...t on the front of the printer 2 Turn the camera on and choose your first photo using the camera control panel 3 Wait for the PictBridge Printing screen to appear on the printer control panel 4 Press The PictBridge Default Print Settings menu appears 5 Press or until 4x6 or 10x15 cm appears for Photo Size 6 Press or repeatedly until you reach Paper Handling 7 Press 8 Press or until 4x6 or 10x15 cm ...

Page 158: ...pass key from another Bluetooth enabled device Consider setting Security to Low to eliminate the need for a pass key 1 From the control panel press or repeatedly until Setup is highlighted 2 Press 3 Press or repeatedly until Change Bluetooth Default Settings is highlighted 4 Press The Bluetooth Default Settings menu appears 5 Press or repeatedly until the option for Security is highlighted 6 Press...

Page 159: ...rint cartridge if necessary Clean the scanner glass If the scanner glass is dirty gently wipe it with a clean lint free cloth dampened with water Review steps to improve print quality See Improving print quality on page 144 Adjust the brightness of the copy 1 Load the document facedown on the scanner glass 2 From the control panel press or repeatedly until Copy is highlighted 3 Press 4 Press or re...

Page 160: ...s the default printer and is not on hold or paused 1 Click In Windows XP Pro Start ª Settings ª Printers and Faxes In Windows XP Home Start ª Control Panel ª Printers and Faxes In Windows 2000 Start ª Settings ª Printers 2 Double click the name of your printer 3 Click Printer Make sure no check mark appears next to Pause Printing Make sure a check mark does appear next to Set As Default Software m...

Page 161: ...nded 5 From the Select Scan Quality section select another DPI setting 6 Click Scan Now Review steps to improve print quality See Improving print quality on page 144 Are you scanning from a newspaper magazine or glossy paper If you are copying or scanning from a newspaper magazine or glossy paper see Scanning clear images from magazines or newspapers on page 122 Check quality of original document ...

Page 162: ...e Certain devices can be connected to the printer so that digital telephone services can be used If you are using an ISDN telephone service connect the printer to an analog telephone port an R interface port on an ISDN terminal adapter For more information and to request an R interface port contact your ISDN provider If you are using DSL connect to a DSL filter or router that will support analog u...

Page 163: ...ess 5 Look down at the Country menu item to see the user default setting indicated by an 6 If you want to change the County Code a Press or repeatedly until you reach the Country menu item b Press or repeatedly until the country or region where you are operating the printer appears c Press to save the setting Is your printer memory full 1 Dial the receiving number 2 Scan the original document one ...

Page 164: ...t faceup in the Automatic Document Feeder ADF or facedown on the scanner glass in the corner indicated by the arrows Check the Dial Prefix setting 1 From the control panel press or repeatedly until Fax is highlighted 2 Press 3 Press or repeatedly until the Fax Setup submenu is highlighted 4 Press 5 Press or repeatedly until the Dialing and Sending submenu is highlighted 6 Press 7 Press or repeated...

Page 165: ...d 9 Press or repeatedly until Behind PBX Dial Tone Detect Off appears 10 Press to save Printer receives a blank fax Check original Ask the sender to verify the original document was loaded correctly Check ink Check the ink levels and install a new print cartridge if necessary Cartridges may have tape on them 1 Remove the print cartridges 2 Make sure the sticker and tape have been removed 1 2 3 Rei...

Page 166: ...ransmission speed Caller ID information is not displayed Caller ID pattern may not be set correctly The printer supports two distinct Caller ID patterns Pattern 1 FSK and Pattern 2 DTMF Depending on the country or region you live in and the telecommunications company you subscribe to you may need to switch the pattern in order for the printer to display Caller ID information For more information s...

Page 167: ...Paper jam in the Automatic Document Feeder ADF 1 Flip open the ADF by grasping the notch in the left side of the ADF and pulling up 2 Firmly grasp the paper and gently pull it out 167 ...

Page 168: ...3 Close the ADF 4 Press Paper jam in the duplex unit 1 Press the button as you grasp the handle on the duplex unit 2 Pull out the duplex unit 3 Push down on the button on the rear access door 168 ...

Page 169: ...ntly pull it out 6 Close the rear access door 7 Align and install the duplex unit 8 Press Paper jam in Tray 1 or optional Tray 2 1 Pull Tray 1 completely out of the printer or pull the optional Tray 2 completely out of its base 2 Remove the jam For Tray 1 169 ...

Page 170: ...media feeder If the jam is visible from the front and there is enough of the envelope or photo card to grasp to remove the jam 1 Pull Tray 1 about 50 8 mm 2 inches out of the printer 2 Grasp the envelope or photo card and pull it out 3 Reinstall Tray 1 170 ...

Page 171: ...is barely visible to remove the jam 1 Press the button as you grasp the handle on the duplex unit 2 Pull out the duplex unit 3 Push down on the button on the rear access door 4 Lower the door slightly 5 Firmly grasp the envelope or photo card and gently pull it out 171 ...

Page 172: ...loading Load a smaller amount of paper into the printer Load paper with the print side facing down If you are not sure which side is the printable side see the instructions that came with the paper See Loading various paper types in Tray 1 on page 78 for information about Maximum loading amounts per paper type Specific loading instructions for supported paper and specialty media Remove each sheet ...

Page 173: ...media loading Verify that the specialty media is loaded correctly For more information see Loading various paper types in Tray 1 on page 78 Try loading one page envelope or sheet of specialty media at a time Make sure the printer is set as the default printer and is not on hold or paused 1 Click For Windows XP Pro Start ª Settings ª Printers and Faxes For Windows XP Home Start ª Control Panel ª Pr...

Page 174: ...rmine which slot accommodates your memory card and to see instructions on how to insert it Nothing happens when memory card is inserted Reinsert memory card The memory card may have been inserted too slowly Remove and then reinsert the memory card quickly Check memory card placement See Inserting a memory card on page 98 to determine which slot accommodates your memory card and to see instructions...

Page 175: ...e Automatic Document Feeder ADF For more information see Loading original documents into the Automatic Document Feeder on page 85 2 From the control panel press Paper or Photo Size Error appears when printing from a PictBridge enabled digital camera and the photo size selected is larger than the paper size set in the printer 1 From the control panel press The Pictbridge Default Print Settings appe...

Page 176: ...sure that Tray 1 and Tray 2 if the optional Tray 2 is installed are fully inserted into the printer Out of Memory appears when you are making more than one copy of a multiple page document using the Automatic Document Feeder 1 Press and a single copy of the remaining pages in the Automatic Document Feeder ADF is printed 2 Load the pages for which you need more copies into the Automatic Document Fe...

Page 177: ...ntil Yes is highlighted 2 Press To insert a color print cartridge 1 Press or until No is highlighted 2 Insert a color cartridge on the right print cartridge carrier For more information see Installing print cartridges on page 142 3 Press Color Ink Low Press any button to clear the message and continue Order a color print cartridge For more information see Ordering supplies on page 147 Critically L...

Page 178: ...ect the power cord from the electrical outlet 3 Reconnect the power cord to the electrical outlet 4 If the button is not lit press 5 Reinsert the black or photo print cartridge 6 If the error Reappears replace the black or photo print cartridge with a new one Does not reappear reinsert the color print cartridge 7 If the error reappears replace the color print cartridge with a new one Error 1103 Ma...

Page 179: ...rinting using the color print cartridge 1 Press 2 Insert a black or photo print cartridge in the left print cartridge carrier For more information see Installing print cartridges on page 142 3 Resend the print job Photo and Color Ink Low Press any button to clear the message and continue Order photo and color print cartridges For more information see Ordering supplies on page 147 Photo Ink Low Pre...

Page 180: ...ne Detected The fax modem is an analog device Certain devices can be connected to the printer so that digital telephone services can be used If you are using an ISDN telephone service connect the printer to an analog telephone port an R interface port on an ISDN terminal adapter For more information and to request an R interface port contact your ISDN provider If you are using DSL connect to a DSL...

Page 181: ...ge 129 Check the Dial Method setting 1 Listen for a dial tone If you hear a dial tone but the printer hangs up without dialing this means it did not recognize the dial tone 2 From the control panel press or repeatedly until Fax is highlighted 3 Press The Fax Mode menu appears 4 Press or repeatedly until Fax Setup is highlighted 5 Press 6 Press or repeatedly until Dialing and Sending is highlighted...

Page 182: ...k Dial on page 129 Check the Dial Method setting 1 Listen for a dial tone If you hear a dial tone but the printer hangs up without dialing this means it did not recognize the dial tone 2 From the control panel press or repeatedly until Fax is highlighted 3 Press The Fax Mode menu appears 4 Press or repeatedly until Fax Setup is highlighted 5 Press 6 Press or repeatedly until Dialing and Sending is...

Page 183: ...til the option you want appears c Press 8 To change the number of times the printer redials a Press or repeatedly until Redial Tries is highlighted b Press or until the option you want appears c Press You can also postpone sending your fax until a later time For more information see Sending a broadcast fax at a scheduled time on page 128 Phone Line Error If the telephone line is being used by anot...

Page 184: ...pears 9 Press Notes The lower transmission speed the longer it will take your fax to be sent This solution will reduce the speed for future faxes until you reset the transmission speed 10 Resend the fax 11 If the problem persists repeat step 1 through step 10 Unsupported Fax Mode The fax machine of the recipient does not support color or does not support the resolution of the fax you are sending 1...

Page 185: ...s not clear any information entered by you such as Phone Book or Speed Dial lists 1 From the control panel press or repeatedly until Maintenance is highlighted 2 Press 3 Press or repeatedly until Reset Defaults is highlighted 4 Press The following message appears Reset all Menu Default settings to factory settings Note Items such as phone lists time date country etc will not be reset 5 Press Remov...

Page 186: ...intended to state or imply that only that product program or service may be used Any functionally equivalent product program or service that does not infringe any existing intellectual property right may be used instead Evaluation and verification of operation in conjunction with other products programs or services except those expressly designated by the manufacturer are the user s responsibility...

Page 187: ...tive for additional suggestions The manufacturer is not responsible for radio or television interference caused by using other than recommended cables or by unauthorized changes or modifications to this equipment Unauthorized changes or modifications could void the user s authority to operate this equipment Note To assure compliance with FCC regulations on electromagnetic interference for a Class ...

Page 188: ...c sc gc ca rpb Le terme IC précédant le numéro de d accréditation inscription signifie simplement que le produit est conforme aux spécifications techniques d Industry Canada European Community EC directives conformity This product is in conformity with the protection requirements of EC Council directives 89 336 EEC 73 23 EEC and 1999 5 EC on the approximation and harmonization of the laws of the M...

Page 189: ...rektīvas 1999 5 EK būtiskajām prasībām un citiem ar to saistītajiem noteikumiem Lietuvių Šiuo Lexmark International Inc deklaruoja kad šis produktas atitinka esminius reikalavimus ir kitas 1999 5 EB direktyvos nuostatas Malti Bil preżenti Lexmark International Inc jiddikjara li dan il prodott huwa konformi mal ħtiġijiet essenzjali u ma dispożizzjonijiet oħrajn relevanti li jinsabu fid Direttiva 19...

Page 190: ... that could affect the operation of this equipment If this happens the telephone company will provide advance notice in order for you to make necessary modifications to maintain uninterrupted service If you experience trouble with this equipment for repair or warranty information contact Lexmark International Inc at www lexmark com or your Lexmark representative If the equipment is causing harm to...

Page 191: ...tre région ou pays Ceci prévient tout endommagement de l équipement causé par les orages et autres surtensions électriques Cet équipement utilise des prises de téléphone CA11A Notice to users of the New Zealand telephone network The following are special conditions for the Facsimile User Instructions The grant of a telepermit for any item of terminal equipment indicates only that Telecom has accep...

Page 192: ...wer switch is turned off Not applicable Low Off 1 W Off The product is plugged into a wall outlet the power switch is turned off and the product is in the lowest possible power consumption mode Not applicable Off The product is plugged into a wall outlet but the power switch is turned off 0 5 The power consumption levels listed in the previous table represent time averaged measurements Instantaneo...

Page 193: ...not print from a flash drive 157 cannot print from digital camera using PictBridge 153 cannot print to network printer 32 cannot scan to application 161 cannot scan to computer over network 162 cannot send or receive fax 162 cards memory 98 printing 94 cartridge alignment error message 177 cartridges print aligning 144 cleaning 145 installing 142 preserving 146 removing 142 wiping 145 Change Bluet...

Page 194: ...176 paper out tray 2 176 paper tray removed 176 phone line busy 183 phone line error 183 photo and color ink low 179 photo ink low 179 printer carrier stall 179 rear cover open 175 remote fax error 184 right cartridge missing 180 scanner jam 175 unsupported fax mode 184 unsupported paper size 185 Ethernet connection using 29 Ethernet port 36 EXT port 36 e mailing documents or photos 121 F factory ...

Page 195: ...8 cards in small media feeder 81 custom size paper 78 documents into the Automatic Document Feeder 85 documents on the scanner glass 86 envelopes 78 envelopes in small media feeder 81 envelopes in Tray 1 76 glossy paper 78 greeting cards 78 heavyweight matte paper 78 index cards 78 iron on transfers 78 labels 78 letterhead paper 78 paper in Tray 1 74 paper in Tray 2 82 photo cards 78 photo cards i...

Page 196: ... PictBridge port 34 33 PictBridge enabled camera printing photos from 104 point and print method 30 poor copy quality 159 poor quality at the edges of the page 156 poor scanned image quality 161 poor text and graphic quality 155 portrait orientation selecting 69 postcards loading 78 printing 94 power button is not lit 151 power supply port 36 previewing jobs 42 print cartridge carrier 35 print car...

Page 197: ... 121 using the control panel 119 Scanning Copying tab Copy section 66 Preview Now section 66 Productivity Tools section 66 Scan section 66 using 66 scanning takes too long or freezes the computer 161 scrapbook page creating 107 sepia tone printing photos in 108 Setup menu 52 Change Bluetooth Default Settings submenu 59 Change Copy Default Settings submenu 55 Change Fax Default Settings submenu 56 ...

Page 198: ...per jam in the Automatic Document Feeder 167 paper jam in the duplex unit 168 paper jam in the printer 166 paper or specialty media misfeeds 172 printer does not feed paper envelopes or specialty media 173 troubleshooting memory card memory card cannot be inserted 174 nothing happens when memory card is inserted 174 troubleshooting network cannot print to network printer 32 printer to be configure...

Reviews: