background image

Introducing your printer

Introducing your printer

Using the printer's light and 
button

Your printer has two sets of lights and buttons:

One set is located at the bottom left-hand corner of 
the printer, on the operator panel. For more 
information on the operator panel light and 
buttons, refer to the Getting Started booklet that 
tells you how to set up and use your printer 
without a computer.

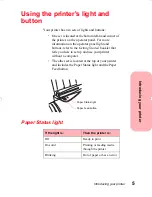
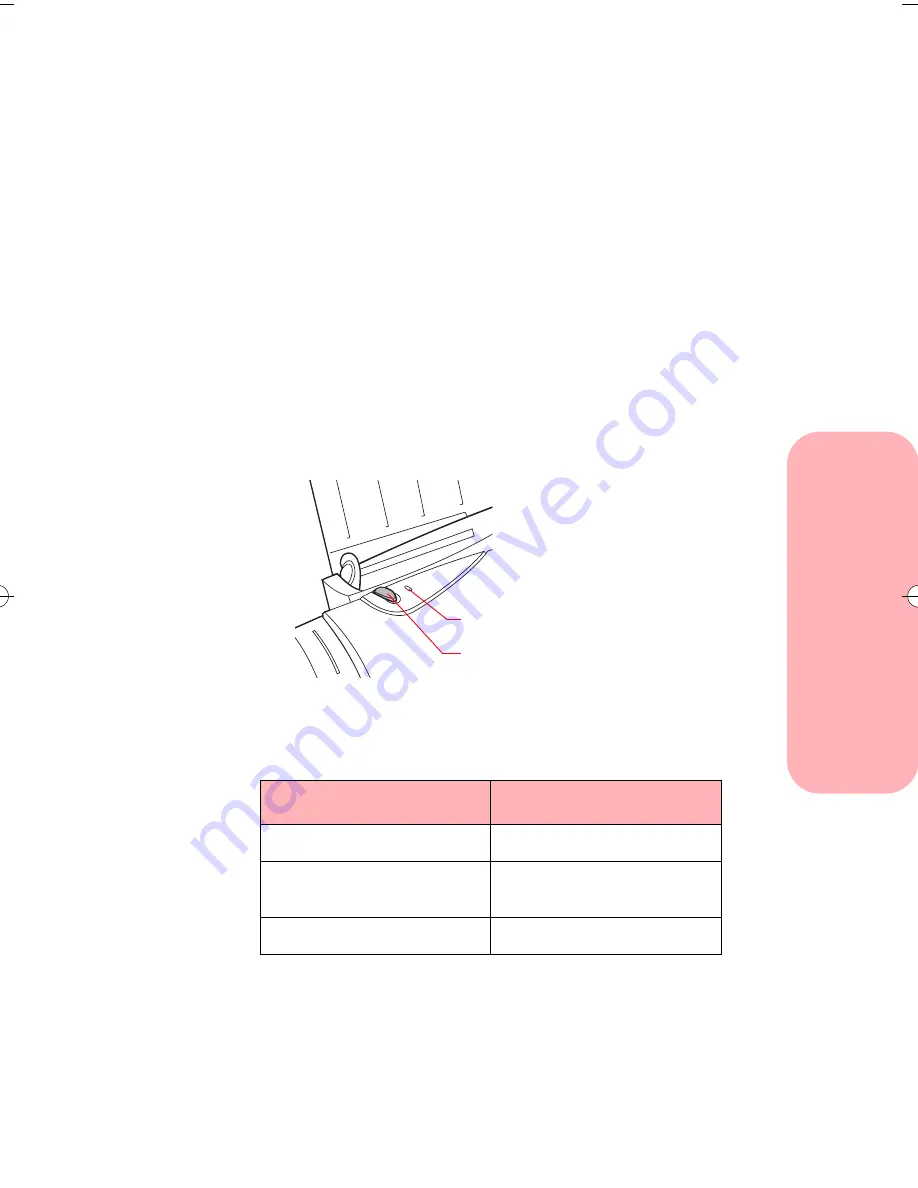
The other set is located at the top of your printer 
and includes the Paper Status light and the Paper 
Feed button.


Paper Status light

If the light is:

Then the printer is:

Off

Ready to print

On solid

Printing or feeding media 
through the printer

Blinking

Out of paper or has an error

Paper Feed button

Paper Status light

5700.book : ch1intro.fm  Page 5  Thursday, July 16, 1998  3:49 PM

Summary of Contents for Photo Jetprinter 5770

Page 1: ...Lexmark Photo Jetprinter 5770 User Guide ...

Page 2: ...can purchase additional copies of publications related to this product by calling 1 800 553 9727 In the United Kingdom and Eire call 0628 481500 In other countries contact your point of purchase Lexmark and Lexmark with diamond design are trademarks of Lexmark International Inc registered in the United States and or other countries Color Jetprinter is a trademark of Lexmark International Inc Photo...

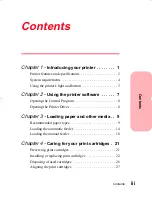
Page 3: ...inter software 7 Opening the Control Program 8 Opening the Printer Driver 8 Chapter 3 Loading paper and other media 9 Recommended paper types 9 Loading the automatic feeder 14 Loading the manual feeder 18 Chapter 4 Caring for your print cartridges 21 Preserving print cartridges 21 Installing or replacing print cartridges 22 Disposing of used cartridges 26 Aligning the print cartridges 27 ...

Page 4: ... 43 Bidirectional communications problems 44 Printhead failure 47 Deleting photo files 49 Error messages on your computer 50 Error messages on the printer operator panel 51 General printing problems 52 Paper feed problems 57 Poor print quality 59 Printer software problems 63 Removing the exit tray 64 Chapter 7 Ordering Supplies 65 Print cartridges 65 Parallel cable 65 Photo paper 66 Coated paper 6...

Page 5: ...Contents v Contents Iron on transfers for T shirts 69 Appendix A Notices 71 Appendix B Statement of Limited Warranty 79 ...

Page 6: ...Contents vi Contents ...

Page 7: ...f to print photos or connect to your computer when you want to print on single sheet paper envelopes labels index cards coated paper glossy film photo paper transparencies greeting cards and iron on transfers This User s Guide describes how to use your printer with a computer For information about using your printer all by itself refer to the Getting Started booklet that tells you how to use your ...

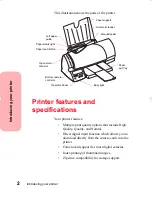
Page 8: ...nd Normal Direct digital input function which allows you to download directly from the camera cards into the printer Camera card support for most digital cameras Index printing of thumbnail images Zip drive compatibility for storage support Paper support Automatic feeder Manual feeder Paper exit tray Busy light Operator Panel Left paper guide Bottom camera card slot Top camera card slot Paper stat...

Page 9: ...us Low cost near laser quality print Quiet operation Portrait and landscape orientation Low ink messages when the print cartridge is low on ink and connected to a computer Superior paper handling in the industry for this class of printer Your printer also supports index cards labels envelopes transparencies plain paper coated paper and hagaki Support for these new paper types iron on transfers gre...

Page 10: ...rature and relative humidity Operating temperature range 10 to 40 C 50 to 104 F Optimum print temperature range 16 to 32 C 60 to 90 F Operating humidity range 8 to 80 RH non condensing Optimum humidity range 20 to 60 RH System requirements If you are using your printer with a computer make sure you Are running Windows 95 or Windows 98 Have a 486 PC system or higher Have at least 8 MB RAM Have at l...

Page 11: ...perator panel light and buttons refer to the Getting Started booklet that tells you how to set up and use your printer without a computer The other set is located at the top of your printer and includes the Paper Status light and the Paper Feed button Paper Status light If the light is Then the printer is Off Ready to print On solid Printing or feeding media through the printer Blinking Out of pap...

Page 12: ...per into the printer when you run out of paper during a print job and the Paper Status light blinks If you run out of paper during a print job 1 Load paper 2 Press the Paper Feed button Note You do not need to press the Paper Feed button in order to get the printer to load the paper under normal conditions ...

Page 13: ...lications Use this software When you want to Control Program install or replace print cartridges align print cartridges monitor print jobs and print cartridge ink levels print a test page change DOS settings control when and how the Control Program appears Printer Driver change printer properties choose the paper source choose page orientation choose different sizes and types of media adjust the q...

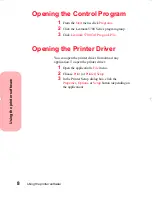
Page 14: ...Series program group 3 Click Lexmark 5700 Ctrl Prog on LPTx Opening the Printer Driver You can open the printer driver from almost any application To open the printer driver 1 Open the application s File menu 2 Choose Print or Printer Setup 3 In the Printer Setup dialog box click the Properties Options or Setup button depending on the application ...

Page 15: ...uidelines for purchasing and loading print materials Recommended paper types This section describes photo paper coated paper transparency paper envelope index card label greeting card and iron on transfer types and sizes you can use with your printer Note Use the Photo print cartridge shipped with your printer to print on photo paper and glossy film Use a Black print cartridge to print on all othe...

Page 16: ...ntities of paper Do not use photo paper designed for copiers laser printers or pen plotters For best results Handle only on the edges Do not touch the side being printed on Store unused paper in the original packaging Do not store in excessively hot or humid areas Feed photo paper one sheet at a time Be careful not to touch the printed surface until the ink is dry If you are printing several sheet...

Page 17: ...t quality on many types of plain paper Since the quality of plain paper varies widely you should test the print quality before buying large quantities of paper You can use letter legal A4 A5 A6 B5 executive and index card size paper with your printer Use paper that meets the following specifications Automatic feeder Manual feeder Length 127 to 432 mm 5 0 to 17 0 in Width 76 to 216 mm 3 0 to 8 5 in...

Page 18: ...r supports letter and A4 size transparencies Use transparencies designed for an inkjet printer such as the following Do not use transparencies designed for copiers laser printers or pen plotters For best results Handle only on the edges Do not touch the side being printed on Store unused paper in the original packaging Do not store in excessively hot or humid areas Feed transparencies one sheet at...

Page 19: ...tomatic feeder or manual feeder to print labels For best results labels used in the printer should meet the following requirements Do not use label sheets with a slick backing material Be sure the adhesive does not come in contact with any part of the printer Use full label sheets Partially used sheets with areas exposed by missing labels can cause labels to peel off during printing and can damage...

Page 20: ...orful custom designed T shirts use Lexmark Iron On Transfers part number 1372480 letter or 1402519 A4 Loading the automatic feeder Depending on the thickness of the media the printer can hold approximately 100 sheets of paper 25 transparencies glossy film or photo paper 10 envelopes thick paper or card stock Paper transparencies glossy film and labels To load paper transparencies glossy film photo...

Page 21: ...utomatic feeder If the media has a preferred print side insert with the print side facing you Insert letterhead with the top of the page pointing down Insert transparencies with a removable stripe so the stripe is away from you and pointing down Note You do not need to push paper into the printer or press the Paper Feed button for the printer to load paper ...

Page 22: ...print Loading envelopes or other print media To load envelopes thick paper or other card stock in the automatic feeder 1 Remove any paper from the automatic feeder 2 Place the envelopes or other card stock against the right edge of the automatic feeder Always place the preferred print side facing you Insert envelopes so that the stamp location is in the lower right hand corner Paper Guide ReleaseT...

Page 23: ...est side feeds into th printer first 3 Squeeze the release tab and the paper guide together and slide the paper guide to the right until it rests against the envelopes or card stock 4 Before you send a job to print choose the appropriate paper size and paper type in the Lexmark printer software Paper guide Release tab ...

Page 24: ...feeder You can print from the manual feeder without removing paper or envelopes from the automatic feeder The manual feeder allows you to print one sheet of print media at a time Loading paper or other print media 1 Extend the paper exit tray 2 Locate the manual feeder Manual feeder ...

Page 25: ...s is in the upper right hand corner Insert an index card or postcard vertically so the shortest side is fed into the printer first Insert transparencies with a removable stripe so the stripe is away from you and pointing down Remove each transparency or glossy film from the paper exit area before the next one is printed to avoid smearing 4 Push the media downward until the printer automatically lo...

Page 26: ...Loading paper and other media 20 Loading paper and other media ...

Page 27: ...it Do not remove a print cartridge from the printer except to replace clean or store it in a print cartridge storage unit The print cartridge will not print correctly if removed from the printer and left exposed for an extended period of time If a print cartridge runs out of ink leave the empty cartridge in the printer until you are ready to replace it Printing with one of the print cartridge carr...

Page 28: ... position for more than three minutes the carrier returns to the far right position The Cartridges Tab remains displayed on your screen If you have not inserted the new cartridge click Cancel and begin the installation process again If you have inserted the new cartridge click New Cartridge Installed Removing a print cartridge If you need to remove a print cartridge before you install a different ...

Page 29: ...Cartridge screen appears Choose the type of cartridge you are installing 4 At the printer pull the handle of the print cartridge you are replacing toward you until you hear a snap The following table lists the correct position for each cartridge type Cartridge type Cartridge carrier slot Color left Photo or Black optional right ...

Page 30: ...alling or changing a print cartridge If necessary follow the steps for Removing a print cartridge on page 22 before proceeding 1 If you are installing a new print cartridge remove it from its packaging Carefully remove the sticker and transparent tape covering the gold contact area from the cartridge DO NOT TOUCH OR REMOVE the gold contact area ...

Page 31: ...e replacement print cartridge in the print cartridge carrier The following table lists the correct position for each cartridge type 3 Push back firmly on the cartridge until it snaps securely into place Cartridge type Cartridge carrier slot Color left Photo or Black optional right ...

Page 32: ...e printer front cover Disposing of used cartridges Do not shake used print cartridges The remaining ink can leak Before discarding the used print cartridge put it in a leak proof bag If you installed Click a new Black cartridge Black Cartridge P N 12A1970 New Cartridge Installed an old Black cartridge Black Cartridge P N 12A1970 Old Cartridge Installed a new Color cartridge Color Cartridge P N 12A...

Page 33: ...m from the operator panel You are using optional Black and Color print cartridges and the black portions of a graphic or text do not align properly with the color portions Below are examples of aligned and misaligned print cartridges To align your print cartridges for best print quality 1 From the printer s Control Program click the Cartridges Tab For help opening the Control Program see Opening t...

Page 34: ...e set only test patterns A and B appear on your screen A B C D 3 From each alignment group on the test page locate the number under the alignment pattern that comes closest to forming a perfectly straight line For example in sample group A above pattern 5 comes closest to forming a straight line 4 In the Align Cartridges dialog box enter the numbers from the printed test page that you chose in ste...

Page 35: ...haracters are not printing completely To run the nozzle test 1 Make sure there is paper in the automatic feeder 2 From the printer s Control Program click the Cartridges Tab For help opening the Control Program see Opening the Control Program on page 8 3 Click the Clean Print Nozzles button The printer feeds a sheet of paper and prints a nozzle test pattern similar to the one shown below 4 Examine...

Page 36: ...o to step 6 6 Remove and reinstall the print cartridge 7 Repeat the nozzle test 8 If the lines are still broken wipe the print cartridge nozzles For instructions see Wiping the print nozzles and contacts Wiping the print nozzles and contacts If print quality does not improve after cleaning the print nozzles see Cleaning the print nozzles on page 29 the problem may be caused by dried ink on the pri...

Page 37: ...he damp cloth against the nozzles for about three seconds Gently blot and wipe dry 3 Allow the gold colored area to dry 4 Reinstall the print cartridge and repeat the nozzle test For help see Cleaning the print nozzles on page 29 5 If the nozzle test line is still broken clean the print cartridge carrier contacts For help see Cleaning print cartridge carrier contacts on page 32 Nozzles Contacts ...

Page 38: ...artridges Tab For help opening the Control Program see Opening the Control Program on page 8 2 From the Cartridges Tab click the Install Color Cartridge button to move the print cartridge carrier to the load position 3 Unplug the printer power cord This forces the print cartridge carrier to remain in the load position 4 Open the printer front cover 5 Remove both print cartridges 6 Use a clean dry ...

Page 39: ...k level counter Click Old Color Cartridge to return the cartridge carrier to the far right position 11 Test the print cartridge by choosing the Clean Print Nozzles button on the Cartridges Tab If the print quality has not improved after this cleaning process replace your print cartridge If print quality still does not improve your printer may require service ...

Page 40: ...Caring for your print cartridges 34 Caring for your print cartridges ...

Page 41: ... You must use the HP DeskJet 500C for color output If your application does not include drivers for the HP DeskJet 500C or the DeskJet 500 contact the software manufacturer for a compatible driver replacement Changing print settings for DOS applications If possible use options in your DOS application to change printer settings Use the steps below only if you want to change a printer setting that d...

Page 42: ...nges on other tabs they apply to all print jobs Printing from DOS applications This section describes how to print from DOS applications in Windows native DOS non Windows applications DOS applications in Windows Use these instructions only if your application runs from the DOS prompt in Windows This section describes printing from a DOS application printing from a DOS application to another printe...

Page 43: ...no version of the HP DeskJet 500C driver Choose the black mono version if you are printing in black only Choose the color version if you are printing in color and black If your application does not offer the HP DeskJet 500C printer driver install the DeskJet 500 printer driver You will not be able to print in color with the DeskJet 500 printer driver For help installing a printer see your applicat...

Page 44: ... Photo Jetprinter 5770 from a DOS application To print to your Lexmark Photo Jetprinter 5770 make sure this option is not selected If prompted restart Windows before sending a DOS print job to your Lexmark printer Printing to a file To print a document that has been processed by the driver and stored in a file that is printed to file 1 Make sure you are in Windows not native DOS 2 Start your appli...

Page 45: ...the printer port The Print command causes printing delays Printing from non Windows DOS applications Follow these steps if your application runs from the native DOS prompt but does not run from the DOS prompt in Windows 1 From Windows open the printer s Control Program For help opening the Control Program see Opening the Control Program on page 8 2 Click the Options Tab 3 Make sure Disable CJ5700 ...

Page 46: ...ur application user s documentation 7 Create a print file using the Print To File function of your application For help on printing to a file see your application user s documentation 8 Exit the DOS application 9 Start Windows 10 Double click the MS DOS icon in the Main group of Windows 11 Use this DOS command to copy the print file to the port where the printer is connected copy filename lptn b I...

Page 47: ... 2 From the Options Tab select the Disable CJ5700 DOS Printing option 3 If prompted restart Windows Enabling DOS printing to your printer To enable DOS printing to your printer 1 Open the printer s Control Program For help opening the Control Program see Opening the Control Program on page 8 2 From the Options Tab make sure Disable CJ5700 DOS Printing Enable DOS Printing to other Printers is not c...

Page 48: ...Printing from DOS 42 Printing from DOS ...

Page 49: ... Section Page Bidirectional communications problems 44 Printhead failure 47 Deleting photo files 49 Error messages on your computer 50 Error messages on the printer operator panel 51 General printing problems 52 Paper feed problems 57 Poor print quality 59 Printer software problems 63 Removing the exit tray 64 ...

Page 50: ...eeding error messages such as Paper Out do not display on your computer screen Before proceeding verify The printer is able to send and receive data a Unplug the printer power cord from the electrical outlet b Make sure the parallel cable is securely attached to both the computer and the printer c Plug the printer power cord into a properly grounded electrical outlet If you have a switch box or ot...

Page 51: ...irectional communications problems have two primary causes You are using the wrong parallel cable Your computer system is not configured for bidirectional communications Replacing the parallel cable You must use an IEEE 1284 compliant parallel cable that supports bidirectional printing Verify your printer cable meets these specifications To purchase a Lexmark cable see Parallel cable on page 65 Co...

Page 52: ...status and ink level information will not display on your computer screen On most computer systems the parallel port configuration and IRQ assignments are changed from the computer s Configuration or Setup Utility Check the documentation that came with your computer for information on the Configuration or Setup Utility Warning If you are not familiar with configuring parallel ports or changing IRQ...

Page 53: ...egin troubleshooting the problem 1 Clean the print cartridge carrier contacts and wipe the print cartridge print nozzles of both print cartridges For help see Cleaning print cartridge carrier contacts on page 32 and Wiping the print nozzles and contacts on page 30 2 Reinstall both print cartridges in the printer 3 Print a test page a From the printer s Control Program click the Status Tab For help...

Page 54: ...th the Photo or Black print cartridge Do not go to step 7 Continue with Replacing the print cartridge on page 49 7 Reinstall the Photo or Black print cartridge For help see Installing or changing a print cartridge on page 24 8 Remove the Color print cartridge 9 Print a test page Did the message reappear YES Go to step 10 NO The problem is with the Color print cartridge Do not go to step 10 Continu...

Page 55: ...ppear YES Your printer requires service See your printer registration card for the appropriate telephone number for your country NO You have solved the problem Deleting photo files If your camera card is full you can make room for more photo files by using your camera to delete any unwanted files If you use Windows Explorer to delete the files from your camera card you must empty the Recycle Bin b...

Page 56: ...of paper You may have the wrong paper source selected in the printer software If an Out of Paper message appears and you are using a non bidirectional printer cable follow the steps below to continue printing 1 Load paper 2 Resend your print job Your printer software will not function properly unless you use an IEEE 1284 compliant parallel cable with your printer Paper jam 1 Pull firmly on the pap...

Page 57: ...nd re insert the camera card in the printer If the error message still displays remove the camera card and check it with the display on your digital camera The camera card may be blank or defective Please Load Paper Make sure the printer has paper the paper is properly loaded Please install photo cartridge You need to install a Photo cartridge Refer to page 4 of your Getting Started booklet that t...

Page 58: ...ick the Properties Options or Setup button depending on the application The Lexmark 5700 dialog box appears 4 Click the Document Quality Tab 5 Make sure Natural Color is selected DOS print file takes too long to print If you are attempting to print a DOS file by sending it to the port to which the printer is connected use the DOS Copy command Avoid using the DOS Print command The DOS Print command...

Page 59: ...ond DOS print job before the first DOS print job has finished processing neither job will print Normally a job is finished processing when the first page of the job prints Also make sure the Lexmark 5700 Series is set as your default printer driver Intermittent printing See Bidirectional communications problems on page 44 Old document prints with different fonts When you print a document formatted...

Page 60: ... If the light continues to blink the printer may need service If your printer needs service refer to your printer registration card or warranty service information for the appropriate telephone number for your country Printer has missing or damaged parts If your printer has missing or damaged parts contact your point of purchase Printer pauses frequently during a print job If your printer pauses f...

Page 61: ... you are trying to print from a DOS based application the problem could be with your DOS settings Check your DOS printer port settings driver and your application settings Printer prints very slowly Try the following if your printer is printing slowly Decrease the print quality If you are printing a text document make sure you are using a Black print cartridge and not a Photo cartridge If you are ...

Page 62: ...e sure The parallel cable is properly connected to the computer and printer For help refer to the printer s setup sheet Paper is loaded in the printer correctly For help see Loading paper and other media on page 9 Print cartridges are installed correctly For help see Installing or replacing print cartridges on page 22 If these suggestions do not solve the problem your printer may need service Refe...

Page 63: ... from the front of the printer 2 Close the printer front cover 3 Resend your print job Start with the page on which the paper jam occurred Paper skews or buckles If paper skews or buckles while moving through the printer make sure You do not force the paper down into the printer when you load it There is not too much paper in the automatic feeder Depending on the thickness of your paper the automa...

Page 64: ...rect type of paper Remove paper from the automatic feeder and flex or fan the paper When loading paper do not force the paper down into the printer Note Humid conditions may cause some papers to stick together Transparencies glossy film or photo papers stick together If transparencies glossy film or photo papers stick together after they exit the printer Use a transparency glossy film or photo pap...

Page 65: ...idges See Aligning the print cartridges on page 27 If you aligned the print cartridges from the printer operator panel but are now using the printer connected to a computer you need to realign the print cartridges from the computer using the printer s Control Program software Characters with white lines Try one or more of the following suggestions to correct this problem A print cartridge may be o...

Page 66: ...2 Make sure you are using the correct type of paper Adjust the Brightness and Contrast Improperly formed or misaligned characters Clean the print cartridge nozzles See Cleaning the print nozzles on page 29 Poor print quality at left right or bottom edge of page Like other printers your printer cannot print in the extreme left right or bottom edges of a page To avoid poor print quality at the edges...

Page 67: ...for all envelope sizes must be 12 7 mm 0 5 in Print is too dark or smudged Try the following suggestions to correct this problem Increase the Brightness setting Make sure the Paper Type setting in the printer software matches the Paper type loaded in the printer Make sure the paper is straight and unwrinkled Let the ink dry before handling the paper Change Print Quality to Quick Print 600 Clean th...

Page 68: ...d pages have alternating bands of light and dark print See Printer pauses frequently during a print job on page 54 Solid black areas on transparencies contain white streaks Try using a different fill pattern in your application software Unexpected or missing characters Make sure you have your Lexmark 5700 Series printer driver selected as the default printer Your printer may have bidirectional com...

Page 69: ...reen see Bidirectional communi cations problems on page 44 Printer software settings are not in effect If the printer settings you choose in the printer software are not in effect check the settings in the software application you are using Printer settings in your application may override settings in the printer software Make all printer setting changes in your application if possible Use the pri...

Page 70: ...aper support 2 Pull the paper exit tray as far out of the printer as possible 3 Turn the printer over so you can see the bottom of the printer 4 Locate the hooks holding the paper exit tray in place 5 Using a ball point pen gently pry the hooks upward until you can pull the exit tray past them 6 Pull the paper exit tray all the way out of the printer Hook Hooks ...

Page 71: ... also order supplies from Lexmark over the telephone Check your printer registration card for the appropriate telephone number for each country Print cartridges To order print cartridges from Lexmark use these part numbers Parallel cable To order an IEEE 1284 compatible parallel cable use Lexmark part number 1329605 Cartridge type Part number Photo 12A1990 Color 12A1980 Black 12A1970 ...

Page 72: ...r the best color and black and white printing results use a coated paper such as Lexmark s High Resolution Premium Inkjet paper To order this paper from Lexmark use these part numbers Size Number of sheets Part number 4x6 20 12A0074 Letter 20 1372481 A4 20 1372208 Size Number of sheets Part number Letter 100 1402780 A4 100 1402781 ...

Page 73: ...exmark use these part numbers Transparencies To print on transparencies use Lexmark Inkjet Transparencies To order these transparencies from Lexmark use these part numbers Size Number of sheets Part number Letter 10 1402795 Letter 50 1402750 A4 10 1402796 A4 50 1372361 Size Number of sheets Part number Letter 20 1402797 A4 20 1402798 ...

Page 74: ...ark use these part numbers Labels To order Inkjet Labels from Lexmark use these part numbers Size Number of sheets Part number Letter 20 1372482 A4 20 70X7254 Sheet size Label size Labels per sheet Number of sheets Part number Letter 1 x 2 5 8 in 30 20 70X7250 Letter 2 x 4 in 10 20 70X7251 A4 63 5 x 38 1 mm 21 20 70X7252 A4 99 1 x 67 7 mm 8 20 70X7253 ...

Page 75: ...Ordering Supplies 69 Ordering Supplies Iron on transfers for T shirts To order Inkjet Iron On Transfers use these part numbers Size Number of sheets Part number Letter 10 1372480 A4 10 1402519 ...

Page 76: ...Ordering Supplies 70 Ordering Supplies ...

Page 77: ...with other products programs or services except those expressly designated by the manufacturer are the user s responsibility Energy Star The EPA ENERGY STAR Computers program is a partnership effort with computer manufacturers to promote the introduction of energy efficient products and to reduce air pollution caused by power generation Companies participating in this program introduce personal co...

Page 78: ...n If this equipment does cause harmful interference to radio or television reception which can be determined by turning the equipment off and on the user is encouraged to try to correct the interference by one or more of the following measures Reorient or relocate the receiving antenna Increase the separation between the equipment and receiver Connect the equipment into an outlet on a circuit diff...

Page 79: ...ember States relating to electromagnetic compatibility and safety of electrical equipment designed for use within certain voltage limits A declaration of conformity with the requirements of the Directive has been signed by the Director of Manufacturing and Technical Support Lexmark International S A Boigny France This product satisfies the Class B limits of EN 55022 and safety requirements of EN 6...

Page 80: ...es de rechange Norme di sicurezza Se il prodotto non è contrassegnato con questo simbolo deve essere collegato lo stesso ad una presa elettrica con messa a terra Il cavo di alimentazione deve essere collegato ad una presa elettrica posta nelle vicinanze del prodotto e facilmente raggiungibile Per la manutenzione o le riparazioni escluse quelle descritte nelle istruzioni operative consultare il per...

Page 81: ... otras piezas de recambio Veiligheidsvoorschriften Zorg ervoor dat uw produkt is aangesloten op een geaard stopcontact als het produkt niet is gemarkeerd met det symbool Het netsnoer moet worden aangesloten op een gemakkelijk bereikbaar stopcontact in de buurt van het produkt Neem contact op met een professionele onderhoudstechnicus voor onderhoud en reparaties die niet in de bij het produkt gelev...

Page 82: ...dukt är utformad testad och godkänd för att uppfylla internationella säkerhetsbestämmelser när den används tillsammans med andra Lexmark produkter Säkerhetsegenskaperna för vissa delar är inte helt uppenbara Lexmark frånsäger sig ansvaret om delar av ett annat fabrikat används Informació de Seguretat Si el vostre producte no està marcat amb el símbol S HAURÀ de connectar a una presa elèctrica de t...

Page 83: ...ebido testado e aprovado para satisfazer os padrões globais de segurança na utilização de componentes específicos da Lexmark As funções de segurança de alguns dos componentes podem não ser sempre óbvias A Lexmark não é responsável pela utilização de outros componentes de substituição Informações de Segurança Se o produto não estiver marcado com este símbolo ele DEVE SER conectado a uma tomada elét...

Page 84: ...Notices 78 Notices ...

Page 85: ...parts Is free from defects in material and workmanship Conforms to Lexmark s official published specifications and Is in good working order If this product does not function as warranted during the warranty period contact a Remarketer or Lexmark for repair without charge If this product is a feature or option this statement applies only when that feature or option is used with the product for whic...

Page 86: ...t its exchange Before you present this product for warranty service remove all programs data and removable storage media For further explanation of your warranty alternatives and the nearest Lexmark authorized servicer in your area please contact Lexmark at 1 800 LEXMARK 1 800 539 6275 or on the World Wide Web at http www lexmark com Extent of Warranty We do not warrant uninterrupted or error free...

Page 87: ...xmark is legally liable In no event will Lexmark be liable for any lost profits lost savings incidental damage or other economic consequential damages This is true even if you advise Lexmark or a Remarketer of the possibility of such damages Lexmark is not liable for any claim by you based on a third party claim This limitation of remedies also applies to any developer of materials supplied to Lex...

Page 88: ...Statement of Limited Warranty 82 Statement of Limited Warranty ...

Page 89: ...iver uses a matrix of dots to represent the image You may need to experiment to find the halftone best suitable for a particular picture In most cases the Air Brush setting produces the best results driver see printer driver fine dither A halftone method used for detailed graphics with limited shading font A set of characters of a given size and style halftone An array in which dots are placed to ...

Page 90: ...f connection that links a printer to a computer by which all 8 bits of a character are sent at the same time See also interface print cartridge The ink reservoir and printhead unit printer driver A program that translates the language of a software application to the language of the printer so the two can communicate data printer setup The printer driver is designed to provide the best print outpu...

Page 91: ...aper ordering 66 types and sizes 11 D disposing of cartridges 26 DOS printing changing print settings 35 from native DOS 39 from Windows 36 to file 38 to other printers 38 41 to your Lexmark printer 41 E electronic emission notices 72 Energy Star 71 envelopes loading 16 18 types and sizes 12 error messages 50 exit tray removing 64 F feeding problems 57 G glossy film loading 14 18 ordering 67 types...

Page 92: ...leting 49 photo paper loading 18 ordering 66 types and sizes 10 power supply replacement 52 print cartridges aligning 27 cleaning 29 cleaning carrier contacts 32 disposing of 26 installing 22 ordering 65 preserving 21 removing 22 replacing 22 wiping nozzles and contacts 30 print nozzles cleaning 29 testing 29 wiping 30 print quality 59 printer button 5 dimensions 4 features 2 light 5 parts 2 softw...

Page 93: ...iption 7 problems 63 supplies ordering 65 system requirements 4 T transparencies loading 14 18 ordering 67 types and sizes 10 12 troubleshooting 43 U United Kingdom Telecommu nications Act 1984 73 W warranty information 79 ...

Page 94: ...Index 88 Index ...
Page 95: ...s appropriate without incurring any obligation to you 1 Did you find the book well organized Yes No 2 Was the content of the book accurate and complete Yes No 3 Was the book easy to use Yes No 4 What can we do to improve the book 5 What type of digital camera do you own _ _____________ 6 How do you plan to use this printer _____Without a computer _____ Connected to a computer _____Both without a c...

Page 96: ...t Along Line POSTAGE WILL BE PAID BY ADDRESSEE Lexmark International Inc Department F95 Building 035 3 740 NEW CIRCLE ROAD NW LEXINGTON KY 40511 9954 Fold Here Tape Please Do Not Staple Tape BUSINESS REPLY MAIL FIRST CLASS MAIL PERMIT NO 2659 LEXINGTON KY ...

Reviews: