Lexmark MS910 Series User Manual Download Page 26

4

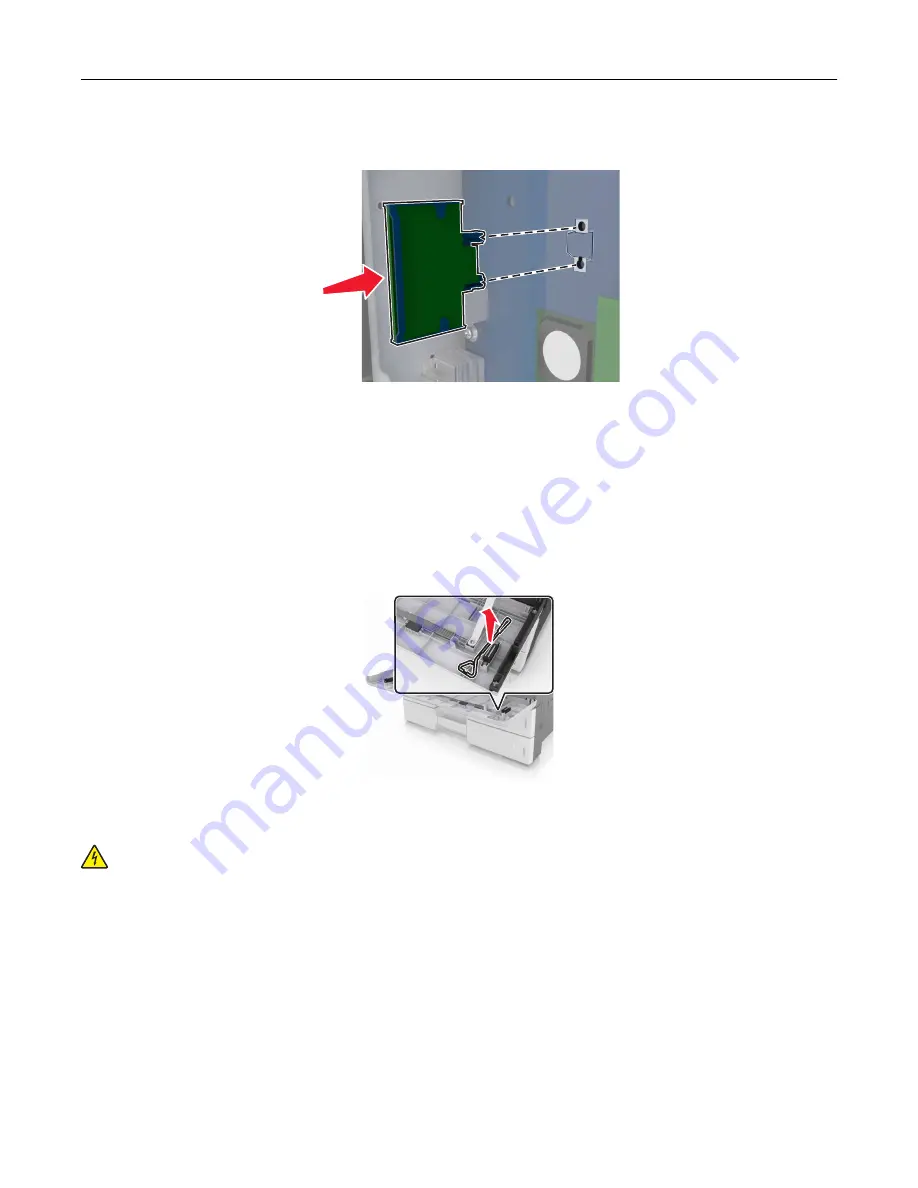
Push the card firmly into place.

Warning—Potential Damage: 

Improper installation of the card may cause damage to the card and the

controller board.

Note: 

The entire length of the connector on the card must touch and be flush with the controller board.

Installing an Internal Solutions Port

Note: 

Use the screwdriver located inside the bottom front door of the printer.

The controller board supports one optional Lexmark Internal Solutions Port (ISP). Install an ISP for additional
connectivity options.

CAUTION—SHOCK HAZARD: 

If you are accessing the controller board or installing optional hardware

or memory devices sometime after setting up the printer, then turn the printer off, and unplug the power
cord from the electrical outlet before continuing. If you have any other devices attached to the printer,
then turn them off as well, and unplug any cables going into the printer.

Additional printer setup

26

Summary of Contents for MS910 Series

Page 1: ...MS910 Series User s Guide July 2017 www lexmark com Machine type s 4021 Model s 230...

Page 2: ...7 Finding the IP address of the printer 17 Finding the IP address of the computer 17 Accessing the Embedded Web Server 17 Activating the home screen applications 18 Showing or hiding icons on the home...

Page 3: ...other held jobs 67 Printing information pages 68 Canceling a print job 69 Understanding the printer menus 70 Menus list 70 Paper menu 71 Reports menu 80 Network Ports menu 81 Security menu 94 Setting...

Page 4: ...anding jam messages and locations 162 x page jam clear jammed paper from multipurpose feeder 200 xx 163 x page jam open door C and clear all jammed paper 2yy xx 164 x page jam slide the 3000 sheet tra...

Page 5: ...ng print problems 208 Solving home screen application problems 235 Embedded Web Server does not open 235 Contacting customer support 236 Notices 238 Product information 238 Edition notice 238 Power co...

Page 6: ...uce the risk of injury from a hot component allow the surface to cool before touching it CAUTION POTENTIAL INJURY To reduce the risk of equipment instability load each tray separately Keep all other t...

Page 7: ...nd exhaust lters as indicated in the product maintenance instructions CAUTION POTENTIAL INJURY Do not cut twist bind crush or place heavy objects on the power cord Do not subject the power cord to abr...

Page 8: ...ork Caring for and maintaining the printer Troubleshooting and solving problems User s Guide and Quick Reference Guide The guides are available at http support lexmark com Note These guides are also a...

Page 9: ...countries and regions See the printed warranty that came with this printer Connecting the printer to an outlet Connect the power cord to the printer and then to a properly grounded and easily accessib...

Page 10: ...04 F Allow the following recommended amount of space around the printer for proper ventilation 1 Rear 120 mm 4 8 in 2 Right side 400 mm 15 7 in 3 Front 444 5 mm 17 5 in 4 Left side 120 mm 4 8 in 5 Top...

Page 11: ...unted con gurations require additional furniture for stability You must use either a printer stand or printer base if you are using multiple input options If you purchased a printer with a similar con...

Page 12: ...et tray 4 2500 sheet tray 2 x 500 sheet tray 5 Finisher Staple hole punch nisher Booklet nisher None When using optional trays The 3000 sheet tray is supported only if the optional 2 x 500 or 2500 she...

Page 13: ...ctions wake the printer from Hibernate mode Pressing the Sleep button until the printer wakes Performing a power on reset using the main power switch 4 Keypad Enter numbers letters or symbols on the p...

Page 14: ...in Hibernate mode Understanding the home screen When the printer is turned on the display shows a basic screen referred to as the home screen Use the home screen buttons and icons to initiate an actio...

Page 15: ...ew a context sensitive help information These may also appear on the home screen Touch To Search Held Jobs Search current held jobs Jobs by user Access print jobs saved by user Pro les and Apps Access...

Page 16: ...wn 4 Accept button Save a setting 5 Cancel button Cancel an action or a selection Return to the previous screen Touch To Return to the home screen Open a context sensitive Help dialog on the printer c...

Page 17: ...ction Note An IP address appears as four sets of numbers separated by periods such as 123 123 123 123 Finding the IP address of the computer For Windows users 1 Run the command prompt 2 Type ipconfig...

Page 18: ...s General Settings Home screen customization A list of basic printer functions appears 3 Select the check boxes to specify which icons appear on the printer home screen Note Cleared check box items ar...

Page 19: ...d Favorites 3 Click Add and then customize the settings Notes See the mouse over help beside each eld for a description of the setting To make sure the location settings of the bookmark are correct ty...

Page 20: ...export con guration settings into a text le and then import the le to apply the settings to other printers 1 Open a Web browser and then type the printer IP address in the address eld Note View the IP...

Page 21: ...Bar Code PRESCRIBE IPDS Printer hard disk LexmarkTM Internal Solutions Ports ISP Standard 10 100 1000 Ethernet MarkNetTM N8350 802 11 b g n wireless print server MarkNet N8352 802 11 b g n wireless pr...

Page 22: ...4 Use the following illustration to locate the appropriate connector Warning Potential Damage Controller board electronic components are easily damaged by static electricity Touch a metal surface on...

Page 23: ...1 Option card connector 2 Memory card connector 3 Lexmark Internal Solutions Port or printer hard disk connector 5 Align the base of the access cover to the printer Additional printer setup 23...

Page 24: ...power cord from the electrical outlet before continuing If you have any other devices attached to the printer then turn them off as well and unplug any cables going into the printer 1 Access the contr...

Page 25: ...then turn them off as well and unplug any cables going into the printer Warning Potential Damage Controller board electronic components are easily damaged by static electricity Touch a metal surface o...

Page 26: ...f the printer The controller board supports one optional Lexmark Internal Solutions Port ISP Install an ISP for additional connectivity options CAUTION SHOCK HAZARD If you are accessing the controller...

Page 27: ...ts or connectors 1 Unpack the ISP kit 1 ISP 2 Plastic mounting bracket 3 Thumbscrews 2 Access the controller board For more information see Accessing the controller board on page 21 3 Align the posts...

Page 28: ...bracket to the controller board cage using the screws 7 Insert the plug of the ISP interface cable into the connector of the controller board Installing a printer hard disk Note Use the screwdriver l...

Page 29: ...cables going into the printer Warning Potential Damage Controller board electronic components are easily damaged by static electricity Touch a metal surface on the printer before touching any controll...

Page 30: ...to the holes in the ISP and then press the hard disk down until the standoffs are in place Installation warning Hold the hard disk by its edges Touching or pressing on the center of the hard disk may...

Page 31: ...e standoffs are in place Installation warning Hold the hard disk by its edges Touching or pressing on the center of the hard disk may damage it b Use the two provided screws to attach the hard disk mo...

Page 32: ...as well and unplug any cables going into the printer Warning Potential Damage Controller board electronic components are easily damaged by static electricity Touch a metal surface on the printer befor...

Page 33: ...printer with a similar con guration then you may need additional furniture For more information see www lexmark com multifunctionprinters CAUTION SHOCK HAZARD If you are accessing the controller board...

Page 34: ...CK HAZARD If you are accessing the controller board or installing optional hardware or memory devices sometime after setting up the printer then turn the printer off and unplug the power cord from the...

Page 35: ...et 1 Screw 5 1 Turn off the printer 2 Unplug the power cord from the electrical outlet and from the printer 3 Unpack the optional tray and then remove all packing material 4 Attach the stabilizing fee...

Page 36: ...the connector cover from the printer 6 Lift the printer using the handles at the sides CAUTION POTENTIAL INJURY The printer weight is greater than 18 kg 40 lb and requires two or more trained personn...

Page 37: ...rinter with the tray and then lower the printer into place 8 Remove the tape from the connectors and then plug the connectors into the receptacle of the printer 9 Open Tray 2 and Tray 3 Additional pri...

Page 38: ...re the tray to the printer using the locking clips and the metal bracket Back Front 11 Reinstall the connector cover 12 Connect the power cord to the printer and electrical outlet Additional printer s...

Page 39: ...the USB symbol on the printer The appropriate Ethernet cable to the Ethernet port Use the To 1 Printer power cord socket Connect the printer to a properly grounded electrical outlet 2 Internal Soluti...

Page 40: ...ges For Macintosh users 1 From System Preferences in the Apple menu navigate to your printer and then select Options Supplies 2 Navigate to the list of hardware options and then add any installed opti...

Page 41: ...a wireless network SSID The SSID is also referred to as the network name Wireless Mode or Network Mode The mode is either infrastructure or ad hoc Channel for ad hoc networks The channel defaults to...

Page 42: ...te to Network Ports Active NIC Auto Submit Note Make sure to turn off the printer then wait for at least ve seconds and then turn the printer back on 1 From the printer control panel navigate to Netwo...

Page 43: ...documentation that came with your access point 5 Enter the eight digit PIN and then save the setting Connecting the printer to a wireless network using the Embedded Web Server Before you begin make su...

Page 44: ...s folder 2 From the shortcut menu of the printer with the new ISP open the printer properties 3 Con gure the port from the list 4 Update the IP address 5 Apply the changes For Macintosh users 1 From S...

Page 45: ...e also provides important information that aids network printing con guration 1 From the home screen navigate to Reports Network Setup Page 2 Check the rst section of the network setup page and con rm...

Page 46: ...l paper size setting is a user de ned setting that lets you print on paper sizes that are not preset in the printer menus 1 From the home screen navigate to Paper Menu Universal Setup 2 Select a unit...

Page 47: ...f the paper you are loading Note Use the indicators on the bottom of the tray to position the guides 3 Flex the sheets back and forth to loosen them and then fan them Do not fold or crease the paper S...

Page 48: ...terhead with the header on the left side of the tray Make sure that the paper is below the maximum ll line on the edge of the paper tray Over lling may cause paper jams 5 Insert the tray 6 From the co...

Page 49: ...ace 4 Load the paper Load only one size and type of paper Loading letterhead Without an optional nisher With an optional nisher One sided printing Note For long edge orientation load letterhead facedo...

Page 50: ...For long edge orientation load letterhead faceup with the header on the left side of the feeder Loading prepunched paper One sided printing Two sided printing Load envelopes with the ap side up Warnin...

Page 51: ...ys make sure the paper size and type for the tray match that of the other tray To unlink trays make sure the paper size or type for the tray does not match that of the other tray 4 Click Submit Note Y...

Page 52: ...If you are using a proxy server then temporarily disable it to load the Web page correctly 2 Click Settings Paper Menu Custom Types 3 Select a custom paper type name and then select a paper type Note...

Page 53: ...atch the paper loaded in the tray Preprinting perforation and creasing may signi cantly affect the print quality and cause jams or other paper feed problems Before loading the card stock on the tray e...

Page 54: ...g material Do not use labels with exposed adhesive Use full label sheets Partial sheets may cause labels to peel off during printing resulting in a jam Partial sheets also contaminate the printer and...

Page 55: ...16 lb might not be stiff enough to feed properly and may cause jams Note Two sided printing is supported for 60 169 g m2 16 45 lb paper Curl Curl is the tendency for paper to curl at its edges Excess...

Page 56: ...ted using an offset lithographic or engraved printing process Avoid paper with rough or heavily textured surfaces Use inks that are not affected by the resin in toner Inks that are oxidation set or oi...

Page 57: ...waste In addition the company encourages purchasing paper from suppliers who demonstrate their commitment to sustainable forestry practices Lexmark does not endorse speci c suppliers although a conve...

Page 58: ...eep the paper clean dry and at Supported paper sizes types and weights Paper sizes supported by the printer Paper size Dimensions Standard 500 she et tray Tray 1 Standard 500 she et tray Tray 2 2 x 50...

Page 59: ...76 2 mm 3 x 3 in to 320 x 1219 2 mm 12 6 x 48 in X X 4 7 3 4 Envelope 98 x 191 mm 3 9 x 7 5 in X X X X X X 9 Envelope 98 x 225 mm 3 9 x 8 9 in X X X X X X 10 Envelop e 105 x 241 mm 4 1 x 9 5 in X X X...

Page 60: ...the width is up to 296 9 mm 11 69 in and the length is up to 1219 2 mm 48 in Set the paper size to Universal Paper types and weights supported by the printer The printer engine supports 60 256 g m2 16...

Page 61: ...sher is installed the standard nisher bin becomes the default bin even for print jobs that do not require nishing Supported paper sizes Paper size Staple nisher Staple hole punch nisher bin 1 Staple h...

Page 62: ...279 4 mm 8 27 x 11 in and 320 x 457 2 mm 12 6 x 18 in Supported paper types Paper type Staple nisher Staple hole punch nisher Booklet nisher Plain Paper 5 Card Stock 2 X Transparency1 2 3 X Recycled 2...

Page 63: ...them from sticking together For more information see Tips on using transparencies on page 55 2 Paper is supported only if the nisher stacks the paper but does not staple it 3 Paper is supported only...

Page 64: ...rms and Favorites select the form from the list enter the number of copies adjust other settings 2 Apply the changes Printing from a computer Note For specialty media such as labels card stock and env...

Page 65: ...f you insert the ash drive when the printer requires attention such as when a jam has occurred then the printer ignores the ash drive If you insert the ash drive while the printer is processing other...

Page 66: ...home screen to print les from the ash drive Supported ash drives and le types Notes High speed USB ash drives must support the full speed standard Low speed USB devices are not supported USB ash driv...

Page 67: ...printer memory Verify Job Expiration Print one copy of a print job and hold the remaining copies It lets you examine if the rst copy is satisfactory or not The print job is automatically deleted from...

Page 68: ...ily disable it to load the Web page correctly 2 Click Settings tab Security Con dential Print Setup 3 Modify the settings Set a maximum number of PIN entry attempts When a user exceeds a speci c numbe...

Page 69: ...and then touch Delete Selected Jobs Note If you press on the keypad then touch Resume to return to the home screen Canceling a print job from the computer 1 Depending on the operating system do eithe...

Page 70: ...st of installed DLEs Download Emulators appears Security Settings Help Miscellaneous Security Settings Con dential Print Erase Temporary Data Files Security Audit Log Set Date and Time General Setting...

Page 71: ...print job continues using the linked tray Paper Size Type menu Use To Tray x Size A4 A5 A6 JIS B5 JIS B4 Letter Legal 12 x 18 11 x 17 SRA3 A3 Executive O cio Mexico Folio Statement Universal Specify...

Page 72: ...of Custom Type x Use this menu to con gure automatic tray linking MP Feeder Size A4 A5 A6 JIS B5 JIS B4 Letter Legal 12 x 18 11 x 17 SRA3 A3 Executive O cio Mexico Folio Statement Universal Specify t...

Page 73: ...is the factory default setting From the Paper menu set Con gure to Cassette for MP Feeder Type to appear as a menu Manual Paper Size A4 A5 A6 JIS B5 Letter Legal Executive O cio Mexico JIS B4 A3 11 x...

Page 74: ...is the U S factory default setting DL Envelope is the international factory default setting Manual Envelope Type Envelope Rough Envelope Custom Type x Specify the envelope type being manually loaded...

Page 75: ...otes Normal is the factory default setting The options appear only if card stock is supported Transparency Texture Smooth Normal Rough Specify the relative texture of the transparencies loaded Note No...

Page 76: ...xture Smooth Normal Rough Specify the relative texture of the paper loaded Note Normal is the factory default setting Rough Cotton Texture Rough Specify the relative texture of the cotton paper loaded...

Page 77: ...ith Preprinted as the paper type Colored Loading Duplex Off Determine and set two sided printing for all print jobs with Colored as the paper type Light Loading Duplex Off Determine and set two sided...

Page 78: ...pecify a paper type when Recycled is selected in other menus Notes Paper is the factory default setting The custom media type must be supported by the selected tray or multipurpose feeder in order to...

Page 79: ...ion if the paper can be loaded in either direction Notes Short Edge is the factory default setting Long Edge appears only when the longest edge is shorter than the maximum width supported in the tray...

Page 80: ...factory default setting x can be any number from 1 to 4 if the appropriate optional bins are installed If multiple bins are assigned the same name then the name appears only once in the bin list Repo...

Page 81: ...onts available for the printer language currently set in the printer Note A separate list is available for PCL and PostScript emulations Print Directory Print a list of all the resources stored in an...

Page 82: ...Mode Off Auto Set the printer to perform the special processing required for bidirectional communication following the conventions de ned by the NPA protocol Notes Auto is the factory default setting...

Page 83: ...out the network printer settings such as the TCP IP address Network Card menu To access the menu navigate to either of the following Network Ports Standard Network Standard Network Setup Network Card...

Page 84: ...TCP IP netmask Gateway View or change the current TCP IP gateway Enable DHCP On Off Specify the DHCP address and parameter assignment Note On is the factory default setting Enable RARP On Off Specify...

Page 85: ...u Network x Network x Setup IPv6 Note This menu is available only in network printers or printers that are attached to print servers Use To Enable IPv6 On Off Enable IPv6 in the printer Note On is the...

Page 86: ...g This lets the printer access a network using an access point Ad hoc con gures wireless connection directly between the printer and a computer Compatibility 802 11b g 802 11b g n Specify the wireless...

Page 87: ...et the printer to automatically switch to PS emulation when a print job received through a USB port requires it regardless of the default printer language Notes On is the factory default setting When...

Page 88: ...rinter is busy processing data from another input port Changing this setting from the printer control panel and then exiting the menus causes the printer to restart The menu selection is then updated...

Page 89: ...printer to perform the special processing required for bidirectional communication following the conventions de ned by the NPA protocol Notes Auto is the factory default setting Changing this setting...

Page 90: ...ors printer hardware initialization requests from the computer Notes Off is the factory default setting The computer requests initialization by activating the Init signal from the parallel port Many p...

Page 91: ...ion when a print job received through a serial port requires it regardless of the default printer language Notes On is the factory default setting When set to Off the printer does not examine incoming...

Page 92: ...nter hard disk before printing Notes Off is the factory default setting The printer does not buffer print jobs on the printer hard disk On buffers print jobs on the printer hard disk Auto buffers prin...

Page 93: ...e printer uses the DSR Signal Notes Off is the factory default setting DSR is a handshaking signal used by most serial cables The serial port uses DSR to distinguish data sent by the computer from dat...

Page 94: ...used when communicating to the SMTP server Some SMTP servers require credentials to send an e mail Notes None is the factory default setting for Device Initiated E mail and User Initiated E mail Devi...

Page 95: ...in attempts before users are locked out You can choose from 1 to 10 attempts The factory default setting is 3 Failure time frame speci es the time frame during which failed login attempts can be made...

Page 96: ...then all con dential jobs held in the printer memory are deleted Repeat Job Expiration Off 1 hour 4 hours 24 hours 1 week Set a limit on how long the printer stores print jobs Verify Job Expiration O...

Page 97: ...m the Embedded Web Server and saved on a computer Delete Log Yes No Specify whether or not audit logs are deleted Note Yes is the factory default setting Con gure Log Enable Audit Yes No Enable Remote...

Page 98: ...the factory default setting Automatically observe DST On Off Set the printer to use the applicable daylight saving time DST start and end times associated with the printer Time Zone setting Note On is...

Page 99: ...may need to install special hardware for those languages to appear Eco Mode Off Energy Energy Paper Paper Minimize the use of energy paper or specialty media Notes Off is the factory default setting...

Page 100: ...quality and full speed printing Run Initial setup Yes No Set the printer to run the setup wizard Note Yes is the factory default setting After completing the setup wizard the default becomes No Keyboa...

Page 101: ...rom the following options None IP Address Hostname Contact Name Location Date Time mDNS DDNS Service Name Zero Con guration Name Custom Text x Model Name Notes IP Address is the factory default settin...

Page 102: ...d buttons that appear on the control panel For each icon or button select from the following options Display Do not display Notes Display is the factory default setting for Search Held Jobs Held Jobs...

Page 103: ...Embedded Web Server Location Specify the location of the printer Note The location is stored on the Embedded Web Server Alarms Alarm Control Cartridge Alarm Staple Alarm Hole Punch Alarm Set an alarm...

Page 104: ...ay off is the factory default setting Timeouts Hibernate Timeout Disabled 1 hour 2 hours 3 hours 6 hours 1 day 2 days 3 days 1 week 2 weeks 1 month Set the amount of time before the printer enters Hib...

Page 105: ...ion This setting has no effect on PCL emulation print jobs Timeouts Job Hold Timeout 5 255 sec Set the amount of time the printer waits for user intervention before it holds jobs that require unavaila...

Page 106: ...how the printer responds when pressing the Sleep button while the printer is idle Notes Sleep is the factory default setting Sleep or Hibernate sets the printer to operate at a lower power con guratio...

Page 107: ...ng Paper Source Tray x MP Feeder Manual Paper Set a default paper source for all print jobs Note Tray 1 is the factory default setting Collate 1 1 1 2 2 2 1 2 3 1 2 3 Stack the pages of a print job in...

Page 108: ...f the value of the Paper Saver setting in the same menu is not set to Off Paper Saver Off 2 Up 3 Up 4 Up 6 Up 9 Up 12 Up 16 Up Specify that multiple page images be printed on one side of a paper Notes...

Page 109: ...hen inserting blank pages in a document for notes Separator Sheet Source Tray x Manual Feeder MP Feeder Specify the paper source for the separator sheet Note Tray 1 is the factory default setting Blan...

Page 110: ...y pages printed using a PCL 5e interpreter and has no effect on pages printed using the PCL XL or PostScript interpreter Download Target RAM Flash Disk Set the storage location for downloads Notes RAM...

Page 111: ...umber of copies for each print job Note 1 is the factory default setting Blank Pages Do Not Print Print Specify whether blank pages are inserted in a print job Note Do Not Print is the factory default...

Page 112: ...ndscape orientation Paper Saver Orientation Auto Landscape Portrait Specify the orientation of a multiple page document Note Auto is the factory default setting The printer chooses between portrait an...

Page 113: ...as after all page 1 s and after all page 2 s Between Jobs sets the same offset position for the entire print job regardless of the number of copies printed This menu appears only when a supported stap...

Page 114: ...ote 0 is the factory default setting Job Accounting menu Note This menu item appears only when a formatted working printer hard disk is installed Use To Job Accounting Log Off On Determine and set if...

Page 115: ...inter responds when disk usage reaches the maximum limit 100MB Note None is the factory default setting URL to Post Logs Determine and set where the printer posts job accounting logs E mail Address to...

Page 116: ...ing screen after the deletion Do Not Delete sets the printer to return to the originating screen after the deletion Activate Hex Trace Assist in isolating the source of a print job problem Notes When...

Page 117: ...protected Job Buffer Size must not be set to 100 PCL Emul menu Use To Font Source Resident Disk Download Flash All Specify the set of fonts used by the Font Name menu Notes Resident is the factory de...

Page 118: ...cters per inch cpi Pitch can be increased or decreased in 0 01 cpi increments For nonscalable monospaced fonts the pitch appears on the display but it cannot be changed PCL Emulation Settings Orientat...

Page 119: ...al Env Off None 0 199 Con gure the printer to work with printer software or programs that use different source assignments for trays and feeders Notes Off is the factory default setting None ignores t...

Page 120: ...ult font for HTML documents Note The Times font is used in HTML documents that do not specify a font Use To Font Size 1 255 pt Set the default font size for HTML documents Notes 12 pt is the factory d...

Page 121: ...cally set to Best Fit Orientation Portrait Landscape Reverse Portrait Reverse Landscape Set the image orientation Note Portrait is the factory default setting Help menu Menu item Description Print All...

Page 122: ...Menu item Description Moving Guide Provides instructions for safely moving the printer Supplies Guide Provides information about ordering supplies Understanding the printer menus 122...

Page 123: ...r and printing multiple pages on one side of a single sheet of paper Using recycled paper As an environmentally conscious company Lexmark supports the use of recycled office paper produced speci cally...

Page 124: ...IP address in the address eld Notes View the printer IP address on the printer home screen The IP address appears as four sets of numbers separated by periods such as 123 123 123 123 If you are using...

Page 125: ...tly 2 Click Settings General Settings 3 In the Screen Brightness eld enter the brightness percentage you want for the display 4 Click Submit Recycling Lexmark provides collection programs and environm...

Page 126: ...that the cartridge came in Lexmark will recycle the box Returning Lexmark cartridges for reuse or recycling Lexmark Cartridge Collection Program diverts millions of Lexmark cartridges from land lls a...

Page 127: ...sh memory Both types are used to store the operating system device settings network information bookmark settings and embedded solutions Hard disk memory Some printers have a hard disk drive installed...

Page 128: ...and embedded solutions by following these steps 1 Turn off the printer 2 From the control panel hold down 2 and 6 while turning the printer on Release the buttons when the screen with the progress bar...

Page 129: ...t in loss of data Disk encryption can take from several minutes to more than an hour during which the printer is unavailable for other user tasks A status bar indicates the progress of the disk wiping...

Page 130: ...f electrical shock when cleaning the exterior of the printer unplug the power cord from the electrical outlet and disconnect all cables from the printer before proceeding 2 Remove paper from the stand...

Page 131: ...2 Remove the waste toner bottle 3 Locate the white tab 4 Gently pull the tab until it stops and then slowly slide it back into place Repeat three times Maintaining the printer 131...

Page 132: ...wiper 6 Insert the wiper into the hole until it stops and then slide it out Repeat three times 7 Put the wiper back to its holder 8 Reinstall the waste toner bottle 9 Close the bottom front door Maint...

Page 133: ...Emptying the hole punch box 1 Open door H 2 Remove and empty the hole punch box Maintaining the printer 133...

Page 134: ...me network 1 Open a Web browser and then type the printer IP address in the address eld Notes View the printer IP address on the home screen The IP address appears as four sets of numbers separated by...

Page 135: ...ne Lexmark supplies and parts Use of third party supplies or parts may affect the performance reliability or life of the printer and its imaging components Use of third party supplies or parts can aff...

Page 136: ...nter supplies Store supplies right side up in their original packing until you are ready to use them Do not expose supplies to Direct sunlight Temperatures above 35 C 95 F High humidity above 80 Salty...

Page 137: ...s To avoid spilling the toner from the waste toner bottle make sure to maintain its orientation Replacing a photoconductor unit 1 Open the bottom front door 2 Remove the waste toner bottle Maintaining...

Page 138: ...ge Do not expose the photoconductor unit to direct light for more than 10 minutes Extended exposure to light may cause print quality problems Warning Potential Damage Do not touch the photoconductor d...

Page 139: ...he bottom front door Replacing the staple cartridge Replacing the staple cartridge in the staple nisher Note The staple nisher is supported only in select printer models 1 Press the latch on the stapl...

Page 140: ...holder 3 Remove the empty staple cartridge from the cartridge holder 4 Insert the new cartridge into the cartridge holder 5 Push the cartridge holder into the nisher until the holder clicks into plac...

Page 141: ...Slide the nisher back into place Replacing the staple cartridge in the booklet nisher 1 Open door H and then pull out the booklet maker 2 Remove the staple cartridge holder Maintaining the printer 14...

Page 142: ...rtridge holder 4 Insert the new cartridge into the cartridge holder 5 Push the cartridge holder into the booklet maker until the holder clicks into place 6 Push the booklet maker back into place and t...

Page 143: ...placing the staple cartridge in the staple hole punch nisher 1 Open door H 2 Remove the staple cartridge holder 3 Remove the empty staple cartridge from the cartridge holder Maintaining the printer 14...

Page 144: ...der 5 Push the cartridge holder into the nisher until the holder clicks into place 6 Close door H Replacing the toner cartridge 1 Open the top front door 2 Rotate the toner cartridge counterclockwise...

Page 145: ...cartridge remove the packing material and then shake the cartridge to redistribute the toner 4 Insert the toner cartridge into the printer 5 Rotate the cartridge clockwise to lock it into place Maint...

Page 146: ...t door 7 Clean the charger and the printhead lens For more information see Cleaning the charger and the printhead lens on page 130 Replacing the waste toner bottle 1 Open the bottom front door Maintai...

Page 147: ...ens For more information see steps 3 7 of Cleaning the charger and the printhead lens on page 130 4 Unpack the new waste toner bottle 5 Insert the new waste toner bottle into the printer until it clic...

Page 148: ...ng the 300K maintenance kit Replacing the exhaust and ozone lters 1 Exhaust lter 2 Ozone lter Replacing the exhaust lter 1 Pull out the exhaust lter 2 Unpack the new exhaust lter Maintaining the print...

Page 149: ...3 Insert the new lter Replacing the ozone lter 1 Pull out the ozone lter 2 Unpack the new ozone lter 3 Insert the new lter Maintaining the printer 149...

Page 150: ...lers 1 Pick roller 2 Feed roller 3 Separator roller Note You can use the rollers stored in the compartment inside the standard trays For more information see Storing the rollers on page 136 1 Turn off...

Page 151: ...To remove the optional 2 x 500 sheet tray follow the procedure in removing the standard tray 3 Open door C Make sure that it does not hit any cable attached to the printer Note If the 3000 sheet tray...

Page 152: ...or D Notes You can only open door D if the optional 2 x 500 or 2500 sheet tray is installed If the 3000 sheet tray is installed slide the tray to open the door 5 Locate the rollers Maintaining the pri...

Page 153: ...ey click into place Note Make sure to insert the rollers to their right places 8 Close doors C and D 9 Insert the trays Replacing the transfer module Note Use the screwdriver located inside the bottom...

Page 154: ...r CAUTION HOT SURFACE The inside of the printer might be hot To reduce the risk of injury from a hot component allow the surface to cool before touching it Note If the 3000 sheet tray is installed the...

Page 155: ...transfer module using the handles and then pull it out completely 7 Unpack the new transfer module Warning Potential Damage Do not expose the transfer belt to direct light for more than 10 minutes Ext...

Page 156: ...place 9 Place the paper guide back into place 10 Tighten the screws of the transfer module lock 11 Reinstall the door stopper 12 Close door C Replacing the transfer roller 1 Open door C Make sure that...

Page 157: ...2 From the control panel hold down 2 and 6 while turning the printer on Release the buttons when the screen with the progress bar appears 3 From the Con guration menu navigate to Reset Maintenance Co...

Page 158: ...inter when you set it down Make sure there is adequate clearance around the printer Use only the power cord provided with this product or the manufacturer s authorized replacement Warning Potential Da...

Page 159: ...s of numbers separated by periods such as 123 123 123 123 If you are using a proxy server then temporarily disable it to load the Web page correctly 2 Click Reports and then click the type of report y...

Page 160: ...e Stop1 The printer stops processing jobs when the supply condition is reached and the user needs to press a button to continue printing Non Continuable Stop1 2 The printer stops processing jobs when...

Page 161: ...is printing Load it before printing or wait for a prompt to load it Do not load too much paper Make sure the stack height is below the maximum paper ll indicator Do not slide the paper into the tray...

Page 162: ...ng the jam location and information to clear the jam appears on the printer display Open the doors covers and trays indicated on the display to remove the jam Notes When Jam Assist is set to On the pr...

Page 163: ...jam slide the 3000 sheet tray and open door F 24y xx Pull the 3000 sheet tray and then remove the jammed paper from the side of the tray Open door F and then remove the jammed paper Area G doors C J...

Page 164: ...l surface 6 Reload the paper x page jam open door C and clear all jammed paper 2yy xx 1 Open door C Make sure that it does not hit any cable attached to the printer 2 Remove the jammed paper from any...

Page 165: ...w the fuser area Duplex area Above the duplex area 3 Open the standard trays and then locate the jammed paper 4 Remove the jammed paper Note Make sure that all paper fragments are removed Clearing jam...

Page 166: ...that it does not hit any cable attached to the printer 3 Remove the jammed paper from any of the following locations Note Make sure that all paper fragments are removed CAUTION HOT SURFACE The inside...

Page 167: ...Fuser area Below the fuser area Duplex area Above the duplex area Clearing jams 167...

Page 168: ...ke sure that all paper fragments are removed 6 Close the trays and door C 7 Slide the 3000 sheet tray back into place x page jam open door D and clear all jammed paper 24y xx 1 Open door D and then re...

Page 169: ...3 Remove the jammed paper Note Make sure that all paper fragments are removed 4 Close the tray and door D x page jam slide the 3000 sheet tray and open door D 24y xx 1 Slide the 3000 sheet tray 2 Open...

Page 170: ...are removed 3 Open the optional tray and then locate the jammed paper 4 Remove the jammed paper Note Make sure that all paper fragments are removed 5 Close the tray and door D 6 Slide the 3000 sheet...

Page 171: ...open door F 24y xx 1 Slide the 3000 sheet tray 2 Remove the jammed paper Note Make sure that all paper fragments are removed 3 Open door F and then remove the jammed paper Note Make sure that all pape...

Page 172: ...Remove the jammed paper from any of the following locations Note Make sure that all paper fragments are removed CAUTION HOT SURFACE The inside of the printer might be hot To reduce the risk of injury...

Page 173: ...ose door C and then slide the 3000 sheet tray back into place x page jam open doors G H and J and clear jammed paper Leave paper in bin 4yy xx 1 Open door G and then remove the jammed paper Note Make...

Page 174: ...en door J and then lift handle J1 to its upright position 3 Open door H 4 Remove the jammed paper from any of the following locations Note Make sure that all paper fragments are removed Clearing jams...

Page 175: ...Door J Note If there is a jammed paper between the nisher bins then remove the paper Areas H1 and H2 Clearing jams 175...

Page 176: ...Areas H3 and H4 Area H6 5 Close Door H 6 Open door C and then remove the jammed paper Note Make sure that door C does not hit any cable attached to the printer Clearing jams 176...

Page 177: ...s latch to access area G Leave paper in bin 40y xx 1 Remove all paper from the staple nisher bin 2 Press the latch and slide the staple nisher to the left and then remove the jammed paper Notes Make s...

Page 178: ...N HOT SURFACE The inside of the printer might be hot To reduce the risk of injury from a hot component allow the surface to cool before touching it Notes Make sure that door C does not hit any cable a...

Page 179: ...r 5 Close door C x page jam press latch to access area G and clear jammed staples Leave paper in bin 402 93 1 Remove all paper from the staple nisher bin 2 Press the latch on the staple nisher and the...

Page 180: ...loose staples 5 Press the staple guard down until it clicks into place 6 Press the staples against the metal bracket Note If the staples are at the rear of the cartridge then shake the cartridge downw...

Page 181: ...the holder clicks into place 8 Slide the nisher back into place x page jam open door H and rotate knob H6 clockwise Leave paper in bin 426 xx 428 xx If the jammed paper is located under door G then op...

Page 182: ...1 Open door J and then lift handle J1 2 Open door H 3 Remove the jammed paper from any of the following locations Note Make sure that all paper fragments are removed Clearing jams 182...

Page 183: ...Door J Note If there is a jammed paper between the nisher bins then remove the paper Areas H1 and H2 Clearing jams 183...

Page 184: ...Areas H3 and H4 Area H6 4 Using handle H5 pull out the booklet maker 5 Remove the jammed paper from any of the following locations Note Make sure that all paper fragments are removed Clearing jams 184...

Page 185: ...Area H8 Area H9 Clearing jams 185...

Page 186: ...nter might be hot To reduce the risk of injury from a hot component allow the surface to cool before touching it Notes Make sure that door C does not hit any cable attached to the printer Make sure th...

Page 187: ...the control panel and then touch Finished changing paper Touch Use current paper source to use the available paper size and type in the tray Touch Reset active bin to reset the active bin for a linked...

Page 188: ...o clear the message and continue printing Touch Reset active bin to reset the active bin for a linked set of bins Cancel the print job Install additional printer memory Con guration change some held j...

Page 189: ...ole punch box Try one or more of the following Empty the hole punch box Select Continue on the printer control panel to clear the message and continue printing Cancel the print job Error reading USB d...

Page 190: ...other data in the printer memory Install additional printer memory Insufficient memory to collate job 37 Try one or more of the following From the printer control panel touch Continue to print the par...

Page 191: ...ource with paper size paper orientation Try one or more of the following Load the tray or feeder with the correct size of paper and then touch Finished loading paper on the control panel Touch Reset a...

Page 192: ...d To clear the message and continue printing Automatically select paper To use the paper loaded in the tray Reset active bin To reset the active bin for a linked set of bins Cancel the print job Load...

Page 193: ...e control panel touch Cancel job to clear the message Touch Reset active bin to reset the active bin for a linked set of bins Install additional printer memory Network x software error 54 Try one or m...

Page 194: ...w 84 xy You may need to replace the photoconductor unit very soon For more information see Replacing a photoconductor unit on page 137 If necessary touch Continue on the control panel to clear the mes...

Page 195: ...and then remove any remaining packaging material Note Make sure that door C does not hit any cable attached to the printer Remove paper from all bins Remove the paper from all of the bins The printer...

Page 196: ...ates Canada 2 European Economic Area EEA Switzerland 3 Asia Paci c Australia New Zealand 4 Latin America 5 Africa Middle East rest of Europe 9 Invalid Notes The x and y values represent xy in the code...

Page 197: ...r cartridge and then install a supported one to clear the message and continue printing For more information see the instruction sheet that came with the supply or see the Replacing supplies section o...

Page 198: ...ars again then contact your system support person Standard network software error 54 Try one or more of the following From the printer control panel touch Continue to continue printing Turn off the pr...

Page 199: ...et 5 Turn the printer back on Too many trays attached 58 1 Turn off the printer 2 Unplug the power cord from the electrical outlet 3 Remove the extra trays 4 Connect the power cord to a properly groun...

Page 200: ...Note If the message appears again then contact your system support person Solving printer problems Basic printer problems The printer is not responding Action Yes No Step 1 Make sure the printer is t...

Page 201: ...xtension cords Is the printer plugged into any surge protectors uninterruptible power supplies or extension cords Connect the printer power cord directly to a properly grounded electrical outlet Go to...

Page 202: ...Turn off the printer and then contact customer support Hardware and internal option problems Cannot detect internal option Action Yes No Step 1 Turn off the printer then wait for about 10 seconds and...

Page 203: ...not operate correctly Action Yes No Step 1 Reinstall the internal print server a Remove and then install the internal print server For more information see Installing an Internal Solutions Port on pag...

Page 204: ...ISP solution interface cable and the receptacle on the controller board are color coded Does the Internal Solutions Port operate correctly The problem is solved Contact customer support Tray problems...

Page 205: ...oes not operate correctly Action Yes No Step 1 Make sure the USB or parallel interface card is installed a Install the USB or parallel interface card For more information see Installing an Internal So...

Page 206: ...per guides are aligned with the paper size indicators on the tray Check if the paper guides are aligned against the edges of the paper Make sure the paper is below the maximum paper ll indicator Check...

Page 207: ...ams still occur frequently Contact customer support The problem is solved Paper jam message remains after jam is cleared Action Yes No Check the entire paper path for jammed paper a Remove any jammed...

Page 208: ...ormatting error or invalid data Delete the print job and then send it again For PDF les generate a new PDF and then print it again If you are printing from the Internet then the printer may be reading...

Page 209: ...the indicator light on the printer control panel is blinking green Note A green blinking light indicates that the printer is busy Is the indicator light blinking green Wait until the printer is ready...

Page 210: ...s supported by the tray b Resend the print job Did the job print from the correct tray or on the correct paper The problem is solved Go to step 2 Step 2 a From the Paper menu on the printer control pa...

Page 211: ...print job by eliminating the number and size of fonts the number and complexity of images and the number of pages in the job Did the job print and collate correctly The problem is solved Contact custo...

Page 212: ...e held jobs stored in the printer memory b Resend the print job Did the job print The problem is solved Go to step 4 Step 4 a Disable the Page Protect feature From the control panel navigate to Settin...

Page 213: ...to print after clearing the message Do the jobs print The problem is solved Go to step 4 Step 4 a Check if the ports USB serial or Ethernet are working and if the cables are securely connected to the...

Page 214: ...print job Do the trays link correctly The problem is solved Go to step 2 Step 2 a From the printer control panel set the paper size and type in the Paper menu to match the paper loaded in the trays t...

Page 215: ...ore information contact your system support person c Resend the print job Do prints still contain characters that have jagged or uneven edges Go to step 2 The problem is solved Step 2 a Use a font tha...

Page 216: ...match the paper size speci ed in the tray settings Step 3 a Depending on your operating system specify the paper size from Printing Preferences or from the Print dialog b Resend the print job Is the p...

Page 217: ...it to direct light for more than 10 minutes Extended exposure to light can cause print quality problems b Resend the print job Did the gray background disappear from the prints The problem is solved G...

Page 218: ...ning Potential Damage Do not expose the photoconductor unit to direct light for more than 10 minutes Extended exposure to light can cause print quality problems b Resend the print job Do horizontal vo...

Page 219: ...ngs Step 3 a Depending on your operating system specify the paper size from Printing Preferences or from the Print dialog b Resend the print job Are the margins correct The problem is solved Contact c...

Page 220: ...you use it b Resend the print job Is the paper still curled Contact customer support The problem is solved Print irregularities ABCDE ABCDE ABCDE Leading edge Trailing edge Action Yes No Step 1 a Move...

Page 221: ...absorbs moisture due to high humidity Store paper in its original wrapper until you use it b Resend the print job Do print irregularities still appear Go to step 6 The problem is solved Step 6 a Clean...

Page 222: ...in the tray to match the paper type texture and weight speci ed in the tray settings Step 3 a Depending on your operating system specify the paper type texture and weight from Printing Preferences or...

Page 223: ...ality menu on the control panel increase the toner darkness Note 8 is the factory default setting b Resend the print job Is the print still too light Go to step 2 The problem is solved Step 2 From the...

Page 224: ...it b Resend the print job Is the print still too light Go to step 6 The problem is solved Step 6 a Clean the charger and the printhead lens b Resend the print job Is the print still too light Go to s...

Page 225: ...is solved Step 2 a Clean the charger and the printhead lens b Resend the print job Is the printer still printing blank pages Go to step 3 The problem is solved Step 3 Replace the photoconductor unit a...

Page 226: ...printhead lens b Resend the print job Do repeating defects still appear on prints Go to step 2 The problem is solved Step 2 a Replace the photoconductor unit if the distance between the defects is equ...

Page 227: ...d weight speci ed in the tray settings Step 3 a Depending on your operating system specify the paper type and weight from Printing Preferences or from the Print dialog b Resend the print job Do shadow...

Page 228: ...s solved Streaked horizontal lines appear on prints ABCDE ABCDE ABCDE Action Yes No Step 1 a Depending on your operating system specify the tray or feeder from Printing Preferences or the Print dialog...

Page 229: ...ines appear on prints Go to step 5 The problem is solved Step 5 a Clean the charger and the printhead lens b Resend the print job Do streaked horizontal lines appear on prints Go to step 6 The problem...

Page 230: ...e print job Do streaked vertical lines appear on prints Go to step 4 The problem is solved Step 4 a Remove and then reinstall the photoconductor unit 1 Remove the photoconductor unit Warning Potential...

Page 231: ...mage Do not expose the photoconductor unit to direct light for more than 10 minutes Extended exposure to light may cause print quality problems b Resend the print job Did the toner fog or background s...

Page 232: ...ns b Resend the print job Do toner specks appear on prints Go to step 2 The problem is solved Step 2 Replace the photoconductor unit and then resend the print job Do toner specks appear on prints Cont...

Page 233: ...t The problem is solved Vertical voids appear on prints Leading edge Trailing edge Action Yes No Step 1 a Make sure your software program is using a correct ll pattern b Resend the print job Do vertic...

Page 234: ...the photoconductor unit to direct light for more than 10 minutes Extended exposure to light may cause print quality problems b Resend the print job Do vertical voids appear on prints Go to step 5 The...

Page 235: ...and then click Submit Does an error message appear in the log Go to step 2 Contact customer support Step 2 Resolve the error Is the application working now The problem is solved Contact customer suppo...

Page 236: ...ill need to be able to describe the problem you are experiencing the message on the printer display and the troubleshooting steps you have already taken to nd a solution You need to know your printer...

Page 237: ...Telephone support is also available In the U S or Canada call 1 800 539 6275 For other countries or regions visit http support lexmark com Troubleshooting 237...

Page 238: ...a product program or service is not intended to state or imply that only that product program or service may be used Any functionally equivalent product program or service that does not infringe any e...

Page 239: ...cel OLIVE Apple Chancery Apple Computer Inc Arial The Monotype Corporation plc CG Times Based on Times New Roman under license from The Monotype Corporation plc is a product of Agfa Corporation Chicag...

Page 240: ...in which case the user will be required to correct the interference at his own expense The manufacturer is not responsible for any radio or television interference caused by using other than recommend...

Page 241: ...ste Management and Handling Rules 2011 which prohibit use of lead mercury hexavalent chromium polybrominated biphenyls or polybrominated diphenyl ethers in concentrations exceeding 0 1 by weight and 0...

Page 242: ...e requirements of DHHS 21 CFR Chapter I Subchapter J for Class I 1 laser products and elsewhere is certi ed as a Class I laser product conforming to the requirements of IEC 60825 1 2014 Class I laser...

Page 243: ...l esposizione al raggio laser FARE Usynlig laserstr ling n r kassettene tas ut og sperren er satt ut av spill Unng eksponering for laserstr len NIEBEZPIECZE STWO niewidzialne promieniowanie laserowe p...

Page 244: ...edule Power modes Using the Sleep Hibernate button Factory default Hibernate Timeout for this product in all countries or regions 3 days The amount of time the printer waits after a job is printed bef...

Page 245: ...f the Directives is available upon request from the Authorized Representative This product satis es the Class A limits of EN 55022 and safety requirements of EN 60950 1 Radio interference notice Warni...

Page 246: ...s par Industrie Canada Pour r duire les interf rences radio potentielles aupr s d autres utilisateurs le type d antenne et son gain doivent tre choisis de telle sorte que la puissance isotrope rayonn...

Page 247: ...ries indicated in the table below AT BE BG CH CY CZ DE DK EE EL ES FI FR HR HU IE IS IT LI LT LU LV MT NL NO PL PT RO SE SI SK TR UK esky Spole nost Lexmark International Inc t mto prohla uje e v robe...

Page 248: ...ngen van richtlijn 1999 5 EG Norsk Lexmark International Inc erkl rer herved at dette produktet er i samsvar med de grunnleggende krav og vrige relevante krav i direktiv 1999 5 EF Polski Niniejszym Le...

Page 249: ...iginal purchase You may be required to deliver your product to the Remarketer or Lexmark or ship it prepaid and suitably packaged to a Lexmark designated location You are responsible for loss of or da...

Page 250: ...TO CHANGE AT ANY TIME WITHOUT NOTICE Limitation of liability Your sole remedy under this limited warranty is set forth in this document For any claim concerning performance or nonperformance of Lexmar...

Page 251: ...Corp at the IETF for Addition of the Camellia Cipher Suites to Transport Layer Security TLS implemented in the product or service The use of certain patents in this product or service is subject to t...

Page 252: ...print job from the computer 69 from the printer control panel 69 cannot open Embedded Web Server 235 card stock tips 53 Cartridge low 88 xy 187 Cartridge nearly low 88 xy 187 Cartridge very low 88 xy...

Page 253: ...accessing 235 Embedded Web Server Security Administrator s Guide where to nd 129 emission notices 240 244 245 246 Empty the hole punch box 189 emptying the hole punch box 133 encrypting the printer ha...

Page 254: ...jams avoiding 161 locating jam areas 162 locations 162 numbers 162 jams clearing in 3000 sheet tray 171 in door C 171 in door F 171 in multipurpose feeder 163 Job Accounting menu 114 K keypad 13 L la...

Page 255: ...36 ordering supplies toner cartridge 135 waste toner bottle 135 ozone lter replacing 148 P paper characteristics 55 letterhead 56 preprinted forms 56 recycled 56 selecting 56 storing 55 58 unacceptabl...

Page 256: ...lete 194 printer hard disk disposing of 127 encrypting 129 installing 28 removing 32 printer hard disk encryption 129 printer hard disk memory erasing 128 printer information where to nd 8 printer IP...

Page 257: ...all bins 195 Remove paper from bin x 195 Remove paper from standard output bin 195 Replace x maintenance kit 0 estimated pages remain 80 xy 196 Replace cartridge 0 estimated pages remain 88 xy 196 Re...

Page 258: ...ductor 0 pages remain 84 xy 197 Replace unsupported cartridge 32 xy 197 Replace unsupported photoconductor 32 xy 197 Replace waste toner bottle 82 xy 197 replacing parts pick feed separator rollers 15...

Page 259: ...ovide unexpected results 199 tips card stock 53 labels paper 54 on using envelopes 53 transparencies 55 tips on using envelopes 53 tips on using letterhead 54 toner cartridge ordering 135 replacing 14...

Page 260: ...Universal Setup menu 78 unlinking trays 51 52 Unsupported option in slot x 55 200 Unsupported USB hub please remove 189 USB port 39 USB parallel interface card troubleshooting 205 using Forms and Fav...

Reviews: