


Chapter 6 Secured Private Disk
6.1
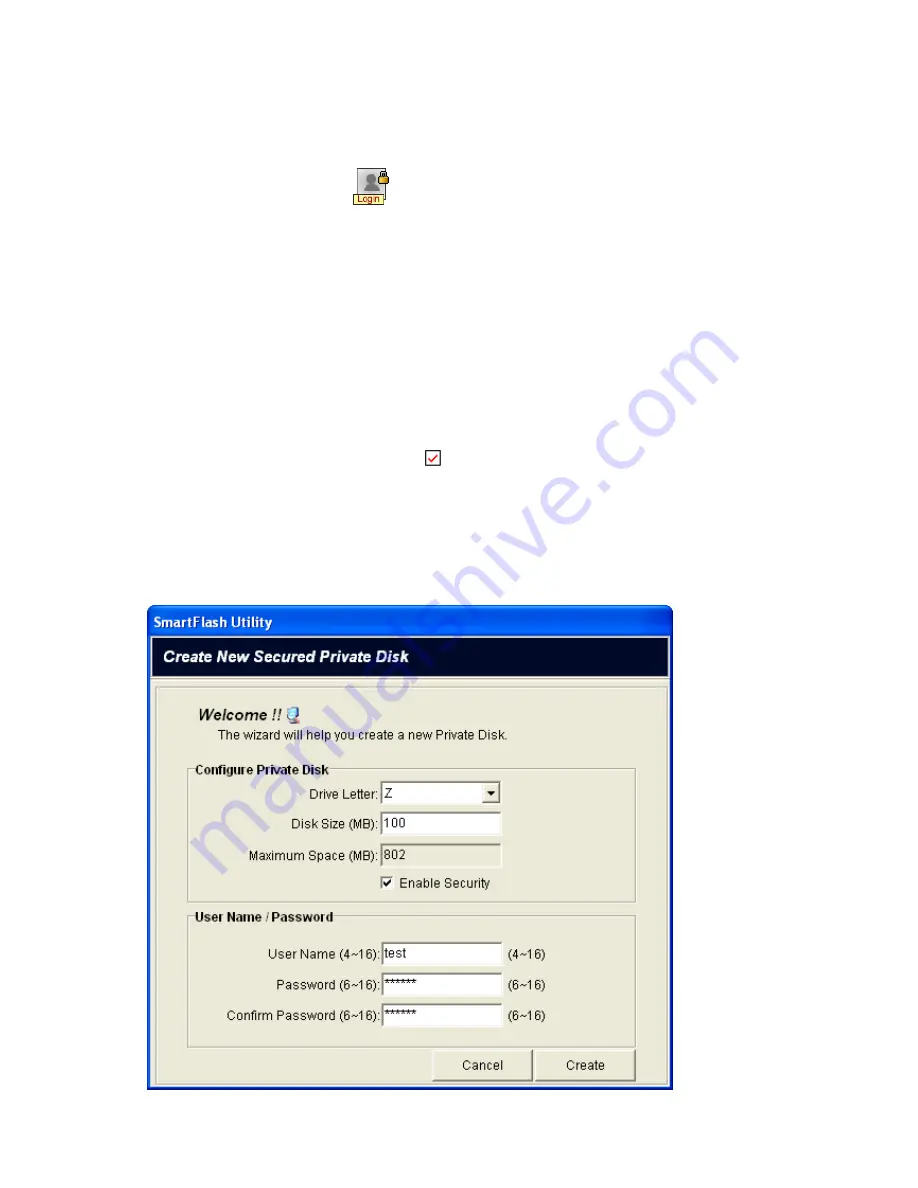
Create your private disk
1.
Click
Secured Private Disk
button in the
SmartFlash
utility screen.
2.
The
Create New Secured Private Disk
window appears requiring you to configure the
following setting.
-
In the
Drive Letter
field: select a disk drive letter you desire.
-
In the
Disk Size
(MB) field: type the desired disk size you desire. Unit is Mega Bytes.
-
In the
Maximum Space (MB)
field: display the allowable space for creating the disk. Unit is
Mega Bytes.
-
In
Enable Security
check box: click
check box to secure your disk.
-
In the
User Name
field: type your desired username (4~16 characters).
-
In the
Password
field: type your password (6~16 characters).
-
In the
Confirm Password
field: retype your password again (6~16 characters).
37
Summary of Contents for MUS-1001
Page 1: ...LevelOne MUS 1001 1GB Smart Flash User Manual V1 0 0 0610 ...
Page 8: ...Chapter 3 Using MUS 1001 Insert the flash drive to PC USB port Open SmartFlash Utility 8 ...
Page 13: ... Click Recover SmartFlash Utility or Upgrade SmartFlash Utility 13 ...
Page 21: ...a Specify the Media File type choose the type of media files that you want to copy 21 ...
Page 24: ...4 Click Play and then Windows Media Player opens to play media files 24 ...
Page 34: ...2 Specify the folders or files then click Next 34 ...
Page 35: ...3 Specify the synchronized files then click OK 4 Copy the media files to Mobile Storage 35 ...
Page 45: ...3 Select Set Private Disk drive as the new destination item 45 ...
Page 77: ...77 ...


