background image

4

Always On USB connector

: By default, the Always On USB connector enables you to charge some

mobile digital devices and smartphones when the dock is in the following situations:

• When the dock is in sleep or hibernation mode

• When the dock is turned off

For more information, refer to the documentation that comes with the dock.

5

Power button

: The power button on the dock functions the same as the one on the computer.

6

System-status indicator

: The indicator on the illuminated ThinkPad logo functions the same as the ones

on the computer. For details, see “Status indicators” on page 6.

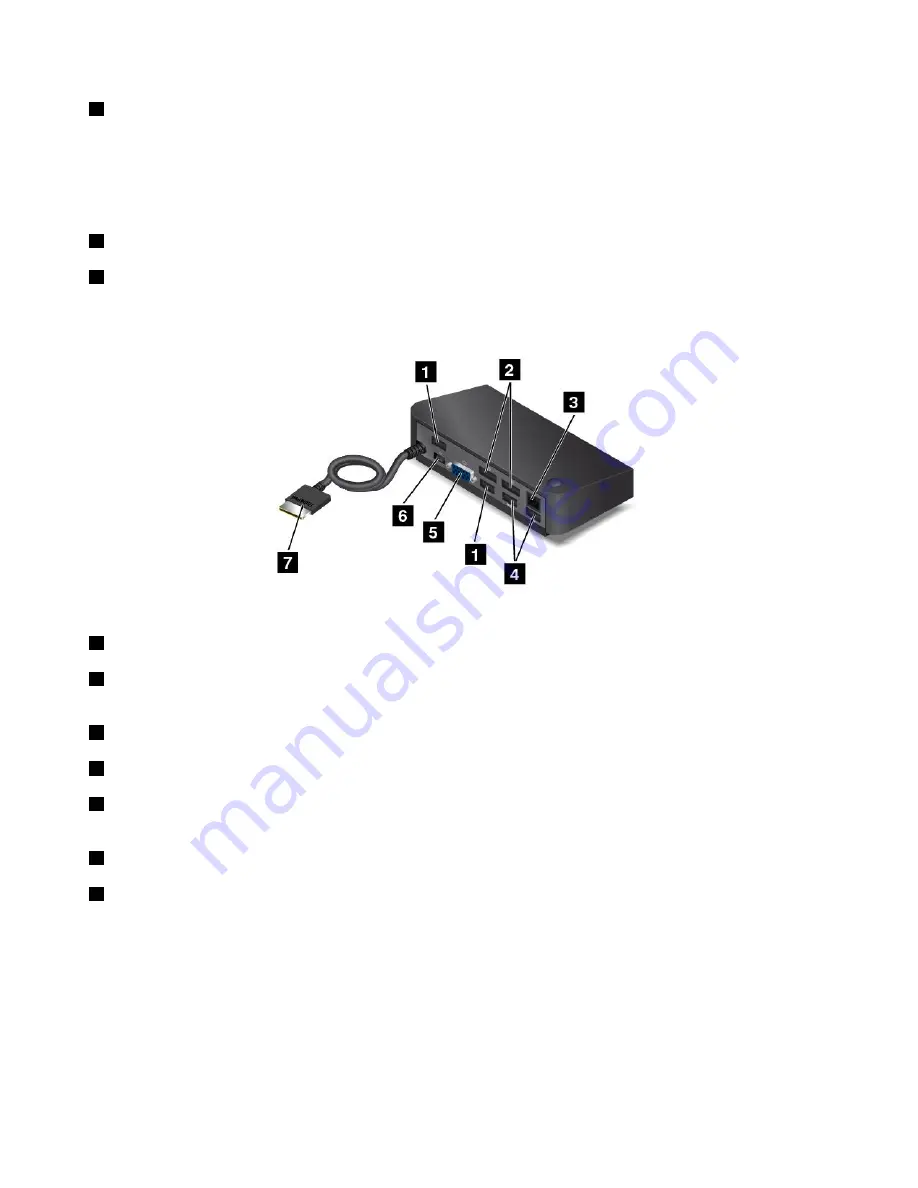
Rear view

1

USB 2.0 connectors

: Used to connect devices that are compatible with USB 2.0.

2

DisplayPort connectors

: Used to attach a high-performance monitor, a direct-drive monitor, or other

devices that use a DisplayPort connector.

3

Ethernet connector

: Used to connect the dock to an Ethernet LAN.

4

USB 3.0 connectors

: Used to connect devices that are compatible with USB 3.0 and USB 2.0.

5

VGA connector

: Used to connect the computer to a VGA-compatible video device, such as a VGA

monitor.

6

Power connector

: Used to connect the ac power adapter.

7

 connector

: Connect the  connector to the computer.

48

ThinkPad P40 Yoga, ThinkPad S3, ThinkPad Yoga 14, and ThinkPad Yoga 460 User Guide

Summary of Contents for ThinkPad Yoga 460

Page 1: ...ThinkPad P40 Yoga ThinkPad S3 ThinkPad Yoga 14 and ThinkPad Yoga 460 User Guide ...

Page 2: ... and Setup Guide and the Regulatory Notice have been uploaded to the Web site To refer to them go to http www lenovo com UserManuals and follow the instructions on the screen Third Edition January 2016 Copyright Lenovo 2015 2016 LIMITED AND RESTRICTED RIGHTS NOTICE If data or software is delivered pursuant a General Services Administration GSA contract use reproduction or disclosure is subject to ...

Page 3: ... Getting help about the Windows operating system 16 Operating modes 17 Enabling the operating modes 17 Rotating the computer display 17 Notebook mode 18 Stand mode 19 Tablet mode 20 Tent mode 21 Using the special buttons 23 Using the special keys 23 ThinkPad Pen Pro 26 Using the keyboard 27 Using the multi touch screen 29 Using the ThinkPad pointing device 32 TrackPoint pointing device 32 Trackpad...

Page 4: ...7 Chapter 9 Recovery overview 109 Recovery overview for the Windows 7 operating system 109 Creating and using recovery media 109 Performing backup and recovery operations 110 Using the Rescue and Recovery workspace 111 Creating and using a rescue medium 112 Reinstalling preinstalled programs and device drivers 112 Solving recovery problems 113 Recovery overview for the Windows 10 operating system ...

Page 5: ...2 Lenovo product service information for Taiwan 152 Eurasian compliance mark 152 Brazil audio notice 152 Appendix B WEEE and recycling statements 153 Important WEEE information 153 Japan recycling statements 153 Recycling information for Brazil 154 Battery recycling information for the European Union 154 Battery recycling information for Taiwan 155 Battery recycling information for the United Stat...

Page 6: ...iv ThinkPad P40 Yoga ThinkPad S3 ThinkPad Yoga 14 and ThinkPad Yoga 460 User Guide ...

Page 7: ...ard by lifting your hands from the palm rest Protect yourself from the heat generated by the ac power adapter When the ac power adapter is connected to an electrical outlet and your computer it generates heat Extended contact with your body even through clothing may cause a skin burn Do not place the ac power adapter in contact with any part of your body while it is in use Never use it to warm you...

Page 8: ...nt or the Lenovo Limited Warranty For more information see Warranty Information in the Safety Warranty and Setup Guide that comes with your computer Customer safety is important Our products are developed to be safe and effective However personal computers are electronic devices Power cords power adapters and other features can create potential safety risks that can result in physical injury or pr...

Page 9: ...heating smoke sparks or fire Damage to a battery such as cracks dents or creases discharge from a battery or a buildup of foreign substances on the battery A cracking hissing or popping sound or strong odor that comes from the product Signs that liquid has been spilled or an object has fallen onto the computer product the power cord or power adapter The computer product power cord or power adapter...

Page 10: ...ds For instance do not leave your power cord or power adapter near sinks tubs toilets or on floors that are cleaned with liquid cleansers Liquids can cause a short circuit particularly if the power cord or power adapter has been stressed by misuse Liquids also can cause gradual corrosion of power cord terminals and or the connector terminals on a power adapter which can eventually result in overhe...

Page 11: ...s is a safety feature Do not defeat this safety feature by trying to insert it into a non grounded outlet If you cannot insert the plug into the outlet contact an electrician for an approved outlet adapter or to replace the outlet with one that enables this safety feature Never overload an electrical outlet The overall system load should not exceed 80 percent of the branch circuit rating Consult a...

Page 12: ...eep the battery away from children Keep the battery away from fire Stop using the battery if it is damaged or if you notice any discharge or the buildup of foreign materials on the battery leads Store the rechargeable batteries or products containing the rechargeable batteries at room temperature charged to approximately 30 to 50 of capacity We recommend that the batteries be charged about once pe...

Page 13: ... depends on the amount of system activity and the battery charge level Extended contact with your body even through clothing could cause discomfort or even a skin burn Periodically take breaks from using the keyboard by lifting your hands from the palm rest and be careful not to use the keyboard for any extended length of time Do not operate your computer or charge the battery near flammable mater...

Page 14: ...configuration procedures Do not use your computer until all internal parts enclosures are fastened into place Never use the computer when internal parts and circuits are exposed DANGER Connect and disconnect cables as described in the following procedures when installing moving or opening covers on this product or attached devices To connect 1 Turn everything OFF 2 First attach all cables to devic...

Page 15: ... output voltage to 150 mV To help protect against hearing loss ensure that the headphones or earphones you use also comply with EN 50332 2 Clause 7 limits for a wide band characteristic voltage of 75 mV Using headphones that do not comply with EN 50332 2 can be dangerous due to excessive sound pressure levels If your Lenovo computer came with headphones or earphones in the package as a set the com...

Page 16: ...xiv ThinkPad P40 Yoga ThinkPad S3 ThinkPad Yoga 14 and ThinkPad Yoga 460 User Guide ...

Page 17: ...nformation on page 8 Features on page 10 Specifications on page 11 Operating environment on page 11 Lenovo programs on page 12 Locating computer controls connectors and indicators This section introduces the computer hardware features to give you the basic information you will need to start using the computer Front view Note Depending on the model your computer might look different from the follow...

Page 18: ...dicator The illuminated dot in the ThinkPad logo functions as a system status indicator For more information see Status indicators on page 6 ThinkPad pointing device 6 Trackpad 7 TrackPoint buttons 8 TrackPoint pointing stick The keyboard contains the ThinkPad pointing device Pointing selecting and dragging are all part of a single process that you can perform without moving your fingers from a ty...

Page 19: ...e used for connecting USB compatible devices such as a USB keyboard or a USB mouse Attention When you attach a USB cable to this connector ensure that the USB mark is facing upward Otherwise the connector might get damaged 4 Mini DisplayPort connector Use the mini DisplayPort connector to connect your computer to a compatible projector external monitor or high definition television This compact co...

Page 20: ...e OneLink Ethernet Adapter you can purchase one from Lenovo at http www lenovo com accessories services index html The Ethernet connector on the OneLink Ethernet Adapter has two network status indicators When the green indicator is on the computer is connected to a LAN When the yellow indicator blinks data is being transmitted For instructions on how to use the ThinkPad OneLink Dock see ThinkPad O...

Page 21: ...ur computer is equipped with a media card reader which provides a media card slot Insert your flash media card into the media card slot to read the data on the card For more information about the supported cards see Using a flash media card on page 45 6 ThinkPad Pen Pro available on some models Depending on the model your computer might have a ThinkPad Pen Pro installed Use the ThinkPad Pen Pro to...

Page 22: ...t 2 Fan louvers The fan louvers and internal fan enable air to circulate in the computer and to ensure proper cooling especially the cooling of the microprocessor Notes To ensure proper airflow do not place any obstacles in front of the fan louvers The fan louvers of your computer might get too hot when the computer is running heavy tasks When you are using or carrying the computer take care to av...

Page 23: ... indicator When the microphone mute indicator is on the microphones are muted 4 Camera status indicator When the camera status indicator is on the camera is in use 5 6 System status indicators There are two ThinkPad logos on your computer one on the palm rest and the other on the outer lid The illuminated dot in each ThinkPad logo works as a system status indicator and helps you identify the statu...

Page 24: ...provides information to help you locate the machine type and model label FCC ID and IC Certification information and the Genuine Microsoft label Machine type and model label The machine type and model label identifies your computer When you contact Lenovo for help the machine type and model information helps support technicians to identify your computer and provide faster service The following ill...

Page 25: ...ll the Windows 7 operating system from a source other than a Lenovo product recovery disc set Windows 10 Genuine Microsoft label Depending on your geographic location the date when your computer was manufactured and the version of Windows 8 Windows 8 1 or Windows 10 that is preinstalled your computer might have a Genuine Microsoft label affixed to its cover See http www microsoft com en us howtote...

Page 26: ...ngs is not displayed click All apps to display all programs and then click Settings System About Right click the Start button and then select System Memory Up to 8 GB DDR3L double data rate 3 low voltage RAM random access memory Storage device Depending on the model 2 5 inch form factor 7 mm height hard disk drive 2 5 inch form factor 7 mm height solid state drive 2 5 inch form factor 7 mm height ...

Page 27: ...eader available on some models Specifications This section lists the physical specifications for your computer Size Width 338 mm 13 3 inches Depth 236 3 mm 9 3 inches Height 19 9 mm 0 78 inch Heat output 45 W 154 Btu hr maximum 65 W 222 Btu hr maximum Power source ac power adapter Sine wave input at 50 60 Hz Input rating of the ac power adapter 100 240 V ac 50 60 Hz Operating environment Environme...

Page 28: ...rk easily and securely Note The available programs are subject to change without notice To learn more about the programs and other computing solutions offered by Lenovo go to http www lenovo com support Accessing Lenovo programs To access Lenovo programs on your computer do the following 1 Click the Start button to open the Start menu Locate a program by the program name 2 If the program is not di...

Page 29: ...gs for the integrated camera and audio devices Lenovo Touch Fingerprint Software Windows 7 If your computer comes with a fingerprint reader the program enables you to enroll your fingerprint and associate it with your passwords As a result fingerprint authentication can replace your passwords and enable simple and secure user access Hotkey Features Integration Windows 7 and Windows 10 Hotkey Featu...

Page 30: ...eb sites Power Manager Windows 7 The Power Manager program provides convenient flexible and complete power management for the computer It enables you to adjust your computer power settings to achieve the best balance between performance and power saving REACHit Windows 7 and Windows 10 REACHit enables you to manage all your files no matter where they are stored inside one single app Connect your d...

Page 31: ... register your computer information is entered into a database which enables Lenovo to contact you in case of a recall or other severe problem In addition some locations offer extended privileges and services to registered users When you register your computer with Lenovo you also will receive the following benefits Quicker service when you call Lenovo for help Automatic notification of free softw...

Page 32: ...rage drive be sure to read Notice on deleting data from your storage drive on page 64 How do I give presentations or attach an external display Ensure that you follow the procedure for Using an external display on page 42 With the Extend desktop function you can display output on both the computer display and an external monitor I have been using the computer for some time already and it is gettin...

Page 33: ... you enter the Windows 7 operating system for the first time the Enable sensors window is displayed Then click Enable this sensor Go to Control Panel Click All Control Panel Items Location and Other Sensors Then select the check box for STMicroelectronics Sensor Hub For the Windows 10 operating systems the operating modes are enabled by default Rotating the computer display This topic provides ins...

Page 34: ... You can use the computer in the notebook mode in scenarios that require using a keyboard and a mouse such as editing documents and writing e mails Attention Do not rotate the computer display with too much force otherwise the computer display or hinges might get damaged Do not apply too much force to the upper right or upper left corner of the computer display Open the computer display slowly as ...

Page 35: ...y with too much force otherwise the computer display or hinges might get damaged Do not apply too much force to the upper right or upper left corner of the computer display If your computer is in the notebook mode do the following to turn the computer from the notebook mode into the stand mode Note Depending on the model your computer might look different from the illustrations in this topic 1 Slo...

Page 36: ...al buttons refer to Using the tablet buttons on page 23 Tablet mode You can use the computer in the tablet mode in scenarios that require frequent interaction with the screen such as browsing the Web site Attention Do not rotate the computer display with too much force otherwise the computer display or hinges might get damaged Do not apply too much force to the upper right or upper left corner of ...

Page 37: ...re automatically disabled However you can control some functions of your computer through the special buttons and the multi touch screen without the use of the keyboard and the touch pad For more information refer to Using the tablet buttons on page 23 and Using the multi touch screen on page 29 Tent mode You can use your computer in the tent mode in scenarios that require limited interaction with...

Page 38: ...o the angle degrees between the LCD and the keyboard 2 Position your computer as shown Your computer is now in the tent mode In the tent mode the keyboard and the touch pad are automatically disabled However you can control some functions of your computer through the special buttons and the multi touch screen without the use of the keyboard and the touch pad For more information refer to Using the...

Page 39: ...ws button Press the Windows button to open the Start menu or press the Windows button to wake up the computer from sleep mode Using the special keys The keyboard has several special keys which consist of the function keys 1 the Fn key 2 and the Windows key 3 Notes Depending on the model your computer might look different from the illustrations in this topic In the notebook mode the keyboard the Th...

Page 40: ...he Fn key and the corresponding function key When the Fn Lock function is enabled The Fn Lock indicator turns on To input F1 F12 press the function keys directly To initiate the special function printed as an icon on each key press the Fn key and the corresponding function key Mutes or unmutes the speakers When the speakers are muted the speaker mute indicator turns on If you mute the sound and tu...

Page 41: ...s Windows Search For Windows 10 Opens the Cortana search box Views the programs that you have opened For Windows 7 Opens Computer For Windows 10 Views all the programs Fn Spacebar Controls the keyboard backlight Press Fn Spacebar to change the modes of the keyboard backlight Note If your computer is installed with the Lenovo Settings 3 0 program or later version there are four modes for the keyboa...

Page 42: ...is difficult for you to type Notes The ThinkPad Pen Pro is not waterproof Take care not to soak it or dip it in water If your computer does not come with a ThinkPad Pen Pro your computer does not support the use of the pen To purchase the ThinkPad Pen Pro go to the Lenovo Support Web site http www lenovo com accessories Using the ThinkPad Pen Pro The following illustration shows the ThinkPad Pen P...

Page 43: ...ode stand mode tent mode or tablet mode Note Ensure that your computer is on or in sleep mode Otherwise the pen will not be charged Using the keyboard Your computer keyboard features the frame travel function This topic provides information on the behavior of the keyboard Notes Depending on the model your computer might look different from the illustrations in this topic In the notebook mode the k...

Page 44: ...ate the computer display from 10 degrees to 190 degrees The following illustration shows the keyboard when the keyboard frame does not travel When you rotate the computer display from 190 degrees to 360 degrees the frame of the keyboard travels upward for about 2 0 mm 0 08 inch The following illustration shows the keyboard after the keyboard frame travels upward 28 ThinkPad P40 Yoga ThinkPad S3 Th...

Page 45: ...ing on the app you use some gestures might not be available The following table introduces some frequently used gestures Touch gesture touch models only Description Touch Tap Mouse action Click Function Open an app or perform an action on an open app such as Copy Save and Delete depending on the app Touch Tap and hold Mouse action Right click Function Open a menu with multiple options Chapter 2 Us...

Page 46: ...part Mouse action Press the Ctrl key while scrolling the mouse wheel forward Function Zoom in Touch Put two or more fingers on an item and then rotate your fingers clockwise or counterclockwise Mouse action If the app supports rotation click the rotation icon Function Rotate an item Touch Swipe in from the right edge Mouse action Click the action center icon on the taskbar Function Open the action...

Page 47: ... on the title bar Short snap for full screened app or when your computer is in tablet mode Touch Swipe downwards shortly from the top edge Mouse action Move your cursor to the top edge of the screen Function Show a hidden title bar Long swipe when your computer is in tablet mode Touch Swipe in from the top edge to the bottom edge Mouse action From the top edge of the screen click and hold move the...

Page 48: ... top down motion Do not apply any pressure on the screen Using the ThinkPad pointing device The ThinkPad pointing device enables you to perform all the functions of a traditional mouse such as pointing clicking and scrolling With the ThinkPad pointing device you also can perform a variety of touch gestures such as rotating and zooming in or out The ThinkPad pointing device consists of the followin...

Page 49: ...tick apply pressure to the pointing stick nonslip cap in any direction parallel to the keyboard The pointer moves accordingly but the pointing stick itself does not move The speed at which the pointer moves depends on the amount of pressure you apply to the pointing stick Left click Press the left click button 2 to select or open an item Right click Press the right click button 3 to display a shor...

Page 50: ...u position your two fingers slightly apart from each other With the trackpad you also can perform a variety of touch gestures For information about using the touch gestures see Trackpad touch gestures on page 34 Trackpad touch gestures The entire trackpad surface is sensitive to finger touch and movement You can use the trackpad to perform the same point and click actions as you would using a trad...

Page 51: ...he task view to see all your open windows Customizing the ThinkPad pointing device You can customize the ThinkPad pointing device so you can use it more comfortably and efficiently For example you can choose to enable the TrackPoint pointing device the trackpad or both You also can disable or enable the touch gestures To customize the ThinkPad pointing device do the following 1 Go to Control Panel...

Page 52: ...the battery The rate at which you use battery power determines how long you can use the batteries of your computer between charges Because of different user habits and needs it is difficult to predict how long a battery charge will last There are two main factors How much energy is stored in the battery when you begin to work The way you use your computer For example How often you access the stora...

Page 53: ...age of power remaining is low or when the power alarm alerts you that the remaining power is low you need to charge your battery or replace it with a charged battery If an ac outlet is convenient plug the ac power adapter into it and then insert the connector into the computer The battery will be fully charged in about three to six hours This is affected by the battery size and the physical enviro...

Page 54: ...l open programs folders and files are saved to the storage devices and then the computer turns off To put the computer into hibernation mode do the following For Windows 7 Open the Start menu then click the arrow next to the Shut down button Click Hibernate from the menu displayed For Windows 10 Define what the power button does first then press the power button to put the computer into hibernatio...

Page 55: ...ion Using the wireless LAN connection A wireless local area network LAN covers a relatively small geographic area such as an office building or a house Devices based on the 802 11 standards can connect to this type of network Your computer comes with a built in wireless network card and a configuration utility to help you establish wireless connections and monitor the connection status This enable...

Page 56: ...cess Connections wireless status icon Power to the wireless radio is off Power to the wireless radio is on No association Power to the wireless radio is on No signal Power to the wireless radio is on The signal strength of the wireless connection is excellent Power to the wireless radio is on The signal strength of the wireless connection is marginal Power to the wireless radio is on The signal st...

Page 57: ...cation area Access Connections gauge No signal Weak signal Medium signal Strong signal Access Connections status icon No location profile is active or none exists Current location profile is disconnected Current location profile is connected Access Connections wireless status icon Power to the WAN radio is off No association No signal Weak signal Medium signal Strong signal Using the Bluetooth con...

Page 58: ...nnected to the HDMI connector by a cable The wireless display can be added through the Wi Di or Miracast function Connecting a wired display Note When you connect an external monitor a video interface cable with a ferrite core is required 1 Connect the external display to an appropriate video connector on your computer 2 Connect the external display to an electrical outlet 3 Turn on the external d...

Page 59: ...put Changing display settings You can change the settings for both the computer display and the external display For example you can define which one is the main display and which one is the secondary display You also can change the resolution and orientation To change display settings do the following 1 Right click on the desktop and select Screen Resolution Windows 7 or Display settings Windows ...

Page 60: ...ng To configure the microphone for optimal sound recording use the Conexant HD Audio Manager program To start the program go to Control Panel and click Hardware and Sound Conexant HD Audio Manager Using the camera If your computer has a camera you can use the camera to preview your video image and take a snapshot of your current image To start the camera do the following For Windows 7 Start the Co...

Page 61: ...tion reduces any static electricity from your body Static electricity could damage the card To install a flash media card do the following 1 Ensure that the card is correctly oriented 2 Insert the card firmly into the slot of the 4 in 1 media card reader If the plug and play feature is not enabled for the installed flash media card do the following to enable the feature 1 Go to Control Panel 2 Cli...

Page 62: ...use Note If you do not remove the card from your computer after you eject the card from the Windows operating system the card can no longer be accessed To access the card you must remove it first then insert it again 46 ThinkPad P40 Yoga ThinkPad S3 ThinkPad Yoga 14 and ThinkPad Yoga 460 User Guide ...

Page 63: ... is an optional device that Lenovo designed specifically for your computer The dock provides convenience and makes your computer easier to use for work study and entertainment If your computer does not come with the dock you can purchase one from Lenovo at http www lenovo com accessories This topic provides basic information about the dock For detailed information about using the dock refer to the...

Page 64: ...r For details see Status indicators on page 6 Rear view 1 USB 2 0 connectors Used to connect devices that are compatible with USB 2 0 2 DisplayPort connectors Used to attach a high performance monitor a direct drive monitor or other devices that use a DisplayPort connector 3 Ethernet connector Used to connect the dock to an Ethernet LAN 4 USB 3 0 connectors Used to connect devices that are compati...

Page 65: ...hanges in your environment Following some simple rules will make things easier and bring you the maximum benefits of your computer Keeping in mind such basics as good lighting and proper seating for example can help you improve your performance and achieve greater comfort This example shows someone in a conventional setting Even when not in such a setting you can follow many of these tips Develop ...

Page 66: ...49 and practice active sitting to avoid discomfort associated with your working postures Making minor voluntary postural changes and taking short frequent work breaks are the key ingredients for healthy computing Your computer is light and mobile you can easily reposition your working surface to accommodate many posture modifications Work area setup options Familiarize yourself with all of your of...

Page 67: ...r example you can use your keyboard to control the pointer and make the keyboard easier to type certain key combinations Personalized mouse Adjust mouse settings to make your mouse easier to use For example you can change the pointer appearance and make your mouse easier to manage windows Speech Recognition Speech Recognition enables you to control your computer by voice Using only your voice you ...

Page 68: ...ng keywords for searching keyboard shortcuts key combinations shortcut keys Zoom You can use the zoom feature to enlarge or reduce the size of text pictures maps or other objects From the keyboard Zoom in Press the Windows logo key the plus sign key to enlarge the size of text pictures maps or other objects Zoom out Press the Windows logo key the minus sign key to reduce the size of text pictures ...

Page 69: ...ons on the use of computers with wireless features on the airplane you must abide by those restrictions If necessary enable the Airplane mode before boarding In the Airplane mode all wireless features are disabled To enable the Airplane mode open the Start menu and then click Settings If Settings is not displayed click All apps to display all programs and then click Settings Network Internet Airpl...

Page 70: ...54 ThinkPad P40 Yoga ThinkPad S3 ThinkPad Yoga 14 and ThinkPad Yoga 460 User Guide ...

Page 71: ...een set you will be prompted to enter it Typing passwords When this icon is displayed type a power on password or a supervisor password When this icon is displayed type a user hard disk password To type a master hard disk password press F1 When the icon changes to type the master hard disk password Note To return to the icon press F1 again Power on password You can set a power on password to help ...

Page 72: ...ord The supervisor password protects the system information stored in the ThinkPad Setup program If you have set a supervisor password no one can change the configuration of the computer without the password It provides the following security features If only a supervisor password is set a password prompt is displayed when you try to start the ThinkPad Setup program Unauthorized users cannot acces...

Page 73: ... type the new supervisor password and press Enter then retype the password in the Confirm New Password field and press Enter To remove a password do the following a In the Enter Current Password field type the current supervisor password and press Enter b Leave the Enter New Password and Confirm New Password fields blank Press Enter twice 5 A Setup Notice window is displayed Press Enter to continu...

Page 74: ...r If you select User Master do the following a First set a user hard disk password When a message window prompts you to set the user hard disk password press Enter to continue Type your new user hard disk password in the Enter New Password field and press Enter Retype the password in the Confirm New Password field and press Enter b Then set a master hard disk password When a message window prompts...

Page 75: ...ve can be used only with a computer that can recognize a hard disk password of over seven characters If you then install the hard disk drive or hybrid drive in a computer that cannot recognize a hard disk password that contains more than seven characters you cannot access the drive Record your password and store it in a safe place If you forget the user hard disk password or both user and master h...

Page 76: ...tem and Security BitLocker Drive Encryption For more information about Windows BitLocker Drive Encryption see the help information system of the Windows operating system or search for Microsoft Windows BitLocker Drive Encryption Step by Step Guide on the Microsoft Web site Disk Encryption hard disk drive Encryption solid state drive and Disk Encryption hybrid drive Some models contain the Disk Enc...

Page 77: ... Security Chip option will not be displayed When you clear the security chip turn off your computer and then turn it on again after you set the security chip to Active Otherwise the Clear Security Chip option is not displayed Using the fingerprint reader Depending on the model your computer might have a fingerprint reader Fingerprint authentication can replace your passwords such as the Windows pa...

Page 78: ...rprints with your power on password and hard disk password To associate your fingerprints with your power on password and hard disk password do the following 1 Turn off and then turn on the computer 2 When prompted swipe your finger on the fingerprint reader 3 Enter your power on password hard disk password or both as required The connection is created When you start the computer again you can use...

Page 79: ... disables the password authentication Note This item is displayed only if High security mode is enabled Reset Fingerprint Data Select this item to erase all of the fingerprint data stored in either the internal or external fingerprint reader Maintaining the fingerprint reader The following actions could damage the fingerprint reader or cause it not to work properly Scratching the surface of the re...

Page 80: ...software payware or service pay service developed for that purpose The process might take several hours For disposing of data on the solid state drive Lenovo provides the Drive Erase Utility for Resetting the Cryptographic Key and Erasing the Solid State Drive tool For disposing of data on the hard disk drive or hybrid drive Lenovo provides the Secure Data Disposal tool Go to http www lenovo com s...

Page 81: ...For more information about how to use your antivirus software refer to the help information system of your antivirus software Chapter 5 Security 65 ...

Page 82: ...66 ThinkPad P40 Yoga ThinkPad S3 ThinkPad Yoga 14 and ThinkPad Yoga 460 User Guide ...

Page 83: ...rectories and files in the C SWTOOLS directory to a removable storage device The supplement files for the Windows 7 operating system are in the C SWTOOLS OSFIXES directory The device drivers are in the C SWTOOLS DRIVERS directory The preinstalled programs are in the C SWTOOLS APPS directory 2 Start the ThinkPad Setup program See Using the ThinkPad Setup program on page 70 3 Select Startup Boot to ...

Page 84: ...ting system will not start correctly When you install the Windows 7 operating system you might need one of the following country or region codes Country or region Code Country or region Code China SC Netherlands NL Denmark DK Norway NO Finland FI Spain SP France FR Sweden SV Germany GR Taiwan and Hong Kong TC Italy IT United States US Japan JP Installing the Windows 10 operating system In some sit...

Page 85: ...Denmark DK Norway NO Finland FI Spain SP France FR Sweden SV Germany GR Taiwan and Hong Kong TC Italy IT United States US Japan JP Installing device drivers Device driver is the program that operates a particular hardware device of the computer If a device does not perform well or you install a new device you need to install or update the corresponding device driver For example if you use the Wind...

Page 86: ...puter supports the corresponding features 3 Set the value of an item by doing one of the following Press the F6 key to change to a higher value Press the F5 key to change to a lower value Note Default values are in boldface 4 To change other configurations press the Esc key to exit the submenu and return to the parent menu 5 When you complete the configuration press the F10 key to save and exit Yo...

Page 87: ...ct AC Only Wake on LAN is enabled only when the ac power adapter is attached If you select AC and Battery Wake on LAN is enabled with any power sources Notes The magic packet type Wake on LAN requires ac power The Wake on LAN function does not work when a hard disk password is set UEFI IPv4 Network Stack for UEFI Only boot mode or Both with UEFI first Disabled Enabled Enable or disable Internet Pr...

Page 88: ...external devices when your computer is in hibernation mode or is turned off without connecting to ac power If you select Enabled your computer can charge external devices when your computer is in hibernation mode or is turned off without connecting to ac power If you select Disabled your computer cannot charge external devices when your computer is in hibernation mode or is turned off without conn...

Page 89: ...inkPad HDMI HDMI connector on ThinkPad Display on dock Display connectors on dock Boot screen is cloned to all displays on dock Shared Display Priority HDMI or WiGig Display on dock Select the priority between shared display outputs HDMI WiGig and Dock displays share a single display output This option chooses which one is prioritized Total Graphics Memory 256 MB 512 MB Allocate the total memory w...

Page 90: ...disable the power saving feature that stops the microprocessor clock automatically when there are no computer activities Normally it is not necessary to change the setting Power On with AC Attach Enabled Disabled If enabled the system is powered on when AC is attached When the system is in hibernate state the system resumes If disabled the system is not powered On nor resumed when AC is attached P...

Page 91: ...ms are provided in Management Engine BIOS Extension MEBx Setup If you select Permanently Disabled you will never be able to enable it again Be cautious when you want to use this option Note You can enter the MEBx Setup menu by pressing the Ctrl P key combination in the Startup Interrupt Menu window To display the Startup Interrupt Menu window press the black button or Enter key during the power on...

Page 92: ...Disabled If you set the supervisor password and enable this function no one but you can change the items in the ThinkPad Setup program Password at Unattended Boot Disabled Enabled If you select and enable Password at unattended boot a password prompt will be displayed when the computer is turned on from either a power off or hibernation state If you select Disabled no password prompt will be displ...

Page 93: ...t is enabled at predesktop If you select Disabled authentication by a fingerprint is disabled at predesktop Reader Priority External Internal Internal Only If you select External an external fingerprint reader is used If an external reader is not present an internal reader is used If you select Internal an internal fingerprint reader is used If an internal reader is not present an external reader ...

Page 94: ...tion is Discrete TPM Active Inactive Disabled Note This item is available only when the Security Chip is set as Discrete TPM If you select Active the security chip will be functional If you select Inactive the Security Chip option will be visible but the security chip will not be functional If you select Disabled the Security Chip option will be hidden and the security chip will not be functional ...

Page 95: ...rt the Intel vPro technology Intel R TXT Feature Unselectable when Intel PTT is enabled Disabled Unselectable for Intel PPT Physical Presence for Provisioning Disabled Enabled This option enables or disables confirmation of a user physical presence when provisioning the security chip If you select Enabled a user confirmation screen will be displayed when provisioning the security chip If you selec...

Page 96: ...d Memory Protection Execution Prevention Disabled Enabled Some computer viruses and worms cause memory buffers to overflow By selecting Enabled you can protect your computer against attacks by such viruses and worms If you find that an application program does not run correctly after choosing Enabled select Disabled and reset the setting Intel R Virtualization Technology Disabled Enabled If you se...

Page 97: ...t for an SD card or a MultiMediaCard Integrated Camera Disabled Enabled If you select Enabled you can use the camera Microphone Disabled Enabled If you select Enabled you can use the microphone internal external or line in I O Port Access Fingerprint Reader Disabled Enabled If you select Enabled you can use the Fingerprint Reader Anti Theft Computrace Enabled Disabled Permanently Disabled Enable o...

Page 98: ...eys This option is used to restore all keys and certificates in Secure Boot databases to factory defaults Any customized Secure Boot settings will be erased and the default platform key will be re established along with the original signature databases including certificate for Windows 10 operating system Clear All Secure Boot Keys This option is used to clear all keys and certificates in Secure B...

Page 99: ...ct top priority of the Boot Priority Order when waking from LAN UEFI Legacy Boot Both UEFI Only Legacy Only UEFI Legacy Boot Priority Legacy First UEFI First CSM Support No Yes Select system boot capability Both The system boots by the following UEFI Legacy Boot Priority setting UEFI Only The system boots from the UEFI enabled operating system Legacy Only The system boots from any operating system...

Page 100: ...e List F12 Option Enabled Disabled If you select Enabled a pop up boot device List will be displayed when you press F12 key Note Only the person who knows the supervisor password can change the setting of this option Boot Order Lock Disabled Enabled If you select Disabled your computer will boot using the default priority If you select Enabled your computer will boot using the priority you have cu...

Page 101: ...indows 7 operating system Discard Changes Discard the changes Notes The changes of the following submenu items will not be discarded and can be reset in ThinkPad Setup menu Date Time Supervisor password Power on password Hard disk password Save Changes Save the changes Updating the UEFI BIOS The UEFI BIOS is the first program that the computer runs when the computer is turned on The UEFI BIOS init...

Page 102: ...our computer It is the responsibility of the UEFI BIOS to provide information about itself and the devices on the system board This specification documents the standards for getting access to this BIOS information Preboot eXecution Environment The Preboot eXecution Environment PXE technology makes the computer more manageable by enabling the computer to start from a server Your computer supports t...

Page 103: ...ove data seek and read times To free up disk space uninstall unused application programs Note You also might want to look for program duplication or overlapping versions Clean out your Inbox Sent and Trash folders from your e mail client program Back up your data at least once a week If critical data is present it is a good idea to perform a daily backup operation Lenovo has many backup options av...

Page 104: ...t is not always necessary to download the latest drivers However you should download the latest driver for a component if you notice poor performance from that component or if you added a new component This might eliminate the driver as the potential cause of a problem Getting the latest drivers from the Web site You can download and install updated device drivers from the Lenovo Web site by doing...

Page 105: ...atic discharge ESD is the opposite of a discharge from your body or clothing to the computer it poses the same risk of a computer malfunction Your computer is designed and manufactured to minimize any effects of electrostatic charge An electrostatic charge above a certain limit however can increase the risk of ESD Therefore when using the computer close to an appliance that can produce negative io...

Page 106: ...of your computer Occasionally clean your computer by doing the following 1 Prepare a mixture of a gentle kitchen use detergent one that does not contain abrasive powder or strong chemicals such as acid or alkaline Use 5 parts water to 1 part detergent 2 Absorb the diluted detergent into a sponge 3 Squeeze excess liquid from the sponge 4 Wipe the cover with the sponge using a circular motion and ta...

Page 107: ...ssed from the outside 2 Wipe or dust the stain gently with a soft dry cloth 3 If the stain remains moisten a soft lint free cloth with water or a 50 50 mixture of isopropyl alcohol and water that does not contain impurities Note Avoid spraying cleaner directly onto the display or the keyboard 4 Wring out as much of the liquid as you can 5 Wipe the display again do not let any liquid drip into the ...

Page 108: ...92 ThinkPad P40 Yoga ThinkPad S3 ThinkPad Yoga 14 and ThinkPad Yoga 460 User Guide ...

Page 109: ... which you can use to restore the internal storage drive to the factory default state For more information see Performing backup and recovery operations on page 110 To run the Lenovo Solution Center program see Lenovo programs on page 12 For additional information refer to the Lenovo Solution Center help system Note If you are unable to isolate and repair the problem yourself after running Lenovo ...

Page 110: ...u and the ac power adapter if in use Although you might lose some data or work by turning off the computer immediately leaving the computer on might make your computer unusable 1 Carefully unplug the ac power adapter immediately 2 Turn off the computer immediately The more quickly you stop the current from passing through the computer the more likely you will reduce damage from short circuits 3 Wa...

Page 111: ...e system CMOS might have been corrupted by an application program The computer uses the default settings Run ThinkPad Setup to reconfigure the settings If you still see the same error code have the computer serviced Message 0271 Real Time Clock Error Check Date and Time settings Solution Neither the date nor the time is set in the computer Enter ThinkPad Setup to set the date and time Message 2000...

Page 112: ...d have the computer serviced TCG is the abbreviation for Trusted Computing Group Five short beeps System board problem Shut down the computer immediately and have the computer serviced Five short beeps pause five more short beeps and pause TCG compliant functionality related problem might be the BIOS code validation failure Shut down the computer immediately and have the computer serviced Memory m...

Page 113: ...t connections You have installed all networking software that is necessary for your network environment Check with your LAN administrator for the necessary networking software Problem The adapter stops working for no apparent reason Solution The network driver files might be corrupt or missing Update the driver by referring to the previous solution for the procedure to make sure that the correct d...

Page 114: ...ing a Headset profile select Bluetooth Hands free Audio and click the Set Default button If you are using an AV profile select Stereo Audio and click the Set Default button 4 Click OK to close the Sound window Problem PIM items sent from the Windows 7 operating systems cannot be received correctly into the address book of any other Bluetooth enabled device Solution The Windows 7 operating system s...

Page 115: ...opic includes the most common problems with displays and multimedia devices including the computer display the external monitor and audio devices Computer screen problems Problem The screen is blank Solution Do the following Press the display mode switching key to bring up the image If you are using the ac power adapter or using the battery and the battery gauge shows that the battery is not deple...

Page 116: ... brightness up key Type the correct password and press Enter If these items are correctly set and the screen remains blank have the computer serviced Problem When I turn on the computer only a white pointer is displayed on a blank screen Solution If you have modified a partition on your hard disk drive or hybrid drive by using partition software information about that partition or the master boot ...

Page 117: ...w the displayed window in full screen and then click Advanced display settings Note If your computer cannot detect the external monitor click the Detect button 4 Click the icon for the desired monitor the Monitor 2 icon is for the external monitor 5 Do the following For Windows 7 Click Advanced settings For Windows 10 Click Display adapter properties 6 Click the Monitor tab 7 Select the correct sc...

Page 118: ...or supports the display mode the resolution and the refresh rate that you have set If it does not set a display mode that the monitor supports If it does support the display mode you have set go to the setup menu for the monitor itself and adjust the settings there Usually the external monitor has buttons for access to the setup menu For details see the documentation that comes with the monitor Au...

Page 119: ... a headphone to your computer while playing sound a speaker does not produce sound in the MULTI STREAM mode at Conexant HD Audio Manager Solution Once the headphone is attached the streaming is automatically redirected to it If you want to listen to sound from the speakers again be sure to set those speakers as the default device The procedure is as follows 1 Open Control Panel Click Hardware and ...

Page 120: ...ws notification area Also the system status indicator does not blink Solution Do the following 1 Ensure that the connection of the ac power adapter is correct For instructions on connecting the ac power adapter see Safety Warranty and Setup Guide that comes with your computer 2 If the connection of the ac power adapter is correct turn off the computer then disconnect the ac power adapter 3 Reconne...

Page 121: ...ror message Sleep and hibernation problems Problem The computer enters sleep mode unexpectedly Solution If the microprocessor overheats the computer automatically enters sleep mode to allow the computer to cool and to protect the microprocessor and other internal components Check the settings for sleep mode Problem The computer enters sleep mode the sleep indicator turns on immediately after the p...

Page 122: ... rejected the device attached to the USB connector might have been disabled If this occurs do a hot unplug and plug operation for the USB device Problem The battery discharges slightly while the computer is in hibernation mode Solution If the wakeup function is enabled the computer consumes a small amount of power This is not a defect For details refer to Power saving modes on page 38 Problems wit...

Page 123: ... with the application If the application still does not run correctly contact your place of purchase or a service representative for help Problems with ports and connectors The following are the most common problems with ports and connectors A USB problem Problem A device connected to the USB connector does not work Solution Open the Device Manager window Ensure that the USB device setup is correc...

Page 124: ...108 ThinkPad P40 Yoga ThinkPad S3 ThinkPad Yoga 14 and ThinkPad Yoga 460 User Guide ...

Page 125: ...ater Acronis True Image 2010 or later Paragon Backup Recovery 10 Suite or later Paragon Backup Recovery 10 Home or later Creating and using recovery media You can use recovery media to restore the storage devices to the factory default settings Recovery media are useful if you transfer the computer to another area sell the computer recycle the computer or put the computer in an operational state a...

Page 126: ...designate where the Rescue and Recovery program stores the backup In a protected area of your storage devices On the secondary the storage devices if there is one On an attached external USB hard disk drive On a network drive On recordable discs a recordable optical drive is required for this option After you have backed up the contents on the storage devices you can restore the complete contents ...

Page 127: ...tory default settings If you have multiple partitions on your storage devices you have the option to restore the factory default settings to the C partition and leave the other partitions intact Because the Rescue and Recovery workspace operates independently from the Windows operating system you can restore the factory default settings even if you cannot start the Windows operating system Attenti...

Page 128: ...on how to use the rescue medium you have created If you have created a rescue medium using a disc use the following instructions to use the rescue medium 1 Turn off your computer 2 Repeatedly press and release F12 when turning on the computer When the Boot Menu window is displayed release F12 3 In the Boot Menu window select the desired optical drive as the first boot device Then insert the rescue...

Page 129: ...rogram when prompted for the device driver you want to install click Have Disk and Browse Then select the device driver file from the device subfolder In the subfolder for the device look for the executable file a file with the extension exe Double click the file and follow the instructions on the screen Attention If you need updated device drivers for your computer do not download them from the W...

Page 130: ...ng advanced startup options With advanced startup options you can change the firmware settings of the computer change the startup settings of the Windows operating system start the computer from an external device or restore the Windows operating system from a system image To use advanced startup options do the following Note The GUI items of the operating system might change without notice 1 Open...

Page 131: ...rive 3 Click Yes in the User Account Control window to allow the Recovery Media Creator program to start 4 In the Recovery Drive window follow the on screen instructions to create a recovery USB drive Using the recovery USB drive If you cannot start your computer refer to the corresponding information in the topic Troubleshooting on page 93 to try to solve the problem by yourself If you still cann...

Page 132: ...116 ThinkPad P40 Yoga ThinkPad S3 ThinkPad Yoga 14 and ThinkPad Yoga 460 User Guide ...

Page 133: ...city damage Limit your movement Movement can cause static electricity to build up around you Always handle components carefully Handle adapters memory modules and other circuit boards by the edges Never touch exposed circuitry Prevent others from touching components When you install a static sensitive option or CRU touch the static protective package that contains the part to a metal expansion slo...

Page 134: ...print these instructions Read the important safety information first See Important safety information on page vi If your computer supports wireless WAN connections your computer might require a micro SIM card to establish wireless WAN connections Depending on the country or region of delivery you might need to purchase a micro SIM card or a micro SIM card might already be installed in your compute...

Page 135: ...he micro SIM card tray 1 The micro SIM card tray ejects 2 Then slide the micro SIM card tray out of the computer 4 Gently take the micro SIM card out of the tray 5 Install a new micro SIM card into the micro SIM card tray Chapter 10 Replacing devices 119 ...

Page 136: ...yboard To remove the keyboard do the following Note Your computer might look different from the illustrations in this topic 1 Disable the built in battery See Disabling the built in battery on page 117 2 Disconnect the ac power adapter and all cables from the computer Wait several minutes to let the computer cool 3 Close the computer display and turn the computer over 120 ThinkPad P40 Yoga ThinkPa...

Page 137: ...4 Remove the screws that secure the keyboard 5 Push hard in the direction shown by the arrows to unlatch the front edge of the keyboard the edge that is close to you Chapter 10 Replacing devices 121 ...

Page 138: ... 1 Then turn the keyboard over as shown by arrow 2 7 Detach the connectors and remove the keyboard Installing the new keyboard To install the new keyboard do the following 122 ThinkPad P40 Yoga ThinkPad S3 ThinkPad Yoga 14 and ThinkPad Yoga 460 User Guide ...

Page 139: ...n turn the keyboard over 2 Insert the keyboard as shown by the arrows Ensure that the rear edge of the keyboard the edge that is close to the computer display is under the frame of the keyboard bezel Chapter 10 Replacing devices 123 ...

Page 140: ...es to the computer Replacing the base cover assembly Before you start print these instructions Read the important safety information first See Important safety information on page vi To replace the base cover assembly do the following 1 Disable the built in battery See Disabling the built in battery on page 117 2 Close the computer display and turn the computer over 124 ThinkPad P40 Yoga ThinkPad ...

Page 141: ...3 Remove the screw caps 1 and the screw 2 4 Loosen the rest of the screws that secure the base cover assembly Chapter 10 Replacing devices 125 ...

Page 142: ...5 Pry up the latches and then remove the base cover assembly 6 Install the new base cover assembly in place 126 ThinkPad P40 Yoga ThinkPad S3 ThinkPad Yoga 14 and ThinkPad Yoga 460 User Guide ...

Page 143: ...n effective way to make programs run faster To replace the memory module read the following prerequisites and then the instructions Note The operating speed of the memory module has dependency on the system configuration In some conditions the memory module in your computer might not be able to operate at the maximum speed Attention Before you start installing a memory module touch a metal table o...

Page 144: ... the new memory module toward the contact edge side of the memory slot Insert the memory module into the memory slot at an angle of about 20 degrees 1 Pivot the memory module downward until it snaps into place 2 Ensure that the memory module is firmly installed in the memory slot and cannot be moved easily Attention Do not touch the contact edge of the memory module Otherwise the memory module mig...

Page 145: ... Do not drop the drive or subject it to physical shocks Put the drive on a material such as soft cloth that absorbs any physical shocks Do not apply pressure to the cover of the drive Do not touch the connector Before removing the storage drive make a backup copy of all the information on it and then turn off the computer Never remove the drive while the computer is operating in sleep mode or in h...

Page 146: ...drive Then take the drive out of the drive bay 6 Disconnect the drive cable from the storage drive 7 Reconnect the drive cable to the new storage drive 130 ThinkPad P40 Yoga ThinkPad S3 ThinkPad Yoga 14 and ThinkPad Yoga 460 User Guide ...

Page 147: ...on I O card Before you start print these instructions Read the important safety information first See Important safety information on page vi To replace the button I O card do the following Attention Sensitive components are mounted on the button I O card Avoid any kind of rough handling during the replacement 1 Disable the built in battery See Disabling the built in battery on page 117 2 Close th...

Page 148: ...4 Detach the connector 5 Remove the button I O card as shown 6 Insert the new button I O card 132 ThinkPad P40 Yoga ThinkPad S3 ThinkPad Yoga 14 and ThinkPad Yoga 460 User Guide ...

Page 149: ...e Depending on the model your computer might look slightly different from the illustrations in this topic To replace the ac power card do the following Attention Sensitive components are mounted on the card Avoid any kind of rough handling during the replacement 1 Disable the built in battery See Disabling the built in battery on page 117 2 Close the computer display and turn the computer over 3 R...

Page 150: ...4 Disconnect the cable from the ac power card 5 Remove the screws that secure the ac power card 134 ThinkPad P40 Yoga ThinkPad S3 ThinkPad Yoga 14 and ThinkPad Yoga 460 User Guide ...

Page 151: ...6 Remove the dc in bracket 7 Remove the ac power card Chapter 10 Replacing devices 135 ...

Page 152: ...8 Install the new ac power card in place 9 Install the dc in bracket in place 136 ThinkPad P40 Yoga ThinkPad S3 ThinkPad Yoga 14 and ThinkPad Yoga 460 User Guide ...

Page 153: ...u start print these instructions Read the important safety information first See Important safety information on page vi Note Depending on the model your computer might look slightly different from the illustrations in this topic To replace the speaker assembly do the following 1 Disable the built in battery See Disabling the built in battery on page 117 2 Close the computer display and turn the c...

Page 154: ...ver assembly on page 124 4 Remove the button I O card See Replacing the button I O card on page 131 5 Detach the connectors 6 Remove the screws Then remove the speaker assembly 138 ThinkPad P40 Yoga ThinkPad S3 ThinkPad Yoga 14 and ThinkPad Yoga 460 User Guide ...

Page 155: ...eplacing the button I O card on page 131 10 Reinstall the base cover assembly 11 Turn the computer over again Connect the ac power adapter and all cables to the computer Replacing the coin cell battery Before you start print these instructions Read the important safety information first See Important safety information on page vi Chapter 10 Replacing devices 139 ...

Page 156: ...tery abuse or mishandling can cause the battery to overheat which can cause gasses or flame to vent from the coin cell battery To replace the coin cell battery do the following 1 Disable the built in battery See Disabling the built in battery on page 117 2 Close the computer display and turn the computer over 3 Remove the base cover assembly See Replacing the base cover assembly on page 124 4 Deta...

Page 157: ...7 Turn the computer over again Connect the ac power adapter and all cables to the computer Chapter 10 Replacing devices 141 ...

Page 158: ...142 ThinkPad P40 Yoga ThinkPad S3 ThinkPad Yoga 14 and ThinkPad Yoga 460 User Guide ...

Page 159: ...mputer Recording problem symptoms and details Collect the answers to the questions below before you call for help Then you will be able to get help as quickly as possible What is the problem Is it continuous or intermittent Is there an error message What is the error code if any What operating system are you using Which version Which software applications were running at the time of the problem Ca...

Page 160: ...r the diagnostic programs might tell you that you need additional or updated device drivers or other software You can get the latest technical information and download device drivers and updates from the Lenovo Web site at http www lenovo com support Lenovo Support Web site Technical support information is available on the Lenovo Support Web site at http www lenovo com support This Web site is upd...

Page 161: ...chnical assistance have the following information available Machine type and model Serial numbers of your computer monitor and other components or your proof of purchase Description of the problem Exact wording of any error messages Hardware and software configuration information for your system Telephone numbers For a list of the Lenovo Support phone numbers for your country or region go to http ...

Page 162: ...146 ThinkPad P40 Yoga ThinkPad S3 ThinkPad Yoga 14 and ThinkPad Yoga 460 User Guide ...

Page 163: ...illustration 1 Wireless LAN antenna auxiliary 2 Wireless LAN antenna main 3 Wireless WAN antenna main available on some models 4 Wireless WAN antenna auxiliary available on some models Wireless related information Wireless interoperability The wireless LAN card is designed to be interoperable with any wireless LAN product that is based on DSSS CCK and or OFDM radio technology and is compliant to T...

Page 164: ...sh Profile OPP Personal Area Networking Profile PAN Phone Book Access Profile PBAP Service Discovery Protocol SDP Synchronization Profile SYNC Video Distribution Profile VDP Generic Attribute Profile GATT Proximity Profile Find Me Profile Immediate Alert Profile Battery Status Profile Usage environment and your health Integrated wireless cards emit radio frequency electromagnetic energy like other...

Page 165: ...ito a proteção contra interferência prejudicial mesmo de estações do mesmo tipo e não pode causar interferência a sistemas operando em caráter primário This equipment is a secondary type device that is it is not protected against harmful interference even if the interference is caused by a device of the same type and it also cannot cause any interference to primary type devices Mexico wireless rad...

Page 166: ...rference to radio or television reception which can be determined by turning the equipment off and on the user is encouraged to try to correct the interference by one or more of the following measures Reorient or relocate the receiving antenna Increase the separation between the equipment and receiver Connect the equipment into an outlet on a circuit different from that to which the receiver is co...

Page 167: ...herzustellen sind die Geräte wie in den Handbüchern beschrieben zu installieren und zu betreiben Des Weiteren dürfen auch nur von der Lenovo empfohlene Kabel angeschlossen werden Lenovo übernimmt keine Verantwortung für die Einhaltung der Schutzanforderungen wenn das Produkt ohne Zustimmung der Lenovo verändert bzw wenn Erweiterungskomponenten von Fremdherstellern ohne Empfehlung der Lenovo gestec...

Page 168: ...or ac power cord The ac power cord shipped with your product can be used only for this specific product Do not use the ac power cord for other devices Lenovo product service information for Taiwan Eurasian compliance mark Brazil audio notice Ouvir sons com mais de 85 decibéis por longos períodos pode provocar danos ao sistema auditivo 152 ThinkPad P40 Yoga ThinkPad S3 ThinkPad Yoga 14 and ThinkPad...

Page 169: ...ollection framework available to them for the return recycle and recovery of WEEE and to minimize any potential effects of EEE on the environment and human health due to the presence of hazardous substances For additional WEEE information go to http www lenovo com recycling Japan recycling statements Collecting and recycling a disused Lenovo computer or monitor If you are a company employee and ne...

Page 170: ... and need to dispose of a battery pack contact the proper person in Lenovo sales service or marketing and follow that person s instructions You also can refer to the instructions at http www lenovo com jp ja environment recycle battery If you use a Lenovo notebook computer at home and need to dispose of a battery pack you must comply with local ordinances and regulations You also can refer to the ...

Page 171: ...collected separately and recycled at end of life The label on the battery may also include a chemical symbol for the metal concerned in the battery Pb for lead Hg for mercury and Cd for cadmium Users of batteries and accumulators must not dispose of batteries and accumulators as unsorted municipal waste but use the collection framework available to customers for the return recycling and treatment ...

Page 172: ...156 ThinkPad P40 Yoga ThinkPad S3 ThinkPad Yoga 14 and ThinkPad Yoga 460 User Guide ...

Page 173: ...uct with included parts cables cords and so on meets the requirements of Directive 2011 65 EU on the restriction of the use of certain hazardous substances in electrical and electronic equipment RoHS recast or RoHS 2 For more information about Lenovo worldwide compliance on RoHS go to http www lenovo com social_responsibility us en RoHS_Communication pdf Copyright Lenovo 2015 2016 157 ...

Page 174: ... the requirements of the Republic of Turkey Directive on the Restriction of the Use of Certain Hazardous Substances in Waste Electrical and Electronic Equipment WEEE 158 ThinkPad P40 Yoga ThinkPad S3 ThinkPad Yoga 14 and ThinkPad Yoga 460 User Guide ...

Page 175: ...Ukraine RoHS India RoHS RoHS compliant as per E Waste Management Handling Rules 2011 Appendix C Restriction of Hazardous Substances Directive RoHS 159 ...

Page 176: ...160 ThinkPad P40 Yoga ThinkPad S3 ThinkPad Yoga 14 and ThinkPad Yoga 460 User Guide ...

Page 177: ...r gov Lenovo encourages you to make efficient use of energy an integral part of your day to day operations To help in this endeavor Lenovo has preset the following power management features to take effect when your computer has been inactive for a specified length of time Power plan Default Turn off the display After 10 minutes Put the computer into sleep After 20 minutes To awaken your computer f...

Page 178: ...6 Clear the Allow this device to wake the computer check box 7 Click OK 162 ThinkPad P40 Yoga ThinkPad S3 ThinkPad Yoga 14 and ThinkPad Yoga 460 User Guide ...

Page 179: ...ublication Lenovo may make improvements and or changes in the product s and or the program s described in this publication at any time without notice The products described in this document are not intended for use in implantation or other life support applications where malfunction may result in injury or death to persons The information contained in this document does not affect or change Lenovo...

Page 180: ... of Intel Corporation in the U S and or other countries BitLocker Microsoft and Windows are trademarks of the Microsoft group of companies The terms HDMI and HDMI High Definition Multimedia Interface are trademarks or registered trademarks of HDMI Licensing LLC in the United States and other countries Other company product and service names may be trademarks or service marks of others 164 ThinkPad...

Page 181: ......

Page 182: ......

Reviews: