background image

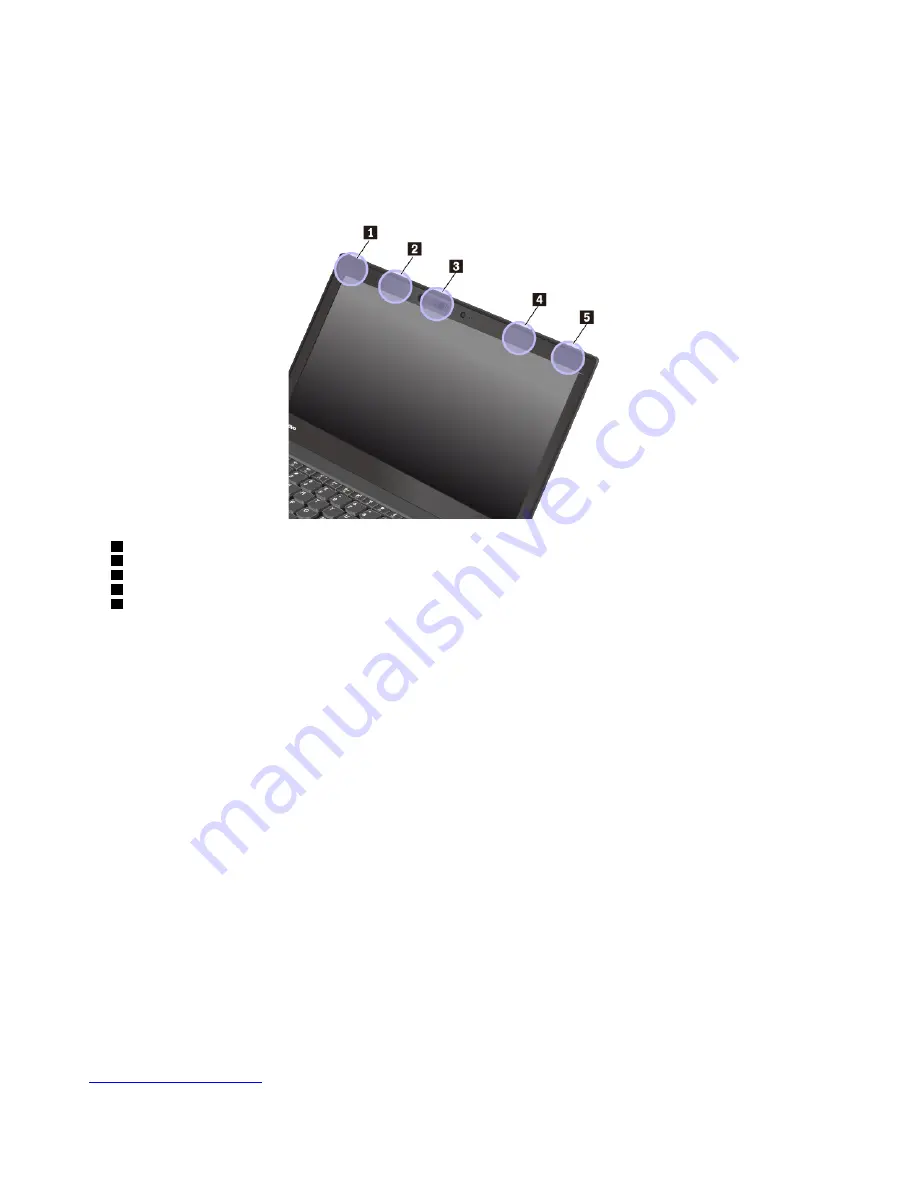
Locating the UltraConnect wireless antennas

ThinkPad notebook computers feature an integrated UltraConnect

™ 

wireless antenna system built into the 

display for optimal reception, enabling wireless communication wherever you are.

The following illustration shows where the antennas are located in your computer.

Wireless-LAN antenna (auxiliary)

Wireless-WAN antenna (auxiliary, available on some models)

WiGig antenna (available on some models)

Wireless-WAN antenna (main, available on some models)

Wireless-LAN antenna (main)

Wireless-radio compliance information

Computer models equipped with wireless communications comply with the radio frequency and safety 
standards of any country or region in which it has been approved for wireless use.

Brazil wireless-radio compliance information

Este equipamento não tem direito à proteção contra interferência prejudicial e não pode causar interferência 
em sistemas devidamente autorizados.

This equipment is not protected against harmful interference and may not cause interference with duly 
authorized systems.

Mexico wireless-radio compliance information

Advertencia: 

En Mexico la operación de este equipo estásujeta a las siguientes dos condiciones: (1) es 

posible que este equipo o dispositivo no cause interferencia perjudicial y (2) este equipo o dispositivo debe 
aceptar cualquier interferencia, incluyendo la que pueda causar su operación no deseada.

Locating wireless regulatory notices

For more information about the wireless regulatory notices, refer to the 

Regulatory Notice 

shipped with your 

computer.

If your computer is shipped without the 

Regulatory Notice

, you can find it on the Web site at: 

https://support.lenovo.com

142

T470 User Guide

Summary of Contents for ThinkPad T470

Page 1: ...T470 User Guide ...

Page 2: ...s User Guide To get all the latest documents go to https support lenovo com Depending on the version of operating systems some user interface instructions might not be applicable to your computer Sixth Edition September 2018 Copyright Lenovo 2017 2018 LIMITED AND RESTRICTED RIGHTS NOTICE If data or software is delivered pursuant to a General Services Administration GSA contract use reproduction or...

Page 3: ... the multi touch screen 16 Using the special keys 18 Using the ThinkPad pointing device 20 ThinkPad pointing device overview 20 Using the TrackPoint pointing device 21 Using the trackpad 22 Using the trackpad touch gestures 23 Customizing the ThinkPad pointing device 24 Replacing the cap on the pointing stick 24 Power management 25 Using the ac power adapter 25 Using the battery 25 Managing the ba...

Page 4: ... 102 Hard disk drive problems 103 Solid state drive problem 103 Software problem 103 USB problem 104 Docking station problem 104 Chapter 8 Recovery information 105 Recovery information for the Windows 7 operating system 105 Creating and using recovery media 105 Reinstalling preinstalled programs and device drivers 106 Recovery information for the Windows 10 operating system 107 Resetting your comp...

Page 5: ... Japan notice for ac power cord 145 Lenovo product service information for Taiwan 145 Taiwan precautionary vision statement 145 Eurasian compliance mark 145 Brazil audio notice 145 Appendix C WEEE and recycling statements of countries and regions 147 General recycling information 147 Important WEEE information 147 Japan recycling statements 148 Recycling information for Brazil 148 Battery recyclin...

Page 6: ...iv T470 User Guide ...

Page 7: ... information includes references to power adapters and batteries In addition to notebook computers some products such as speakers and monitors ship with external power adapters If you have such a product this information applies to your product In addition computer products contain a coin sized internal battery that provides power to the system clock even when the computer is unplugged so the batt...

Page 8: ...ck keep liquids away from your computer Protect the cables from being damaged Applying strong force to cables may damage or break them Route communication lines or the cables of an ac power adapter a mouse a keyboard a printer or any other electronic device so that they cannot be walked on tripped over pinched by your computer or other objects or in any way subject to treatment that could interfer...

Page 9: ...om your product Or you might hear sounds like popping cracking or hissing These conditions might merely mean that an internal electronic component has failed in a safe and controlled manner Or they might indicate a potential safety issue However do not take risks or attempt to diagnose the situation yourself Contact the Customer Support Center for further guidance For a list of Service and Support...

Page 10: ...ustomer Support Center or your documentation Only use a Service Provider who is approved to repair your particular product Note Some computer parts can be upgraded or replaced by the customer Upgrades typically are referred to as options Replacement parts approved for customer installation are referred to as Customer Replaceable Units or CRUs Lenovo provides documentation with instructions when it...

Page 11: ... terminals on a power adapter which can eventually result in overheating Ensure that all power cord connectors are securely and completely plugged into receptacles Do not use any power adapter that shows corrosion at the ac input pins or shows signs of overheating such as deformed plastic at the ac input pins or anywhere on the power adapter Do not use any power cords where the electrical contacts...

Page 12: ...replace the outlet with one that enables this safety feature Never overload an electrical outlet The overall system load should not exceed 80 percent of the branch circuit rating Consult an electrician for more information if you have questions about power loads and branch circuit ratings Be sure that the power outlet you are using is properly wired easily accessible and located close to the equip...

Page 13: ...ry Do not crush or puncture the battery Do not short circuit the battery or expose it to water or other liquids Keep the battery away from children Keep the battery away from fire Stop using the battery if it is damaged or if you notice any discharge or the buildup of foreign materials on the battery leads Store the rechargeable batteries or products containing the rechargeable batteries at room t...

Page 14: ...s according to local laws and regulations Notice for non rechargeable coin cell battery DANGER If the coin cell battery is incorrectly replaced there is danger of an explosion The battery contains a small amount of harmful substance Do not heat to more than 100 C 212 F The following statement applies to users in the state of California U S A California Perchlorate Information Products containing m...

Page 15: ...e your computer or charge the battery near flammable materials or in explosive environments Ventilation slots fans and or heat sinks are provided with the product for safety comfort and reliable operation These features might inadvertently become blocked by placing the product on a bed sofa carpet or other flexible surface Never block cover or disable these features When the ac power adapter is co...

Page 16: ...r until all internal parts enclosures are fastened into place Never use the computer when internal parts and circuits are exposed DANGER Connect and disconnect cables as described in the following procedures when installing moving or opening covers on this product or attached devices To connect 1 Turn everything OFF 2 First attach all cables to devices 3 Attach signal cables to connectors 4 Attach...

Page 17: ...our computer complies with EN 50332 2 Sub clause 7 This specification limits the computer s maximum wide band true RMS output voltage to 150 mV To help protect against hearing loss ensure that the headphones or earphones you use also comply with EN 50332 2 Clause 7 limits for a wide band characteristic voltage of 75 mV Using headphones that do not comply with EN 50332 2 can be dangerous due to exc...

Page 18: ...xvi T470 User Guide ...

Page 19: ...models 1 Conventional camera available on some models The camera enables you to take pictures or hold a video conference For more information see Using the cameras on page 33 2 Microphones The microphones capture sound and voice when used with a program capable of handling audio 3 Infrared camera available on some models The infrared camera provides a personal and secure way for you to sign in to ...

Page 20: ...leep or hibernation mode To change what the power button does do the following 1 Go to Control Panel and then change the view of Control Panel from Category to Large icons or Small icons 2 Click Power Options Choose what the power buttons do 3 Follow the instructions on the screen 6 Fingerprint reader available on some models Fingerprint authentication provides simple and secure user access by ass...

Page 21: ... power is below 10 the USB C accessories connected to the USB C connector might not work correctly Thunderbolt 3 technology is not supported on the Windows 7 32 bit operating system After you install another operating system you can enable the Thunderbolt 3 technology in ThinkPad Setup by doing the following 1 Turn on the computer and press F1 when the logo screen is displayed 2 Select Config Thun...

Page 22: ...d Otherwise the connector might get damaged 3 HDMI connector The High Definition Multimedia Interface HDMI connector is a digital audio and video interface It enables you to connect your computer to a compatible digital audio device or video monitor such as a DVD player or a high definition television HDTV 4 Ethernet connector The Ethernet connector enables you to connect the computer to a local a...

Page 23: ...use the computer with battery power whenever ac power is unavailable 2 Docking station connector You can connect the computer to a supported docking station to extend the computer capabilities 3 Speakers Your computer is equipped with a pair of stereo speakers 4 Keyboard drainage holes If you accidentally spill water or drink over the keyboard the keyboard drainage holes can help drain out liquid ...

Page 24: ...fying the various status indicators on your computer Note Depending on the model your computer might look different from the following illustrations 1 Camera status indicator When this indicator is on the conventional camera is in use or the infrared camera is in recognition mode 2 7 System status indicators The indicator in the ThinkPad logo on the computer lid and the indicator in the power butt...

Page 25: ...nes are muted 8 ac power status indicator This indicator shows the ac power and charging status of the computer Green connected to ac power battery power 80 100 Yellow connected to ac power battery power 1 80 Off not connected to ac power Important product information This section provides information to help you locate the following Machine type and model information FCC ID and IC Certification i...

Page 26: ...identifies the actual FCC ID and IC certification number for the wireless module installed by Lenovo Note Do not remove or replace a preinstalled wireless module by yourself For replacement you must contact Lenovo service first Lenovo is not responsible for any damage caused by unauthorized replacement For a user installable wireless WAN module this label directs you to consult this user guide for...

Page 27: ... and the Product ID The Product ID is important when you reinstall the Windows 7 operating system from a source other than a Lenovo product recovery disc set Windows 10 Genuine Microsoft label Your computer might have a Genuine Microsoft label affixed to its cover depending on the following factors Your geographic location Date when your computer was manufactured Version of Windows 10 that is prei...

Page 28: ... do the following For Windows 7 Open the Start menu right click Computer and then click Properties For Windows 10 Right click the Start button and then click System Memory Double data rate 4 DDR4 small outline dual in line memory module SODIMM Storage device 2 5 inch form factor 7 mm 0 28 inch height hard disk drive available on some models 2 5 inch form factor 7 mm 0 28 inch height solid state dr...

Page 29: ...lable on some models Wireless LAN Wireless WAN available on some models Wireless Gigabit WiGig available on some models Others Conventional camera available on some models Microphones Computer specifications Size Width 336 6 mm 13 25 inches Depth 232 5 mm 9 15 inches Thickness 19 95 mm 0 79 inches Maximum heat output depending on the model 45 W 154 Btu hr 65 W 222 Btu hr Power source ac power adap...

Page 30: ...rd Particles that fall into your keyboard can cause damage Lenovo programs Your computer comes with Lenovo programs to help you work easily and securely Accessing Lenovo programs To access Lenovo programs on your computer do the following 1 Open the Start menu and locate a program by the program name 2 If the program is not displayed on the Start menu on Windows 7 click All programs to display all...

Page 31: ...it with your passwords As a result fingerprint authentication can replace your passwords and enable simple and secure user access Hotkey Features Integration Windows 7 and Windows 10 This software enables F1 F12 special keys and buttons on your computer For example when the microphone mute key or button is pressed the microphone state switches between mute and unmute The mute state indicator is di...

Page 32: ...his program provides convenient flexible and complete power management for the computer It enables you to adjust your computer power settings to achieve the best balance between performance and power saving Recovery Media Windows 7 This program enables you to restore the contents of the internal storage drive to the factory default settings System Update Windows 7 This program enables you to keep ...

Page 33: ...is topic provides a few tips to help you optimize the use of your ThinkPad notebook computers Can I get my user guide in another language To download the user guide in another language go to https support lenovo com Then follow the instructions on the screen How to turn off my computer For Windows 7 Open the Start menu and click Shut down For Windows 10 Open the Start menu click Power and then cli...

Page 34: ... you are unable to access this electronic user guide when necessary Installing a new operating system on page 67 Computer stops responding on page 88 Power problems on page 101 Getting help about the Windows operating system The Windows help information system provides you with detailed information about using the Windows operating system so that you can get the most of your computer To access the...

Page 35: ...he location you want Mouse action Click hold and drag an item Function Move an object Touch Move two fingers closer together Mouse action Press the Ctrl key while scrolling the mouse wheel backward Function Zoom out Touch Move two fingers farther apart Mouse action Press the Ctrl key while scrolling the mouse wheel forward Function Zoom in Touch Put two or more fingers on an item and then rotate y...

Page 36: ...e the pointer to the bottom of the screen and then release Function Close the current app Tips on using the multi touch screen The multi touch screen is a glass panel covered with a plastic film Do not apply pressure or place any metallic object on the screen which might damage the touch panel or cause it to malfunction Do not use fingernails gloved fingers or inanimate objects for input on the sc...

Page 37: ...e standard F1 F12 function and the special function printed as an icon on each key When the Fn Lock indicator is off you can use the default function You can change the default function in the Keyboard Properties window Mute or unmute the speakers When the speakers are muted the indicator on the key is on If you mute the sound and turn off your computer the sound will remain muted when you turn on...

Page 38: ... F12 or Ctrl F12 Open the Snipping Tool program Key combinations Fn B This key combination has the same function as the Break key on a conventional external keyboard Fn K This key combination has the same function as the ScrLK or Scroll Lock key on a conventional external keyboard Fn P This key combination has the same function as the Pause key on a conventional external keyboard Fn S This key com...

Page 39: ...enabled To change the settings see Customizing the ThinkPad pointing device on page 24 Using the TrackPoint pointing device The TrackPoint pointing device enables you to perform all the functions of a traditional mouse such as pointing clicking and scrolling The TrackPoint pointing device consists of the following components 1 Pointing stick 2 Left click button primary click button 3 Right click b...

Page 40: ...ich the pointer moves depends on the amount of pressure you apply to the pointing stick Left click Press the left click button 2 to select or open an item Right click Press the right click button 3 to display a shortcut menu Scroll Press and hold the dotted scroll bar 4 while applying pressure to the pointing stick in the vertical or horizontal direction Then you can scroll through the document We...

Page 41: ...ch gestures For information about using the touch gestures see Using the trackpad touch gestures on page 23 If the trackpad surface is stained with oil turn off the computer first Then gently wipe the trackpad surface with a soft and lint free cloth moistened with lukewarm water or computer cleaner Using the trackpad touch gestures The entire trackpad surface is sensitive to finger touch and movem...

Page 42: ...fingers down Put three fingers on the trackpad and move them down to show the desktop Customizing the ThinkPad pointing device You can customize the ThinkPad pointing device so you can use it more comfortably and efficiently For example you can choose to enable the TrackPoint pointing device the trackpad or both You also can disable or enable the touch gestures To customize the ThinkPad pointing d...

Page 43: ...severely damage your computer 1 Connect the power cord to the ac power adapter 2 Connect the ac power adapter to the power connector of the computer If your computer is shipped with a USB C type ac power adapter connect the adapter to the USB C connector of the computer 3 Connect the power cord to an electrical outlet Tips on using the ac power adapter When the ac power adapter is not in use disco...

Page 44: ...essage is displayed and the computer display is turned off To enable the battery alarm do the following 1 Start the Power Manager program See Accessing Lenovo programs on page 12 2 Click the Global Power Settings tab 3 For Low battery alarm or Critically low battery alarm set the percentage of the power level and set the action Note If your computer enters sleep or hibernation mode when the batter...

Page 45: ...more information see the Windows help information system Power saving modes There are several modes that you can use at any time to conserve power This section introduces each mode and gives tips on the effective use of battery power Screen blank mode for Windows 7 only The computer display requires considerable battery power To enter screen blank mode right click the battery status icon in the Wi...

Page 46: ... not using the wireless features such as Bluetooth or wireless LAN turn them off to help conserve power Cabled Ethernet connections With an Ethernet cable you can connect your computer to a local network through the Ethernet connector on your computer The Ethernet connector has two network status indicators When the green indicator is on the computer is connected to a LAN When the yellow indicator...

Page 47: ...passed the better the signal is Using the wireless WAN connection Wireless wide area network WAN which uses cellular networks for data transmission enables you to establish wireless connections over remote public or private networks These connections can be maintained over a large geographical area by use of multiple antenna sites or satellite systems maintained by wireless service providers Some ...

Page 48: ...ettings Then enable Bluetooth Network Connection For Windows 10 Do one of the following Press the Bluetooth control key and turn on the Bluetooth feature Open the Start menu and then click Settings Network Internet Airplane mode The Bluetooth feature is enabled 2 Right click the data that you want to send 3 Select Send To Bluetooth Devices 4 Select a Bluetooth device and then follow the instructio...

Page 49: ...l as shown 2 Slowly move the card a distance within 30 mm 1 18 inches to the direction of the computer display Then hold the card until you are prompted that the card has been successfully detected Note When pairing the card ensure that the card does not exceed the detection tolerance of 5 mm 0 20 inches leftward Pairing your computer with an NFC enabled smartphone Before you start ensure that the...

Page 50: ...Energy Saving Graphics You do not have to restart your computer close programs or intervene manually Using audio features Your computer is equipped with the following items Audio connector 3 5 mm 0 14 inches in diameter Microphones Speakers Your computer also has an audio chip that enables you to enjoy various multimedia audio features such as the following Compliant with High Definition Audio Pla...

Page 51: ... video capturing and video conferencing To use the conventional camera with other programs open one of the programs and start the photographing video capturing or video conferencing function Then the camera starts automatically and the green camera status indicator turns on For more information about using the camera with a program see the help information system of the program You can configure t...

Page 52: ...Then click Get Started 5 Enter the PIN you have set earlier The camera preview starts 6 Follow the instructions on the screen to complete the setup 7 Click Improve Recognition to improve the image so that Windows Hello can recognize you in different light conditions or when your appearance changes To use the infrared camera to unlock your computer do the following 1 On the Windows lock screen sele...

Page 53: ...mart card into the smart card reader of your computer Otherwise the reader might get damaged Installing a media card or a smart card Attention Before you start installing a card touch a metal table or a grounded metal object This action reduces any static electricity from your body Static electricity could damage the card To install the card do the following 1 Locate the appropriate type of slot f...

Page 54: ...m the Windows operating system the card can no longer be accessed To access the card you must remove it first and then insert it again Using an external display This section provides instructions on how to connect an external display choose display modes and change display settings You can use an external display such as a projector or a monitor to give presentations or to expand your workspace Yo...

Page 55: ... screen Note Depending on the situation you might see Disconnect PC screen only Computer only or Disconnect projector Duplicate Displays the same video output on both your computer screen and an external display Extend Extends the video output from your computer display to an external display You can drag and move items between the two displays Second screen only Shows the video output only on an ...

Page 56: ... of you leans back When taking off remember to turn off your computer or put it to hibernation mode If you intend to use your computer or wireless services such as Internet and Bluetooth check with the airline for restrictions and availability of services before boarding the airplane If there are restrictions on the use of computers with wireless features on the airplane you must abide by those re...

Page 57: ...e and more To shop at Lenovo go to https www lenovo com accessories ThinkPad Basic Dock ThinkPad Pro Dock and ThinkPad Ultra Dock This section introduces how to use the ThinkPad Basic Dock ThinkPad Pro Dock and ThinkPad Ultra Dock Controls connectors and indicators ThinkPad Basic Dock 1 Power button Press the power button to turn on or turn off the computer 2 Eject button Press the eject button to...

Page 58: ...n always use the Ethernet connector or the external monitor connector on the docking station Do not use the ones on the computer 5 ac power connector Connect the ac power adapter 6 VGA connector Connect the computer to a VGA compatible video device such as a VGA monitor ThinkPad Pro Dock 1 Power button Press the power button to turn on or turn off the computer 2 Key lock indicator This indicator t...

Page 59: ...nd smartphones 2 USB 2 0 connectors 3 USB 3 0 connectors Connect USB compatible devices such as a USB keyboard a USB mouse a USB storage device or a USB printer 4 Ethernet connector Connect the docking station to an Ethernet LAN Note When your computer is attached to the docking station always use the Ethernet connector or the external monitor connector on the docking station Do not use the ones o...

Page 60: ...n off the computer 2 Key lock indicator This indicator turns on when the system lock key is in the locked position 3 Docking status indicator This indicator turns on when the computer is attached to the docking station properly 4 Eject button Press the eject button to release the computer from the docking station 5 Sliding adjuster Use the sliding adjuster as a guide to align the docking station c...

Page 61: ...compatible digital audio device or video monitor such as a DVD player or an HDTV 8 DVI connector Connect a monitor that supports Digital Visual Interface DVI connection Note The DVI connector provides a digital interface only This connector can only be used with a computer that supports DVI connection To connect a DVI monitor do the following 1 Turn off the computer 2 Connect the DVI monitor to th...

Page 62: ...t you turn the system lock key to the unlocked position horizontal 2 Attach your computer to the docking station as shown until you hear a click 1 Turn the system lock key to the locked position vertical 2 3 Check the docking status indicator If the indicator is off your computer is not attached to the docking station successfully To solve the problem detach and reattach the computer If the proble...

Page 63: ...e system lock key to the unlocked position horizontal 3 Press the eject button to eject the computer 1 and then grasp both sides of the computer to remove it 2 Guidelines on connecting multiple external displays to the docking station You can connect multiple external displays to a supported ThinkPad docking station To ensure that the multiple displays work correctly observe the following guidelin...

Page 64: ... displays including your computer display can work at the same time As a result if you connect three external displays to the ThinkPad Ultra Dock the display connected to the VGA connector will not work when your computer display is on When the computer display is off 46 T470 User Guide ...

Page 65: ...s have a wireless LAN card with built in WiGig feature These computer models can work with the ThinkPad WiGig Dock wirelessly to expand computing capabilities ThinkPad WiGig Dock overview 1 Status indicator The indicator in the ThinkPad logo shows the status of the dock The indicator is solid on when the dock is on in normal mode 1 2 USB 2 0 connectors Chapter 3 Enhancing your computer 47 ...

Page 66: ... that fits this security lock slot 9 ac power connector Connect the ac power adapter 10 HDMI connector Connect a compatible digital audio device or video monitor such as a DVD player or an HDTV 11 DisplayPort connector Connect a high performance monitor a direct drive monitor or other devices that use a DisplayPort connector 12 Ethernet connector Connect the dock to an Ethernet LAN 1 Emergency res...

Page 67: ... electrical outlet 4 Turn on the dock by pressing the power button 5 If an external display is available connect the external display to the appropriate connector HDMI or DisplayPort connector on the dock The external display shows some wireless pairing instructions when you connect your computer to the dock Chapter 3 Enhancing your computer 49 ...

Page 68: ...ck Connecting to the ThinkPad WiGig Dock To connect your computer to the ThinkPad WiGig dock do the following 1 After the setup and preparation turn on your computer and the dock Then do the following For Windows 7 Click the Start button to open the Start menu and then click All programs Intel Intel Wireless Dock Manager to start the Wireless Dock Manager program For Windows 10 Click the action ce...

Page 69: ... Dock Manager program enables you to manage the dock You can change the name of the dock change the radio channel to optimize the signal strength and set a password to manage the dock settings To manage the ThinkPad WiGig Dock do the following 1 Click the Start button to open the Start menu For Windows 7 click All programs to display all programs 2 Click Intel Intel Wireless Dock Manager to start ...

Page 70: ...52 T470 User Guide ...

Page 71: ...eys Num Lock for five seconds Turn on or turn off Toggle Keys Left Alt Left Shift Num Lock Turn on or turn off Mouse Keys Left Alt Left Shift PrtScn or PrtSc Turn on or turn off High Contrast For more information go to https windows microsoft com and then search using any of the following keywords keyboard shortcuts key combinations shortcut keys Ease of Access Center Ease of Access Center on the ...

Page 72: ... you can start programs open menus click objects on the screen dictate text into documents and write and send e mails Everything you do with the keyboard and mouse can be done with only your voice To use Speech Recognition do the following 1 Go to Control Panel and ensure that you view Control Panel by Category 2 Click Ease of Access Speech Recognition 3 Follow the instructions on the screen Scree...

Page 73: ...ovo provides electronic documentation in accessible formats such as properly tagged PDF files or HyperText Markup Language HTML files Lenovo electronic documentation is developed to ensure that visually impaired users can read the documentation through a screen reader Each image in the documentation also includes adequate alternative text so that visually impaired users can understand the image wh...

Page 74: ...ormance If your work area is not in an office setting ensure to take special note of employing active sitting and taking work breaks Many ThinkPad product solutions are available to help you modify and expand your computer to best suit your needs You can find some of these options at https www lenovo com accessories Explore your options for docking solutions and external products that provide the ...

Page 75: ...ver Wipe it with a lint free cloth dampened in mild soap and water Avoid applying liquids directly to the cover Cleaning the keyboard Wipe the keys one by one with a lint free cloth dampened in mild soap and water If you wipe several keys at a time the cloth might hook onto an adjacent key and possibly damage it Avoid spraying cleaner directly onto the keyboard To remove any crumbs or dust from be...

Page 76: ...58 T470 User Guide ...

Page 77: ...ect password to start using the computer When this icon is displayed type a power on password or a supervisor password Supervisor password The supervisor password protects the system information stored in the ThinkPad Setup program It provides the following security features If only a supervisor password is set a password prompt is displayed when you try to start the ThinkPad Setup program Unautho...

Page 78: ...rd your password and store it in a safe place If you forget the user hard disk password or both user and master hard disk passwords Lenovo cannot reset your passwords or recover data from the storage drive You must take your computer to a Lenovo reseller or a marketing representative to have the storage drive replaced Proof of purchase is required and a fee will be charged for parts and service No...

Page 79: ... encrypt all user and system files including the swap and hibernation files BitLocker uses the TPM to provide enhanced protection for your data and to ensure early boot component integrity A compatible TPM is defined as a V1 2 TPM Windows 7 32 bit or V2 0 TPM Windows 7 64 bit and Windows 10 To check the BitLocker status go to Control Panel view Control Panel by Category and click System and Securi...

Page 80: ...Windows password power on password and hard disk password In this way you can log in to your computer simply and securely Enrolling your fingerprints To enable fingerprint authentication enroll your fingerprints first During the enrollment the fingerprints are associated with the Windows password automatically It is recommended that you enroll more than one fingerprint in case of any injuries to y...

Page 81: ...nd hard disk password To change the settings go to ThinkPad Setup program See Using the ThinkPad Setup program on page 70 Attention If you always use your fingerprint to log in to the computer you might forget your passwords Write down your passwords and keep them in a safe place If you forget your power on password you must take your computer to a Lenovo authorized servicer or a marketing represe...

Page 82: ...sure to delete data stored on the storage drive before you dispose of sell or hand over your computer You can use the following methods to delete data from the storage drive Move the data to the Recycle Bin and then empty the Recycle Bin Format your storage drive using the software to initialize it Use the recovery program provided by Lenovo to bring the storage drive back to the factory default s...

Page 83: ...lid State Drive tool Using firewalls If your system is preinstalled with a firewall program it protects against computer Internet security threats unauthorized access intrusions and Internet attacks It also protects your privacy For more information about how to use the firewall program see the help system that comes with the program Protecting data against viruses Lenovo provides a full version o...

Page 84: ...66 T470 User Guide ...

Page 85: ...age 61 2 Copy all the subfolders and files at C SWTOOLS to a removable storage device The supplement files for the Windows 7 operating system are at C SWTOOLS OSFIXES The device drivers are at C SWTOOLS DRIVERS The preinstalled programs are at C SWTOOLS APPS 3 Start the ThinkPad Setup program 4 Select Startup Boot to display the Boot Priority Order submenu 5 Select the drive that contains the oper...

Page 86: ...the operating system do not change the initial UEFI Legacy Boot setting in the ThinkPad Setup program Otherwise the operating system will not start correctly When you install the Windows 7 operating system you might need one of the following country or region codes Country or region Code Country or region Code Mainland China SC Netherlands NL Denmark DK Norway NO Finland FI Spain SP France FR Swed...

Page 87: ...ntry or region Code Country or region Code Mainland China SC Netherlands NL Denmark DK Norway NO Finland FI Spain SP France FR Sweden SV Germany GR Taiwan and Hong Kong TC Italy IT United States US Japan JP Installing device drivers Device drivers are programs that contain instructions for the operating system about how to operate or drive a certain piece of hardware Each hardware component on you...

Page 88: ...mplete control of which updates to download and install After you select the update packages you want System Update or Lenovo Vantage automatically downloads and installs the updates System Update or Lenovo Vantage is preinstalled on your computer and is ready to run The only prerequisite is an active Internet connection You can start the program manually or you can use the schedule feature to ena...

Page 89: ... copy a save or a format operation If you select the wrong device the data on that device might be erased or overwritten If you are using the Windows BitLocker Drive Encryption feature and your computer has a Trusted Platform Module do not change the startup sequence BitLocker Drive Encryption locks the computer when it detects the change of startup sequence To change the startup sequence do the f...

Page 90: ...nu Startup menu Restart menu Note Depending on the model and operating system the menu items and the default value might change without notice Main menu When you enter the ThinkPad Setup program you first see the Main menu as follows Note The BIOS menu items might change without notice Depending on the model the default value might vary UEFI BIOS Version UEFI BIOS Date Embedded Controller Version ...

Page 91: ...s Disabled Enabled Description Enable or disable Internet Protocol Version 4 IPv4 network stack for UEFI environment This menu is displayed only in UEFI Only boot mode or Both boot mode with UEFI first UEFI IPv6 Network Stack Values Disabled Enabled Description Enable or disable Internet Protocol Version 6 IPv6 network stack for UEFI environment This menu is displayed only in UEFI Only boot mode o...

Page 92: ...isabled Enabled Description Enable or disable the built in TrackPoint pointing device Note If you want to use an external mouse select Disabled Trackpad Values Disabled Enabled Description Enable or disable the built in trackpad Note If you want to use an external mouse select Disabled Fn and Ctrl Key swap Values Disabled Enabled Description If you select Enabled the Fn key works as the Ctrl key a...

Page 93: ...me Extension Values Disabled 1 second 2 seconds 3 seconds 5 seconds 10 seconds Description This option defines the amount of time to extend the boot process in seconds The system cannot detect some external monitors during boot because they need a few seconds to be ready Try this option if the monitor being used does not display the boot screen Power Intel SpeedStep technology Values Disabled Enab...

Page 94: ...on hard disk or supervisor password Different beeps remind you that the password you entered is right or wrong Keyboard Beep Values Enabled Disabled Description Enable or disable a beep when unmanageable key combinations are pressed Thunderbolt TM 3 Wake by Thunderbolt TM 3 Values Disabled Enabled Description Enable or disable Wake Feature with Thunderbolt TM 3 Port If you select Enabled the batte...

Page 95: ...ction USB Key Provisioning Values Disabled Enabled Permanently Disabled Description This option enables or disables USB key provisioning CIRA Timeout Values 0 255 Description Set the timeout option for the CIRA connection to be established Selectable values are from 1 to 254 If you select 0 use 60 seconds as the default timeout value If you select 255 the waiting time for establishing a connection...

Page 96: ...enable this option the supervisor password is required when you try to enter the Boot menu by repeatedly pressing F12 To use this function a supervisor password must be set Password Count Exceeded Error Values Disabled Enabled Descriptions Enable this option to display the POST 0199 error message and prompt for the Security password Set Minimum Length Values Disabled x characters 4 x 12 Descriptio...

Page 97: ...TPM 2 0 Descriptions You can use a discrete TPM chip with TPM 2 0 mode Note This item is not displayed on the TPM 1 2 support model Security Chip Selection Values Windows 7 64 bit and Windows 10 TPM 2 0 TPM 1 2 Values Windows 7 32 bit TPM 2 0 TPM 1 2 Descriptions Set the TPM operational mode Note This item is displayed only on the TPM 1 2 support model Security Chip for TPM 2 0 Values Enabled Disa...

Page 98: ... flash the UEFI BIOS to earlier version Windows UEFI Firmware Update Values Disabled Enabled Descriptions This option enables or disables Windows UEFI Firmware Update feature When this option is enabled Windows UEFI firmware update is allowed Memory Protection Execution Prevention Values Disabled Enabled Descriptions Some computer viruses and worms cause memory buffers to overflow By enabling this...

Page 99: ... is in sleep mode will be detected If you remove the internal storage device while the computer is in sleep mode the computer will shut down when you wake it up and any unsaved data will be lost Anti Theft Computrace Module Activation Values Disabled Enabled Permanently Disabled Descriptions Enable the UEFI BIOS interface to activate the computrace module Computrace is an optional monitoring servi...

Page 100: ...ear SGX user data Device Guard Device Guard Values Disabled Enabled Descriptions This option is used to support Microsoft Device Guard When this option is enabled Intel Virtualization Technology Intel VT d Feature Secure Boot and OS Optimized Defaults are automatically enabled Boot order is restricted to customer image only To complete the configuration of Device Guard you have to set a supervisor...

Page 101: ...estore to the factory default settings Note Enable OS Optimized Defaults to meet the Microsoft R Windows 8 R certification requirement When you change this setting some other settings are changed automatically such as CSM Support UEFI Legacy Boot UEFI Legacy Boot Priority Secure Boot and Secure RollBack Prevention Discard Changes Descriptions Discard the changes Save Changes Descriptions Save the ...

Page 102: ...g hours and on weekends so that the users are not interrupted during work and the LAN traffic is kept to a minimum It saves time and increases productivity If the computer is turned on through Wake on LAN the computer starts follow the Network Boot sequence Asset ID EEPROM The Asset ID EEPROM contains information about the computer configuration and the serial numbers of the key components It also...

Page 103: ... Network Boot sequence do the following 1 Restart the computer When the logo screen is displayed press F1 to start the ThinkPad Setup program 2 Select Startup Network Boot The boot device list is displayed 3 Select a boot device to make it as the top boot priority 4 Press F10 to save the settings and exit You can press F9 to restore to the factory default settings Chapter 6 Advanced configuration ...

Page 104: ...86 T470 User Guide ...

Page 105: ...ting device drivers read the device driver information release notes for compatibility or known issues Keep a log book Entries might include major hardware or software changes driver updates minor issues you have experienced and how you resolved the minor issues If you ever need to run a recovery on your computer to return the preinstalled contents onto the machine the following tips might help al...

Page 106: ... on the Windows 10 operating system Note If you are unable to isolate and repair the problem yourself after running Lenovo Vantage save and print the log files created by the program You need the log files when you speak to a Lenovo technical support representative Lenovo Vantage supports the hardware scan function It combines diagnostic tests system information collection security status and supp...

Page 107: ... uncomfortable or unsure about removing components call the Customer Support Center for assistance 4 While the computer is off remove all sources of power and external hardware Remove any non original memory module added to your computer After removing the extra memory module and reinstalling the original memory module repeat step 2 If the computer still does not turn on consult the user manual fo...

Page 108: ... enter ThinkPad Setup Message 0270 Real Time Clock Error Solution System Real Time Clock is not functional Have the computer serviced Message 0271 Check Date and Time settings Solution The date or the time is not set in the computer Enter ThinkPad Setup and set the date and time Message 1802 Unauthorized network card is plugged in Power off and remove the network card Solution The wireless network...

Page 109: ...e storage Solution Press F1 after the error message is displayed to enter ThinkPad Setup A dialog asks the user for confirmation to clean up the storage If the user selects Yes all data that were created by the operating system or programs will be deleted except global variables defined by the Unified Extensible Firmware Interface Specification If the user selects No all data will be kept but the ...

Page 110: ... validation failure Replace the system board service provider only 0285 TCG compliant functionality related error might be the TPM initialization failure Replace the system board service provider only 0286 Integrated graphics error Replace the system board service provider only 0287 Discrete graphics error 1 Reinstall or replace the discrete graphics card service provider only 2 Replace the system...

Page 111: ...river and then follow the instructions on the screen to update the driver The switch port and the adapter have the same duplex setting If you configured the adapter for full duplex ensure that the switch port also is configured for full duplex Setting a wrong duplex mode can degrade performance cause data loss or result in lost connections You have installed all networking software that is necessa...

Page 112: ...h you want to connect Simultaneous searching is not allowed in the Bluetooth connection Problem Sound does not come from the Bluetooth headset headphones but comes from the local speaker even though the Bluetooth headset headphones is connected using a Headset profile or AV profile Solution Do the following 1 Exit the program that uses the sound device for example Windows Media Player 2 Go to Cont...

Page 113: ...r is installed by doing the following 1 Go to Control Panel and then change the view of Control Panel from Category to Large icons or Small icons 2 Click Keyboard 3 Click the Hardware tab In the Device Properties section ensure that you see this message Device status This device is working properly If keys on the keyboard still do not work have the computer serviced Problem All or some keys on the...

Page 114: ... on the hard disk drive by using the software and recover the partition if required Use the recovery solutions to restore the system to the factory default state For more information see Chapter 8 Recovery information on page 105 If the problem persists have the computer serviced Problem The screen goes blank while the computer is on Solution Your screen saver or power management might have been e...

Page 115: ...ws 7 operating system to change the color settings right click on the desktop and click Screen resolution Click Advanced settings select the Monitor tab and then set Colors 14 Click OK Problem Incorrect characters are displayed on the screen Solution Ensure that you install the operating system and program correctly If the problem persists have the computer serviced Problem I try to turn off my co...

Page 116: ...ternal monitor 5 Do the following For Windows 7 Click Advanced settings For Windows 10 Click Display adapter properties 6 Click the Monitor tab 7 Select the correct screen refresh rate Problem Wrong characters are displayed on the screen Solution Ensure that you follow the correct procedure when installing the operating system and program If they are installed and configured correctly but the prob...

Page 117: ...Click OK Note For more information about controlling volume see your Windows online help Problem I cannot move the volume slider or balance slider Solution The slider might be grayed out This means that its position is fixed by the hardware and cannot be changed Problem The volume sliders do not stay in place when some audio programs are used Solution It is normal for the sliders to change positio...

Page 118: ...Ensure that sound comes from the headset attached directly to the computer Fingerprint reader problems Problem The surface of the reader is dirty stained or wet Solution Gently clean the surface of the reader with a dry soft lint free cloth Problem The reader often fails to enroll or authenticate your fingerprint Solution If the surface of the reader is dirty stained or wet gently clean the surfac...

Page 119: ...e Windows notification area have the ac power adapter and your computer serviced Power problems Print these instructions now and keep them with your computer for reference later Problem My computer is getting no power at all Solution Check the following items 1 Verify the power button The power button is illuminated whenever the computer is on 2 Check all power connections Remove any power strips ...

Page 120: ... range See Operating environment on page 11 If the problem persists have the computer serviced Problem A critical low battery error occurs and the computer immediately turns off Solution The battery power is getting low Plug the ac power adapter into an electrical outlet and then into the computer Alternatively replace the battery with a charged one Problem The computer display remains blank after...

Page 121: ...cess to data When you carry the hard disk drive When you carry your computer This is a normal characteristic of a hard disk drive and is not a defect Problem The hard disk drive does not work Solution On the Startup menu of ThinkPad Setup ensure that the hard disk drive is on the Boot priority order list If it is on the Excluded from boot order list it is disabled Select the entry for it on the li...

Page 122: ... Manager window Ensure that the USB device setup is correct and that the assignment of computer resource and the installation of the device driver are correct To open the Device Manager window go to Control Panel and ensure that you view Control Panel by Category and click Hardware and Sound Device Manager If you are prompted for an administrator password or confirmation type the password or provi...

Page 123: ...list of the Lenovo Support phone numbers for your country or region go to https pcsupport lenovo com supportphonelist The data on the recovery media can be used only for the following purposes Reinstalling the programs and device drivers on your computer Reinstalling the operating system Modifying the data files on the hard disk drive using the additional files Creating recovery media To create re...

Page 124: ...ls 3 Open the apps folder The folder contains several subfolders named for various preinstalled programs 4 Open the subfolder and locate the EXE file 5 Double click the EXE file and follow the instructions on the screen to complete the installation Reinstalling preinstalled device drivers Attention Reinstalling device drivers will change the current configuration of your computer Reinstall device ...

Page 125: ...age To use advanced startup options do the following Note The items in the graphical user interface GUI might change without notice 1 Open the Start menu and then click Settings Update security Recovery 2 In the Advanced startup section click Restart now Troubleshoot Advanced options 3 Select a startup option you want and then follow the instructions on the screen Recovering your operating system ...

Page 126: ... box on the taskbar Then click Create a recovery drive 3 Click Yes in the User Account Control window to allow the Recovery Media Creator program to start 4 In the Recovery Drive window follow the instructions on the screen to create a recovery USB drive Using the recovery USB drive If you cannot start your computer refer to the corresponding information in the topic Troubleshooting on page 88 to ...

Page 127: ...e static protective package that contains the part to other unpainted metal surface on the computer for at least two seconds When possible remove the static sensitive part from the static protective package and install the part without setting it down When this is not possible place the static protective package on a smooth level surface and place the part on the package Do not place the part on t...

Page 128: ... of unauthorized batteries and provides no warranties for failures or damage arising out of their use DANGER If the rechargeable battery is incorrectly replaced there is danger of an explosion The battery contains a small amount of harmful substances To avoid possible injury Replace only with a battery of the type recommended by Lenovo Keep the battery away from fire Do not expose it to excessive ...

Page 129: ...wing instructions Micro SIM card is a small plastic card with an Integrated Circuit IC chip mounted on one side of the card To replace the micro SIM card do the following 1 Disable the built in battery See Disabling the built in battery on page 109 2 Close the computer display and turn the computer over 3 Remove the removable battery See Replacing the removable battery on page 110 4 Gently push th...

Page 130: ... with a micro SIM adapter into the micro SIM card slot The adapter might damage the slot 6 Reinstall the removable battery 7 Turn the computer over Connect the ac power adapter and all cables to the computer Replacing the base cover assembly Before you start read Important safety information on page v and print the following instructions Notes 112 T470 User Guide ...

Page 131: ...l the base cover assembly To start the computer disconnect the ac power adapter and then reconnect it to the computer To replace the base cover assembly do the following 1 Disable the built in battery See Disabling the built in battery on page 109 2 Ensure that the computer is turned off and disconnected from ac power and all cables 3 Close the computer display and turn the computer over 4 Remove ...

Page 132: ...ame time to disengage the hooks from the chassis 7 Press the location c on the built in battery with your thumb and insert your fingers into the holes d to pivot this area of the base cover assembly upward as shown This area of the base cover assembly will be disengaged from the chassis 114 T470 User Guide ...

Page 133: ...cover assembly 2 10 Reinstall the removable battery 11 Turn the computer over Connect the ac power adapter and all cables to the computer Replacing a memory module Before you start read Important safety information on page v and print the following instructions Increasing memory capacity is an effective way to make programs run faster You can increase memory capacity by replacing or adding a memor...

Page 134: ... Replacing the removable battery on page 110 5 Remove the base cover assembly See Replacing the base cover assembly on page 112 6 To remove the memory module do the following a Open the film to access the memory module 1 b Open the latches on both sides of the memory slot at the same time 2 c Remove the memory module 3 7 To install a new memory module do the following a Place the notched end of th...

Page 135: ...o not touch the contact edge of the internal storage drive Otherwise the internal storage drive might get damaged Do not apply pressure to the internal storage drive Do not make the internal storage drive subject to physical shocks or vibration Put the internal storage drive on a soft material such as cloth to absorb physical shocks Note Depending on your computer model a 2 5 inch hard disk drive ...

Page 136: ...le from the system board 7 Pull the tape to remove the 2 5 inch storage drive and its bracket 8 Disconnect the cable from the 2 5 inch storage drive 9 Detach the bracket from the 2 5 inch storage drive 118 T470 User Guide ...

Page 137: ...ket to the new 2 5 inch storage drive 2 Connect the cable to the new 2 5 inch storage drive 3 Insert the new storage drive 1 and then pivot it downward 2 Ensure that the new storage drive is seated in place and the tape does not cover the speaker Chapter 9 Replacing devices 119 ...

Page 138: ...1 Disable the built in battery See Disabling the built in battery on page 109 2 Ensure that the computer is turned off and disconnected from ac power and all cables 3 Close the computer display and turn the computer over 4 Remove the removable battery See Replacing the removable battery on page 110 5 Remove the base cover assembly See Replacing the base cover assembly on page 112 6 Disconnect the ...

Page 139: ...ts bracket 8 If you also want to replace the M 2 solid state drive cable disconnect the cable from the M 2 solid state drive converter 9 Remove the two screws that secure the M 2 solid state drive adapter 1 and then remove the adapter 2 Chapter 9 Replacing devices 121 ...

Page 140: ...s upward 11 Gently pull the M 2 solid state drive out of the slot To install the new M 2 solid state drive do the following 1 Align the notch in the new M 2 solid state drive with the slot key in the M 2 slot Insert the solid state drive into the M 2 slot until it is secured tightly 1 and then pivot it downward 2 122 T470 User Guide ...

Page 141: ...tall the M 2 solid state drive adapter and then install the two screws to secure the M 2 solid state drive adapter 4 If the M 2 solid state drive cable has been disconnected connect the cable to the M 2 solid state drive converter Chapter 9 Replacing devices 123 ...

Page 142: ...er the speaker 6 Connect the cable to the system board 7 Reinstall the base cover assembly and the removable battery 8 Turn the computer over Connect the ac power adapter and all cables Replacing a wireless WAN card The following information is only applies to computer models with user installable modules 124 T470 User Guide ...

Page 143: ...ed from ac power and all cables 3 Close the computer display and turn the computer over 4 Remove the removable battery See Replacing the removable battery on page 110 5 Remove the base cover assembly See Replacing the base cover assembly on page 112 6 To remove the wireless WAN card do the following a Open the film to access the wireless WAN card 1 b Hold the cable connector with your fingers and ...

Page 144: ...one outlet on the wall Attention Before you start installing an M 2 solid state drive touch a metal table or a grounded metal object This action reduces any static electricity from your body Static electricity could damage the drive Some computers might come with an M 2 solid state drive in the wireless WAN card slot To replace the M 2 solid state drive do the following 1 Disable the built in batt...

Page 145: ... drive out of the slot 3 7 To install a new M 2 solid state drive do the following a Align the notched edge of the new M 2 solid state drive with the slot key in the slot Then carefully insert the M 2 solid state drive into the slot 1 b Pivot the new M 2 solid state drive downward 2 c Install the screw to secure the M 2 solid state drive in place 3 Chapter 9 Replacing devices 127 ...

Page 146: ...able from the telephone outlet on the wall To remove the keyboard do the following 1 Disable the built in battery See Disabling the built in battery on page 109 2 Ensure that the computer is turned off and disconnected from ac power and all cables 3 Close the computer display and turn the computer over 4 Remove the removable battery See Replacing the removable battery on page 110 5 Loosen the two ...

Page 147: ... keyboard slightly upward as shown by arrow 1 Then turn over the keyboard as shown by arrow 2 8 Put the keyboard on the palm rest and detach the connectors Then remove the keyboard Chapter 9 Replacing devices 129 ...

Page 148: ...ch the connectors and then turn over the keyboard 2 Insert the keyboard into the keyboard bezel as shown Ensure that the top edge of the keyboard the edge that is close to the computer display is under the frame of the keyboard bezel 130 T470 User Guide ...

Page 149: ...he direction as shown by the arrows Ensure that the latches are secured under the keyboard frame 4 Close the computer display and turn the computer over Tighten the screws to secure the keyboard Chapter 9 Replacing devices 131 ...

Page 150: ... to water or rain Do not short circuit it Do not drop crush puncture the battery or make it subject to strong forces Battery abuse or mishandling can cause the battery to overheat which can cause gasses or flame to vent from the battery or coin cell battery To replace the coin cell battery do the following 1 Disable the built in battery See Disabling the built in battery on page 109 2 Ensure that ...

Page 151: ... assembly and the removable battery 9 Turn the computer over Connect the ac power adapter and all cables to the computer Attention After you replace the coin cell battery reset the system date and time in the ThinkPad Setup program See Date Time menu on page 77 Chapter 9 Replacing devices 133 ...

Page 152: ...134 T470 User Guide ...

Page 153: ...ing questions before you call for help Then you are able to get help as quickly as possible What is the problem Is it continuous or intermittent Is there an error message What is the error code if any What operating system are you using Which version Which software applications were running at the time of the problem Can the problem be reproduced If so how Recording system information The serial n...

Page 154: ...em is determined to be caused by Lenovo hardware under warranty trained service personnel are available to provide the applicable level of service Engineering change management Occasionally there might be changes that are required after a product has been sold Lenovo or your reseller if authorized by Lenovo will make selected Engineering Changes ECs that apply to your hardware available The follow...

Page 155: ...t phone numbers are available at https pcsupport lenovo com supportphonelist If the number for your country or region is not provided contact your Lenovo reseller or Lenovo marketing representative Purchasing additional services During and after the warranty period you can purchase additional services Service availability and service name might vary by country or region For more information about ...

Page 156: ...138 T470 User Guide ...

Page 157: ... the Web site or from your computer contact your local Lenovo office or reseller to obtain a printed version of the LLW Accessing the Ubuntu help system The Ubuntu help system provides information about how to use the Ubuntu operating system To access the help system from the Unity move your pointer to the Launch bar and then click the Help icon If you cannot find the Help icon from the Launch bar...

Page 158: ...140 T470 User Guide ...

Page 159: ... that operate within the guidelines identified by radio frequency RF safety standards and recommendations therefore Lenovo believes that this product is safe for use by consumers These standards and recommendations reflect the consensus of the worldwide scientific community and result from deliberations of panels and committees of scientists who continually review and interpret the extensive resea...

Page 160: ...azil wireless radio compliance information Este equipamento não tem direito à proteção contra interferência prejudicial e não pode causar interferência em sistemas devidamente autorizados This equipment is not protected against harmful interference and may not cause interference with duly authorized systems Mexico wireless radio compliance information Advertencia En Mexico la operación de este equ...

Page 161: ...allation If this equipment does cause harmful interference to radio or television reception which can be determined by turning the equipment off and on the user is encouraged to try to correct the interference by one or more of the following measures Reorient or relocate the receiving antenna Increase the separation between the equipment and receiver Connect the equipment into an outlet on a circu...

Page 162: ...he limits for Class B equipment according to European Standards harmonized in the Directives in compliance The limits for Class B equipment were derived for typical residential environments to provide reasonable protection against interference with licensed communication devices German Class B compliance statement Hinweis zur Einhaltung der Klasse B zur elektromagnetischen Verträglichkeit Dieses P...

Page 163: ...ith your product can be used only for this specific product Do not use the ac power cord for other devices Lenovo product service information for Taiwan Taiwan precautionary vision statement 警語 使用過度恐傷害視力 注意事項 使用30分鐘請休息10分鐘 2歲以下幼兒不看螢幕 2歲以上每天看螢幕不要超過1小時 Eurasian compliance mark Brazil audio notice Ouvir sons com mais de 85 decibéis por longos períodos pode provocar danos ao sistema auditivo Appendix ...

Page 164: ...146 T470 User Guide ...

Page 165: ... geography This label is applied to various products to indicate that the product is not to be thrown away but rather put in the established collection systems for reclaiming these end of life products Users of electrical and electronic equipment EEE with the WEEE marking must not dispose of end of life EEE as unsorted municipal waste but use the collection framework available to them for the retu...

Page 166: ...ted circuit board or drive use the methods described above for collecting and recycling a disused computer or monitor Disposing of disused lithium batteries from Lenovo computers A button shaped lithium battery is installed inside your Lenovo computer to provide power to the computer clock while the computer is off or disconnected from the main power source If you need to replace it with a new one...

Page 167: ...lead Hg for mercury and Cd for cadmium Users of batteries and accumulators must not dispose of batteries and accumulators as unsorted municipal waste but use the collection framework available to customers for the return recycling and treatment of batteries and accumulators Customer participation is important to minimize any potential effects of batteries and accumulators on the environment and hu...

Page 168: ...ion and treatment go to https www lenovo com lenovo environment Battery recycling information for Taiwan Battery recycling information for the United States and Canada Recycling information for China 150 T470 User Guide ...

Page 169: ...ctronic equipment RoHS recast or RoHS 2 For more information about Lenovo worldwide compliance on RoHS go to https www lenovo com rohs communication Turkish RoHS The Lenovo product meets the requirements of the Republic of Turkey Directive on the Restriction of the Use of Certain Hazardous Substances in Waste Electrical and Electronic Equipment WEEE Ukraine RoHS India RoHS RoHS compliant as per E ...

Page 170: ...152 T470 User Guide ...

Page 171: ...Taiwan RoHS Appendix D Restriction of Hazardous Substances RoHS Directive of countries and regions 153 ...

Page 172: ...154 T470 User Guide ...

Page 173: ...cation Lenovo may make improvements and or changes in the product s and or the application s described in this publication at any time without notice The products described in this document are not intended for use in implantation or other life support applications where malfunction may result in injury or death to persons The information contained in this document does not affect or change Lenovo...

Page 174: ...ource license including any Linux agreement s which may accompany software included with this product Lenovo may update this document at any time without notice To obtain the most up to date documentation for your computer go to https support lenovo com 156 T470 User Guide ...

Page 175: ...nies DisplayPort are trademarks of the Video Electronics Standards Association Ubuntu is a registered trademark of Canonical Ltd The terms HDMI and HDMI High Definition Multimedia Interface are trademarks or registered trademarks of HDMI Licensing LLC in the United States and other countries Wi Fi Wi Fi Alliance WiGig and Miracast are registered trademarks of Wi Fi Alliance NVIDIA is a registered ...

Page 176: ...158 T470 User Guide ...

Page 177: ......

Page 178: ......

Reviews:

Related manuals for ThinkPad T470