


3. Place a soft, clean towel or cloth on the desk or surface. Hold the sides of your computer and gently lay
it down so that the screen is against the surface and the cover is facing up.
4. Remove the computer cover. See “Removing the computer cover” on page 70.
5. Open the system board shielding. See “Opening the system board shielding” on page 71.
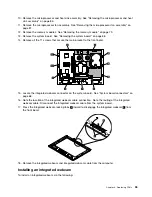
6. Note the locations of all cable connections on the system board and disconnect all cables. See “System
board connectors” on page 68.
7. Remove the microprocessor and heat sink assembly from the system board. See “Removing the
microprocessor and heat sink assembly” on page 85.
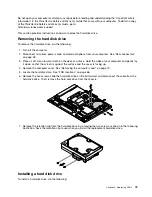
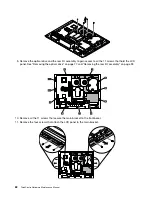
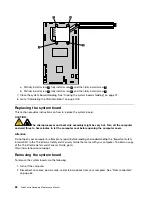
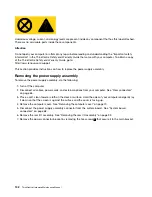
8. Remove the four screws that attach the system board to the main bracket
1
.
9. Carefully lift the system board out of the chassis.
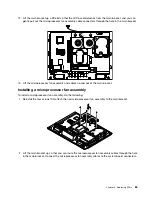
10. Remove the memory modules from the failing system board and install them in the same locations on
the new system board.
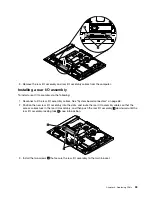
Installing a system board
To install a system board, do the following:
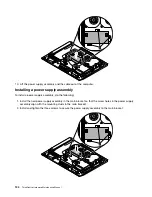
1. Install the new system board into the chassis and align the screw holes with those in the chassis.
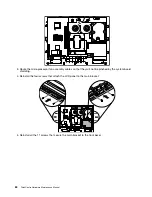
2. Insert and tighten the four screws
1
that secure the system board to the main bracket.
Chapter 8
.
Replacing FRUs
89
Summary of Contents for ThinkCentre A70z ALL-IN-ONE
Page 1: ...ThinkCentre Hardware Maintenance Manual Machine Types 0401 0421 0994 1165 1184 1186 and 2565 ...
Page 2: ......
Page 3: ...ThinkCentre Hardware Maintenance Manual Machine Types 0401 0421 0994 1165 1184 1186 and 2565 ...
Page 15: ...Chapter 2 Safety information 9 ...
Page 19: ...Chapter 2 Safety information 13 ...
Page 20: ...1 2 14 ThinkCentre Hardware Maintenance Manual ...
Page 21: ...Chapter 2 Safety information 15 ...
Page 27: ...Chapter 2 Safety information 21 ...
Page 31: ...Chapter 2 Safety information 25 ...
Page 46: ...40 ThinkCentre Hardware Maintenance Manual ...
Page 188: ...182 ThinkCentre Hardware Maintenance Manual ...
Page 192: ...186 ThinkCentre Hardware Maintenance Manual ...
Page 193: ......
Page 194: ...Part Number 71Y7087 Printed in USA 1P P N 71Y7087 71Y7087 ...