
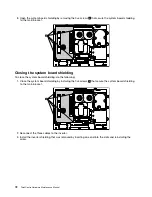


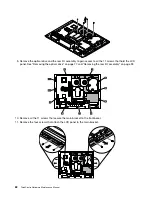


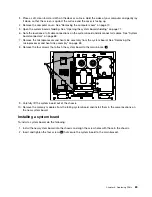


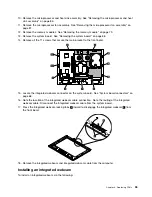


9. Remove the optical drive and the rear I/O assembly to gain access to all the 11 screws that hold the LCD
panel. See “Removing the optical drive” on page 77 and “Removing the rear I/O assembly” on page 92.
10. Remove all the 11 screws that secure the main bracket to the front bezel.
11. Remove the four screws that attach the LCD panel to the main bracket.
82
ThinkCentre Hardware Maintenance Manual
Summary of Contents for ThinkCentre A70z ALL-IN-ONE
Page 1: ...ThinkCentre Hardware Maintenance Manual Machine Types 0401 0421 0994 1165 1184 1186 and 2565 ...
Page 2: ......
Page 3: ...ThinkCentre Hardware Maintenance Manual Machine Types 0401 0421 0994 1165 1184 1186 and 2565 ...
Page 15: ...Chapter 2 Safety information 9 ...
Page 19: ...Chapter 2 Safety information 13 ...
Page 20: ...1 2 14 ThinkCentre Hardware Maintenance Manual ...
Page 21: ...Chapter 2 Safety information 15 ...
Page 27: ...Chapter 2 Safety information 21 ...
Page 31: ...Chapter 2 Safety information 25 ...
Page 46: ...40 ThinkCentre Hardware Maintenance Manual ...
Page 188: ...182 ThinkCentre Hardware Maintenance Manual ...
Page 192: ...186 ThinkCentre Hardware Maintenance Manual ...
Page 193: ......
Page 194: ...Part Number 71Y7087 Printed in USA 1P P N 71Y7087 71Y7087 ...