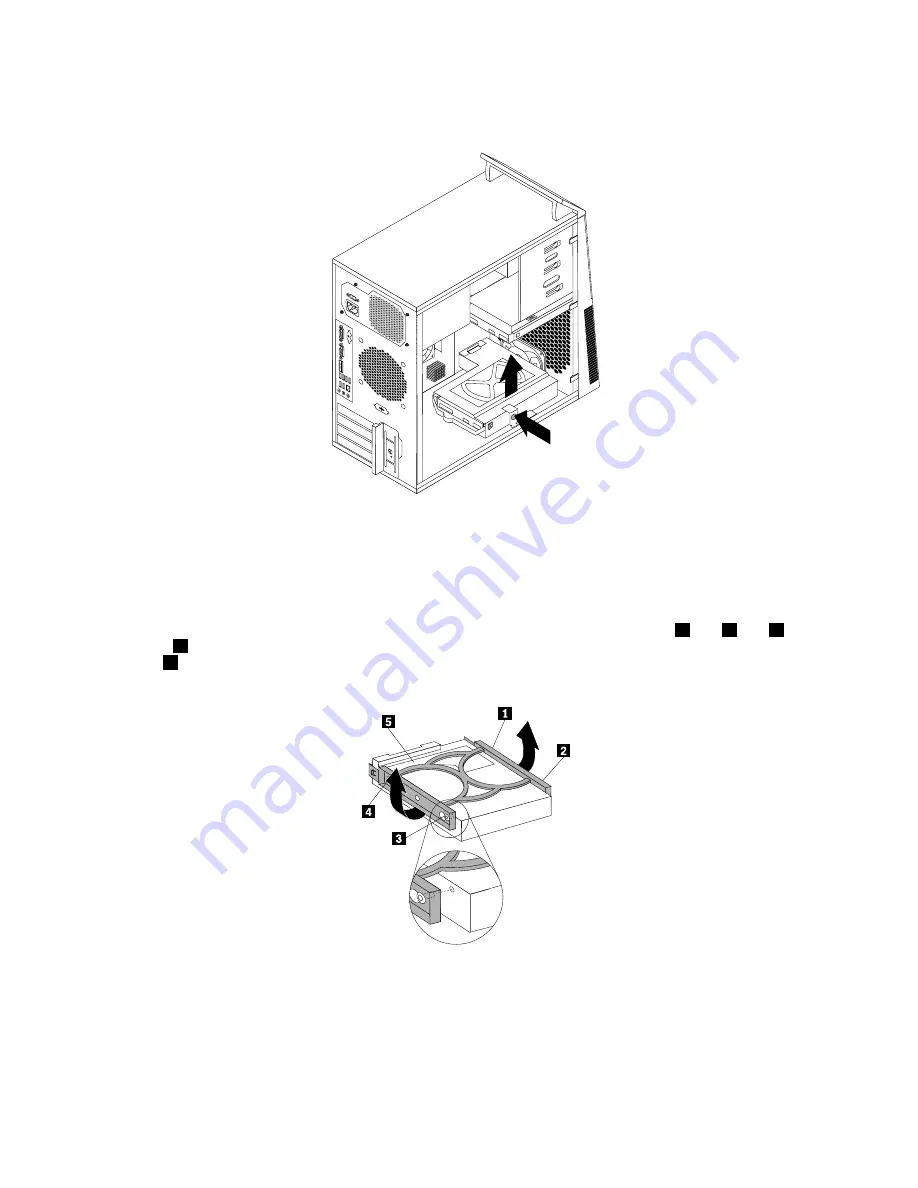
5. Press the blue release button to release the hard disk drive cage from the chassis.
Figure 35. Removing the secondary hard disk drive
6. Remove the hard disk drive cage from the chassis by simply sliding it outward.
7. Pull on the blue handle to release and remove the hard disk drive from the hard disk drive cage.
8. Flex the sides of the blue bracket to remove the hard disk drive from the bracket.
9. To install a new hard disk drive into the blue bracket, flex the bracket and align pin
1
, pin
2
, pin
3
,
and pin
4
on the bracket with the corresponding holes in the hard disk drive. Do not touch the circuit
board
5
on the bottom of the hard disk drive.
Figure 36. Installing the hard disk drive into the bracket
10. Slide the new hard disk drive into the hard disk drive cage until it snaps into position.
102
ThinkCentre Hardware Maintenance Manual
Summary of Contents for 2208
Page 6: ...2 ThinkCentre Hardware Maintenance Manual ...
Page 13: ...Chapter 2 Safety information 9 ...
Page 14: ... 18 kg 37 lb 32 kg 70 5 lb 55 kg 121 2 lb 10 ThinkCentre Hardware Maintenance Manual ...
Page 18: ...14 ThinkCentre Hardware Maintenance Manual ...
Page 19: ...1 2 Chapter 2 Safety information 15 ...
Page 20: ...1 2 16 ThinkCentre Hardware Maintenance Manual ...
Page 26: ...22 ThinkCentre Hardware Maintenance Manual ...
Page 27: ...1 2 Chapter 2 Safety information 23 ...
Page 31: ...Chapter 2 Safety information 27 ...
Page 32: ...1 2 28 ThinkCentre Hardware Maintenance Manual ...
Page 36: ...32 ThinkCentre Hardware Maintenance Manual ...
Page 52: ...48 ThinkCentre Hardware Maintenance Manual ...
Page 76: ...72 ThinkCentre Hardware Maintenance Manual ...
Page 118: ...114 ThinkCentre Hardware Maintenance Manual ...
Page 286: ...282 ThinkCentre Hardware Maintenance Manual ...
Page 291: ......
Page 292: ...Part Number 0B07128 Printed in USA 1P P N 0B07128 0B07128 ...


