


13. Reinstall the heat sink and fan assembly. See “Replacing the heat sink and fan assembly” on page 109.
14. Reconnect all cables that were disconnected from the system board.
What to do next:
• To work with another piece of hardware, go to the appropriate section.
• To complete the replacement, go to “Completing the parts replacement” on page 126.
Replacing the coin-cell battery
Attention:
Do not open your computer or attempt any repair before reading and understanding the Chapter
1 “Read this first: Important safety information” on page 1.
Your computer has a special type of memory that maintains the date, time, and settings for built-in features,
such as parallel-connector assignments (configuration). A coin-cell battery keeps this information active
when you turn off the computer.
The coin-cell battery normally requires no charging or maintenance throughout its life; however, no coin-cell
battery lasts forever. If the coin-cell battery fails, the date, time, and configuration information (including
passwords) are lost. An error message is displayed when you turn on the computer.
Refer to the “Lithium coin-cell battery notice” in the
Safety, Warranty, and Setup Guide
for information about
replacing and disposing of the coin-cell battery.
To replace the coin-cell battery, do the following:
1. Remove any media from the drives and turn off all connected devices and the computer. Then,
disconnect all power cords from electrical outlets and disconnect all cables that are connected to the
computer.
2. Remove the computer cover. See “Removing the computer cover” on page 90.
3. Locate the coin-cell battery. See “Computer components” on page 31.
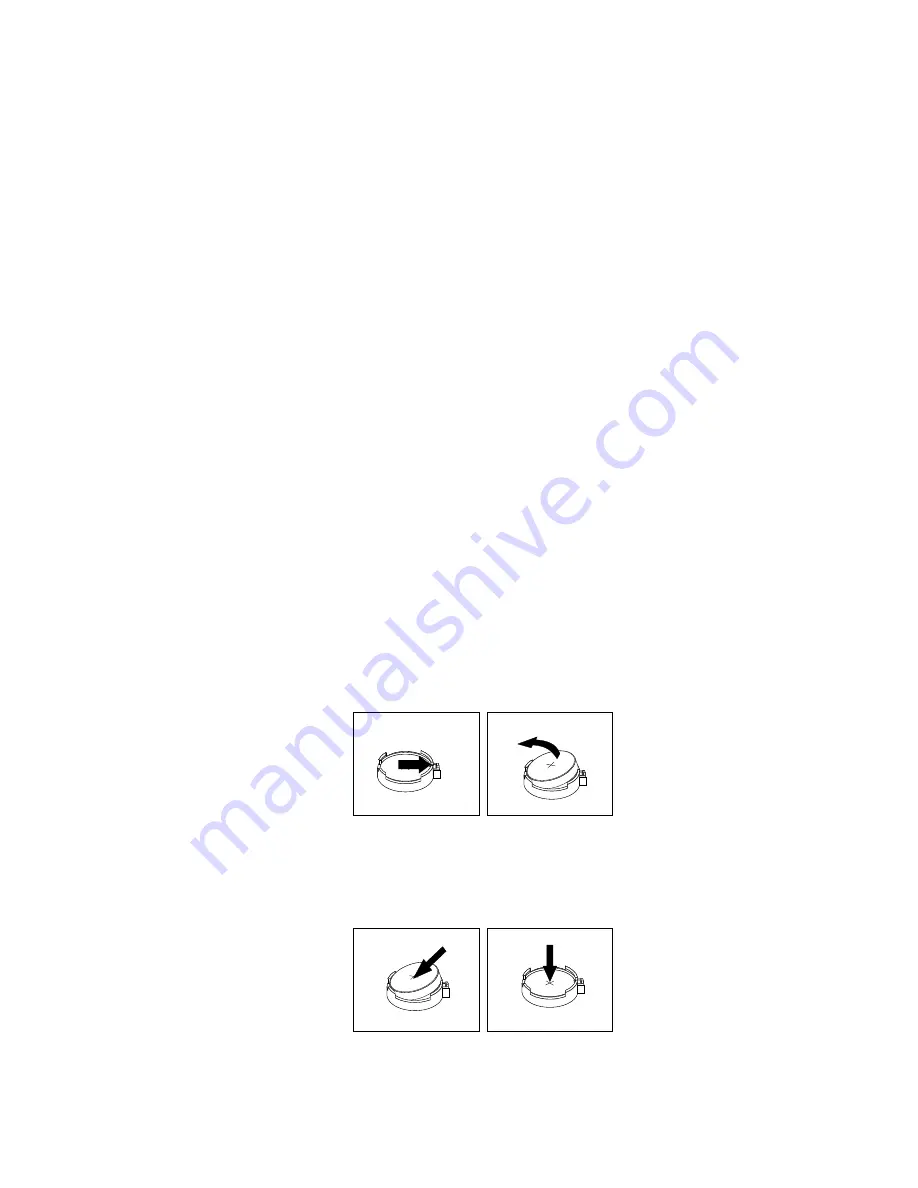
4. Remove the coin-cell battery as shown.
Figure 37. Removing the coin-cell battery
5. Install the new coin-cell battery as shown.
Figure 38. Installing the coin-cell battery
.
Installing or replacing hardware
113
Summary of Contents for 10K9
Page 1: ...ThinkCentre M73p Hardware Maintenance Manual Machine Types 10K9 10KA 10KB and 10KC ...
Page 6: ...iv ThinkCentre M73p Hardware Maintenance Manual ...
Page 8: ...vi ThinkCentre M73p Hardware Maintenance Manual ...
Page 16: ...8 ThinkCentre M73p Hardware Maintenance Manual ...
Page 20: ...12 ThinkCentre M73p Hardware Maintenance Manual ...
Page 21: ...1 2 Chapter 1 Read this first Important safety information 13 ...
Page 22: ...1 2 14 ThinkCentre M73p Hardware Maintenance Manual ...
Page 27: ...1 2 Chapter 1 Read this first Important safety information 19 ...
Page 28: ...1 2 20 ThinkCentre M73p Hardware Maintenance Manual ...
Page 31: ...Chapter 1 Read this first Important safety information 23 ...
Page 52: ...44 ThinkCentre M73p Hardware Maintenance Manual ...
Page 64: ...56 ThinkCentre M73p Hardware Maintenance Manual ...
Page 70: ...62 ThinkCentre M73p Hardware Maintenance Manual ...
Page 78: ...70 ThinkCentre M73p Hardware Maintenance Manual ...
Page 136: ...128 ThinkCentre M73p Hardware Maintenance Manual ...
Page 140: ...132 ThinkCentre M73p Hardware Maintenance Manual ...
Page 144: ...136 ThinkCentre M73p Hardware Maintenance Manual ...
Page 148: ...140 ThinkCentre M73p Hardware Maintenance Manual ...
Page 151: ...Appendix D China Energy Label Copyright Lenovo 2015 143 ...
Page 152: ...144 ThinkCentre M73p Hardware Maintenance Manual ...
Page 154: ...146 ThinkCentre M73p Hardware Maintenance Manual ...
Page 157: ......
Page 158: ......