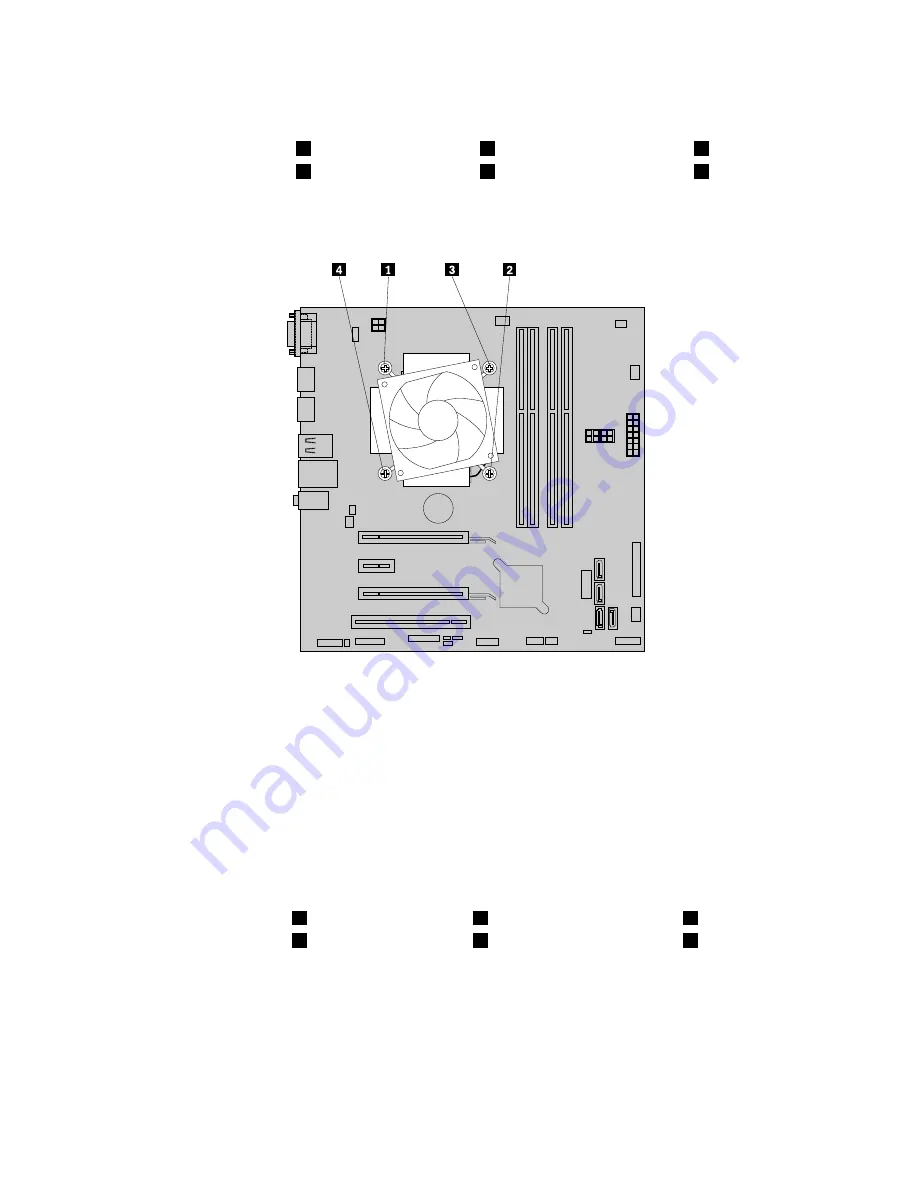
6. Follow the following sequence to remove the four screws that secure the heat sink and fan assembly
to the system board:
a. Partially remove screw
1
, then fully remove screw
2
, and then fully remove screw
1
.
b. Partially remove screw
3
, then fully remove screw
4
, and then fully remove screw
3
.
Note:
Carefully remove the four screws from the system board to avoid any possible damage to the
system board. The four screws cannot be removed from the heat sink and fan assembly.
Figure 33. Removing the heat sink and fan assembly
7. Lift the failing heat sink and fan assembly off the system board.
Notes:
• You might have to gently twist the heat sink and fan assembly to free it from the microprocessor.
• Do not touch the thermal grease while handling the heat sink and fan assembly.
8. Position the new heat sink and fan assembly on the system board so that the four screws are aligned
with the holes in the system board. Ensure that the heat sink and fan assembly cable faces toward the
microprocessor fan connector on the system board.
9. Follow the following sequence to install the four screws to secure the new heat sink and fan assembly.
Do not over-tighten the screws.
a. Partially tighten screw
1
, then fully tighten screw
2
, and then fully tighten screw
1
.
b. Partially tighten screw
3
, then fully tighten screw
4
, and then fully tighten screw
3
.
10. Connect the heat sink and fan assembly cable to the microprocessor fan connector on the system
board. See “Parts on the system board” on page 34.
What to do next:
• To work with another piece of hardware, go to the appropriate section.
• To complete the installation or replacement, go to “Completing the parts replacement” on page 126.
110
ThinkCentre M73p Hardware Maintenance Manual
Summary of Contents for 10K9
Page 1: ...ThinkCentre M73p Hardware Maintenance Manual Machine Types 10K9 10KA 10KB and 10KC ...
Page 6: ...iv ThinkCentre M73p Hardware Maintenance Manual ...
Page 8: ...vi ThinkCentre M73p Hardware Maintenance Manual ...
Page 16: ...8 ThinkCentre M73p Hardware Maintenance Manual ...
Page 20: ...12 ThinkCentre M73p Hardware Maintenance Manual ...
Page 21: ...1 2 Chapter 1 Read this first Important safety information 13 ...
Page 22: ...1 2 14 ThinkCentre M73p Hardware Maintenance Manual ...
Page 27: ...1 2 Chapter 1 Read this first Important safety information 19 ...
Page 28: ...1 2 20 ThinkCentre M73p Hardware Maintenance Manual ...
Page 31: ...Chapter 1 Read this first Important safety information 23 ...
Page 52: ...44 ThinkCentre M73p Hardware Maintenance Manual ...
Page 64: ...56 ThinkCentre M73p Hardware Maintenance Manual ...
Page 70: ...62 ThinkCentre M73p Hardware Maintenance Manual ...
Page 78: ...70 ThinkCentre M73p Hardware Maintenance Manual ...
Page 136: ...128 ThinkCentre M73p Hardware Maintenance Manual ...
Page 140: ...132 ThinkCentre M73p Hardware Maintenance Manual ...
Page 144: ...136 ThinkCentre M73p Hardware Maintenance Manual ...
Page 148: ...140 ThinkCentre M73p Hardware Maintenance Manual ...
Page 151: ...Appendix D China Energy Label Copyright Lenovo 2015 143 ...
Page 152: ...144 ThinkCentre M73p Hardware Maintenance Manual ...
Page 154: ...146 ThinkCentre M73p Hardware Maintenance Manual ...
Page 157: ......
Page 158: ......


