


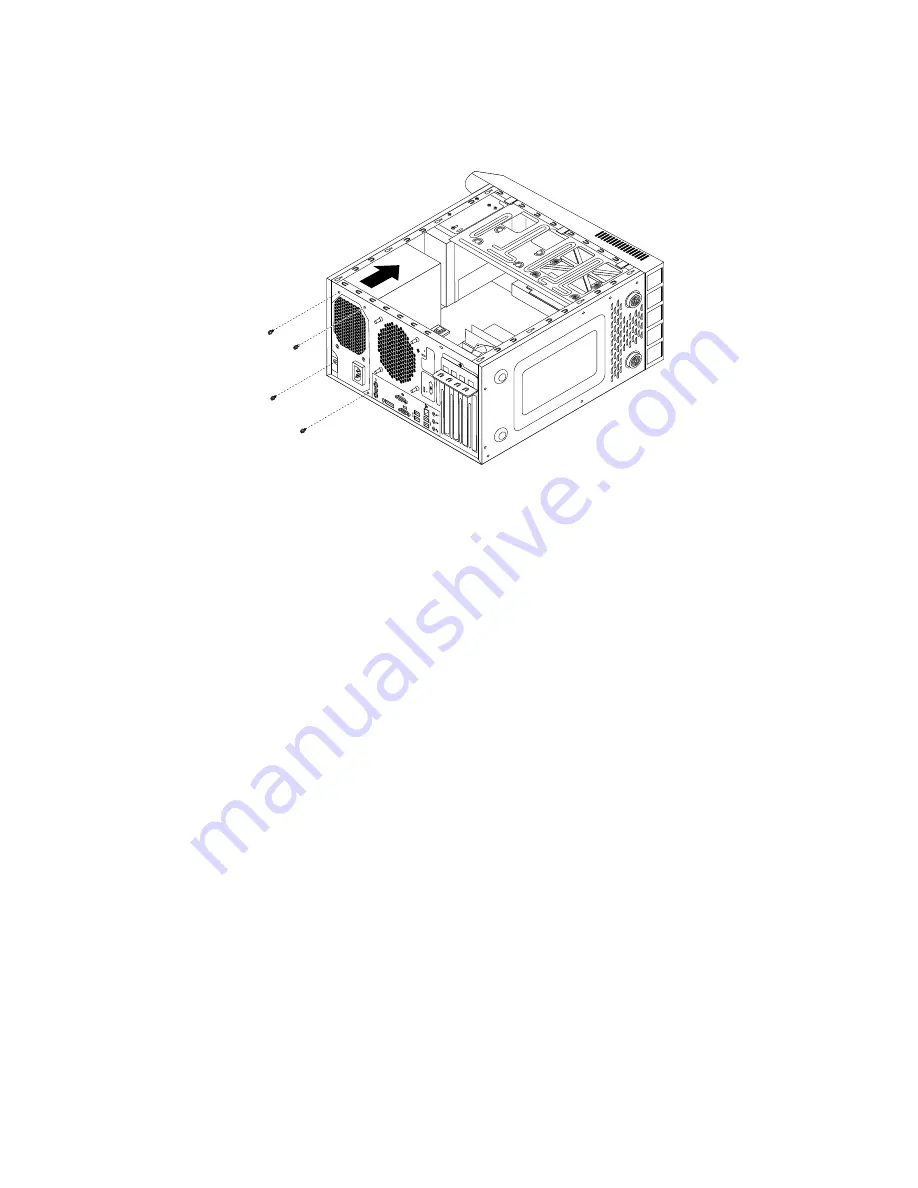
6. Lay the computer on its side and remove the four screws at the rear of the chassis that secure the
power supply assembly.
Figure 22. Removing the screws for the power supply assembly
7. Slide the power supply assembly to the front of the computer and then lift it out of the chassis.
8. Ensure that the new power supply assembly is the correct replacement.
9. Install the new power supply assembly into the chassis so that the screw holes in the power supply
assembly align with those in the chassis.
10. Install and tighten the four screws to secure the power supply assembly.
Note:
Use only screws provided by Lenovo.
11. Reconnect the power supply assembly cables to the system board and each of the drives.
12. Secure the power supply assembly cables with the cable clips and ties in the chassis.
What to do next:
• To work with another piece of hardware, go to the appropriate section.
• To complete the installation or replacement, go to “Completing the parts replacement” on page 126.
Replacing the rear fan
Attention:
Do not open your computer or attempt any repair before reading and understanding the Chapter
1 “Read this first: Important safety information” on page 1.
To replace the rear fan, do the following:
1. Remove any media from the drives and turn off all connected devices and the computer. Then,
disconnect all power cords from electrical outlets and disconnect all cables that are connected to the
computer.
2. Remove the computer cover. See “Removing the computer cover” on page 90.
3. Disconnect the rear fan cable from the system fan connector on the system board. See “Parts on the
100
ThinkCentre M73p Hardware Maintenance Manual
Summary of Contents for 10K9
Page 1: ...ThinkCentre M73p Hardware Maintenance Manual Machine Types 10K9 10KA 10KB and 10KC ...
Page 6: ...iv ThinkCentre M73p Hardware Maintenance Manual ...
Page 8: ...vi ThinkCentre M73p Hardware Maintenance Manual ...
Page 16: ...8 ThinkCentre M73p Hardware Maintenance Manual ...
Page 20: ...12 ThinkCentre M73p Hardware Maintenance Manual ...
Page 21: ...1 2 Chapter 1 Read this first Important safety information 13 ...
Page 22: ...1 2 14 ThinkCentre M73p Hardware Maintenance Manual ...
Page 27: ...1 2 Chapter 1 Read this first Important safety information 19 ...
Page 28: ...1 2 20 ThinkCentre M73p Hardware Maintenance Manual ...
Page 31: ...Chapter 1 Read this first Important safety information 23 ...
Page 52: ...44 ThinkCentre M73p Hardware Maintenance Manual ...
Page 64: ...56 ThinkCentre M73p Hardware Maintenance Manual ...
Page 70: ...62 ThinkCentre M73p Hardware Maintenance Manual ...
Page 78: ...70 ThinkCentre M73p Hardware Maintenance Manual ...
Page 136: ...128 ThinkCentre M73p Hardware Maintenance Manual ...
Page 140: ...132 ThinkCentre M73p Hardware Maintenance Manual ...
Page 144: ...136 ThinkCentre M73p Hardware Maintenance Manual ...
Page 148: ...140 ThinkCentre M73p Hardware Maintenance Manual ...
Page 151: ...Appendix D China Energy Label Copyright Lenovo 2015 143 ...
Page 152: ...144 ThinkCentre M73p Hardware Maintenance Manual ...
Page 154: ...146 ThinkCentre M73p Hardware Maintenance Manual ...
Page 157: ......
Page 158: ......