Page 11
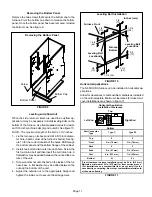
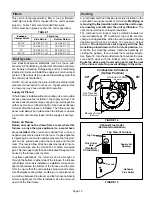
Removing the Bottom Panel
Remove the two screws that secure the bottom cap to the
furnace. Pivot the bottom cap down to release the bottom
panel. Once the bottom panel has been removed, reinstall
the bottom cap. See figure 9.
Removing the Bottom Panel
FIGURE 9
Screw
Bottom Panel
Bottom Cap
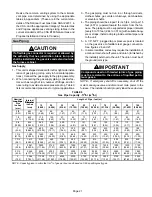
Leveling an Upflow Unit
When the side return air inlets are used in an upflow ap-
plication, it may be necessary to install leveling bolts on the
bottom of the furnace. Use field−supplied corrosion−resist-
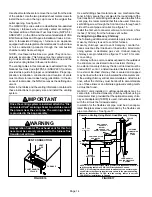
ant 5/16 inch machine bolts (4) and nuts (8). See figure 10.
NOTE − The maximum length of the bolt is 1−1/2 inches.
1 − Lie the furnace on its back and drill a 5/16 inch diame-
ter hole in each corner of the furnace’s bottom. See fig-
ure 10 for the correct location of the holes. Drill through
the bottom panel and the bottom flange of the cabinet.
2 − Install one bolt and two nuts into each hole. Screw the
first nut onto a bolt and then insert the bolt into a hole. A
flat washer may be added between the nut and the bot-
tom of the unit.
3 − Screw another nut onto the bolt on the inside of the fur-
nace base. A flat washer may be added between the
nut and the bottom of the unit.
4 − Adjust the outside nut to the appropriate height and
tighten the inside nut to secure the arrangement.
FIGURE 10
1−3/4
(44)
1−3/4
(44)
3/8
(10)
1−3/4 (44)
3/8
(10)
3/8
(10)
3/8
(10)
1−3/4
(44)
Leveling Bolt Installation
Leveling Bolt
Locations
Leveling Bolt
Locations
Inches (mm)
Furnace Front
Furnace
Bottom
Horizontal Applications
The G60UHV(X) furnace can be installed in horizontal ap-
plications.
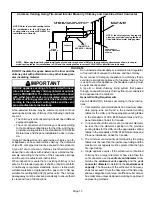
Allow for clearances to combustible materials as indicated
on the unit nameplate. Minimum clearances for closet or al-
cove installations are shown in
figure 11.
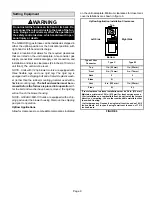
Horizontal Application
Installation Clearances
Top
Bottom
Left End
Right End
Vent Connector
Type
Type C
Type B1
Top
0
0
*Front
3 in. (76 mm)
3 in. (76 mm)
Back
0
0
Ends
2 in. (51 mm)
2 in. (51 mm)
Vent
6 in. (152 mm)
1 in. (25 mm)
Bottom
0
‡
0
‡
*Front clearance in alcove installation must be 24 in. (610 mm).
Maintain a minimum of 24 in. (610 mm) for front service access.
‡
For installations on a combustible floor, do not install the fur-
nace directly on carpeting, tile or other combustible materials oth-
er than wood flooring.
FIGURE 11


