LEGRAND 1U, User Manual
The LEGRAND 1U, an exceptional networking accessory, comes with a comprehensive User Manual providing step-by-step instructions for easy installation and optimal use. Download the manual for free from our website and delve into a seamless networking experience with the LEGRAND 1U.
Share
Download


Reviews:
No comments
Related manuals for 1U

Juice Bar
Brand: PS Audio Pages: 2

ICT180S-12B
Brand: ICT Pages: 27

BETAPACK 4
Brand: Zero88 Pages: 12
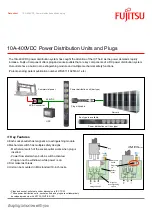
10A-400VDC
Brand: Fujitsu Pages: 2

EverBOX Grip
Brand: Mennekes Pages: 308

Power Distribution 8
Brand: ferroamp Pages: 12

Power Distribution 15
Brand: ferroamp Pages: 12

OPTO BRANCH 4
Brand: Elation Pages: 12

PSOA
Brand: Cord Tech Pages: 5

PN 8618
Brand: Blue Sea Systems Pages: 2

PE5216
Brand: ATEN Pages: 2

NRGence eco PDU PE PE5216
Brand: ATEN Pages: 78

PE5324kJA
Brand: ATEN Pages: 82

eco PE Series
Brand: ATEN Pages: 92


