INSTALLATION PROCEDURE
CONTINUED
6
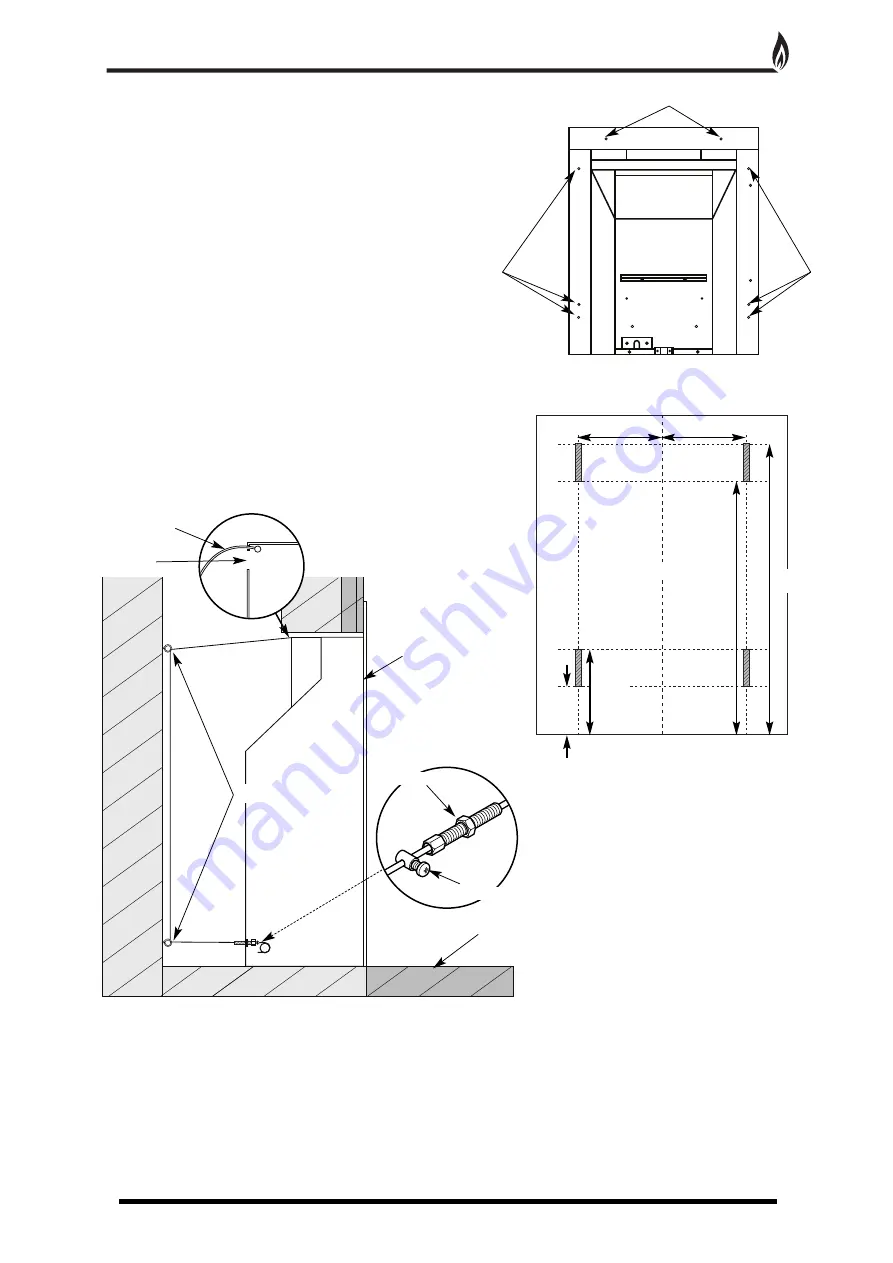
Radiant box
Hearth
Eye Bolts
Centre Line
Drill Holes for 4 eye bolts
on 112mm centre lines
between max and min height.
65mm
min
Fix the radiant box into the opening, securing into position using the cable fixing kit (Fig. 6). Do not cut off the
loose ends as the full length is required should the radiant box need refitting at any time. Coil up and securely
store underneath the burner tray.
1. Position the burner tray into the box in order to determine the length of 8mm gas supply needed and cut to
length.
2. Before making the final connection, thoroughly purge the supply pipe to clear any foreign matter, i.e. masonry
dust etc, as this could lead to blockages in the control valve and/or pilot assemblies.
3. Fix the burner in place using the four screws and make the gas connection. Carry out a gas soundness test.
ALTERNATIVE FIXING METHOD
Where the drilling of the back panel is not practical, an alternative
fixing method may be employed using the
optional
cable fixing kit
provided. Drill four holes in the rear of the fireplace opening (Fig. 5).
Securely fix the four eye bolts provided using suitable rawl plugs.
Feed one cable through each of the top holes in the rear of the
fire box.
115mm
max
500mm
min
550mm
max
112mm
112mm
Tension Nut
Cable Clamping Screw
Fig. 5
Fig. 6
Cable
Rectangular
Cutout
Insert cable into rectangular cutout
and feed the end back through the
small hole above the cutout.
Fixing
Holes
Fixing
Holes
Fixing Holes
9. When the burner tray has been removed, decide which
side of the appliance the gas supply will be entering the
radiant box and remove the relevant blanking plate. The
gas supply should be concealed as much as possible. Both
blanking plates
MUST
be re-fitted or this could seriously
impair performance.
10. With the radiant box placed in the opening, mark out
four of the eight fixing holes. Remove the box and carefully
drill and fit rawl plugs.
11. Pass the 8mm gas connection through the back of the
box and secure the box into place using four screws
(straight shank screws are recommended for marble).
Check that the outer flange of the appliance is completely
sealed against the back panel.
Fig. 4


