DA11
Operation
11
will appear after that to indicate the programmable settings have been stored in non-volatile
memory. This means the settings will be retained if the power is turned “Off” and restored when
the power is turned back “On.”
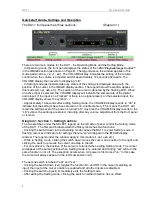
- The first time Setting mode is entered after power is applied, the left-most LED will begin
flashing. If other functions or inputs are enabled, the LED above their legend will be illuminated.
- When the Setting mode is exited, the position of the cursor is retained, so upon re-entering
Setting mode it will appear at the same position (allowing setting changes to the same function).
The LED at the cursor position indicates the status of the function differently than other positions-
- At positions other than that of
the cursor, if the LED is illuminated (“On”), the function is enabled
(“On”). If the LED is “Off,” the function is “Off.”
-
At the cursor position, if the LED is flashing at a fast rate, the function is “On.” If the LED is
flashing slowly, the function
is “Off.”
!!!
Please note that in the following function descriptions, the distinction between whether
the LED is at the cursor position or not is omitted for clarity. For example: if the LED is
“On” it is either rapidly flashing at the cursor position or steadily illuminated at other
positions.
- For single functions such as output, invert, or dim; when the right SELECT switch is clicked
down to the
“set” position, the function toggles between On and Off with each click.
- The input selection is
“interlocked” electronically, so selecting a new input de-selects the
previous one. For example, if the xlr input is selected, and you position the cursor above the usb
legend and click “Set,” the usb input will be selected and the xlr input will be deselected.
- The XLR output pin2/pin 3 selection for unbalanced operation is interlocked in a similar manner.
xlr, opt, usb, rca-
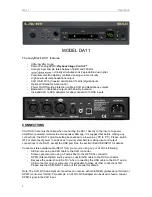
The first four positions in the Setting mode display are the digital audio inputs of the DA11, and
correspond to the connectors on the back panel. To listen to the desired input, enter the Setting
mode by clicking the
switch once, and then click it either up or down to move the cursor to
the position above the legend for the desired input.
Once the cursor is above the desired input, clic
k the right SELECT switch down in the “set”
direction to toggle the input “On.” Clicking the switch again will toggle the input “Off.” If the input is
“On,” the cursor flashes quickly and if the input is “Off,” the cursor flashes slowly. It is possible to
turn all of the inputs “Off.”
-
Because only one input can be “On” at a given time, enabling a previously de-selected input will
automatically de-select an input that was
“On.”
The numerical VOLUME display changes in Setting mode to indicate the input sample rate, and
whether the DA11
is “locked” to a valid input signal (synchronized to the input).
- If the input is locked, the VOLUME display indicates the sample rate of the input by displaying
“44” for 44.1kHz, “48” for 48kHz, “88” for 88.2kHz, and “96” for 96kHz. The DA11 incorporates an
advanced version of the Crystal mode introduced in the DA10- the
. When the
digital audio input of the DA11 is switched or the signal feeding the input is changed, the DA11
automatically checks the incoming sample frequency. If the sample frequency is close enough to
the nominal frequencies 44.1, 48, 88.2 or 96 kHz; the control circuitry automatically selects
with enhanced jitter rejection.
-
For all other input sample frequencies, a more “standard” PLL mode is employed which allows
the DA11 to lock to input signals between 32 and 200 kHz. For inputs below 100kHz, the DA11
displays one of the four sample rates that is closest to the input sample rate. For example; an
input that is locked to a valid 32 kHz sample rate wo
uld be indicated by a “44” in the VOLUME
display. For
xlr
or
rca
inputs higher than 100kHz, “44” is displayed. Switching between modes is
seamless so that there is no loss of lock or muting when
is engaged
.
Summary of Contents for DA11
Page 4: ...DA11 Table of Contents ...


