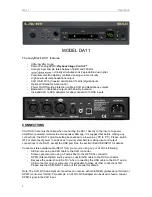
DA11
Operation
10
-
At all other positions, a steadily illuminated LED indicates “on,” and an LED that is not
illuminated indicates “off.”
To set the XLR outputs for Pin 2 Hot Unbalanced operation (for included XLR to RCA adapters);
1.) Enter the Setting mode by clicking the switch marked
“
”
down.
2.) The current setting of the XLR outputs is now displayed above the front panel designations
“pin 2” and “pin 3.” If it has not been changed from the factory setting, both LED’s above the pin 2
and pin 3
designations will be “On,” denoting balanced operation.
3.) Click the
switch to move the flashing cursor until it is the
above “pin 3” legend. Click the
right switch
down once in the set direction to toggle pin 3 “Off.” The LED above pin 3 will be “Off”
to indicate that pin 3 of the XLR outputs is now connected to ground.
OPERATION:
A. FRONT PANEL DISPLAYS
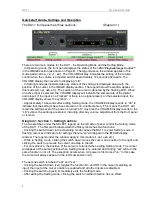
There are two modes for the front panel controls of the DA11- Operating Mode and Setting Mode.
The front panel displays serve different functions in the two modes, and may also change
appearance in each mode to indicate changes in settings or input signals.
In the center of the front panel, the IMAGE display has two modes:
1.) In Operating
mode, two LED’s indicate the setting of the
>PiC< Playback Image
Control™.
The numbers above the display are the legend for this mode (
+2
,
+1
,
0
,
-1
, ….,
-1
,
0
,
+1
,
+2
).
2.) In Setting mode the status of all of the programmable settings are displayed. The legend for
the indicators in Setting mode is below the display-
xlr
,
opt
,
usb
,
rca
,
output
,
pin 2
,
pin 3
,
dim
.
- In Operating
mode, if the “mute” function is activated by the optional infrared remote, the entire
display goes “dark.”
- In Operating
mode, if the SAFE MODE of the infrared receiver is disabled, the two LED’s that
indicate the setting of the Stereo Image Control flash when
the “LE” symbol appears.
On the right side of the front panel, the VOLUME display has two modes:
1.) In Operating mode, the numerical value of the volume is displayed for ten seconds after the
setting has been changed. After ten seconds, the “LE” symbol appears.
2.) In Setting mode, the VOLUME display indicates both the input sample rate and whether the
selected input is “locked” to a valid signal. If the input is locked, the sample rate is displayed as a
two digit number; if it is not locked or a signal is not present, the symbol “- -" is displayed. Please
see the section (below) titled “
xlr, opt, usb, rca
”
in for details.
- Any time the VOLUME display reverts from the numerical display to the LE symbol, the settings
are stored in non-volatile memory.
- In Operating mode with
SAFE MODE enabled, the symbol “LE” indicates that the infrared
receiver is
“gated off” so that the DA11 will not respond to remote commands other than “Mute.”
To “open the gate,” press the “0” button and the display changes to the numerical volume setting.
Please see the section OPTIONAL INFRARED REMOTE for details.
B. SETTING MODE
To enter the Setting mode, click the
switch under the SELECT legend once either up or
down. The IMAGE display will change from indicating the setting of the
>PiC< Playback Image
Control
™
to indicating the status of the programmable settings.
To e
xit the Setting mode, click the right SELECT switch up towards “exit.” The displays will revert
to the Operating mode: the IMAGE display indicates the setting of the
>PiC<™
and the VOLUME
display indicating the numerical volume setting for approximately 10 seconds.
The symbol “LE”
Summary of Contents for DA11
Page 4: ...DA11 Table of Contents ...


