background image

80

Hosting a Remote Control session

F

or Remote Control to take place the host need only be running LapLink—you do not need to be at the 

computer. Sensitive information is protected by the conditions of the connection. You can grant greater 
access, or limit these conditions, through the LapLink security system.

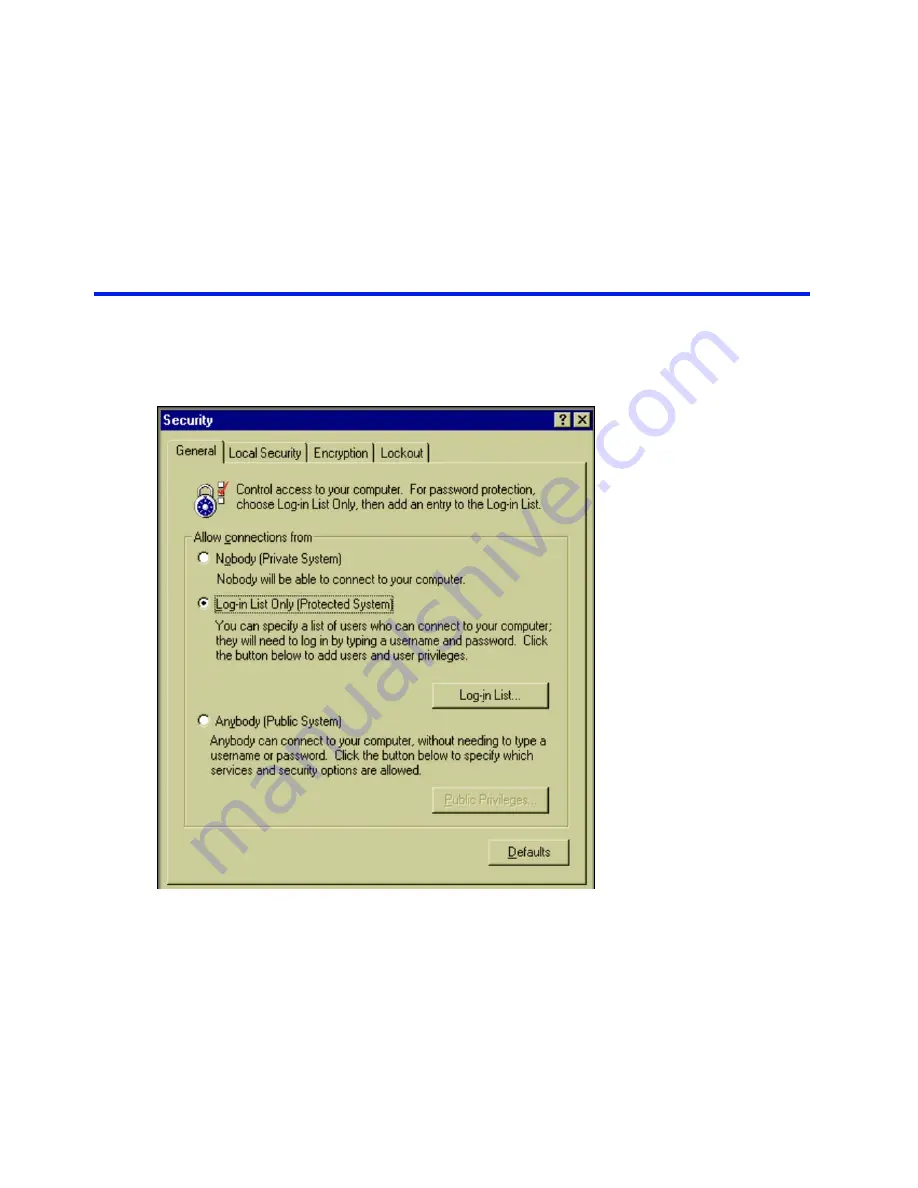
After installation, change the default 
security setting to allow your com-
puter to accept incoming connec-
tions and serve as a host.

To host a Remote Control session, 
leave LapLink running. (Minimize it if 
you wish.)

Summary of Contents for MN-LGD011-XX-US

Page 1: ...1 MN LGD011 XX US...

Page 2: ...ed trademarks of their respective holders Patents SpeedSync U S Patent Number 5 446 888 This product may contain one or more of the following licensed products RSA Data Security Inc MD5 Message Digest...

Page 3: ...Address Book 47 48 Using the Address Book 49 View Options and Folders 52 The Button Bar 53 Adding an Address Book Entry General Tab 55 Connection tab 56 Connection Types 57 Services tab 59 Other Tool...

Page 4: ...cheduling an Xchange Agent to run automatically 8 Using Print Redirection 135 136 Using Print Redirection Overview 138 Printing over a LapLink connection 140 Setting up printers for Print Redirection...

Page 5: ...5 1 Introducing LapLink Gold Corporate 6 Why LapLink Gold 8 Staying in touch with the office 10 Connecting at the office...

Page 6: ...e already on your home computer the file is transferred almost before you know it In fact LapLink Gold merely updates the file transferring only the parts that have changed Use Remote Control to start...

Page 7: ...s say the hotel s internet connection is down when the CEO calls Using the powerful new Address Book features all the connection information can be stored cen trally This allows you to share saved con...

Page 8: ...transfer files as you would normally If your office computer is attached to a network you can read your e mail and access the customary network resources though you cannot connect to other computers...

Page 9: ...s address through the LapLink ILS server Then be sure to leave LapLink Gold running Connecting without running LapLink Gold There may be times when you need to connect to your office computer running...

Page 10: ...esk you can use Remote Control to trou bleshoot problems on other computers chatting with their users if necessary NOTE A LapLink Gold license either a single user license or a special volume license...

Page 11: ...lished name or address of the host computer Before you use Connect over Internet other LapLink Gold users will set up LapLink Gold as a host on their computers so that their e mail addresses or other...

Page 12: ...computer available for ILS connections 28 Making an Internet connection to a computer behind a firewall 31 Connecting Over the Internet Using Laplink Everywhere 34 Connecting directly by modem 36 Dial...

Page 13: ...vices Connecting to the Officet LapLink provides sev eral ways to connect to other computers Which method you use depends on the resources available to the computers Can you connect to the Internet on...

Page 14: ...ter modem modem Use Connect over Modem and dial in to the modem on the remote computer Modem connections are available in all versions of Windows page 34 TCP IP or IPX network TCP IP or IPX network Us...

Page 15: ...en click Cable Attach one end of the yellow LapLink parallel cable to a parallel port on each computer Only available for WIn95 98 ME The blue LapLink serial cable has two connectors at one end but on...

Page 16: ...USB cable to connect as your first option If you don t have a USB port available you can also use a serial or parallel port You can obtain cables for these con nection types from Laplink If there is...

Page 17: ...case sensitive 4 Click the Connection tab In the Connection Type list click Cable 5 Click the Services tab Choose the services you want to enable when you connect to this computer 6 Click OK to save...

Page 18: ...twork or a TCP IP network NOTE To simplify routine connections over a network cre ate Address Book entries See Adding an Address Book Entry General Tab You can usually open a network connection simply...

Page 19: ...he IP address of the host computer 3 Under Services check the services you want to use such as File Transfer and Remote Control 4 Click OK Using an Address Book entry to connect over a home or office...

Page 20: ...ick the Windows Start button point to Programs Accessories and click Command Prompt 2 Type IPCONFIG and press ENTER The TCP IP address for that computer appears in the IP Address line Filtering the li...

Page 21: ...S from the Connect menu above the Link Bar When you connect to another LapLink computer on the Internet you can use Remote Control File Transfer and any of the other LapLink services you would use whe...

Page 22: ...k the services you want to use 5 Click OK Using an Address Book entry to connect over ILS It s a good idea to create an Address Book entry especially if you plan to use the connection more than once L...

Page 23: ...e computer s public routable IP address not an address published through an Internet directory Connect Over LAN Network is most useful when you con nect to computers whose IP addresses never change Fo...

Page 24: ...ssigned a different IP address each time you go online So how do you make your computer available to other LapLink computers on the Internet You have your e mail address or other unique identifier pub...

Page 25: ...Give it as well as log in name and password to any LapLink user you allow to connect to your computer on the Internet 3 Set options to determine how to publish your Internet address To publish the add...

Page 26: ...can use LapLink Gold Corporate s Firewall Connection Service to make the connection 1 For more information on the ports that LapLink uses and for up to date instructions on configuring firewalls visit...

Page 27: ...side the firewall must have an Address Book entry that includes the unique computer name user name and password for the computer outside the firewall to use The computer outside the firewall must be c...

Page 28: ...30 4 Under Services check the services you want to use 5 Click OK...

Page 29: ...blic access computers like those found in libraries and Internet caf s LapLink Everywhere and LapLink Gold are two programs that have been designed to work separately or together Unlike LapLink Gold L...

Page 30: ...han one computer be sure to use the same user name and password for each one If you originally chose not to Learn more about LapLink Everywhere after the installation of LapLink Gold Corpo rate you ma...

Page 31: ...ick the Address Book button on the LinkBar then click the Add button 2 In the Description box type a brief description of the remote computer as a reference 3 In the Computer Name box type the exact n...

Page 32: ...s logged on to a net work Before Connecting over a modem The LapLink security setup of the computer you are connecting to must be changed to allow incoming con nections See Allowing incoming connectio...

Page 33: ...e line area codes country codes and a 1 when dialing long distance 4 Click the Dial button Using an Address Book entry to connect over modem It s a good idea to create an Address Book entry especially...

Page 34: ...n that network You can also connect to LapLink computers on the Internet and browse the Internet using the Internet connection in the office In short you can access the same network resources you use...

Page 35: ...on available to Windows Connecting to a network computer using Dial Up Networking To use Dial Up Networking to connect to a network computer 1 Click the Connect Over button on the LinkBar and then cli...

Page 36: ...AN adapter use Connect Over LAN Network Before you connect by wireless Prepare your infrared or other wireless devices to com municate with each other e g move within range Ensure that the wireless po...

Page 37: ...tion list click the name of the computer you want to connect to 3 Under Services check the services you want to use such as File Transfer and Remote Control 4 Click OK TIP To turn Autoconnect off sele...

Page 38: ...not offer CAPI 2 0 ISDN as a means of connecting unless CAPI 2 0 ISDN is installed on your computer CAPI 2 0 ISDN is widely used in Europe particularly in Ger many In North America ISDN seldom is imp...

Page 39: ...be enabled in LapLink on both computers LapLink must be running on both computers Connecting to a computer over CAPI 2 0 ISDN To connect to a computer over CAPI 2 0 ISDN 1 Click the Connect Over butt...

Page 40: ...2 0 ISDN calls and uses the two channels available for LapLink communications For example you can specify that LapLink not respond to any incoming calls to a particular channel or you can double the r...

Page 41: ...If you don t want LapLink to answer any incoming calls clear the Enable box under Auto Answer then make sure that the Accept Calls Only on the Following Numbers box is blank TIP When typing the numbe...

Page 42: ...and use the saved connection as a convenient way to reconnect later NOTE To connect to several computers at once open connections to each of those computers before saving connections When you save a...

Page 43: ...this box Restore Saved Connec tions at Startup 3 Click the name of the connection file you want to open or type it in the Connection File box If the file does not appear in the list of files click th...

Page 44: ...the Address Book 48 Using the Address Book 49 View Options and Folders 52 The Button Bar 53 Adding an Address Book Entry General Tab 55 Connection tab 56 Connection Types 57 Services tab 59 Other Tool...

Page 45: ...It allows you to save connections you use frequently create folders organize your work import and export connection information to and from a global database and allows connections to users directly f...

Page 46: ...e accessed by many differ ent users in your organization For instance it might be useful to provide a group of connections to your entire tech support team and another list to your IT team Global fold...

Page 47: ...ose Rename Type in the new folder name in the box The new folder below is called Remote Sites Once finished click outside the folder name text box to fin ish Adding a Sub folder It is just as easy to...

Page 48: ...l of its contents including any entries in that folder LapLink Gold Cor porate also allows you to Cut and Paste a folder and any connections in the selected folder You can delete it from your Address...

Page 49: ...of the function of each button Close Exits the user from the Address Book Connect Connects you to the selected user Add Brings up the Add User screen Edit Allows you to edit a selected user Delete Del...

Page 50: ...y the same as the Windows computer name To see or change the computer name on the host computer you are connecting to go to the Options menu in LapLink on that machine and choose Computer Name The oth...

Page 51: ...nter these pieces of information here These fields are both case sensitive so make sure the Log In Name and Password match exactly However only the password field is case sensitive Add To Favorites ch...

Page 52: ...on the host computer before attempting to create a con nection Security Must Allow a Connection On the Host machine or the machine to which you are trying to connect security must be set to allow a co...

Page 53: ...s Cable LapLink Gold Corporate accepts use of parallel serial or USB cable as connection types NOTE It is generally not necessary to create an address book entry for cable connections as LapLink Gold...

Page 54: ...e privacy and pre vent interruptions at the host by disabling its keyboard and mouse and blanking its screen Enable the options you want to control once you connect by checking the appropri ate checkb...

Page 55: ...ible On the General tab The Description and Computer Name fields must con tain characters On the Connection tab A Connection Type must be selected On the Services tab At least one Service must be sele...

Page 56: ...r Address Book entry click Edit to make changes Delete If you want to delete a user or a user folder from your Address Book choose the user or folder and select the Delete key Find Find allows you to...

Page 57: ...f LapLink Gold Corporate is not able to locate this computer in the selected folder it will ask you whether you d like to look through the rest of the Address book to find it See Below At this Point L...

Page 58: ...eams When clicking on the Setup Global button the Import Export screen on the left appears LapLink Gold Corpo rate requires a connection to an SQL database through an ADO string If you or your adminis...

Page 59: ...users you must first use Export to send those changes back to the main database Then other LapLink Gold users must use Import to receive the changes CAUTION If you make changes to your Global address...

Page 60: ...4 Allowing incoming connections 66 Denying access to certain drives and folders 68 Locking out password crackers 70 Allowing or requiring callbacks 72 Protecting your security settings with a password...

Page 61: ...ach entry specify the password and the log in name the user must provide to open an incoming connection and grant the user permission to use services and other features The safest way to allow incomin...

Page 62: ...ers The introduction of case sensitivity has these important consequences CAUTION For incoming connections from computers run ning versions earlier than LapLink 2000 1 type passwords using ALL CAPITAL...

Page 63: ...ur drives and folders must be acces sible to other users You can hide certain drives and fold ers so that other users will not see them in their File Transfer windows and cannot copy files to or from...

Page 64: ...ghlight it in the list of current users and click the Edit button 4 Click the Folder Security tab and then click Only Allow Access as Specified Below Access is now denied to all drives and folders 5 I...

Page 65: ...ompro mised Password crackers use a variety of techniques some techniques are more sophisticated than others but almost all require guessing To guard against unauthorized access use Lockout to bar any...

Page 66: ...tically whenever a user connects using that log in name and the correct password For this reason only consecutive failed attempts are recorded permanently not cumulative failed attempts To reset to ze...

Page 67: ...r attempts to con nect to host computer by modem instead of completing the connection the LapLink Gold Corporate host computer reverses the call by hanging up and then dialing to the guest computer Th...

Page 68: ...ed back users who choose to be called back can specify the number to dial This is the most flexible of all the options Optional Specified Number Only Lets the guest user decide whether to be called ba...

Page 69: ...other computers Protecting your security settings is a particularly good idea if you allow others to control your computer remotely Setting up password protection for your LapLink security settings e...

Page 70: ...in Logging features To protect your LapLink security settings 1 Click the Security button on the LinkBar 2 On the Local Security tab check this box Protect Local Security with a Password 3 In the Chan...

Page 71: ...other connections where your information might be intercepted and compromised You can use the encryption methods provided in LapLink or use the powerful encryption options available in Windows operta...

Page 72: ...ompatible Encryption Provides com patibility with versions earlier than LapLink 2000 CryptoAPI Encryption Using the Specified Provider2 Sets a higher degree of security using an algorithm installed on...

Page 73: ...st 84 Customizing keyboard control 86 Disabling the host keyboard and mouse and blanking its screen 88 Rebooting and logging on to the host 90 Taking Screen Shots 92 Viewing a Screen Shot 94 Saving Sy...

Page 74: ...to be at the computer On the other hand you may want to join the guest as an observer or an active participant Opening a Remote Control window On a guest you can open a Remote Control window at the ti...

Page 75: ...ormation is protected by the conditions of the connection You can grant greater access or limit these conditions through the LapLink security system After installation change the default security sett...

Page 76: ...er computers can con nect to the host using any other services What you see on a host When a guest connects and begins Remote Control your LapLink workspace is minimized on the host If you double clic...

Page 77: ...view Devoting your entire screen to a view of the host You can view the host screen in two ways In a window within LapLink the default As a full screen display hiding LapLink and the rest of your Wind...

Page 78: ...desktop operates at a higher screen resolution From your laptop you can lower the desktop s screen resolution to match your laptop s 1 You can then view all of the host screen in full screen view The...

Page 79: ...dows system keys are key combinations that perform a variety of tasks Pressing ALT TAB for example switches to the program you used last The Windows Start key found on most keyboards is another exampl...

Page 80: ...ortcut keys LapLink offers two shortcut keys to change your view of a host screen Pressing CTRL SHIFT F switches between full screen and window view of the host Pressing CTRL SHIFT S switches between...

Page 81: ...host for locking You can configure a host to determine who can lock it and how it will be locked Guests cannot lock the host without your permission and locking privileges you grant cannot be changed...

Page 82: ...the host Disable the host mouse The host s mouse is locked preventing anyone at the host from using the mouse to interrupt your work Disable the host keyboard The host s keyboard is locked preventing...

Page 83: ...the guest From a guest computer you may want to restart a host to put into effect changes you have made on that computer Or you may want to restart a host computer to ensure that no one else can call...

Page 84: ...command on their computers Always Reboot When Guest Disconnects Check this box to require that the host be restarted whenever a guest breaks a con nection or the connection is broken accidentally Ens...

Page 85: ...must first establish a Remote Control session with a host computer Once this connection has been established simply click on theSession menu and choose Screen Shot to take a snapshot of the host desk...

Page 86: ...taken a snapshot of the screen you can save it to your hardrive for later viewing Laplink saves the snap shot as a PNG file which by default are viewed with Internet Explorer NOTE Internet Explorer 5...

Page 87: ...ot Viewing a Screen Shot NOTE From the Sessions menu choose View Screen Shot Note that screen viewing is enabled both during a session and when not connected and it is the only Ses sion option availab...

Page 88: ...Viewing a Screen Shot 93 NOTE If you want to access the PNG files themselves LapLink Gold Corporate saves them to the C WINNT TSI32 LLW directory...

Page 89: ...troubleshooting tool provides your support professionals with a single report offering a great deal of useful information Saving System Information To save system infor mation from the host computer...

Page 90: ...k creates a report that saves your Windows System information Below are just a few of the headings of informa tion contained in your Laplink report System summary information Hardware resources IRQ in...

Page 91: ...oard during Remote Control only a small part of the information is trans ferred to the other computer immediately The rest of the information is transferred when you paste To prevent the loss of infor...

Page 92: ...er of bit maps and bitmap colors transferred over a connection To change Remote Control performance settings 1 On the Options menu click Remote Control Options 2 On the Performance tab click either of...

Page 93: ...as necessary to display larger bitmaps On the Guest Colors tab adjust these options Use Solid Colors Displays solid colors instead of dith ered or patterned colors Performance is not affected but you...

Page 94: ...files and folders 106 Copying or moving files and folders 108 Setting File Transfer options for the results you want 110 Synchronizing folders with SmartXchange 112 Replacing one folder with another...

Page 95: ...files to one computer and delete them from the other move the files You can open File Transfer windows at the time you con nect to a remote computer Or you can open File Transfer windows sometime afte...

Page 96: ...w the same name followed by a 1 or 2 Step two select the files In the opposite File Transfer window select the files you ll be transferring to the target you just displayed To select the folders and f...

Page 97: ...nd display its contents On the right side you see the contents of the open drive and folder Commands on the View menu let you change the appearance and the order of the contents Click a drive or folde...

Page 98: ...contents sub folders and files on the right side of the File Transfer win dow By default the contents appear in Detail view file name size type based on the MS DOS name extension modifi cation date an...

Page 99: ...n CTRL while you click each one You can also click Select All or Select By on the File menu To cancel an individual selection hold down CTRL and click the item You must select a folder or file before...

Page 100: ...ders and files in the current folder On the File menu click Select All TIP To select everything on a drive click the drive and then click Select All To select folders and files using the Select By com...

Page 101: ...r case you see a confirmation dialog box showing details of the operation you are about to perform You can then proceed immediately change certain conditions or cancel the operation entirely When you...

Page 102: ...he previous page To copy or move using a command With the source window still active click Copy or Move on the File menu You now see the File Copy or File Move dialog box as described next NOTE Copy a...

Page 103: ...File Transfer Options on the Options menu then click the Filter tab Whenever you confirm a copy or move operation you can change the settings for that operation There are three File Transfer options t...

Page 104: ...ally the most powerful of the File Transfer options It can make the difference between copying hun dreds of files or only a few When the box is checked Include Subfolders in Copies extends your select...

Page 105: ...m one folder to the other and back again NOTE With SmartXchange you determine the items to be copied by selecting the folder containing the items not by selecting the items themselves Select the folde...

Page 106: ...lder is open look at the title bar at the top of the File Transfer window 2 On the SyncTools menu click SmartXchange Or click the Sync button on the toolbar near the top of the File Transfer window or...

Page 107: ...oning a folder adds and updates target files until they are identical to those on the source In addition it deletes any target file that has no counterpart on the source NOTE With Clone Folder you det...

Page 108: ...mand with caution Any subfolder or file not on the source will be deleted from the target To replace one folder with another 1 On the left side of the target window click the folder whose contents you...

Page 109: ...c SpeedSync is designed to cut transfer times when you are updating files It has no effect when you are copying files that were not on the target before you started copying Before a file is copied Spe...

Page 110: ...le Transfers TIP To review the effect of SpeedSync on your past file transfers open at least one File Transfer window Then click SpeedSync Statistics on the SyncTools menu You see the statistics for y...

Page 111: ...the interrupted file is copied Files successfully copied before the interruption are not copied again TIP File Transfer Recovery is particularly useful when you copy large files over an unreliable mo...

Page 112: ...file When it is cleared the entire file must be sent again Transfer Only If Files Are Newer Located on the Filter tab this box must be checked so that files successfully cop ied before the interrupti...

Page 113: ...Using Xchange Agent Overview 122 Creating an Xchange Agent 124 Previewing and running an Xchange Agent 126 Dealing with conflicts 128 Customizing an Xchange Agent 130 Using filters to include or exclu...

Page 114: ...eping two computers often a laptop and a desktop in sync Whether your most recent work appears on one or both of the computers Xchange Agent transfers files so that both have only the newer copies of...

Page 115: ...on in which files will be copied when the agent is run In a preview you can customize the agent by excluding pairs of files and entire folders from the current synchroni zation leaving the files as th...

Page 116: ...both computers or you can drag folders from File Transfer windows onto the Xchange Agent window In either case you can preview the agent to ensure that you have set up the synchronizations as intended...

Page 117: ...ify ing whether the synchronization is Local Local or Local Remote click a folder on each side of the window Repeat the procedure to add other folder pairs Drag folders from File Transfer windows onto...

Page 118: ...roceed without a preview To set up agents to run without a preview see page 129 To open and preview an Xchange Agent 1 In LapLink click Open Xchange Agent on the Sync Tools menu In Xchange Agent click...

Page 119: ...se Preview button on the toolbar You are now in edit mode TIP While in edit mode you can customize an agent in several ways For more information see page 128 Running an Xchange Agent There are several...

Page 120: ...ither the older or the newer file to the other folder replacing the file already in that folder Copy either the older or the newer file to the other folder and give the file a new name Nothing is repl...

Page 121: ...pped Files To exclude old conflicts from synchronizations 1 Open the Xchange Agent 2 On the File menu click Properties 3 On the Advanced tab click this option Exclude Previously Skipped Files Other co...

Page 122: ...menu Click the agent file and then click Open OR In Xchange Agent click Open Xchange Agent on the File menu Click the agent file and then click Open Changing the direction of copy When you create an X...

Page 123: ...s tab click this option Run Unattended without Preview or Confirma tions Then determine how conflicts will be handled by clicking either of these options Copy the Newer File over the Older or Do Not C...

Page 124: ...ters to synchronize only the files matching the filters Or you can exclude the files matching the filters and synchronize the rest of the files To filter files by type using the preset filters 1 Click...

Page 125: ...ck the filter and then click the Add button 7 To use the filters to exclude not include file types check this box Exclude Files That Match These Filters To remove the effects of a filter 1 Click the f...

Page 126: ...he agent on schedule simply leave the scheduler running on the guest computer You can set up an Xchange Agent to run at a particular time on one of these schedules Just once on a particular date Every...

Page 127: ...and assign a different name to the schedule file TIP To change how an Xchange agent is scheduled access it throught the LapLink scheduler icon which appears at the right end of the Windows taskbar To...

Page 128: ...135 8 Using Print Redirection 136 Using Print Redirection Overview 138 Printing over a LapLink connection 140 Setting up printers for Print Redirection...

Page 129: ...eport to a high quality laser printer in your office Without Print Redirection you d have to transfer the doc ument to the other computer and then use Remote Con trol to run a program on the remote co...

Page 130: ...in LapLink Requirements for Print Redirection There are three requirements for using Print Redirection You must connect to another version of LapLink that supports Print Redirection The default secur...

Page 131: ...her end Printing over a LapLink connection is much like printing to a local printer You simply choose a different printer one that has been installed especially to print over LapLink When printing fro...

Page 132: ...nter icon NOTE You can use Print Redirection over a LapLink con nection even when it is not one of the services currently open Print Redirection becomes available on demand Choosing among several prin...

Page 133: ...ting to at the other end of the connection Before you can use Print Redirection you need to add a printer for Print Redirection to the computer you ll be printing from the location where your document...

Page 134: ...both computers are using the same printer drivers For more information about configuring a printer for LapLink Printer Redirection see technical document 36 at www laplink com support Setting up a pr...

Page 135: ...143 9 Using Text Chat and Voice Chat 144 Exchanging typed messages using Text Chat 146 Talking to someone using Voice Chat 148 Improving Voice Chat performance 150 Using Manual conversation mode...

Page 136: ...Text Chat window If not you can open one after you open the connection To open a Text Chat window Click the Open Text Chat button on the Shortcut bar Or click Open Text Chat on the Window menu TIP If...

Page 137: ...to the Text Chat window as necessary To paste text into a Text Chat window 1 In Notepad or another Windows text editor select the text and copy it 2 In LapLink click the lower part of the Text Chat wi...

Page 138: ...someone you re connected to over LapLink while using other LapLink services like File Transfer and Remote Control To use Voice Chat you must have a computer that is capable of recording and playing s...

Page 139: ...The trans mission of just one voice at a time is known as half duplex Voice Chat conversations are always half duplex unless both sound cards are configured for full duplex The indica tor at the top...

Page 140: ...crophone before using Voice Chat For exceptions see online help However Voice Chat lets you change settings for your speaker microphone and environment to improve perfor mance in Voice Chat It is reco...

Page 141: ...lay back a few sec onds of speech 7 If you could not hear what you recorded move the Micro phone Level slider towards High and try using the Sound Recorder again 8 Under Set Environment Level click th...

Page 142: ...Automatic and Manual Automatic is the normal conversation mode and allows hands free operation of Voice Chat Automatic mode sends speech whenever you talk Manual mode requires you to click a button i...

Page 143: ...to talk Talking in Manual mode Manual mode works differently depending on whether your conversation is full duplex or half duplex When using half duplex you click the walkie talkie but ton once in or...

Page 144: ...work connections 161 Checklist for Internet connections 163 Checklist for cable connections 165 Checklist for wireless connections 166 Checklist for CAPI 2 0 ISDN connections 167 Checklist for File Tr...

Page 145: ...ting book in Help Topics and display one of the topics Then answer the questions about your problem and try the sug gested remedies In some cases you will find shortcut but tons to dialog boxes use th...

Page 146: ...modem in LapLink exit LapLink and make sure the modem is turned on In the Windows Control Panel double click Modems click the Diagnostics tab and click the appropriate port Click More Info If the tes...

Page 147: ...Use Dialing Properties to simplify the dialing process In the Telephone Number box type the number EXACTLY as it is to be dialed including numbers dialed to get an out side line area codes country co...

Page 148: ...is box is checked in the Connect over Dial Up Networking dialog box After Connecting to the Network Choose a LapLink Connection Ensure that your computer is set up for network con nections Making conn...

Page 149: ...her end of the connection Click Connect Options Options menu On the Disconnect tab check the Disconnect Inactive Connections box and type the number of minutes below In most cases the connection is co...

Page 150: ...otocols are installed using the Networks option in the Windows Con trol Panel See your Windows Help and documentation for information on adding network protocols or consult your net work administrator...

Page 151: ...better if the frame type for the IPX connection is preset rather than selected automatically try setting the frame type to Ethernet 802 2 or Ethernet 802 3 This setting should be changed on both compu...

Page 152: ...omputers Enable a TCP IP port in LapLink To connect over the Internet in LapLink a TCP IP network port must be enabled that is made available for use in LapLink To enable a TCP IP port in LapLink clic...

Page 153: ...firewallor router to allow LapLink con nections over CTCP port 1547 For more informa tion visit www laplink com support TIP Do not attempt to connect two computer over the internet through the same s...

Page 154: ...printer ports Attach a blue LapLink cable to serial COM modem or mouse ports connect only one end to each computer LapLink does not work over most other serial cables or any printer cables Attach a La...

Page 155: ...d a Windows driver The LapLink En hanced driver is preferable when you alternate between par allel communications and other types of communications you can leave the parallel port enabled without expe...

Page 156: ...p Options menu click the COM port to which the wireless device is at tached Click Wireless in the Type box and then check the Enable Port box Ensure that Autoconnect is turned on Autoconnect opens wir...

Page 157: ...0 ISDN Click Configure and then verify that the Enable box under Auto Answer is checked If you are using ISDN in North America avoid using the LapLink CAPI 2 0 ISDN In North America ISDN doesn t usua...

Page 158: ...nts root of a drive Windows may create hidden files or fold ers that could be in use and cannot be transferred Like wise do not attempt to transfer directories containing the Windows operating system...

Page 159: ...rt Speed is set at 115200 Change the transfer mode to standard in Port Setup Options menu click the appropriate COM port click Configure and click Standard under Transfer Mode Tips for transfers over...

Page 160: ...apLink callback feature If the remote computer requires or requests a callback be fore opening a modem connection the agent cannot run On the remote computer turn off the callback feature Click the Se...

Page 161: ...h er pairs you do not want synchronized Then before clos ing Preview or quitting Xchange Agent run the agent TIP You can omit file and folder pairs only from the current synchronization To remove them...

Page 162: ...n If the window in which you are viewing the host screen does not show all of the host screen you can use your keyboard to view areas beyond the borders of the window press CTRL ALT SHIFT and any of t...

Page 163: ...ion press CTRL and ALT again TIP To have CTRL ALT DELETE take effect on a host computer click Send CTRL ALT DELETE to Host on the guest s Session menu Keep LapLink running before the Windows NT Win do...

Page 164: ...r end of the connection When there are several printers available however you may want to use a printer other than the de fault To set up LapLink to allow you to choose among the avail able printers c...

Page 165: ...arliest This starts to hap pen when the conversation exceeds 32 000 characters If you intend to save a lengthy conversation begin saving be fore this limit is reached To save a conversation click in t...

Page 166: ...djustment in order to send clear speech Make sure your microphone is placed at a good dis tance from your mouth not too far and not too close and then adjust the microphone level using the Levels tab...

Reviews: