background image

9

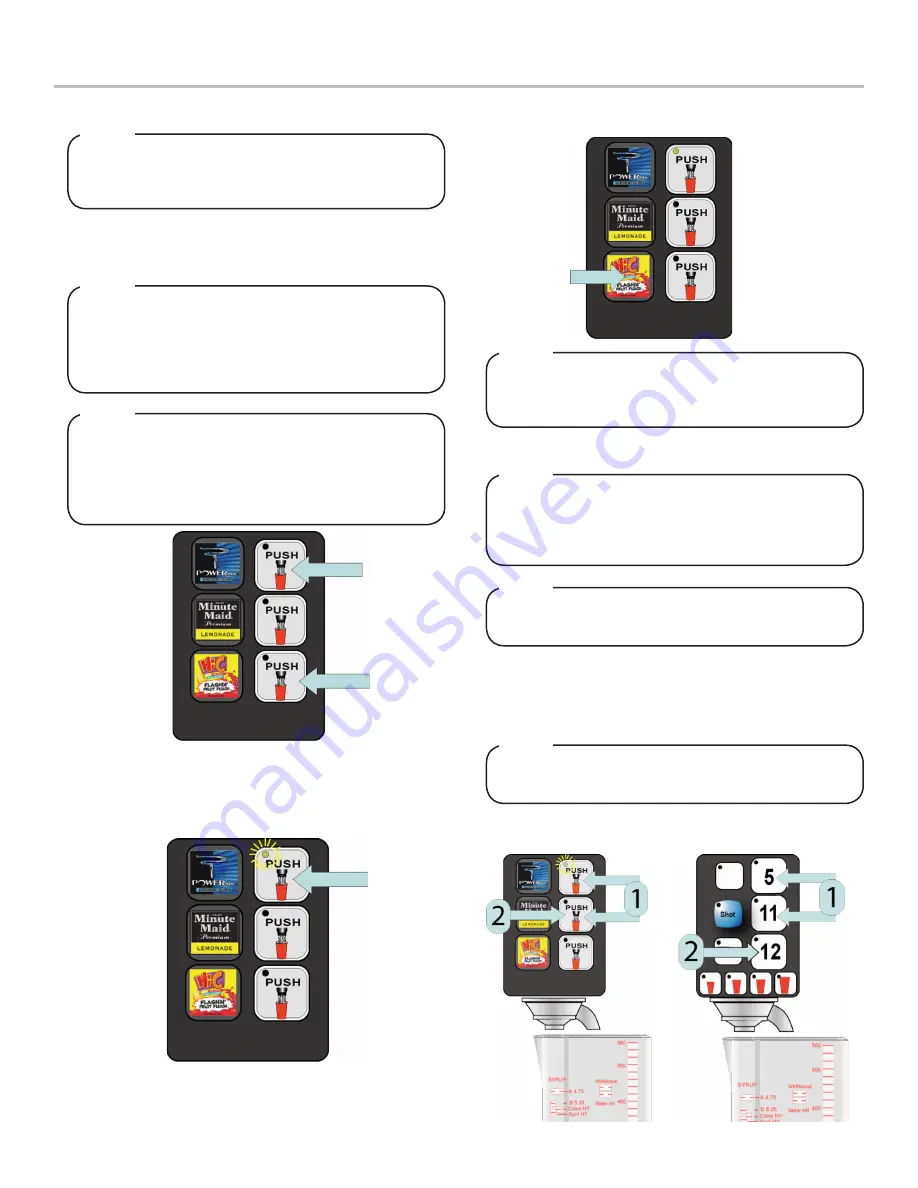
The MVU can be programmed to serve carbonated or 

non-carbonated beverages as well as a flavor shot from 

each of the beverage positions on the valve.

NOTE

On some dispensers the top button may be hidden (no 

“Push” label present). In this case, the button can be 

used to enter the programming mode and the button 

should be set to No Water (light off). The light for the 

top hidden button will be visibly when lit. 

NOTE

If no entries are made for 60 seconds while in program-

ming mode, the PC board automatically saves the last 

changes to the programming.

NOTE

Lights On = Plain Water
Lights Flashing Slowly = Carb Water
Lights Flashing Quickly = Flavor Shot

Lights Off = No Water

NOTE

Adjust Water Flow Rate & Syrup/Water Ratio - MVU

PROGRAMMING AND MAINTENANCE - MVU

1.  To enter programming mode, press both the top and bottom 

brand “Push” buttons and the same time and hold for 5 

seconds. 

2.  If the button light is off, press the Push button one time to 

change to a non-carb beverage.

3.  Press the same brand button again to change to a carbonat-

ed beverage (light will flash slowly).

4.  Press the button one more time to change to a flavor shot 

mode (light will flash quickly and water will be turned off. 


The dispenser’s water flow rate is calibrated using the 


on-board computer as a timer.

NOTE


The Self-Serve format uses the same two buttons to 


check flow rate.

NOTE

Adjust Water Flow Rate & Syrup/Water Ratio - MVU


Ensure there is ice on the cold plate and the lines are 

cold before attempting to set the flow rates on the 

valves. The drink temperature should be no higher than 

40°F (4.4°C) when flow rates are set. 

NOTE

1.  The check the flow rate, press the top and middle buttons at 

the same time and hold for approximately 5 seconds.

2.  The pour/cancel button will illuminate and the shot LED will 

blink 5 times. 

3.  Place a ratio cup under the nozzle and press any brand 

button. Water will pour for 4 seconds.

Self-Serve

Crew-Serve

5.  Repeat process for each brand on the MVU, then press the 

Save button to save the programming. 

Summary of Contents for Bevariety ACIB Series

Page 1: ...s not a toy Children should not be supervised not to play with appliance It should not be used by children or infirm persons without supervision This appliance is not intended for use by persons inclu...

Page 2: ...local standards It is the responsibility of the installer to ensure compliance Water Notice Units are equipped with an automatic agitation system and will activate unexpectedly Do not place hands or f...

Page 3: ...chilled products 30 only or two chilled and one ambient product on each MVU pad Capable of dispensing flavor shots Replaces the two center LEVs Provides additional carb or non carb beverage flexibili...

Page 4: ...ack and side to side Place a level on the top of the rear edge of the dispenser The bubble must settle between the level lines Repeat this procedure for the remaining three sides Level unit if necessa...

Page 5: ...the left side wall Dispenser Installation The installation and relocation if necessary must be carried out by qualified personnel with up to date knowledge and practical experience in accordance with...

Page 6: ...ocation to the tee fitting at water line 3 Connect line from tee fitting at water line to the remote pump deck inlet regulator 4 Complete the carbonated water line connection installed in the previous...

Page 7: ...aking connections Each dispenser must have a separate electrical circuit Do not use extension cords Do not connect multiple electrical devices on the same outlet WARNING A Regulator Adjustment Screw B...

Page 8: ...ctivate valve to purge syrup until steady flow is achieved 8 Using a Lancer ratio cup activate the valve and capture a sample Verify that the syrup level is even with the water level Use a screwdriver...

Page 9: ...press the Push button one time to change to a non carb beverage 3 Press the same brand button again to change to a carbonat ed beverage light will flash slowly 4 Press the button one more time to chan...

Page 10: ...n to capture a sample Self Serve Crew Serve 8 Verify that the syrup level is even with the water level Use screwdriver to adjust appropriate LFCV if necessary 9 Repeat steps 7 8 for each brand on MVU...

Page 11: ...save 60 seconds after all changes have been made NOTE 5 Repeat Steps 2 4 for each of the desired brands 6 Press the Pour Cancel button to save Cleaning Solution Mix a mild non abrasive detergent e g...

Page 12: ...lush solution from the dispenser Cleaning and Sanitizing Syrup Lines Figal Tank 1 Disconnect syrup inlet from the figal syrup tank 2 Prepare cleaning solution and using a plastic bristle brush scrub b...

Page 13: ...off power to the dispenser 2 Remove Merchandiser 3 Remove Ice Chute Lever then remove Splash Plate Assembly by lifting it up and out from the dispenser face 4 Remove the Ice Chute Assembly base by rem...

Page 14: ...14 WIRING DIAGRAMS ACIB 22 30...

Page 15: ...15 PLUMBING DIAGRAMS ACIB 22 30...

Page 16: ...Lancer Corp 800 729 1500 Technical Support Warranty 800 729 1550 custserv lancercorp com lancercorp com...

Reviews: