


UNICO 01.02.2013
English / Englisch
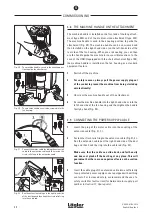
Fig. 9
Inserting the extension into the clamping piece of
the pipe bend.
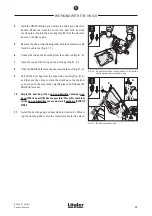
Fig. 13
Undoing the clamping lever on the extension and
tilting the handlebar over into the desired posi tion.
Fig. 12
The extension can also be pushed all the way
down to the fan housing.
Fig. 11
Undoing the clamping lever (1.), sliding the ex-
tension to suit your height (2.) and tightening the
clamping lever (3.).
Fig. 10
Inserting the handlebar into the clamping piece of
the extension and tightening the clamping lever.
4.4 INSTALLING THE EXTENSION AND THE
HANDLEBAR
1
Insert the extension into the clamping piece of the pipe bend
and tighten the clamping lever firmly (Fig. 9).
2
Insert the long straight end of the handlebar into the clamping
piece and tighten the clamping lever firmly. (Fig. 10).
4.5 ADJUSTING THE EXTENSION AND THE
HANDLEBAR
4.5.1 ADJUSTING THE EXTENSION
The extension of the UNICO can be adjusted to suit the height and
body position of any person performing the sanding work:
1
Switch off the machine.
2
For safety reasons, always pull the power supply plug out
of the socket to prevent the machine from being started up
unintentionally!
3
To adjust the handle height, undo the clamping lever at the
front end of the pipe bend (Fig. 11, 1.).
4
Slide the extension upward or downward (Fig. 11, 2.). At the
bottom, it is also allowed to rest on the fan housing (Fig. 12).
5
Tighten the clamping lever firmly again (Fig. 11, 3.).
6
To adjust the handlebar, undo the clamping lever at the upper
end of the extension (Fig. 13, 1.).
7
Tilt the handlebar over into the desired position (Fig. 13, 2.)
and then tighten the clamping lever firmly again.
4
COMMISSIONING
15
Summary of Contents for UNICO
Page 46: ...UNICO 01 02 2013 English Englisch SPARE PARTS 46 11...
Page 48: ...UNICO 01 02 2013 English Englisch SPARE PARTS 48 11...
Page 50: ...UNICO 01 02 2013 English Englisch SPARE PARTS 50 11...
Page 52: ...UNICO 01 02 2013 English Englisch SPARE PARTS 52 11...


