UNICO 01.02.2013
English / Englisch
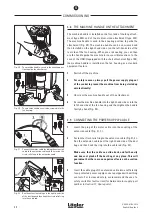
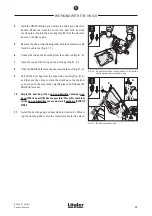
Fig. 28
Remove the screws on the wall-protecting wheel
bracket and then remove the complete wall-
protecting wheel.
Fig. 27
Undo the screws on the wall-protecting wheel
bracket.
Fig. 26
Undo the screw in the centre of the wall-protect-
ing wheel and then position the wheel.
4.7 ADJUSTING THE WALL-PROTECTING WHEEL
In case of walls or baseboards with different shapes, sanding into
these walls or baseboards can be prevented by adjusting the wall-
protecting wheel.
1
Switch off the machine.
2
For safety reasons, always pull the power supply plug out
of the socket to prevent the machine from being started up
unintentionally!
3
Use an Allen key to undo the screw in the centre of the wall-
protecting wheel and then move the wall-protecting wheel
into the desired position (Fig. 26). Tighten the screw again.
You can also increase the adjustment distance of the wall-
protecting wheel by undoing the two screws with which the
wall-protecting wheel bracket is fastened to the attachment
(Fig. 27, 1. + 2.).
4
Move the wall-protecting wheel bracket into your desired
position (Fig. 27, 3.) and then tighten the screws again.
5
To check your adjustments, place the switched-off UNICO
against the wall so that the wall-protecting wheel rests
against the wall. However, the sanding disc wheel is not al-
lowed to touch the wall or the baseboard. Otherwise, readjust
the wall-protecting wheel.
In the case of applications in which you deliberately want to sand
right up to the wall, you can then move the wall-protecting wheel
completely out of the working zone.
In the case of applications in which you want to sand underneath
very low radiators or cabinets, you can then remove the wall-
protecting wheel completely:
1
Switch off the machine.
2
For safety reasons, always pull the power supply plug out
of the socket to prevent the machine from being started up
unintentionally!
3
Remove the two screws with which the wall-protecting wheel
bracket is fastened to the attachment and then remove the
complete wall-protecting wheel (Fig. 28).
4
COMMISSIONING
19
Summary of Contents for UNICO
Page 46: ...UNICO 01 02 2013 English Englisch SPARE PARTS 46 11...
Page 48: ...UNICO 01 02 2013 English Englisch SPARE PARTS 48 11...
Page 50: ...UNICO 01 02 2013 English Englisch SPARE PARTS 50 11...
Page 52: ...UNICO 01 02 2013 English Englisch SPARE PARTS 52 11...


