background image

MagnaTherm Boilers and Water Heaters

Page 67

Section 12

troUBleSHootInG

12.1  lockouts, Holds, and alerts

The control system on the MagnaTherm responds to 

three kinds of trouble indications:

• 

LOCKOUT:

   A “lockout” is caused by a 

serious problem that might involve a safety 

issue.  Once the controller enters a lockout, the 

burners will shut down, and will not be allowed 

to run again until the cause of the problem 

is corrected, and the control is manually 

reset.  The controller will also lockout if you 

change a safety-related parameter, and the unit 

will require ‘Safety Verification’ before the 

control will be allowed to operate. (For more 

information on verification, see Section 9)  

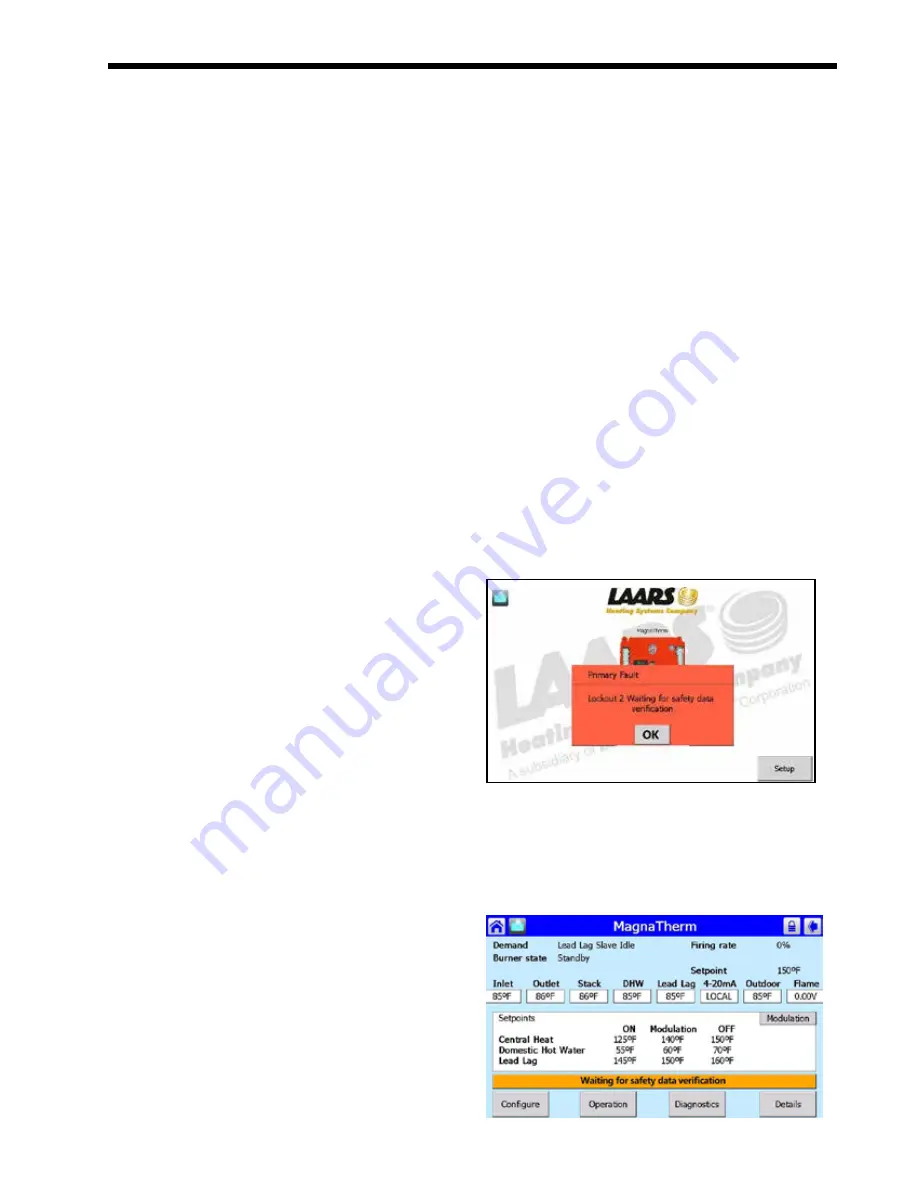
During a lockout condition, the image of the 

affected controller on the ‘home’ screen will 

appear in red.  A bell symbol will appear in the 

upper left-hand corner of the control screen.  

The system maintains a “history” of the 15 

most recent lockouts.

• 

HOLD:

    The system may enter a “hold” for 

a period of time before locking out.  This 

allows the controller to see if the error becomes 

resolved prior to the hard lockout.  Holds may 

also show during ignition sequence and normal 

operation, as the control moves from one task 

to another. 

• 

ALERT:

  An “alert” indicates that some feature 

of the control system’s operation was not 

correct, delayed or waiting for a response.  

This indicates a change in state of the control 

system and doesn’t necessarily mean there is 

a problem. For example, Alerts occur as the 

fan speed transitions from the pre-purge to the 

startup. This indicates that the control system 

is waiting for a condition to be satisfied.   No 

Reset is required to recover from an alert.  The 

system maintains a “history” of the 15 most 

recent alerts.  Sometimes it can be helpful to 

check this list as a troubleshooting aid. 

12.1.1  responding to a lockout, Hold, or alert

1.  if a problem occurs while the system is starting 

up, the system will declare a Hold.  A brief 

explanation of the cause of the Hold will 

appear in an orange bar across the bottom of 

the screen. if you tap the orange bar, the system 

will present more information about the Hold.


correct the cause of the problem, and press the 

button on the screen to clear the Hold.

2.  if a serious problem continues, the system will 

Lockout. A brief explanation of the cause of the 

Lockout will appear in an orange bar across the 

bottom of the screen.  if you tap the orange bar, 

the system will present more information about 

the Lockout.


correct the cause of the problem, and press the 

Reset button.

3.  if an Alert occurs while the system is running, 

the system will present a note across the bottom 

of the screen.  if you tap the orange bar, the 

system will present more information about the 

Alert. Press the OK button to indicate that you 

have seen the Alert.

4.  if an audible alarm on the display is active, you 

can use the Silence button to stop it.

12.1.2  Viewing the lockout and alert 

Histories

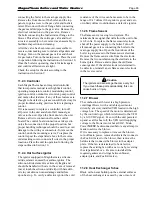
if your boiler is in a Lockout status, the Home 

Screen will look like Menu 27

1.  To view the Lockout/Alert history, start at the 

‘home’ screen Menu 27.  

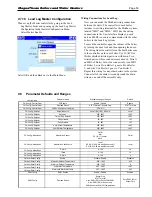
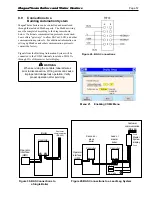
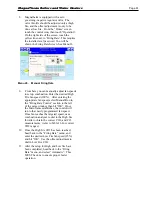
menu 27.   ‘Home’ screen (

shown in lockout

)

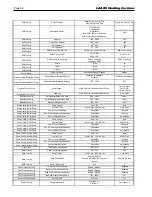
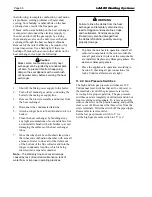
2.  Touch the control icon in the center of the 

screen and the Status Summary Screen will 

appear.  

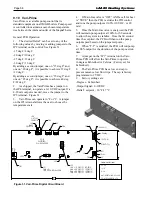
menu 28.  Status Summary menu

Summary of Contents for MAGNATHERM MGH2000

Page 1: ...se serious injury property damage or death Improper installation and or operation will void the warranty AVERTISSEMENT Assurez vous de bien suivres les instructions donn es dans cette notice pour r du...

Page 2: ...Massachusetts 14 3 4 Common Vent Test 15 3 5 Outdoor Installation 16 Section 4 Gas Supply and Piping 4 0 Gas Supply and Piping 16 Section 5 Pump Requirements 5 1 MagnaTherm Boiler Flow and Head Requi...

Page 3: ...up Instructions 10 1 Filling the Boiler System 62 10 2 Initial Operation 63 10 2 1 Initial Burner Operation 63 10 2 2 Combustion Setup Procedure 63 10 3 Shutting Down the MagnaTherm 63 10 4 Restarting...

Page 4: ...LAARS Heating Systems...

Page 5: ...onfiguration can cause fuel buildup and explosion Improper user operation may result in property loss severe physical injury or death Any changes to safety related configuration parameters must only b...

Page 6: ...following information describes the model number structure 1 2 Model Series Designation M G MagnaTherm 3 Usage H Hydronic V Volume Water 4 7 Size 2 0 0 0 1 999 000 BTU hr input 3 0 0 0 3 000 000 BTU...

Page 7: ...r Condensing Unit Air Intake and Filter Water Outlet Water Inlet Vent Power Pack Perspective from opposite corner Perspective from front left corner Shown with front doors and left side panels removed...

Page 8: ...LAARS Heating Systems Page 4 Manual gas valve Blower Touch Screen Model 3000 Air Intake and Filter Water Outlet Water Inlet Vent Power Pack Condensate Trap Heat Exchanger Condensing Unit...

Page 9: ...ers and Water Heaters Page 5 Model 4000 Manual gas valve hidden behind main gas valve Blower Touch Screen Air Intake and Filter Water Outlet Water Inlet Vent Power Pack Condensate Trap Heat Exchanger...

Page 10: ...8 75 85 6 G H J K l m n P q r S t Inches cm Inches cm 60 8 154 2 6 7 8 4 21 67 4 171 4 10 39 2 100 30 4 77 16 41 23 58 10 2 26 14 36 13 33 71 180 4 10 8 9 23 76 8 195 4 3 11 44 4 113 34 5 88 17 7 45 2...

Page 11: ...l for snow accumulation in the local area both terminals should be installed at an appropriate level above grade or the maximum expected snow line The dimensions and requirements that are shown in Tab...

Page 12: ...stalled or the combustion air can be ducted directly to the unit Ventilation air must be provided in either case 3 1 1 Combustion Air From Room In the United States the most common requirements specif...

Page 13: ...t pipe length allowed is 100 feet 30 m Each elbow is considered to be 5 feet 1 5m When using polypropylene or stainless steel materials in horizontal duct configurations a single elbow must be install...

Page 14: ...hout the addition of an external vent extraction fan professionally engineered and approved by the local jurisdiction MagnTherm units are never permitted to share a vent with any Catagory 1 appliances...

Page 15: ...e gas sampling port internal to the MagnaTherm so one must be installed in the vent system external to the MagnaTherm A flue gas sampling port available as a component of the ULC S636 certified vent s...

Page 16: ...gulator vent outlet See note 4 3 feet 91 cm J Clearance to nonmechanical air supply Direct vent only 36 91cm inlet to building or the combustion air inlet Other than Direct vent 4 ft 1 2m below 36 inc...

Page 17: ...roup is 84 213 cm See Figure 5 6 The vent outlet must be at least 12 above the top of the air inlet and must be at least 84 213 cm horizontally from the air inlet See Figure 5 84 213 12 Figure 4 Minim...

Page 18: ...d In addition the installing plumber or gasfitter shall observe that a battery operated or hard wired carbon monoxide detector with an alarm is installed on each additional level of the dwelling build...

Page 19: ...to their previous conditions of use 7 Any improper operation of the common venting system should be corrected so the installation conforms with the National Fuel Gas Code ANSI Z223 1 NFPA 54 and or CA...

Page 20: ...p must be provided upstream of the gas controls 7 All threaded joints should be coated with piping compound resistant to action of liquefied petroleum gas 8 The appliance and its individual shutoff va...

Page 21: ...bic Feet of Gas per Hour Table 8 Pipe Capacity for Natural Gas Table 9 Pipe Capacity for Propane Nominal 1 2 2 3 4 Actual ID 1 61 2 067 2 469 3 068 4 026 Length ft 10 3 520 6 790 10 800 19 100 39 000...

Page 22: ...Therm Electrical Op Temp Rise Flow Head Loss Grains F C GPM LPM Feet m per Gallon 2000 20 12 177 670 43 9 13 4 10 3000 25 14 220 833 46 14 10 4000 30 17 266 1006 41 2 12 6 10 Size Size Size temperatur...

Page 23: ...er Section 6 Water Connections MGH Boilers 6 1 MGH System Piping Hot Supply Connections Note This appliance must be installed in a closed pressure system with a minimum of 12 psi 82 7 kPa static press...

Page 24: ...g Schematics Figure 7 through Figure 10 show suggested piping configurations for MGH boilers These diagrams are only meant as guides All components or piping required by local code must be installed 6...

Page 25: ...feed controls Air vent 4 pipe dia max 4 pipe dia max 4 pipe dia max 4 pipe dia max Low temp radiant zone Space heating zone circuits Space heating zone circuit System pump Note This drawing is a sche...

Page 26: ...one Air vent Water feed controls Expansion tank 4 pipe dia max Indirect DHW tank Anti scald mixing valve Domestic hot water out Cold water Note This drawing is a schematic representation of a piping s...

Page 27: ...ow temp radiant zone Space heating zone circuit Air vent Water feed controls Expansion tank Common piping must be sized for the combined water flow of all of the boilers 4 pipe dia max 4 pipe dia max...

Page 28: ...pipe dia max 4 pipe dia max 4 pipe dia max Indirect DHW tank Note Indirect pump must be sized for boiler and indirect Anti scald mixing valve Domestic hot water out Cold water Note In this piping arr...

Page 29: ...r less with a pH range of 6 5 to 9 5 pH Values outside of this range may reduce the life expectancy of the product Operating the MGV in water with higher hardness levels will cause heat exchanger foul...

Page 30: ...ndensate inside and outside of the boiler from freezing Damage due to freezing water or condensate is not covered by the warranty If installed indoors and there is an event such as a power outage comp...

Page 31: ...n the drain connection and a floor drain or condensate pump if a floor drain is not accessible The condensate drain must be installed to prevent the accumulation of condensate When a condensate pump i...

Page 32: ...m line is equipped with multiple voltage packages to adapt to customer needs ranging from 120 600 volts with single or 3 phase versions Refer to the rating plate for appropriate voltage and current ra...

Page 33: ...mp terminals are found on the Main control board TB1 15A through 20A They are fed 120 Volts internally from the main power feed The current rating of the contacts is 7 4 amps and an appropriately size...

Page 34: ...LAARS Heating Systems Page 30 Figure 14 Electronics Panel Layout 1 CA 2 KM 1 E23 1 E23 1 KM 1 A00 A00 1 E00 1 30 QTY PA 5 2 4 6 8 1 9 7 3 8 4 Control Panel Layout...

Page 35: ...ESET HIGH LIMIT CONTROL 8 1 E2339800 TOUCH SCREEN ALARM SILENCE SWITCH MANUAL RESET HIGH LIMIT ALARM BELL optional LOW WATER CUT OFF BAS GATEWAY optional 7 1 E2346100 6 1 KM004300 5 1 A0014300 4 Termi...

Page 36: ...OR OR W BR Y BL W BR BL BK W BK Y G BK W V BR BL W R W R W Y 4 DISPLAY 7 DISPLAY 8 LWCO 2 120V N P1 P2 ADDITIONAL HIGH LIMIT BLOCKED FLUE BLOCKED INTAKE THERMAL CUTOUT FLOW SWITCH HIGH GAS MANUAL RESE...

Page 37: ...TEMP DRAIN WIRE FROM SHIELDED CABLE BL BL W W BK BL BL V V R R BL BL Y Y Y USED ON SIZE 4 0 KBTU ONLY BL Y BL V W V OR OR W W BK W V W BK BR Y BR Y G W BK BK BK R BK Y W R W R W R GY BL BR R BR Y GY V...

Page 38: ...LTAGE PANEL E23578 D C B 4 3 1 S PROPRIETARY TO LAARS HEATING SYSTEMS AND SHALL NOT BE 2 BY LAARS HEATING SYSTEMS DWG NO SH 1 REV KG 1 17 14 REVISIONS REV CHANGE APPR ENGR APPR ECN DRAFT CHECK RELEASE...

Page 39: ...L A B C D 4 3 1 TITLE PROPRIETARY TO LAARS HEATING SYSTEMS AND SHALL NOT BE 2 BY LAARS HEATING SYSTEMS FRACTIONS DWG NO E23603 SH 1 2 5 14 REVISIONS REV CHANGE APPR ENGR APPR ECN DRAFT REV RELEASED 14...

Page 40: ...1 BY LAARS HEATING SYSTEMS E23602 SH 1 DWG NO REV AL 2 4 14 REVISIONS REV CHANGE APPR ENGR APPR ECN DRAFT CHECK RELEASED JM 2 4 14 14 002N 13 APPROVALS UNLESS OTHERWISE SPECIFIED PURPOSE EXCEPT AS SPE...

Page 41: ...6 37 38 39 40 42 41 TOD FEED J10 2 J6 8 J6 7 ALARM 27 28 26 25 24 23 22 21 TB1 4A 20 19 18 17 15 16 FIELD CONNECTIONS TT ANALOG OUTDOOR SYSTEM DHW PUMP SYSTEM PUMP BOILER PUMP J8 3 TB1 13 J8 6 J8 7 J8...

Page 42: ...5 24 23 22 21 TB1 4A 20 19 18 17 15 16 FIELD CONNECTIONS TT ANALOG OUTDOOR SYSTEM DHW PUMP SYSTEM PUMP BOILER PUMP J8 3 TB1 13 J8 6 J8 7 J8 11 J8 12 J4 2 J4 4 TB1 4A TB1 4A J4 6 VFD 16 VFD 17 J4 2 J4...

Page 43: ...DISPLAY 4 35 36 37 38 39 40 42 41 TOD FEED J10 2 J6 8 J6 7 ALARM 27 28 26 25 24 23 22 21 TB1 4A 20 19 18 17 15 16 FIELD CONNECTIONS TT ANALOG OUTDOOR SYSTEM DHW PUMP SYSTEM PUMP BOILER PUMP J8 3 TB1 1...

Page 44: ...al operation the Touch Screen will automatically present this Home screen See Menu 1 Menu 1 Home Screen Menu 2 Status Summary Figure 22 To access the Touch Screen The home screen shows a picture of th...

Page 45: ...d Setup and parameter changes made when the system is installed and some diagnostic and troubleshooting functions The installer level password is lnt lower case LNT User Level no password required Non...

Page 46: ...s andmechanics Hazardousburnerconditionscan happenwithimproperoperationsthatmayresultin PROPERTYLOSS PHYSICALINJURY orDEATH Press OK to continue The system will ask you to login before you make a chan...

Page 47: ...ify the entries in those groups in the same way Do this until the following screen shows Menu 8 Safety Parameter Reset 6 When the process is complete the system will tell you to reset the control syst...

Page 48: ...uts used by the system Details Allows you to check the status of all of the setup parameters on the control system 9 5 Configuring Parameters In this section we will give you a quick explanation of ho...

Page 49: ...and Alert logs will be incorrect The display has a removable battery CR2032 to store time date lockout and alerts in the event of a power failure To set the clock 1 Start at the home screen Menu 14 H...

Page 50: ...display information regarding software date codes model numbers and program name as well as giving the installer access to re name the boiler and to change the modbus addresses for lead lag operation...

Page 51: ...ect water heaters that are used with boiler MGH systems 9 7 5 Warm Weather Shutdown Configuration Connect the outdoor reset sensor as descibed in Section 9 7 3 From this menu you will be able to enabl...

Page 52: ...er Run Time DHW Pump Cycles Boiler Pump Cycles and System Pump Cycles This menu is Read Only 9 7 10 High Limits The outlet High limit can be adjusted using the installer password After a change is mad...

Page 53: ...ght normally Model Propane Orifice inches Propane Pressure Natural Pressure 2000 0 040 3 4 3 4 3000 0 035 3 4 3 4 4000 0 047 2 3 3 4 Table 14 Required Gas Pressures 9 7 15 System Configuration The ins...

Page 54: ...Lead Lag Master A Run sequence is initiated when the system temperature falls to the Lead Lag Central Heat setpoint Actually this is the LL CH setpoint less the On Hysteresis value The default settin...

Page 55: ...at the firing rate of that first boiler rises to your boiler configurations Base Load Value see Table 15 the next boiler in the sequence will start up and begin firing at 20 to 35 fan speed depending...

Page 56: ...turning on Slave Enable You will be prompted to sign in This can be done by pressing the LOCK symbol at the top right type in lnt LNT lower case and press OK Then you can select Slave Enable Select En...

Page 57: ...entral Heat CH Config Central Heat CH Config Setpoint CH Config Setpoint CH Config Setpoint CH Config Setpoint CH Config Setpoint CH Config Setpoint CH Config Setpoint CH Config Modulation CH Config M...

Page 58: ...Auto 22 50 Auto On 100 100 60 100 60 100 CH LL Slave CH DHW LL Slave DHW CH DHW Arrow Points to Loop with Higher Priority Arrow Points to Loop with Higher Priority Shutdown Immediately 95F Shutdown I...

Page 59: ...me Shutdown Immediately Shutdown Immediately Disabled 65 65F 40F 150F 0 Disabled 0 100 Enable Disable DHW CH Enabled CH DHW DHW CH Enable Disable Drop After Priority Time 240 min or 4 Hrs Boost During...

Page 60: ...gs Modulation Lead Lag Master Config Adv Settings Modulation Lead Lag Master Config Adv Settings Modulation Lead Lag Master Config Adv Settings Modulation Lead Lag Master Config Adv Settings Modulatio...

Page 61: ...protocols contact the factory Signals from the Building Automation System will be connected to the COM2 terminals located on TBI 33A through 35A of this master boiler display WARNING When servicing th...

Page 62: ...100 10 VDC or 20 mA 5 Once the Main Gas valve is energized the PCB will maintain pump output at 100 for 60 seconds to allow the system to stabilize Once the 60 second timer has expired the PCB will t...

Page 63: ...on in the lower left corner Menu 24 Configuration Menu 5 From the Configuration menu select the line Burner Control Ignition Menu 25 Burner Control Ignition Once there select Pilot Test Hold and turn...

Page 64: ...n high fire CO2 0 5 to 1 2 wc Propane 10 0 0 2 0 25 lower than high fire CO2 0 5 to 1 2 wc 4 000 Natural 9 0 0 2 0 25 lower than high fire CO2 0 5 to 1 2 wc Propane 10 0 0 2 0 25 lower than high fire...

Page 65: ...gh Fire fan speed 100 After entering the appropriate fan speed select Manual Run in the Firing Rate Control section to the left of the same window then hit OK Once the Main flame establishes the contr...

Page 66: ...ontrol that may have been under water Section 10 Initial startup Instructions 10 1 Filling the Boiler System 1 Ensure the system is fully connected Close all bleeding devices and open the make up wate...

Page 67: ...ial Operation The initial setup must be checked before the unit is put into operation Problems such as failure to start rough ignition strong exhaust odors etc can be due to improper setup Damage to t...

Page 68: ...ed service technician a Appliance control f Flow switch b Automatic gas valve g Low water cutoff c Pressure switches h Burner d Blower i Heat exchanger e Pump j Ignitor Do the following once every six...

Page 69: ...amic encased hot surface ignitor The silicone nitride element is extremely fragile and should be handled with care in the event of removal never touch the silicone nitride tip with bare skin oils in y...

Page 70: ...have been brushed clean rinse the tubes and combustion chamber with a small amount of water to rinse all of the debris out of the bottom of the flue collector and into the longer condensate trap line...

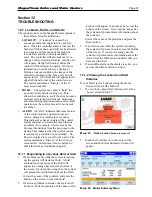
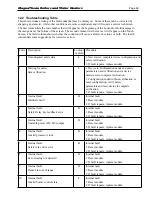
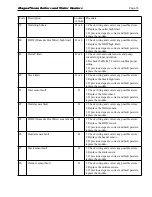
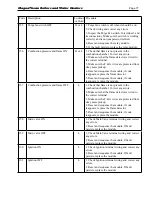
Page 71: ...o the startup This indicates that the control system is waiting for a condition to be satisfied No Reset is required to recover from an alert The system maintains a history of the 15 most recent alert...

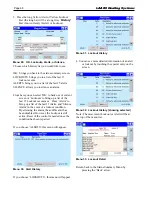
Page 72: ...last 15 Lockout occurances Press Alerts to bring up a list of the last 15 Alerts and Silence Alarm in the event of a lockout condition By silencing the alarm the audible alert has been disabled Howeve...

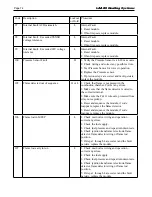
Page 73: ...ters need verification and a device needs reset to complete verification 2 Configuration ended without verification re enter configuration verify safety parameters and reset device to complete verific...

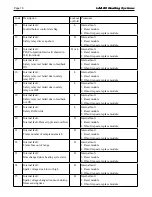
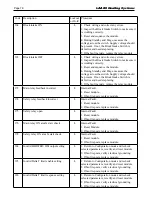
Page 74: ...odule 2 If fault repeats replace module 18 Internal fault Safety relay test failed due to feedback not ON L Internal fault 1 Reset module 2 If fault repeats replace module 19 Internal fault Safety RAM...

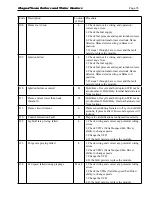
Page 75: ...r H Internal fault 1 Reset module 2 If fault repeats replace module 32 46 Internal fault Safety Key 0 through 14 L Internal fault 1 Reset module 2 If fault repeats replace module 47 Flame Rod to groun...

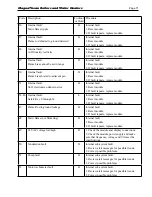
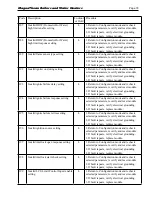
Page 76: ...heck wiring and correct any faults 2 Check Preignition Interlock switches to assure proper functioning 3 Check the valve operation 4 Reset and sequence the module monitor the PII status 5 If code pers...

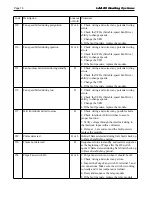
Page 77: ...module 91 Inlet sensor fault H 1 Check wiring and correct any possible errors 2 Replace the Inlet sensor 3 If previous steps are correct and fault persists replace the module 92 Outlet sensor fault H...

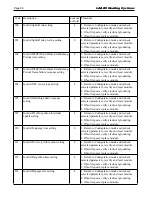
Page 78: ...ber Correct any errors 2 Make sure that the flame detector is wired to the correct terminal 3 Make sure the F G wires are protected from stray noise pickup 4 Reset and sequence the module if code reap...

Page 79: ...nal hardware test Not a lockout 111 Flame current lower than weak threshold H Hold time of recycle and hold option Will not be a lockout fault Hold Only Internal hardware test Not a lockout 113 Flame...

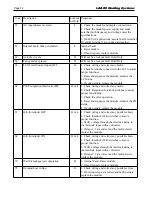
Page 80: ...FDs Variable speed Fan Drive ability to change speeds 3 Change the VFD 4 If the fault persists replace the module 137 ILK Interlock failed to close H 1 Check wiring and correct any possible shorts 2 C...

Page 81: ...ppears replace the module 157 Combustion pressure and flame OFF L 1 Check that flame is not present in the combustion chamber Correct any errors 2 Make sure that the flame detector is wired to the cor...

Page 82: ...module 2 If fault repeats replace module 174 Safety relay feedback incorrect L Internal Fault 1 Reset module 2 If fault repeats replace module 175 Safety relay open L Internal Fault 1 Reset module 2...

Page 83: ...ical grounding 3 If fault repeats replace module 194 Invalid ignite failure response setting L 1 Return to Configuration mode and recheck selected parameters reverify and reset module 2 If fault repea...

Page 84: ...ctrical grounding 3 If fault repeats replace module 205 Invalid Outlet high limit response setting L 1 Return to Configuration mode and recheck selected parameters reverify and reset module 2 If fault...

Page 85: ...le 219 Invalid Stack limit response setting L 1 Return to Configuration mode and recheck selected parameters reverify and reset module 2 If fault repeats verify electrical grounding 3 If fault repeats...

Page 86: ...3 If fault repeats replace module 230 Invalid CH Central Heat demand source setting L 1 Return to Configuration mode and recheck selected parameters reverify and reset module 2 If fault repeats verify...

Page 87: ...to Configuration mode and recheck selected parameters reverify and reset module 2 If fault repeats verify electrical grounding 3 If fault repeats replace module 12 3 Diagnostic Tests and Input Output...

Page 88: ...ncludes a diagnostic screen that lists some information on the Lead Lag slaves in the system See Menu 39 Menu 39 Lead Lag Diagnostics Use the left and right arrows to see all of the columns in the dis...

Page 89: ...Sequence When there is a call for heat the unit will close pump contacts to energize the customer supplied relay contactor to start water flow Once the LCI circuit flow switch gas pressure switches L...

Page 90: ...BUTION BOX G Section 13 Replacement Parts Use only genuine LAARS replacement parts 13 1 General Information To order or purchase parts for the LAARS MagnaTherm Appliance contact your nearest LAARS dea...

Page 91: ...0N3050 40N3163 19 Hinge mounting bracket right 20N3164 30N3051 40N3164 20 Panel right rain splatter 30N3053 30N3053 40N3050 21 Panel left rain splatter 30N3054 30N3054 40N3050 22 Bracket hinge brace 3...

Page 92: ...LAARS Heating Systems Page 88 DETAIL A View from Back 12 3 12 5 11 14 2 1 4 8 9 13 16 Final Assembly...

Page 93: ...rubber bumper F2039700 F2037900 F2037900 13 Bushing nylon S0064900 S0064900 S0064900 14 Grommet 2 pipe S2116500 S2116500 S2116500 15 Grommet push in S2123600 S2123600 S2123600 16 Plug button 7 8 F003...

Page 94: ...9 Pressure switch E2348101 E2348102 E2348101 10 Outlet box not shown E2350900 E2350900 E2350900 11 Spacer F2035400 F2035400 F2035400 12 Silicone rubber bumper F2039700 F2037900 F2037900 13 Bushing ny...

Page 95: ...witch RE0013000 RE0013000 RE0013000 Flow switch paddle E2255800 E2255800 E2255900 4 Well immersion 1 2 NPT RE2058300 RE2058300 RE2058300 5 Sensor water temperature duplex RE2319900 RE2319900 RE2319900...

Page 96: ...5090 N A 17 Gasket venturi gas valve S2104900 N A 4000 3 Door right 20N3100 30N3100 40N3100 4 Door left 20N3150 30N3150 40N3150 5 Control panel assemblies MGH 30N7080 30N7080 40N7080 MGH with CSD 1 30...

Page 97: ...124600 14 Ignitor hot surface W2013900 15 Sight glass RF0044800 16 Flame sensor W2014000 Gas Train Assembly APPROVALS INTENDED SIZE 1 2 3 010 1 8 AL 6 17 13 SOFTWARE S CJT 6 17 13 DWG NO D SHEET 1 OF...

Page 98: ...LAARS Heating Systems Page 94 28 26 26 23 27 16 31 23 20 5 35 11 10 29 7 25 34 37 2 24 9 12 13 14 3 3 4 36 1 17 19 26 9 6 6 21 17 18 22 30 32 15 8 33 Gas Train Assembly Models 2000 and 3000...

Page 99: ...fitting 1 4 tube x 1 4NPT P0004100 P0004100 16 Pilot tube 20N5086 30N6027 17 Nipple 1 8 x2 P0011300 P0011300 18 Elbow 1 8 P2008900 P2008900 19 Nipple 1 8 P0011100 P0011100 20 Nipple tee weldment 30N6...

Page 100: ...A 1 W2000300 VALVE MANUA 2 S2123500 WASHER SEA 2 P2089600 ADAPTER FEMALE 1 P2089300 ADAPTER 1 4 TUB 1 40N6040 GAS TRA 1 40N6031 GAS TRAIN 1 V2022300 VALVE 18 23 24 16 22 14 13 12 21 20 1 19 17 14 7 25...

Page 101: ...ipe gas inlet 40N6034 19 Elbow 90 2 P2091100 20 Nipple 2 x2 P0021100 21 Flange 2 V2021900 22 Elbow 90 1 8 P2008900 23 Tee 3 8 P2090600 24 Bushing 3 8 x1 8 P2090700 25 Nipple 3 8 x2 P2089000 26 Ball va...

Page 102: ...LAARS Heating Systems Page 98 6 2 7 11 1 5 4 12 10 3 3 8 9 6 Control Panel Assembly...

Page 103: ...40 2 Low water cutoff RE2075100 RE2075100 RE2075100 3 Bushing 7 8 nylon open E2074300 E2074300 E2074300 4 Relay 24VAC DPDT E2327800 E2327800 E2327800 5 Display touch control E2339800 E2339800 E2339800...

Page 104: ...03 335 6300 Fax 603 335 3355 1869 Sismet Road Mississauga Ontario Canada L4W 1W8 905 238 0100 Fax 905 366 0130 www Laars com Printed in U S A Laars Heating Systems 1401 Document 1276 Dimensions and sp...

Reviews: