background image

26

Sending and Receiving Text Messages

2.

Select an option and press 

.

Disabled

 turns off 

Save to Sent

.

Prompt

 allows you to choose whether or 

not to save your message when you send it.

Enabled

 automatically saves all 

successfully sent messages in the 

Sent

folder.

To view successfully sent messages:

1.

Select 

Menu


Messages


Sent

.

2.

Press 

 up or down to scroll through the 

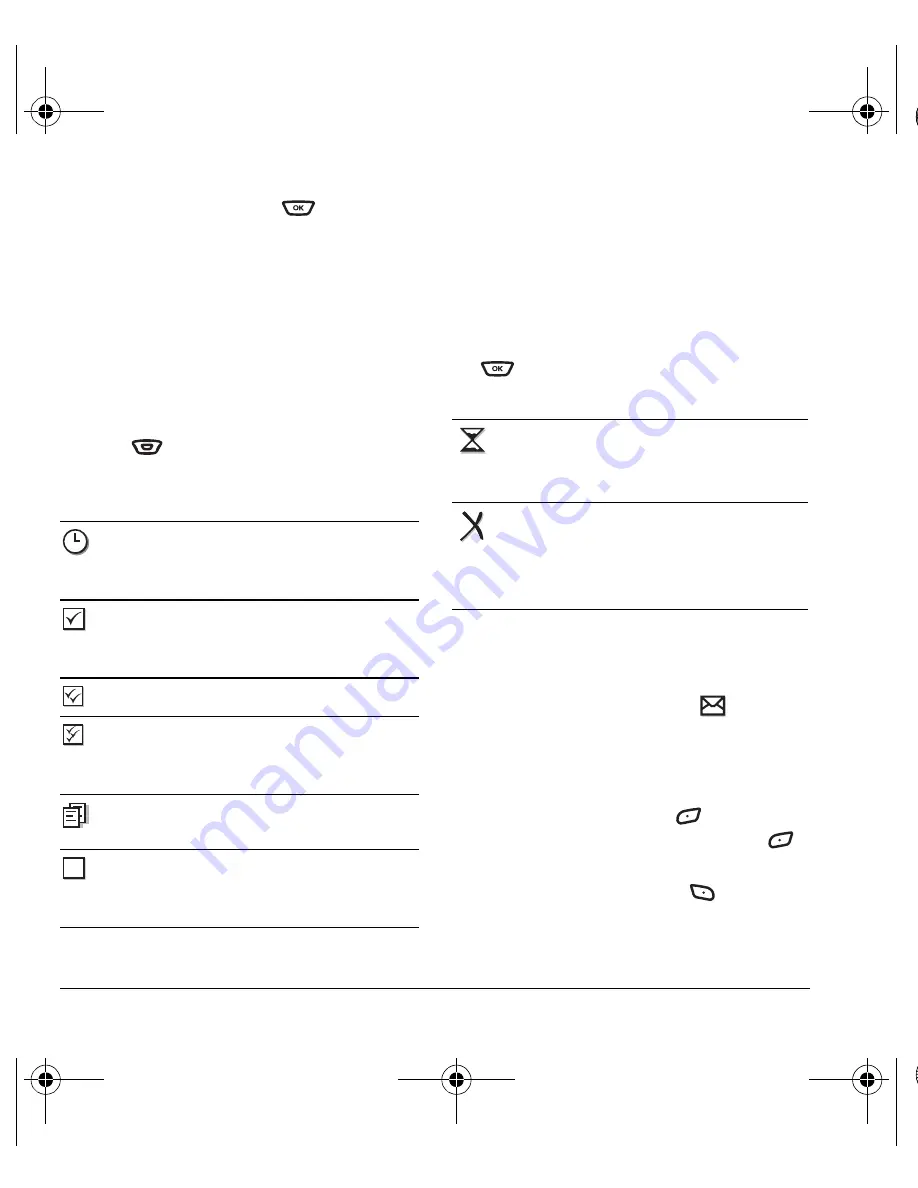
list of messages. One of the following symbols 
appears next to each message:

Viewing failed or pending messages

Failed or pending messages are stored in 
your

OutBox

. To view your 

OutBox

:

1.

Select 

Menu


Messages


→ 

OutBox. 

A list of 

all failed or pending messages appears.

2.

Scroll through the list of messages and press 

 to read one.


One of the following 

symbols appears next to each message:

Retrieving text messages

When a text message is received, your screen 
displays “New Messages” with the 


symbol at 

the top of your screen. The symbol flashes if the 
message is urgent.

If you see the “New Messages” note

• To view the message

press 

 to select 

InBox

, highlight the message, and press 


to select 

View

.

• To

 Ignore 

the message

press .

The scheduled message will be sent at the 
scheduled time. You cannot cancel delivery 
of the message.

The scheduled message has been sent and 
will be delivered as scheduled. You cannot 
cancel delivery of the message.

The message has been received.

The message has been received and opened. 
(This symbol may not be available. Check 
with your service provider.)

The message has been sent to more than 
one recipient.

The message has never been sent or has not 
been sent since it was last modified. You can 
cancel delivery of the message.

The message is pending and will be sent 
when possible. You can cancel delivery of 
the message.

The message cannot be sent 
because service is not available. An alert 
appears on your phone if the message 
cannot be sent.

82-G1673-1EN.book  Page 26  Tuesday, August 22, 2006  1:23 PM

Summary of Contents for K342

Page 1: ...FrontMatter fm Page i Thursday August 24 2006 11 24 AM ...

Page 2: ...luetooth trademarks are owned by Bluetooth SIG Inc and used by Kyocera Wireless Corp under license All other trademarks are the property of their respective owners Copyright 2006 Kyocera Wireless Corp All rights reserved Ringer Tones Copyright 2000 2002 Kyocera Wireless Corp 82 G1673 1EN Rev 001 Bluetooth Certification For information about K342 Bluetooth Certification visit the Bluetooth Qualific...

Page 3: ...atts kg W kg averaged over one gram of tissue The standard incorporates a substantial margin of safety to give additional protection for the public and to account for any variations in measurements Caution The user is cautioned that changes or modifications not expressly approved by the party responsible for compliance could void the warranty and user s authority to operate the equipment Optimize ...

Page 4: ...nly in normal position to ear Avoid dropping hitting bending or sitting on the phone Keep phone dry If the phone gets wet turn the power off immediately and contact your dealer Water damage may not be covered under warranty Resetting the phone If the screen seems frozen and the keypad does not respond to keypresses reset the phone by completing the following steps 1 Remove the battery door 2 Remov...

Page 5: ...o evaluate it for your personal needs M Ratings Phones rated M3 or M4 meet FCC requirements and are likely to generate less interference to hearing devices than phones that are not labeled M4 is the better higher of the two ratings Hearing devices may also be measured for immunity to this type of interference Your hearing device manufacturer or hearing health professional may help you choose the p...

Page 6: ...ing Multimedia Messages 30 Sending multimedia messages 30 Receiving multimedia messages 31 Viewing multimedia messages 32 7 Customizing Your Phone 33 Silencing all sounds 34 Choosing ringers 34 Setting sounds for your phone 35 Using shortcuts 36 Personalizing the screen 37 Creating a secure environment 39 Setting position location 42 8 Voice Commands 43 Setting digit lengths 43 Setting up a voice ...

Page 7: ... battery door by sliding the notches into the openings at the bottom and outside edges of the battery casing 5 Slide the door up to secure the cover into place Charging the battery You must have at least a partial charge in the battery to make or receive calls To charge the battery 1 Connect the AC adapter to the jack on the bottom of the phone 2 Plug the adapter into a wall outlet The battery ico...

Page 8: ...de Your phone switches between modes to find the best signal To set your phone to operate in a single mode select Menu Settings Network Digital Analog Operating in digital mode when far away from a base station or cell site Using data cables or accessories Operating when no service is available or service is available intermittently High earpiece and ringer volume settings Repeating sound vibratio...

Page 9: ...l the last number dialed Press and hold to access voice shortcuts Back key erases characters in text entry and returns you to the previous screen Keypad for entering numbers letters or symbols Shift key changes the text mode in text entry Right softkey accesses the Contacts directory and other menu options OK key selects a menu item or option End Power key turns the phone on and off ends a call or...

Page 10: ...you hear two beeps External earpiece Camera lens Camera Flash Message Indicator Light light flashes when taking a picture or lights when you have a message or missed call External screen displays time caller ID signal and battery strength Warning Inserting an accessory into the incorrect jack will damage the phone 15 16 17 18 19 20 21 82 G1673 1EN book Page 4 Tuesday August 22 2006 1 23 PM ...

Page 11: ...coming Calls Outgoing Calls Missed Calls Erase Call Lists Call History Timer All Calls Timer Contacts View All Add New View Groups Speed Dial List Voice Dial List Information Messages New Text Msg New Pix Msg Voicemail InBox Browser Alerts Sent OutBox Saved Drafts Msg Settings Group Lists Erase Messages Camera Launches the camera Media Gallery Camera Pictures Images Sounds Videos Settings Silent M...

Page 12: ...ail Press and hold and follow the system prompts Verify your phone number Select Menu Phone Info Build Info Silence the ringer on an incoming call Press or then to answer Activate voice dialing Press once and follow the prompts see page 43 Launch the browser Press and hold left Record a voice memo Press and hold right Access Call History list Press down Take a picture Press and hold camera key Foc...

Page 13: ...hone is dormant The battery is fully charged The more black bars the greater the charge The alarm clock is set The phone is in privacy mode or is accessing a secure Web site You have a text message You have a voice message New voice and text message New photo message New photo and voice message New photo and text message New photo voice and text message The phone is set to light up instead of ring...

Page 14: ...n a call comes in the phone rings vibrates or lights up The phone number of the caller also appears if it is not restricted If the number is stored in your Contacts directory the contact name appears Press to answer the incoming call or Press to answer the incoming call and turn on the speakerphone Answering calls using the flip You can set the phone to answer immediately when you open the flip Th...

Page 15: ...the phone to hold calls The Hold Call feature allows you to place incoming calls on hold until you are ready to answer them Note This feature will not work if Open to Answer is enabled See Answering calls using the flip on page 8 1 Select Menu Settings Convenience Hold Call Enabled If you have not recorded a hold message you will be prompted to record one such as Please hold I ll answer in a minut...

Page 16: ...all details Details on the last 60 calls you made received or missed are stored in the Call History list and are identified by the following icons Viewing recent calls 1 Select Menu Call History 2 Select a list All Calls Incoming Calls Outgoing Calls or Missed Calls 3 Select a recent call item and press to select Options options may vary Save adds the phone number to the Contacts list Send Text Ms...

Page 17: ...ed dial a contact that has a speed dial location Note You must 1 enable 1 Touch dialing on your phone and 2 have a speed dial location assigned to a contact Enabling 1 Touch dialing Select Menu Settings Convenience 1 Touch Dialing Enabled Using 1 Touch dialing To call a contact that has a speed dial location From the home screen press and hold the speed dialing number If it is a two digit number p...

Page 18: ...emergency services Note Regardless of your 3 digit emergency code 911 111 999 000 etc your phone operates as described below Dial your 3 digit emergency code and press You can call the code even if your phone is locked or your account is restricted When you call your phone enters Emergency mode This enables the emergency service exclusive access to your phone to call you back if necessary To make ...

Page 19: ... digital and analog Analog only sets the phone to work in analog mode only Analog call forces a call into analog mode for the duration of the next call Digital only sets the phone to work in digital mode only Setting an alert for roaming You may use this setting if you want the phone to alert you when you roam outside of your home service area 1 Select Menu Settings Network Roam Svc Alert 2 Select...

Page 20: ...y required that you turn off your mobile phone because it emits RF signals that interfere with air traffic control In Airplane mode however your phone will not emit RF signals You cannot make or receive calls send text messages use the Web or Bluetooth Wireless Connectivity but you can play games use the Scheduler set the clock and make emergency calls to designated emergency numbers Please check ...

Page 21: ...y once To enter a number while in or mode press and hold a number key until the number appears on the screen Entering words letter by letter 1 Press a key once for the first letter twice for the second letter and so on If your phone is set to Spanish French or Portuguese accented letters are available 2 Wait for the cursor to move right and enter the next letter Note To enter a space press Enterin...

Page 22: ...ault text entry modes You can change the default text entry mode when creating a text message This setting applies only to the message body screen not the To screen 1 Select Menu Messages Msg Settings Default Text 2 Select Normal Alpha or Rapid Mode Changing modes Sometimes you need to change modes For example to enter numbers in an email address while in mode you must change to mode enter the num...

Page 23: ...press until you find the symbol you want See page 16 Enter a smiley Use mode and press a key once to enter its number For more options see page 16 Enter a space Press Erase a character Press Erase all characters Press and hold Move the cursor right or left Press right or left Move the cursor up or down Press up or down Change text entry modes Press and hold Capitalize any letter In mode press Choo...

Page 24: ...tes press down repeatedly For help switching between numbers and letters for email or Web addresses see Changing modes on page 16 Adding a code or extension When you save the phone number of an automated service you may include a pause to stop dialing for example where you would wait to dial an extension 1 From the home screen enter the phone number 2 Press to select Options 3 Select a type of pau...

Page 25: ... Highlight the contact s phone number and press to select Options 4 Select Add to Group 5 Select Personal or Business and press Note To assign Personal or Business ringers see Assigning business and personal ringers on page 34 Assigning a contact to a voice dial list When you assign a contact to your voice dial list you can speak a voice command to call the contact or find a contact s phone inform...

Page 26: ...ghlight Send as vCard and press Select an option via EMS via MMS via Bluetooth 5 Enter a recipient s phone number and press to select Send Customizing a phone number 1 Press to select Contacts 2 Highlight the contact to edit and press 3 Press down to highlight the contact number 4 Press to select Options 5 Highlight an option and press Check with your service provider for availability Call to call...

Page 27: ...list see Access contact information using the find command on page 45 Checking the Frequent List From the home screen select Contacts The last 15 of your most frequently called contacts appear when the Frequent List is enabled Scroll past the double line to view the All Contacts list To enable the Frequent List setting Select Menu Settings Convenience Frequent List Enabled Searching the Contacts d...

Page 28: ... corresponding to the letters of the name you want to find A matching contact or speed dial entry appears 2 Press down to scroll through matching entries 3 Highlight the name you want and then press to call the number 82 G1673 1EN book Page 22 Tuesday August 22 2006 1 23 PM ...

Page 29: ...Enter a new address manually To learn how to enter text see Understanding text entry screens on page 15 3 Add another recipient if desired Press to select Options then select Recent List Contacts or Group Lists or Enter a space or comma after the first number then enter another recipient manually Note You can send a message to up to 10 recipients at once The messages will be sent one at a time onc...

Page 30: ...revents the message from being deleted if you have activated AutoErase and enables you to send the message to others Save QuickText saves the message you have just entered as a prewritten message then returns to the message entry screen so you can send the message Settings allows you to choose from the following after pressing Request Receipt alerts you when recipient has received your message Set...

Page 31: ...en you start a message the maximum character limit appears once you are in the message entry field This number counts down as you enter characters until it reaches 0 If you continue to enter text after this counter reaches 0 a message segment may be appended When you reach the message size limit you are prompted to edit the message or alerted that the message is being appended Note Does not apply ...

Page 32: ...ges with the symbol at the top of your screen The symbol flashes if the message is urgent If you see the New Messages note To view the message press to select InBox highlight the message and press to select View To Ignore the message press The scheduled message will be sent at the scheduled time You cannot cancel delivery of the message The scheduled message has been sent and will be delivered as ...

Page 33: ...o the message with a copy of the original attached Save Message to save the message Save as QuickText to save the text from the message as QuickText which you can insert into other messages Graphics are not saved as part of QuickText For more about QuickText see page 29 View Sender information 3 Select Done Note The symbol indicates that a graphic did not come through It may be too large or incorr...

Page 34: ...as new messages are received Customizing message settings To make messaging easier you can customize settings for sending and receiving messages Creating group lists You can create and save a list of multiple recipients Your Kyocera K342 phone stores five group lists with up to 10 recipients per list 1 Select Menu Messages Group Lists Create New 2 Enter a name for the list For help entering text s...

Page 35: ... characters per message 1 Select Menu Messages Msg Settings Edit QuickText 2 To create a new pre written message select New Msg or To edit an existing pre written message highlight the message and select Edit 3 Enter or edit the text and press to select Save For help entering text see Understanding text entry screens on page 15 Note You can also save a message you have written or received as Quick...

Page 36: ...ress to select Options Then select Recent List Contacts or Group Lists Press to select a recipient Note You can send one multimedia message to a maximum of 10 recipients 4 Press down once to enter brief text in the Subject field 5 Press down once to enter a brief text message in the Text field 6 Press down to enter the Image Video field Note You may add only one picture or one video per multimedia...

Page 37: ...a message with Normal or Urgent priority 10 Press to select Send This will send your multimedia message Receiving multimedia messages There are two settings for receiving a multimedia message on your K342 phone Auto receive default and Prompt Auto receive mode When a multimedia message is received it is automatically downloaded onto your phone The alert New Message s appears along with the text Me...

Page 38: ...orward launches the message creation screen allowing you to forward the multimedia message The original address will not be shown nor will the graphic sound and text fields Lock Msg to avoid accidentally erasing it Message Info displays multimedia message information priority sender subject time sent and received and message size Play Video plays the video in the multimedia message Replay plays th...

Page 39: ... Airplane Mode Open to Answer Fast Find Frequent List Hold Call 1 Touch Dialing Web Prompt Call Guard Voice Features Automatic Add Expert Mode Display Results Digit Lengths Voice Answer Voice Wake Up Voice Training Messaging Alerts Signature Edit QuickText Auto Retrieve Callback Number Text Msg Receipt Pict Msg Receipt Save to Sent Auto Erase Default Text Voicemail Security Lock Phone Limit Calls ...

Page 40: ...ent mode Note The phone will ring when it is attached to an external power source such as a charger even if all sounds have been silenced Shortcut to Vibrate Only mode Press and hold Turning sounds back on Press and hold Choosing ringers Your Kyocera K342 phone has multiple ringers you can choose to use for incoming calls 1 Select Menu Settings Sounds Ringer Type 2 Scroll down the list to hear the...

Page 41: ...adjust the earpiece speakerphone and ringer volume as well as key tones Adjusting the earpiece volume To adjust the earpiece volume manually during a call press or up or down To set the earpiece volume 1 Select Menu Settings Sounds Earpiece Volume 2 Press right to increase the volume or left to decrease the volume 3 Press to select Save Using smart sound You can set a baseline volume that the phon...

Page 42: ... Winner Zilofon sets the phone to alert you once when a new message is received Vibrate Remind Beep Remind Fwy Remind Game Remind Bloop Remind Winner Remind Zilofon Remind sets the phone to notify you once when a new message is received and then notify you again every five minutes To stop a reminder alert press to select Ignore Disabled turns off message alerts Using shortcuts From the home screen...

Page 43: ...ct an option and press Graphic displays icons of each menu item with its name at the bottom of the screen List displays a list of each menu item Wheel displays a rotating graphic image of the menu items 3 Press to return to the home screen The next time you select Menu you will see the menu view you selected Adjusting the backlighting Your screen lights up while you are in a call or when you press...

Page 44: ...play contrast 1 Select Menu Settings Display Contrast 2 Press left or right to adjust the contrast and select Save Setting numbers to auto hyphenate Auto hyphenation when enabled automatically inserts hyphens into your phone numbers to be consistent with the U S dialing plan For example 1 222 333 4444 Select Menu Settings Display Auto Hyphen Enabled Selecting a screen saver Screen savers appear on...

Page 45: ...s involved in securing your phone and preventing access to personal information All security features are shielded by a four digit lock code Changing your lock code The lock code is typically 0000 or the last 4 digits of your phone number 1 Select Menu Settings Security 2 Enter your four digit lock code 3 Select New Lock Code A message appears Change Code 4 Press to select Yes and enter a new four...

Page 46: ...s Limit Outgoing calls only Incoming calls can still be received and answered Limit All calls both incoming and outgoing Erasing all contacts You can erase all entries from your Contacts directory 1 Select Menu Settings Security 2 Enter your four digit lock code 3 Select Erase Contacts 4 Select Yes to erase all contacts A message appears Erase ALL Contacts 5 Press to select Yes to erase all contac...

Page 47: ...or PC and switch the phone from voice mode to data fax mode Note To purchase a cable call 800 349 4188 U S A only 858 882 1410 or visit www kyocera wireless com store 1 Connect the phone to the laptop or PC 2 Set the Com speed 3 Select Menu Settings Network Data Fax Calls 4 Press to select an option Voice only allows only voice calls Fax next call or Data next call sets the phone to fax mode or da...

Page 48: ...hone is in digital mode You do not have the option of turning off the locator to emergency services 1 Select Menu Settings Network Location 2 Select 911 Only or Location On 911 Only default shares your position information only with emergency services when you call your 3 digit emergency code 911 000 111 etc Location On shares your position information with your service provider s network in addit...

Page 49: ...e must not have more than three words or components in a contact name for voice dialing recognition Adding a contact to your voice dial list 1 Select Menu Contacts Voice Dial List 2 Highlight the contact the phone responds with the name you highlighted 3 Press after each contact you want to include in your voice dial list A checkmark tag is placed in the box next to the contact s name 4 Press to s...

Page 50: ...of the person you want to call Note The phone responds Please repeat or Say a name if it does not recognize the name If the name you spoke matches a contact in the Voice Dial List the phone responds Name correct Say Yes to make the call No to select a similar name or Cancel to cancel the phone call Note If the phone finds multiple voice tags that sound like the name you said the phone will list th...

Page 51: ...ress and hold to access voice shortcuts quickly Access contact information using the find command You can use voice commands to find contact information for contact s that are in your voice dial list To add a person to your Voice Dial List see Adding a contact to your voice dial list on page 43 1 From the home screen press The phone responds Say a command 2 Say Find Contact The phone responds Say ...

Page 52: ...g voice recognition on page 47 Answering the phone If your phone is attached to a hands free car kit you can set it to 1 answer automatically or 2 answer using a voice command Answering automatically You can set your phone to answer automatically Note This setting also works with the portable hands free car kit Select Menu Settings Accessories Auto Answer After 5 secs Answering using voice command...

Page 53: ... Voice Training 2 Read the message and press to select OK 3 Select Train Numbers Read the message and press to select OK 4 Follow the prompts displayed on the screen Speak each number until training is complete Untrain voice recognition Allows you to untrain voice recognition if your phone is having trouble recognizing your voice 1 Select Menu Settings Voice Features Voice Training 2 Read the mess...

Page 54: ... Settings 3 Highlight an option and press Flash options are On Off or Automatic Resolution options are 1280 x 1024 best for printing 640 x 480 320 x 240 best for sending to email and 160 x 120 Low Light Mode brightens the picture for low light environments Self Timer options are Off default or 3 5 or 10 second pauses When set the camera beeps from 3 seconds down to the time the shutter snaps the p...

Page 55: ...pplication Flash Resolution Shutter Sound White Balance Quality and LED Menu options for camera mode 1 Press to activate camera mode 2 Select Options 3 Press up or down to scroll through the options on the vertical menu bar Settings displays available camera settings you may set up prior to taking a picture Video Mode toggles between video and camera modes Brightness allows you to adjust the brigh...

Page 56: ...ting up the video camera Menu settings can only be accessed when the camera mode is activated 1 Select Menu Camera 2 Press to select Options 3 Press up or down to scroll through the vertical menu bar Icon Description Flash on Camera mode Top right corner numbers Number of snapshots remaining Zoom level Bottom left corner numbers Resolution setting Multishot Self Timer Key Camera Menu Screen Take p...

Page 57: ...ys the most recently recorded video Recording a video When you begin recording a tone sounds the video record icon blinks and a Recording indicator with a timer progress bar displays A tone sounds when the video stops recording 1 Select Menu Camera 2 Press to select Options 3 Scroll up or down on the vertical menu bar using to select the Video Mode option 4 Focus on the image and press to select R...

Page 58: ...s option Options while not recording Pause Resume pauses and resumes recording toggle Cancel dismisses menu When not recording goes back to the last function While recording stops recording Dismisses menu options Exit to idle when not recording Exit to idle Up Zoom in Scrolls menu options up Down Zoom out Scrolls menu options down 82 G1673 1EN book Page 52 Tuesday August 22 2006 1 23 PM ...

Page 59: ...ture and press to select View 3 Press to select Send and launch the multimedia messaging application or press to select Options Erase the image Assign picture as a Caller ID or as wallpaper Zoom allows you to zoom in or out on the picture Send to Online allows you to upload a photo or other content to a server Not available on all phones Check with your service provider Take Picture to snap anothe...

Page 60: ...contains sounds saved on your phone Ringers contains ringers saved on your phone Voice Memos contains voice memos you made to yourself 3 Press to select Options 4 Highlight an option and press options vary according to selection Play to review the sound Record New allows you to record new sounds Erase the sound Lock to prevent accidentally erasing the sound Rename allows you to rename the sound fi...

Page 61: ... can share the videos Record New allows you to record new videos Erase the videos Send to Online launches the messaging application so that you can send a video to your online site Lock to prevent accidentally erasing the video Rename allows you to rename the video file Details gives you the file size of the video Erase All erases all videos stored 4 Select Close when done 82 G1673 1EN book Page 5...

Page 62: ...d left to select a function and press to perform it Naming a saved voice memo 1 Select Menu Tools Games Voice Memo Recorded Memos 2 Highlight the memo and select Options 3 Select Rename 4 Press and hold to clear the default name 5 Use the keypad to enter a name for the memo 6 Select Save Erasing a saved voice memo 1 Select Menu Tools Games Voice Memo Recorded Memos 2 Highlight the memo and select ...

Page 63: ...on and press 8 Press to set the reminder sound Select an option and press 9 Press to select a Silent Mode setting Select No or During Event and press 10 Press to select whether or not this is a recurring event Select an option and press No Daily Weekly Monthly or Annually 11 Select Save Editing erasing or sending an event 1 Select Menu Tools Games Scheduler View Month 2 Press up down left or right...

Page 64: ...lect Menu Tools Games Alarm Clock 2 Highlight QuickAlarm and select Set 3 Select an option and press 5 minutes 15 minutes default 30 minutes or 60 minutes A message appears telling you the QuickAlarm is On 4 When the alarm rings select Off to turn off the alarm or Reset to set the QuickAlarm again Tip Calculator The Tip Calculator helps you calculate how much tip to include with a bill 1 Select Me...

Page 65: ...ect Menu Tools Games Stopwatch 2 Select Start to begin counting Select Stop to stop counting Select Reset to clear the counter Games The games in this section may not be available on your phone Check with your service provider for availability If you receive an incoming call alert while you are playing a game the game is paused and exited You can return to play once the call alert ends Games do no...

Page 66: ...ames Race 21 2 Press to select Yes at the prompt Turn off backlight to conserve battery 3 Select New Game The first card to be placed is shown at the top left of the screen Press a key to add a card to the row as follows Note Each time you place a card a new card appears for placement 4 Continue placing cards until you are satisfied with your selections You can pause or end the game at any time by...

Page 67: ...g 1 Select Options Colors and Tools 2 Select then Done 3 Press a number key to move the cursor To erase part of a drawing 1 Select Options Colors and Tools 2 Select then Done 3 Press a number key to move the eraser To Navigate Use the following keys to doodle Saving a doodle It is a good idea to save the doodle while you are working on it If you receive a call while creating an unsaved doodle it w...

Page 68: ...ols and Games Resuming a doodle To return to another saved doodle Select Menu Tools Games Doodler Resume Doodle or Select Menu Media Gallery Images Doodles 82 G1673 1EN book Page 62 Tuesday August 22 2006 1 23 PM ...

Page 69: ...er guide provided with your Bluetooth wireless technology device Setting up Bluetooth wireless technology on your Kyocera phone When you turn Bluetooth On the first time you will be prompted to do a device search Follow the same procedure as for Find New 1 Select Menu Bluetooth On Off 2 Select one of the following On Visible allows other devices to find your phone On Invisible hides your phone for...

Page 70: ...ices Connecting and disconnecting to a Bluetooth wireless technology device Before you can use the Bluetooth wireless technology functions of your phone you must set your phone to be ready to communicate with a device This is called connecting Connecting to a Bluetooth wireless technology device To connect your phone to an audio Bluetooth wireless technology device 1 Select Menu Bluetooth My Devic...

Page 71: ...ing your phone s Bluetooth identification You can change the name of your phone to identify it when pairing with various devices 1 Select Menu Bluetooth Settings My Name 2 Enter the new name in the text field and press to Save Visible Duration You can set the time that your K342 remains visible to other Bluetooth wireless technology devices 1 Select Menu Bluetooth Settings Visible Duration 2 Selec...

Page 72: ...d some Web menu options at the bottom of the screen A appears in a secure session An underline and an arrow indicate that there is more text Press down to view more text Press to return to the previous screen To choose a site highlight it and press to select Go 4 When you have finished using the Internet press to exit the Web Browser Using the Web menu options The following options may appear on y...

Page 73: ... list of bookmarks appears 3 Enter the number corresponding to the bookmark you want and press Checking Net alerts Alerts received from a Web site are sent to your Browser Alerts inbox 1 Select Menu Messages Browser Alerts This action launches the browser inbox 2 Press to accept browser fees 3 Select an alert and follow the prompts Setting a Web Prompt Allows you to set a prompt to confirm start o...

Page 74: ...le in the following countries Before requesting support please try to reproduce and isolate the problem When you contact the Customer Care Center be ready to provide the following information The name of your service provider The actual error message or problem you are experiencing The steps you took to reproduce the problem The phone s electronic serial number ESN To locate the ESN select Menu Ph...

Page 75: ...a wireless com store You may also call us at 800 349 4188 U S A only or 858 882 1410 Become a product evaluator To participate in the testing and evaluation of Kyocera Wireless Corp products including cellular or PCS phones visit beta kyocera wireless com 82 G1673 1EN book Page 69 Tuesday August 22 2006 1 23 PM ...

Page 76: ... redialing 9 camera 49 menu options 49 recording video 51 sending a picture 30 setting up 48 taking a picture 50 color themes 39 Com Port speed 41 connect a Bluetooth wireless technology enabled accessory 64 contact command 44 contacts directory 18 contrast 38 countdown timer 59 custom menu creating 36 D data fax setup 13 41 deleting a Bluetooth wireless technology enabled accessory from your phon...

Page 77: ...g a Bluetooth wireless technology enabled accessory 65 resetting the phone iv ringers choosing types 34 for contacts 18 for roaming calls 13 silencing 6 volume 35 roaming 7 alerts 13 controlling 13 ringer 13 S scheduler 56 screen contrast 38 screen icons 7 15 26 34 screen savers 38 secret contacts 10 21 security 39 sent messages 25 setting up Bluetooth wireless technology enabled device 63 shortcu...

Page 78: ...72 recording 56 voicemail 11 12 setting up 6 volume earpiece 8 35 key beep 36 ringer 35 W wallpaper 38 Web Browser 66 82 G1673 1EN book Page 72 Tuesday August 22 2006 1 23 PM ...

Page 79: ...82 G1673 1EN book Page 73 Tuesday August 22 2006 1 23 PM ...

Page 80: ...82 G1673 1EN book Page 74 Tuesday August 22 2006 1 23 PM ...

Reviews: