background image

Kramer Electronics Ltd. 


VP-440X 

– Operating and Controlling VP-440X 

20 


Operating via Ethernet 

You can connect to the 

VP-440X

 via Ethernet using either of the following methods: 

  Directly to the PC using a crossover cable (see 

Connecting Ethernet Port Directly to a 

PC

 on page 

20

)

  Via a network hub, switch, or router, using a straight-through cable (see 

Connecting 

Ethernet Port via a Network Hub or Switch

 on page 

22

). 


If you want to connect via a router and your IT system is based on IPv6, speak to your IT 
department for specific installation instructions. 

Connecting Ethernet Port Directly to a PC 

You can connect the Ethernet port of the 

VP-440X

 directly to the Ethernet port on your PC 

using a crossover cable with RJ-45 connectors. 


This type of connection is recommended for identifying the 

VP-440X


with the factory configured default IP address. 


After connecting the 

VP-440X

 to the Ethernet port, configure your PC as follows: 

1.  Click 

Start

 > 

Control Panel

 > 

Network and Sharing Center

2.  Click 

Change Adapter Settings

3.  Highlight the network adapter you want to use to connect to the device and click 

Change 

settings of this connection

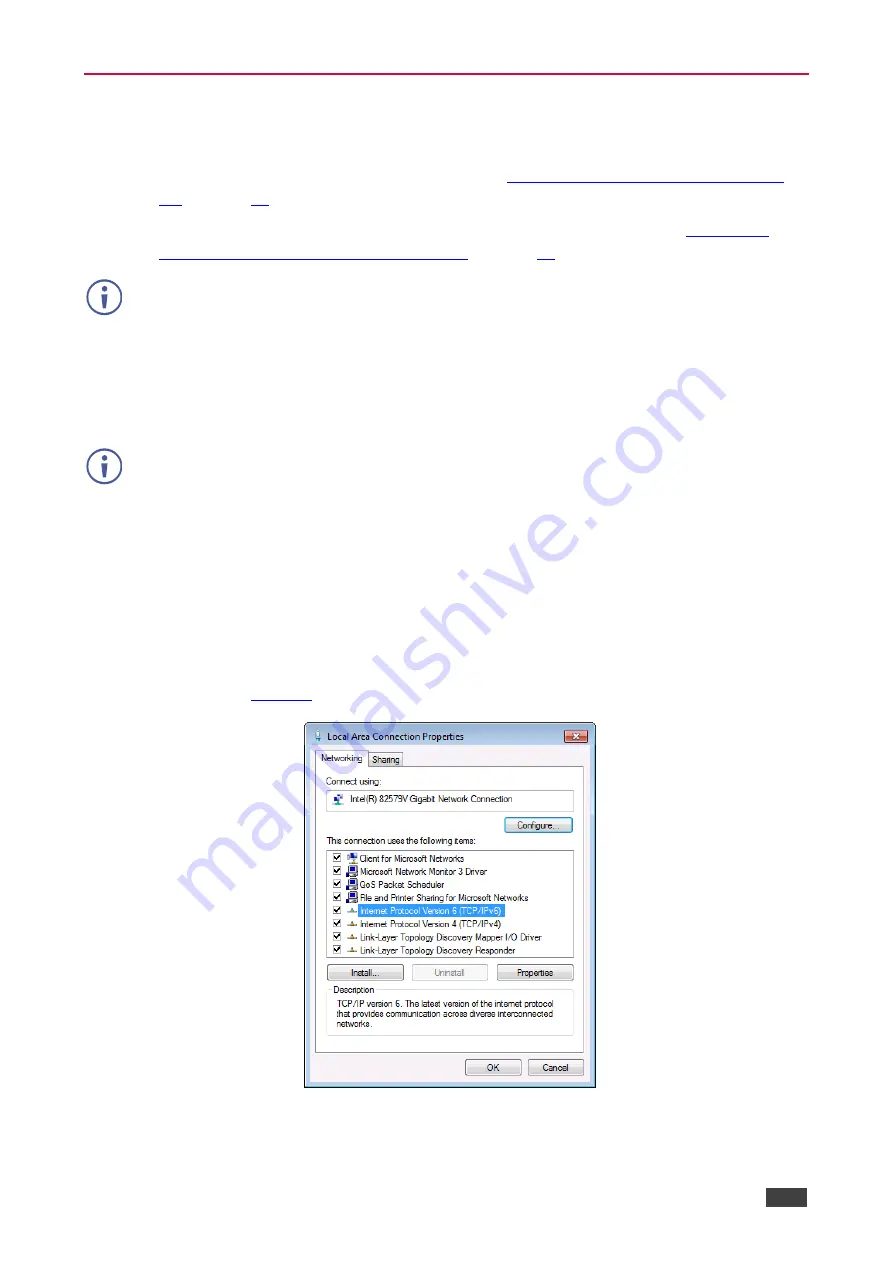
The Local Area Connection Properties window for the selected network adapter appears 
as shown in 

Figure 5

. 


Figure 5: Local Area Connection Properties Window 

4.  Highlight either 

Internet Protocol Version 6 (TCP/IPv6)

 or 

Internet Protocol Version 4 

(TCP/IPv4)

 depending on the requirements of your IT system. 


Summary of Contents for VP-440X

Page 1: ...P N 2900 301382 Rev 1 www kramerAV com USER MANUAL MODEL VP 440X 4K Presentation Switcher Scaler ...

Page 2: ...ts 28 Adjusting Microphone and Output Volume 28 Viewing Device Settings 29 Upgrading Firmware 29 Configuring Network Settings 31 Configuring Video Output Settings 32 Configuring HDCP per Input Output 34 Managing EDID 35 Adjusting Audio Input Settings 37 Adjusting Microphone Settings 38 Defining Additional Audio Settings 38 Setting Equalizer 38 Setting Auto Sync Off 39 Configuring Automatic Switchi...

Page 3: ...ignal quality due to poor matching and elevated noise levels often associated with low quality cables Do not secure the cables in tight bundles or roll the slack into tight coils Avoid interference from neighboring electrical appliances that may adversely influence signal quality Position your Kramer VP 440X away from moisture excessive sunlight and dust Safety Instructions Caution This equipment ...

Page 4: ...es at up to 4K 60Hz 4 2 0 24bpp video resolution and provides even further reach for lower HD video resolutions VP 440X provides exceptional quality advanced and user friendly operation and flexible control Exceptional Quality High Performance Professional Scaler Up scales down scales and cross scales up to resolutions of 4K 60 4 4 4 The output resolution can be set to the native resolution of eit...

Page 5: ...OSD On Screen Display for making adjustments that can be located anywhere on the screen Efficient power saving features Advanced EDID management per input Includes non volatile memory that retains the last settings after switching the power off and then on again Flexible Connectivity Flexible Digital and Analog Audio Select a dedicated unbalanced analog audio input to embed into each input In addi...

Page 6: ...lling your VP 440X Control your VP 440X directly via the front panel push buttons with on screen menus or By RS 232 serial commands transmitted by a touch screen system PC or other serial controller Via the Ethernet using built in user friendly webpages ...

Page 7: ...igation Buttons Press to decrease numerical values or select from several definitions When not in the OSD menu press to reduce the output volume Press to move up the menu list values Press to increase numerical values or select from several definitions When not in the OSD menu press to increase the output volume Press to move down the menu list Enter Press to accept changes and change the SETUP pa...

Page 8: ...isplay configurable SELECT 7 pin Terminal Block Connector HDMI 1 to HDMI 4 and PC connect to contact closure switches by momentary contact between the desired pin and G pin to select an input REMOTE connect the pin to G to turn on off the display or the device configurable see Configuring the REMOTE Pin on page 18 PC IN 15 pin HD Connector Connect to the computer graphics VGA source AUDIO INPUT Un...

Page 9: ...ient temperature air flow is compatible for the device Avoid uneven mechanical loading Appropriate consideration of equipment nameplate ratings should be used for avoiding overloading of the circuits Reliable earthing of rack mounted equipment should be maintained To mount the VP 440X on a rack Mount the unit in a rack using the recommended rack adapter see www kramerav com product VP 440X To moun...

Page 10: ...I IN connectors 2 Connect an analog stereo audio source not shown in Figure 3 for each of the four HDMI inputs and for the PC input to the 3 5mm mini jack connectors 3 Connect the video outputs An HDBaseT receiver for example Kramer TP 580Rxr to the HDBT IN RJ 45 connector An HDMI acceptor to the HDMI OUT connector 4 Connect an unbalanced stereo audio acceptor for example active speakers not shown...

Page 11: ...he CONTROL port to the DATA port Rx to Tx and Tx to Rx and connect the external device to the HDBT receiver s RS 232 port Connect the RS 232 terminal block on the rear panel of the VP 440X to a PC controller as follows From the RS 232 9 pin D sub serial port connect Pin 2 to the TX pin on the VP 440X RS 232 terminal block Pin 3 to the RX pin on the VP 440X RS 232 terminal block Pin 5 to the G pin ...

Page 12: ...3 HDMI IN 4 or PC IN Reset the resolution to XGA 1080p Lock the front panel Control the device via the OSD menu using the MENU Enter and navigation buttons see Using the OSD Menu on page 11 Connecting the Remote Control Switches Pin Name Function REMOTE User configurable ON OFF switch for turning the display on or off see Configuring the REMOTE Pin on page 18 PC Momentarily connect to G to select ...

Page 13: ...e menu The default OSD timeout is set to 10 seconds Use the OSD menu to perform the following operations Adjusting Image Parameters on page 12 Selecting an Input Signal on page 12 Setting Output Parameters on page 13 Setting Audio Parameters on page 13 Setting OSD Parameters on page 15 Managing EDID via OSD on page 15 Setting HDCP on page 16 Setting Sleep Mode on page 16 Setting Switching Mode on ...

Page 14: ...ng CLOCK Adjust the VGA input clock sampling rate H_POSITION Set the vertical position of the image on the VGA input V_POSITION Set the horizontal position of the image on the VGA input Video HUE Set the color hue SATURATION Set the color saturation SHARPNESS Set the sharpness of the picture NOISE REDUCTION Select the noise reduction filter Off default Low Middle or High Color Set the Red Green an...

Page 15: ...560x1440 60Hz RB 4k2k 60Hz 4 2 0 Image size and output resolution are defined Setting Audio Parameters VP 440X enables defining the audio source per input the audio delay time the input and output volume as well as microphone settings To set the audio 1 On the front panel press MENU The menu appears 2 Click Audio and define the audio parameters according to the information in the following table M...

Page 16: ...he transition time of the audio level reduction after the signal rises above the threshold level Hold Time Set the hold time to define the time period talkover remains active although the signal falls below the threshold level for a short period of time Release Time Set the release time to define the transition time for the audio level to return from its reduced level to its normal level after the...

Page 17: ...tion does not appear OSD parameters are set Managing EDID via OSD VP 440X enables managing the EDID via the OSD MENU buttons To manage the EDID 1 On the front panel press MENU The menu appears 2 Click EDID Manage and define the EDID parameters according to the information in the following table Menu Item Function EDID on HDMI 1 to 4 For each HDMI input select a built in EDID file and press enter D...

Page 18: ...lect FOLLOW OUTPUT recommended for the scaler to match its HDCP output to the HDCP setting of the acceptor to which it is connected Select FOLLOW INPUT to change its HDCP output setting according to the HDCP of the input recommended when the output is connected to a splitter switcher HDCP is set on the input output Setting Sleep Mode Auto Sync Off turns off the output after a period of not detecti...

Page 19: ...ected input Last Connected Automatically switches to the last connected input and reverts to the previously selected input after that input is lost Switching mode is defined Setting Ethernet Parameters VP 440X enables defining the Ethernet parameters via the MENU front panel buttons To set the Ethernet parameters 1 On the front panel press MENU The menu appears 2 Click Advanced and define the Ethe...

Page 20: ...after cycling power To unlock the panel press both PANEL LOCK and RESET TO XGA 1080P buttons simultaneously for about 5 seconds PANEL LOCK button mode is defined Defining CEC VP 440X enables passing CEC commands via the connected source to the connected display To set the CEC Consumer Electronic Control functionality 1 On the front panel press MENU The menu appears 2 Click Advanced and select HDMI...

Page 21: ... The menu appears 2 Click Factory and select either Reset full reset or a Soft Reset reset device information excluding Ethernet parameters then click Yes Wait for completion of factory reset resolution is set to Native Device is reset Updating the Firmware VP 440X enables performing firmware update via the front panel MENU buttons To update the firmware 1 Save the new firmware file to a memory st...

Page 22: ...thernet port of the VP 440X directly to the Ethernet port on your PC using a crossover cable with RJ 45 connectors This type of connection is recommended for identifying the VP 440X with the factory configured default IP address After connecting the VP 440X to the Ethernet port configure your PC as follows 1 Click Start Control Panel Network and Sharing Center 2 Click Change Adapter Settings 3 Hig...

Page 23: ...ure 6 or Figure 7 Figure 6 Internet Protocol Version 4 Properties Window Figure 7 Internet Protocol Version 6 Properties Window 6 Select Use the following IP Address for static IP addressing and fill in the details as shown in Figure 8 For TCP IPv4 you can use any IP address in the range 192 168 1 1 to 192 168 1 255 excluding 192 168 1 39 that is provided by your IT department ...

Page 24: ...ow 7 Click OK 8 Click Close Connecting Ethernet Port via a Network Hub or Switch You can connect the Ethernet port of the VP 440X to the Ethernet port on a network hub or using a straight through cable with RJ 45 connectors Configuring Ethernet Port You can set the Ethernet parameters via the embedded webpages ...

Page 25: ...thernet connection Before attempting to connect Perform the procedures in Operating via Ethernet on page 20 Ensure that your browser is supported The following operating systems and Web browsers are supported Operating Systems Versions Windows 7 IE Firefox Chrome Safari Windows 10 IE Edge Firefox Chrome Mac Safari iOS Safari Some features might not be supported by some mobile device operating syst...

Page 26: ...ge with Navigation List on Left 3 View the FW version and IP address 4 Click the tabs on the left side of the screen to access the relevant webpage The VP 440X enables performing the following Loading and Saving Configurations on page 25 Entering Standby Mode on page 26 Configuring Video Input Settings on page 26 Switching an Input to the Outputs on page 27 Freezing Blanking Video Outputs on page ...

Page 27: ...lock Connectors on page 41 Password Protecting Webpage Access on page 44 Loading and Saving Configurations VP 440X enables you to save a configuration to recall it in the future Saving a Configuration To save the current configuration 1 Configure the device as required 2 In the Navigation pane click Switching The Switching page opens Figure 9 3 Click Save The Save File window appears When using Ch...

Page 28: ...ion Click the power icon on the right hand side of the webpages header When in standby mode the icon displays a gray background Figure 10 VP 440X Power Button Configuring Video Input Settings VP 440X enables you to individually configure settings for each of the video inputs via the Switching page To configure video input settings 1 In the Navigation pane click Switching The Switching page appears...

Page 29: ...nalog The analog audio input is selected Embedded The embedded audio in the HDMI signal is selected Automatic default The embedded audio on the HDMI input is selected for an HDMI signal or the analog audio input is selected if the input is not HDMI for example for a DVI input signal 6 Adjust the input volume using the slider or entering a value 7 Upon completion save the changes and click the exit...

Page 30: ... video frame Clears the video output from the display the display goes blank The output is set to freeze or blank Adjusting Microphone and Output Volume The microphone and output volume can also be adjusted from the Audio webpage To adjust the microphone and output volume 1 In the Navigation pane click Switching The Switching page appears Figure 11 2 Use the slider controls in the Volume area of t...

Page 31: ...e Settings The Device Settings page appears Figure 14 Device Settings Page 2 View the model name device name SN MAC address and current firmware version Upgrading Firmware Upgrade VP 440X easily via the webpages or via the PROG USB port see Upgrading Firmware on page 47 To upgrade the VP 440X firmware 1 In the Navigation pane click Device Settings The Device Settings page appears see Figure 14 2 N...

Page 32: ...5 Device Settings Page Firmware Upgrade Message 5 Click OK The new firmware is uploaded 6 Once the file is uploaded follow the instructions on the webpage Figure 16 Device Settings Page New Firmware Update Complete 7 Make sure that the new version appears on the lower left side of the webpage Figure 17 Current Firmware Information Display The new firmware is uploaded to the device ...

Page 33: ...ure 18 The Device Settings Page 2 Change the network settings as required and click Set changes OR Select the DHCP On check box and click Set changes A message appears asking you to confirm the setting change 3 Click OK to confirm the change The current webpage session is disconnected To access the webpages reload with the new setting 4 Click Soft Factory Reset to restart the unit IP address value...

Page 34: ... you to configure settings for the video that is passed through the HDBT and HDMI outputs via the Output Settings webpage To configure video output settings 1 Click Output Settings on the Navigation List The Output Settings page appears For HDMI inputs Figure 19 The Output Settings Page HDMI IN is the Input ...

Page 35: ...red output resolution or Native HDBT Set the output resolution to match the native resolution of the device connected to HDBT OUT Native HDMI Set the output resolution to match the native resolution of the device connected to HDMI OUT 3 In the Size drop down box and select the video size on the display Over Scan Best Fit default Full Pan Scan Letter Box Under 2 Under 1 Follow In ...

Page 36: ...splay screen Phase Set the phase of the input sampling clock Clock Set the input sampling rate Output settings are defined Configuring HDCP per Input Output VP 440X enables you to configure HDCP individually for each input output via the HDCP webpage To configure HDCP 1 Click HDCP on the Navigation List The HDCP page appears Figure 21 The HDCP Page 2 In the On Output area click one of the followin...

Page 37: ...ttings for each of the 5 inputs via the EDID webpage To manage EDID 1 Click EDID on the Navigation List The EDID page appears Figure 22 The EDID Page 2 Under Read from click the required EDID source or click Browse to use an EDID configuration File 3 Under Copy to check the inputs to copy the selected EDID to The Copy button is enabled ...

Page 38: ... Ltd VP 440X Using Embedded Webpages 36 4 Click Copy The selected EDID is copied to the selected inputs and the Copy EDID Results message appears Figure 23 The EDID Page The Copy EDID Results 5 Click Close EDID is copied ...

Page 39: ...ox set the audio delay time in milliseconds 3 In the Input area Use the slider controls or enter a number from 0 to 100 in the field to adjust the HDMI and PC volume per input For each HDMI input select an audio source option for each of the HDMI inputs Automatic the embedded audio on the HDMI input is selected for an HDMI signal or the analog audio input is selected if the input is not HDMI for e...

Page 40: ... slider controls or enter a number in the fields to adjust the microphone settings see Figure 4 Mic only microphone audio overrides the main output audio Off microphone is disabled default Microphone settings are adjusted Defining Additional Audio Settings Set DRC loudness and DSP see Setting Audio Parameters on page 13 for further details To define additional settings 1 Click Audio on the Navigat...

Page 41: ...39 Setting Auto Sync Off See Setting Sleep Mode on page 16 for Auto Sync off option details 1 Click Advanced on the Navigation List The Advanced page appears Figure 25 The Advanced Page 2 Set Auto Sync off to Off Fast Slow or Immediate Auto Sync Off is set ...

Page 42: ...o scanning and select PC input from which to begin the scanning Last connected When detecting that a source is connected to an input which previously had no signal automatically switch to that input Automatic switching is defined Defining Lock Mode Define which buttons are disabled when you click the PANEL LOCK button on the front panel When selecting Save modes the front panel remains locked afte...

Page 43: ...Rx signals Use the RS 232 CONTROL port to perform the following actions User Control of VP 440X via RS 232 on page 41 VP 440X Control of a Device via RS 232 on page 42 User Control of VP 440X via RS 232 To control VP 440X via RS 232 1 Connect your controlling device e g PC to the CONTROL RS 232 port see Connecting to VP 440X via RS 232 on page 9 2 Click RS 232 on the Navigation List The RS 232 pag...

Page 44: ... RS 232 Port for control of drop down box to External Control Figure 27 RS 232 Page Controlling an External Device 4 Set RS 232 Configuration parameters to enable communication with the display connected to the acceptor 5 Configure the external device commands as follows Enter a device command for example turn POWER OFF Enter the command description for example Turn Display Off Select a trigger fr...

Page 45: ...elete to delete the command Click Test to test the command Change any of the command configurations Enable or disable the command Control the display via the RS 232 port For RS 232 control of an external device on the receiver side for example the display at the HDBT receiver set up as above connect the CONTROL RS 232 port to the DATA RS 232 port and connect Rx and Tx on the receiver to the displa...

Page 46: ... require a password Figure 30 Authentication Page To secure the webpages with a username and password 1 Click Authentication on the Navigation List The Authentication page appears 2 Check Authenticate Web Pages access to indicate that you want the webpages to lock 3 Enter a User Name Admin by default 4 Enter a password Admin by default ...

Page 47: ...the webpages are locked you will be prompted for your username and password To access secured webpages 1 Click Authentication on the left side of the webpage Figure 30 2 Enter the correct username and password 3 Click the right arrow Figure 32 Prompt to Unlock Webpages Webpage is accessed via password Removing Password Protection from Webpages 1 Click Authentication on the Navigation List The Auth...

Page 48: ...mer Electronics Ltd VP 440X Using Embedded Webpages 46 Viewing Device Information In the Navigation page open the About page to view the webpage version and Kramer Electronics details Figure 33 About Page ...

Page 49: ...Kramer Electronics Ltd VP 440X Upgrading Firmware 47 Upgrading Firmware Upgrade the firmware via any of the following options Updating the Firmware on page 19 Upgrading Firmware on page 29 ...

Page 50: ... Inputs 3 seconds Video Latency 1 2 frames Analog Audio Maximum Line level 1 2Vrms Maximum Mic level 20mVrms Line Input Impedance 20kΩ Line Output Impedance 500Ω Frequency Response 20Hz 20kHz 1dB Audio THD Noise 0 01 20Hz 20kHz at unity gain Crosstalk 85 dB 20Hz to 20kHz THD NOISE 0 03 1kHz at nominal level Extended Ethernet Max Transmission Bandwidth 100Mbps Extended RS 232 Baud Rate 300 to 11520...

Page 51: ... x 1 7 Shipping Dimensions W D H 35 1cm x 21 2cm x 7 2cm 13 8 x 8 4 x 2 8 Net Weight 1kg 2 2lbs Shipping Weight 1 6kg 3 5lbs approx Accessories Included Power adapter cord Optional For optimum range and performance use the recommended USB Ethernet serial and IR Kramer cables available at www kramerav com product VP 440X Specifications are subject to change without notice at www kramerav com ...

Page 52: ...Menu Setup Factory Reset press Enter to confirm Front panel buttons Press the Reset to XGA 720p Button while plugging the power to reset the machine Input Resolution Support Resolution Refresh Rate HDMI PC 480I 576I Yes No 480P 576P Yes No 720P 60 50 Yes No 1080I 60 50 Yes No 1080P 60 50 Yes No 1080P 24 25 30 Yes No 640x480 60 67 72 75 85 Yes Yes 800x600 56 60 72 75 Yes Yes 1024x768 60 70 75 Yes Y...

Page 53: ...00 RB 60 Yes Yes 2560X1600 RB 60 Yes Yes 1920x1080 60 Yes Yes 1280x720 60 Yes Yes 2560X1440 RB 60 Yes Yes 720x480P 60 Yes Yes 720x576P 50 Yes Yes 1280x720P 50 60 Yes Yes 1920x1080P 24 25 30 50 60 Yes Yes 4K2K 24 25 30 Yes Yes 4K2K 50 60 Yes No 4K2K 4 2 0 50 60 No Yes Default EDID This section describes the following default EDIDs Default EDID 1080P on page 51 Default EDID 4K 3G on page 53 Default ...

Page 54: ... 1024p at 60Hz VESA STD 1400 x 1050p at 60Hz VESA STD 1920 x 1080p at 60Hz VESA STD 640 x 480p at 85Hz VESA STD 800 x 600p at 85Hz VESA STD 1024 x 768p at 85Hz VESA STD 1280 x 1024p at 85Hz VESA STD EIA CEA 861 Information Revision number 3 DTV underscan Supported Basic audio Supported YCbCr 4 4 4 Supported YCbCr 4 2 2 Supported Native formats 3 Detailed timing 1 1440x900p at 60Hz 16 10 Modeline 1...

Page 55: ... 00 1E 30 46 8F 33 00 10 09 00 00 00 1E 28 3C 80 A0 70 B0 23 40 30 20 36 00 10 0A 00 00 00 1A 30 2A 40 C8 60 84 64 30 18 50 13 00 10 09 00 00 00 1E 21 39 90 30 62 1A 27 40 68 B0 36 00 10 0A 00 00 00 1C 00 00 00 00 00 08 Default EDID 4K 3G Monitor Model name VP 440X Manufacturer KMR Plug and Play ID KMR040D Serial number 49 Manufacture date 2018 ISO week 6 EDID revision 1 3 Input signal type Digita...

Page 56: ...DTV 16 9 1 1 1920 x 1080p at 50Hz HDTV 16 9 1 1 1280 x 720p at 60Hz HDTV 16 9 1 1 1280 x 720p at 50Hz HDTV 16 9 1 1 1920 x 1080i at 60Hz HDTV 16 9 1 1 1920 x 1080i at 50Hz HDTV 16 9 1 1 720 x 480p at 60Hz EDTV 4 3 8 9 720 x 576p at 50Hz EDTV 4 3 16 15 720 x 480i at 60Hz Doublescan 4 3 8 9 720 x 576i at 50Hz Doublescan 4 3 16 15 1920 x 1080p at 30Hz HDTV 16 9 1 1 1920 x 1080p at 25Hz HDTV 16 9 1 1 ...

Page 57: ...ed timing 3840x2160p at 30Hz 16 9 Modeline 3840x2160 297 000 3840 4016 4104 4400 2160 2168 2178 2250 hsync vsync Detailed timing 1 1920x1080p at 60Hz 16 9 Modeline 1920x1080 148 500 1920 2008 2052 2200 1080 1084 1089 1125 hsync vsync Standard timings supported 640 x 480p at 60Hz IBM VGA 640 x 480p at 72Hz VESA 640 x 480p at 75Hz VESA 800 x 600p at 56Hz VESA 800 x 600p at 60Hz VESA 800 x 600p at 72...

Page 58: ...A 00 00 00 00 00 00 00 00 00 00 00 00 00 00 00 00 00 00 00 00 00 00 00 00 00 52 Default EDID 6G Monitor Model name VP 440X Manufacturer KMR Plug and Play ID KMR060D Serial number 49 Manufacture date 2018 ISO week 6 EDID revision 1 3 Input signal type Digital Color bit depth Undefined Display type Monochrome grayscale Screen size 360 x 360 mm 20 0 in Power management Standby Suspend Extension blocs...

Page 59: ...nel configuration 2 0 Front left right Yes Front LFE No Front center No Rear left right No Rear center No Front left right center No Rear left right center No Rear LFE No CE vendor specific data VSDB IEEE registration number 0x000C03 CEC physical address 0 1 0 0 Supports AI ACP ISRC No Supports 48bpp Yes Supports 36bpp Yes Supports 30bpp Yes Supports YCbCr 4 4 4 Yes Supports dual link DVI No Maxim...

Page 60: ...x nn Command Parameter CR LF Command parameters Multiple parameters must be separated by a comma In addition multiple parameters can be grouped as a single parameter using brackets and Command chain separator character Multiple commands can be chained in the same string Each command is delimited by a pipe character Parameters attributes Parameters may contain multiple attributes Attributes are ind...

Page 61: ...IO BYPASS CR FEEDBACK nn AUDIO BYPASS state CR LF state Audio Processing status 0 DSP 1 Bypass Get threshold and time for channel 1 AUDIO BYPASS CR AUD LVL Set volume level COMMAND AUD LVL io_mode io_index vol_level CR FEEDBACK nn AUD LVL io_mode io_index vol_level CR LF io_mode Input Output 0 Input 1 Output io_index Number that indicates the specific input or output port for input 0 HDMI 1 1 HDMI...

Page 62: ...q_type eq_level CR LF io_mode 1 eq_type Equalizer Types Hz 120 200 500 1200 3000 7500 12000 eq_level Equalizer level 10dB to 10dB 0 to 40 Set 200Hz EQ level to 12 EQ LVL 1 200 12 CR EQ LVL Get equalization level COMMAND EQ LVL io_mode io_index eq_type CR FEEDBACK nn EQ LVL io_mode io_index eq_type eq_level CR LF io_mode 1 eq_type Equalizer Types Hz 120 200 500 1200 3000 7500 12000 eq_level Equaliz...

Page 63: ...CR HELP Get command list or help for specific command COMMAND HELP CR HELP cmd_name CR FEEDBACK 1 Multi line nn Device cmd_name cmd_name CR LF To get help for command use HELP COMMAND_NAME CR LF nn HELP cmd_name CR LF description CR LF USAGE usage CR LF cmd_name Name of a specific command Get the command list HELP CR To get help for AV SW TIMEOUT HELP av sw timeout CR IMAGE PROP Set the image size...

Page 64: ...odel This command identifies equipment connected to VP 440X and notifies of identity changes to the connected equipment The Matrix saves this data in memory to answer REMOTE INFO requests COMMAND MODEL CR FEEDBACK nn MODEL model_name CR LF model_name String of up to 19 printable ASCII chars Get the device model MODEL CR MUTE Set audio mute COMMAND MUTE out_index mute_mode CR FEEDBACK nn MUTE out_i...

Page 65: ...inistrator COMMAND NET GATE ip_address CR FEEDBACK nn NET GATE ip_address CR LF ip_address Format xxx xxx xxx xxx Set the gateway IP address to 192 168 0 1 NET GATE 192 168 000 001 CR NET GATE Get gateway IP A network gateway connects the device via another network and maybe over the Internet Be aware of security problems COMMAND NET GATE CR FEEDBACK nn NET GATE ip_address CR LF ip_address Format ...

Page 66: ...udio output number 1 delay 0 Off 1 40ms 2 110ms 3 150ms Set the scaler audio delay to 40ms SCLR AUDIO DELAY 1 1 C R SCLR AUDIO DELAY Get the scaler audio delay Gets the audio delay for the selected audio output COMMAND SCLR AUDIO DELAY scaler_index CR FEEDBACK nn SCLR AUDIO DELAY scaler_index delay CR LF scaler_index Audio output number 1 delay 0 Off 1 40ms 2 110ms 3 150ms Get the scaler audio del...

Page 67: ...s COMMAND VFRZ out_index CR FEEDBACK nn VFRZ out_index freeze_flag CR LF out_index Number that indicates the specific output 1 freeze_flag On Off 0 Off 1 On Get output freeze status VFRZ 1 CR VID RES Set output resolution Set command with is_native ON sets native resolution on selected output resolution index sent 0 Device sends as answer actual VIC ID of native resolution To use custom resolution...

Page 68: ...0x1024 209 1440x900 210 1400x1050 211 1680x1050 212 1600x1200 213 1920x1080 214 1920x1200 215 2560x1600 216 2560x1440 217 480p 218 576p 219 720p50 220 720p60 221 1080p24 222 1080p25 223 1080p30 224 1080p50 225 1080p60 226 4k24 227 4k25 HDMI only 228 4k30 HDMI only 229 4k50 230 4k60 Get output resolution VID RES 1 1 0 CR VMUTE Set enable disable video on output Video mute parameter 2 blank picture ...

Page 69: ... enough space for data firmware FPGA ERR_FS_NOT_ENOUGH_SPACE 11 Not enough space file system ERR_FS_FILE_NOT_EXISTS 12 File does not exist ERR_FS_FILE_CANT_CREATED 13 File can t be created ERR_FS_FILE_CANT_OPEN 14 File can t open ERR_FEATURE_NOT_SUPPORTED 15 Feature is not supported ERR_RESERVED_2 16 Reserved ERR_RESERVED_3 17 Reserved ERR_RESERVED_4 18 Reserved ERR_RESERVED_5 19 Reserved ERR_RESE...

Page 70: ...d or any other party authorized to repair Kramer Electronics products this product must be insured during shipment with the insurance and shipping charges prepaid by you If this product is returned uninsured you assume all risks of loss or damage during shipment Kramer Electronics will not be responsible for any costs related to the removal or re installation of this product from or into any insta...

Page 71: ...and a list of Kramer distributors visit our website where updates to this user manual may be found We welcome your questions comments and feedback The terms HDMI HDMI High Definition Multimedia Interface and the HDMI Logo are trademarks or registered trademarks of HDMI Licensing Administrator Inc All brand names product names and trademarks are the property of their respective owners ...

Reviews: