


English
Français
Deutsch
Español
Saving and loading data
En-
27
Listening to the demo songs
Loading the demo songs
1. Press
the
DISK
button
(the
LED
will
light)
to
enter
Disk
mode.
2. If
you’ve
edited
or
created
any
new
sounds
or
songs,
save
them
before
proceeding!
Loading
the
demo
songs
will
replace
the
contents
of
the
internal
memory,
including
Programs,
Combinations,
Songs,
sample
data,
and
so
on.
If
you’ve
made
any
edits,
save
them
to
the
internal
disk
or
a
USB
drive
before
you
proceed.
3. Press
the
File
tab
and
then
the
Load
tab,
to
go
to
the
Load
page.
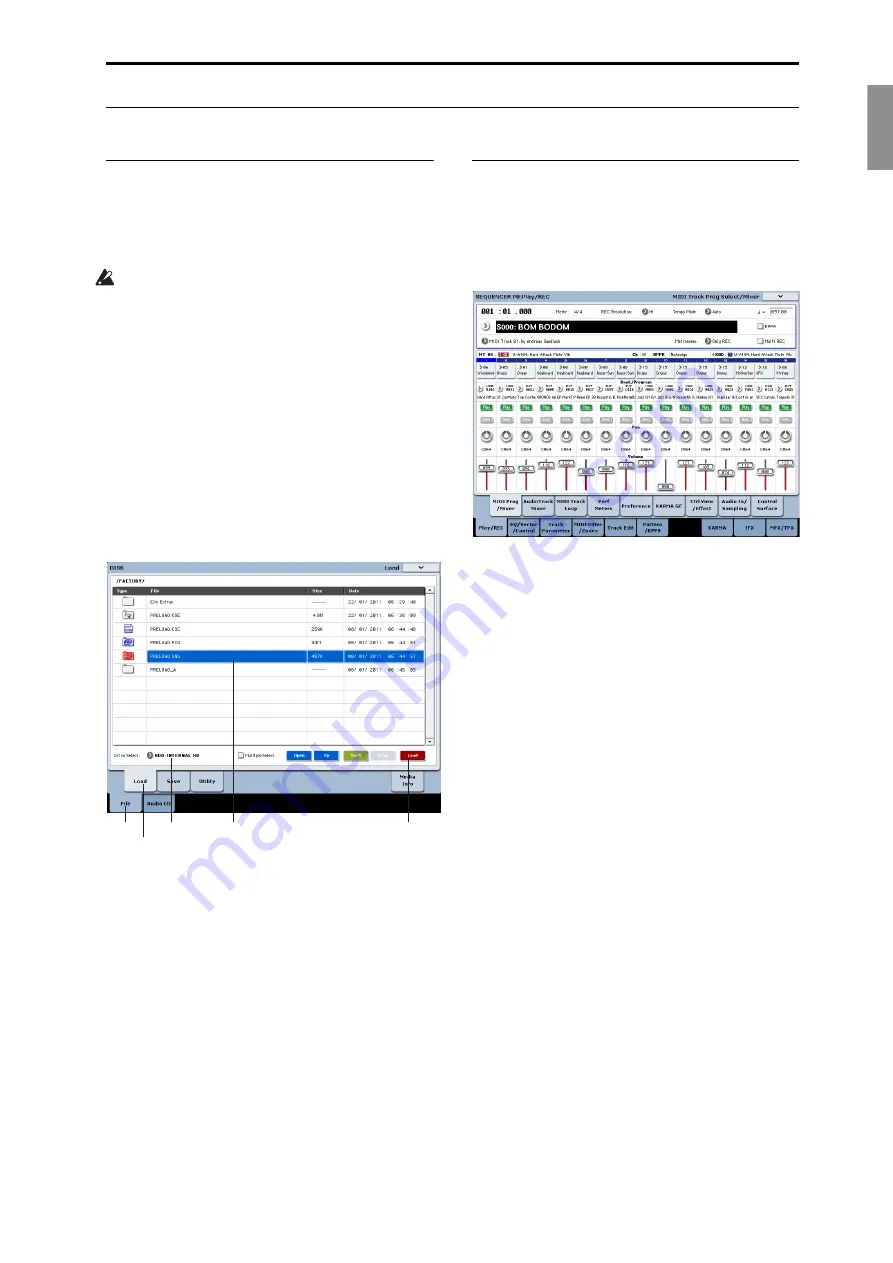
4. Make
sure
that
“Drive
Select”
is
set
to
HDD:INTERNAL
HD.
The
contents
of
the
hard
disk
will
appear.
5. Touch
the
FACTORY
directory
to
select
it.
6. Press
the
Open
button
to
enter
the
directory.
7. Touch
the
PRELOAD.SNG
file
to
select
it.
This
file
contains
the
demo
song,
along
with
all
of
the
sounds
that
it
needs.
8. Press
the
Load
button
to
open
the
dialog
box.
9. Select
the
“Load
PRELOAD.PCG
too”
check
box.
With
this
option
checked,
the
matching
.PCG
file
will
be
loaded
along
with
the
.SNG
file.
10.Select
the
“Load
PRELOAD.KSC
too”
check
box.
With
this
option
checked,
the
matching
.KSC
file
will
be
loaded
as
well.
11.Set
.SNG
Allocation
to
Clear.
12.Set
.KSC
Allocation
to
Clear
All.
13.Press
the
OK
button
to
load
the
data.
Playing the demo songs
1. Press
the
SEQ
button
(the
LED
will
light)
to
enter
Sequencer
mode.
If
you
haven’t
done
anything
with
Sequencer
mode
since
turning
on
the
power,
the
P0:
Play/REC–
MIDI
Track
Prog
Select/Mixer
page
will
appear.
If
this
page
is
not
displayed,
press
the
EXIT
switch
several
times.
Although
the
exact
number
will
depend
on
the
page
you’re
in,
pressing
the
EXIT
switch
no
more
than
three
times
will
always
bring
you
back
to
this
page.
Let’s
start
by
listening
to
song
S000.
2. Verify
that
song
S000
is
selected.
If
another
song
is
selected,
touch
the
song
name
to
highlight
it.
Then
press
the
numeric
key
0,
and
then
the
ENTER
switch.
3. Press
the
SEQUENCER
START/STOP
switch.
The
LED
will
blink,
and
the
song
will
begin
playing
back.
4. If
you
want
to
stop
playback
mid
‐
way
through
the
song,
press
the
START/STOP
switch
once
again.
Let’s
listen
to
the
next
song.
5. Select
the
song
name
by
touching
it
on
the
display.
6. Press
numeric
key
1,
and
then
press
the
ENTER
switch.
This
selects
Song
S001.
Alternatively,
you
can
press
the
Song
Select
popup
(the
round
button
located
at
the
left
of
the
song
name),
and
a
list
of
song
names
will
appear.
Select
a
song,
and
press
the
OK
button.
7. Press
the
SEQUENCER
START/STOP
switch
to
begin
playback.
To
stop
playback,
press
the
same
switch
once
again.
Drive Select
File tab
Load tab
PRELOAD.SNG
Load tab


