background image

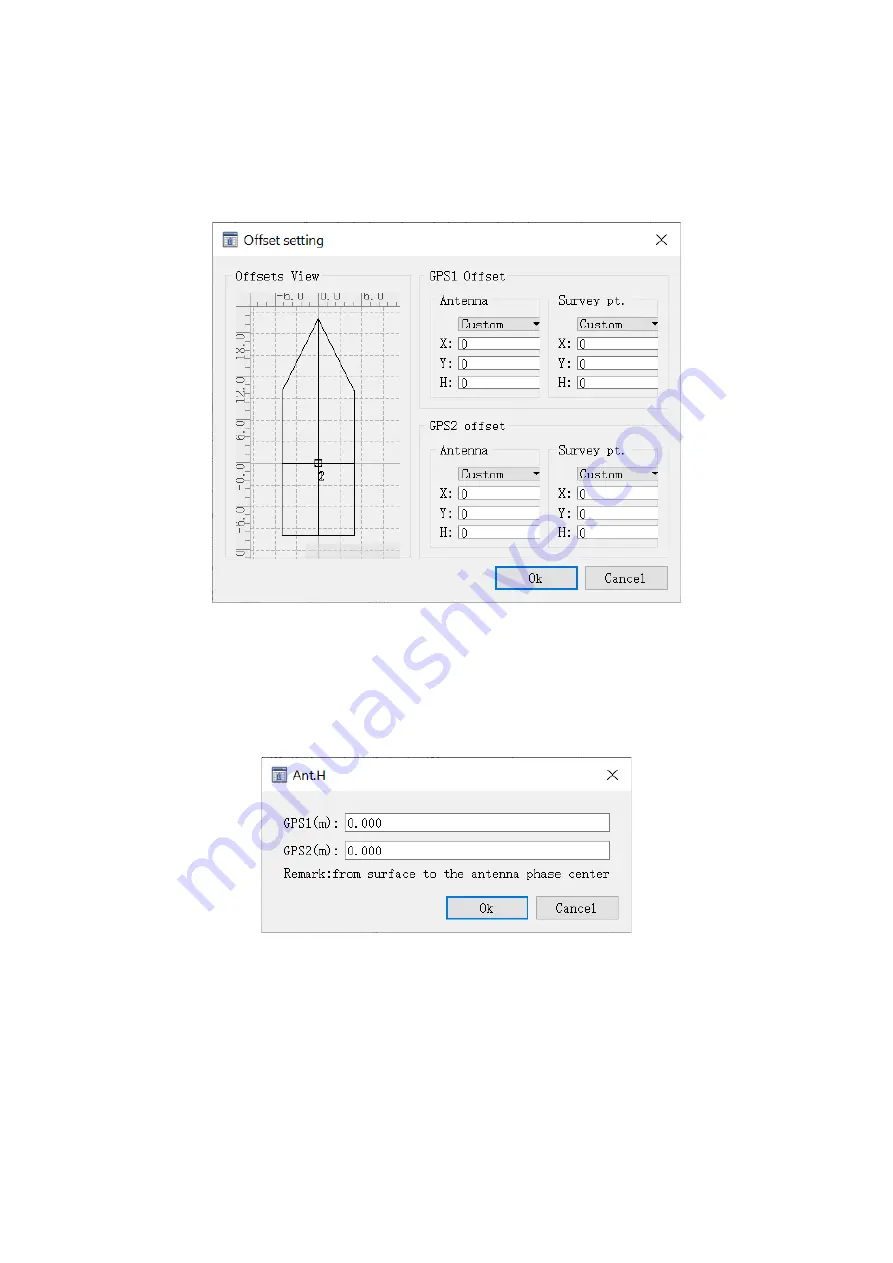
GPS1 and GPS2 are placed, the final course is from the stern to the bow, and the offset of the 2 
antennas in the coordinate system needs to be accurately measured and filled into the offset 
setting.


Fig.3-54 Offset setting


Beacon

—It is to configure the beacon signal as long as the V series of compass is connected.


Antenna

—Here can set the antenna height for GPS1, and this height is the vertical height, which 

is the distance from measurement point to receiver antenna phase center.


Fig.3-55 Ant.H


Shallow alarm

—It is to set a threshold of shallow water alarm, enter a proper value for the 

threshold and check the box of Enabled to apply the settings, while the measuring depth is less 
than the assigned value, the shallow water alarm will be triggered, and the alarm information 
would display in the message window.


Summary of Contents for SDE-28S

Page 1: ...SDE 28S Digital Echo Sounder User Manual...

Page 2: ...pter 8 2 3 4 I O devices 8 2 3 5 Instrument case 9 Chapter 3 Software 10 3 1 EchoSounder 10 3 1 1 EchoSounder main interface 10 3 1 2 Menu 12 3 1 3 Toolbar 23 3 2 HySurvey 25 3 2 1 Main interface 25 3...

Page 3: ...al memory and built in 8GB SSD storage SED 28S can connect to GPS from any manufacturers for positioning also the users can run different hydrographic surveying softwares support embedded Win XP versi...

Page 4: ...of the high frequency transducer is about 200KHz that of the low frequency transducer is about 20KHz Low frequency signal has a longer wavelength strong diffraction function so strong penetration capa...

Page 5: ...n about every hardware component of SDE 28S 2 1 Front components Fig 2 1 Front components Ref Component Description Logo Brand logo label Handle Carry the device Screen Display the operation contents...

Page 6: ...n SN label Serial number of device and the bar code Transducer port Connect the transducer to echo sounder VGA port Connect to external display RS232 port Connect to the GNSS receiver USB port Connect...

Page 7: ...calculate the depth of water Transducers are divided into single frequency and dual frequency according to the purposes or applications since SDE 28S is a single frequency echo sounder it is equipped...

Page 8: ...ct to the positive of the accumulator and the black clip connects to negative otherwise the instrument would be burn if the cable connects to wrong node The adapter is mainly used to connect to the AC...

Page 9: ...illed with anti collision foam the host and other accessories can be dispersed and embedded the outer layer is a hard instrument case sealing strong wear resistant anti wrestling This instrument case...

Page 10: ...choSounder main interface EchoSounder software is mainly used for configuring the transducer sounding parameters collecting the echo wave raw data transmitting the data depth data to the Hysurvey soft...

Page 11: ...ronments then adjust the transmitting power of pulse according to the different environment Ruler The ruler can indicate the depth value from the reflected waves and the scale of which can be zoomed i...

Page 12: ...tup Print preview Print to PDF Print and Exit The file menu is mainly to use to create a new depth file and print the depth file Fig 3 3 File menu New click on this option a new file dialog pop up inp...

Page 13: ...he data files print settings Fig 3 5 Page setup Print preview preview the echo wave print Print to PDF print the data file as pdf format Print click on it to print the data file directly Exit exit the...

Page 14: ...nt velocity the velocity of fresh water and sea water are different so requests to check the echo sounder before each measurement There are various ways for this check but the common is two ways one i...

Page 15: ...his is a protecting depth value for echo sounder if the measurement depth is lower than this input value the echo sounder would alarm this is mainly to protect the transducer from the shallow 4 Echo a...

Page 16: ...sensor device to correct heave real time for customer after connecting to the sensor click on port setting to set the port parameters and click modify button to apply this port then choose the correc...

Page 17: ...he transmitted pulse and the echo wave when measure in shallow water If the pulse length is too short then the signal duration time is too short when measure in deep water or the absorption power of t...

Page 18: ...e value is necessary to be set in order to make the instrument can maximum identify the effective echo signal Threshold it decides when the timer using for accumulating the echo continuous time stops...

Page 19: ...s 1 6ms High 3 1 10 100 300m 0 6ms 1 8ms High 3 1 10 Rec Speed the default recording speed of the software is 1 when 2 is selected the software will record echo data at double speed Fig 3 11 Rec speed...

Page 20: ...the system will automatically adjust the transmission frequency to a suitable gear in this case the underwater section diagram cannot be fully displayed on the screen while the scale is still fixed a...

Page 21: ...digitized line are contained in this menu select the proper option according to the need Fig 3 18 Display setting Ruler Increment select the time for ruler increment the software will mark automatica...

Page 22: ...ice information Fig 3 21 Help Register registration is the process of registering each instrument for use after user receives the echo sounder there will be around 30 hours for trial period so before...

Page 23: ...isk space hardware information and the software information as well Fig 3 23 Device information 3 1 3 Toolbar Below the menu a series of shortcut buttons are listed in the shortcut menu they are open...

Page 24: ...3 27 Device setting After the correct parameters have been set such as draught sound velocity and so on click this button to start the measurement It is the button to mark the user graphic file with a...

Page 25: ...depth data collection and post processing easy to use And the operation flow is completely consistent with the user s actual work flow Its strong scalability can let it connect to all kinds of GPS rec...

Page 26: ...Menu 3 2 2 1 Project Under the project menu there including new project open project modify project import export save and exit Fig 3 30 Project New project Click on this option to create a new projec...

Page 27: ...der location project date operator and something else then click Next button to the next parameter configuration Fig 3 32 Basic info At Coord tap if there are no the local coordinate system in the lis...

Page 28: ...re the transformation parameters for the local system click Parameters button to enter the dialog and input the parameters Fig 3 34 Edit coordinate system Fig 3 35 Parameters After finishing the coord...

Page 29: ...he default data format Move to serial parameter tap choose the correct COM port and baudrate The parameters of Parity Stop bits and Data bits modification should be under the guidance of the professio...

Page 30: ...TK option if we connect an RTK receiver And the mark method would be auto and manual using space button and mark interval can be with time or distance distance interval is generally used the coordinat...

Page 31: ...instrument then click OK button to open it or double click on the data file to open it Fig 3 40 Open project Modify project Click on this option to enter the project wizard basic information coordinat...

Page 32: ...s CAD2000 dxf format KOLIDA dat and ssd format Hypack xyz and mtx format as well as S57 format electronic chart Fig 3 42 Import Export This function is able to export the base map as CAD2000 dxf graph...

Page 33: ...u contains all kinds of settings like coordinate system survey devices data collection store setting data transmit and so on Coordinate system New a local coordinate system for current project includi...

Page 34: ...here is able to set the data collection conditions GPS acquisition condition According to the connected GNSS receiver positioning accuracy for example we choose RTK option if we connect an RTK receive...

Page 35: ...x for the file and along with line number forms the file name Number The line number indicates which file is to be measured and along with line name to form the file name for example Ln1 and Ln2 where...

Page 36: ...Fig 3 50 Continuous naming Survey line pt name Each time clicking on the measure button the line number will increase by one and the point name will increase by line number point name for example as s...

Page 37: ...The offset setting is to set the relative offset of the GNSS receiver antenna and the measuring point in the ship center coordinate system After the ship s center coordinate system is established the...

Page 38: ...onnected Antenna Here can set the antenna height for GPS1 and this height is the vertical height which is the distance from measurement point to receiver antenna phase center Fig 3 55 Ant H Shallow al...

Page 39: ...of vessel display on the screen Fig 3 58 Ship mode setting Orientation mode It is a setting of ship s position displayed on the screen there would be 4 modes for option center heading up center beyon...

Page 40: ...s and the font for the navigation info window which locates at the left side of main screen as well as the content color Fig 3 60 Navigation info Plotting mode Here are two methods for plotting one is...

Page 41: ...line the software will pop up a dialog which displays coordinate type color and layer about the object Fig 3 63 Object snap mode Filter If choose this for the view mode while click properties under to...

Page 42: ...int of the element Perpendicular Capture the points perpendicular to an existing element Nearest Capture the points of the mouse to an existing element Speed unit This is the unit for the speed of shi...

Page 43: ...can be customized here as well as software automatic start automatic open the recent project when the software starts When Use color table is checked the depth data will display with different color a...

Page 44: ...e undo button use redo to return to the previous operation interface Draw point This is used for drawing the auxiliary mark points with mouse or coordinate If choosing coordinate method choose coordin...

Page 45: ...software will draw a straight line according to the settings Fig 3 74 Draw line Draw polyline It is used to draw a polyline mouse or coordinate If choosing coordinate method choose coordinate option i...

Page 46: ...rcle name center point coordinate and the radius After that select the corresponding properties for the line such as layer type width and color then click OK button the software will draw a circle acc...

Page 47: ...able to annotate the elements on the map with mouse or coordinate Enter the content of the text coordinate layer and the annotation style or self define the coordinate by clicking on Select button Fig...

Page 48: ...he line name nodes coordinate or select the point from library and then select the corresponding properties like line type width color attribution and symbol Fig 3 80 Align feature Move This is used f...

Page 49: ...stly used for the depth survey in inland waterways This way only needs to draw the central axis then the working lines would automatically generate according to the input channel width and survey widt...

Page 50: ...as On the pop up dialog enter the boundary point coordinates or click Draw button to draw the boundary lines or click Select button to select the existing lines on the screen then enter the inclinatio...

Page 51: ...sign is same on the left and right and the corners were processed Vertical design is simpler that it draws the vertical parallel lines only according to the specific baseline and the spacing and the w...

Page 52: ...rallel design This is to draw the planned lines on both sides base on the drawing central axis On the pop up dialog enter the nodes coordinate for the axis and the number of planned lines on the both...

Page 53: ...he sector from the center line The starting angle of the axis is the angle between the starting edge and the true north and same definition to the ending angle Fig 3 86 Sector design VesselDesigner Th...

Page 54: ...ey Under the survey menu there are some operations related to the measurement such as re handshake device connection record pause_survey stop record auto record stakeout point stakeout line heading co...

Page 55: ...to the GPS collection conditions and marking methods set by user and send marking commands to the echo sounder software Pause_survey Pause recording the data Stop record Stop recording the data Auto...

Page 56: ...ent point to the planned line less than the locked distance the planned line would be locked as the current measurement line Fig 3 91 Auto mode setting Mouse select In this mode the mouse cursor as a...

Page 57: ...e the heading Fig 3 93 Heading Compass Display the compass on the main interface Fig 3 94 Compass Replay The software will replay the coordinate data measured in the current project and the ship s tra...

Page 58: ...the pan operation right click in the view window Zoom in Use this screen to zoom in the screen the screen will zoom in at the center while clicking on it each time Zoom out Use this screen to zoom out...

Page 59: ...Contra rotate Each time click on this option the base map will rotate counterclockwise by 10 North up Click on this option the rotated map will recover to true north Grid switch The grid function is...

Page 60: ...own in the figures below Fig 3 100 Display point number Fig 3 101 Hide point number Trace display Click on this option the software will pop up the survey line selection window Choose a line in the li...

Page 61: ...xt displayed in the project as shown in the figure below drag the middle slider to scale the text Fig 3 104 Scale text 3 2 2 6 Tool The tool menu contains many kinds of utilities like the coordinate c...

Page 62: ...parameters 7 parameters and the fitting parameters or the current project Fig 3 107 System parameters Measure This is one of the commonly used tools it can conveniently measure the azimuth angle and d...

Page 63: ...ea Properties Click on this option the mouse will turn into a small red box Use it to click on the point line arc circle and other graphics on the screen the software will pop up a window to display v...

Page 64: ...includes survey line collection time point name longitude latitude altitude X Y h heading high frequency measuring depth low frequency measuring depth solution status HRMS VRMS and other information A...

Page 65: ...Fig 3 112 Base coordinate view Symbol manager This option is able to add delete and edit the symbols of point or line Fig 3 113 Symbol manager...

Page 66: ...nter the local coordinate library and it also can add delete edit the local coordinate here and the other operations Fig 3 114 Local coordinates Geo library This is the place where the geodetic coordi...

Page 67: ...oblematic values in the original measured depth data and take out the required coordinates and depth values according to the assigned sampling method and interval Fig 3 117 Single beam editor Edit dep...

Page 68: ...ormed through the post processing And there are 2 methods for the processing one is to use parameters file cot the other one is to use the current project parameters Fig 3 119 Post processing File exp...

Page 69: ...t choose the measurement line and adjustment items and click Export button A dialog will pop up then select the name and path of the result and click Save Echosounder With the different depth the erro...

Page 70: ...r In the actual work user can work in a custom coordinate system then correct the custom coordinate system to the standard coordinate system through the coordinate system error correction Fig 3 123 Co...

Page 71: ...m error Tide station It is able to choose an edited tide gauge station to correct the depth data Fig 3 125 Tide station adjustment Tide station Here is to new or edit a tide gauge station data Fig 3 1...

Page 72: ...measurement lines choose the line and click OK button to export a dat format file Fig 3 127 Trace export 3 2 2 8 Help The About interface contains the information of software version expire date copyr...

Page 73: ...dow display or hide Fig 3 129 Layout 3 2 3 Toolbar The toolbar contains a variety of shortcuts shortcuts Description New project Open the existing project Save the graphic Re handshake for reconnectin...

Page 74: ...ment Move the screen Zoom in Zoom out Zoom window Zoom all Zoom 1 1 Grid switch Undo Redo Draw point Draw line Draw polyline Draw circle Draw arc Annotation Point symbol Align feature Move the element...

Page 75: ...bject snap 3 2 4 Navigation info GPS1 plot Navigation info window and GPS plot window are located at the left site of the main interface This window displays position coordinate depth heading ship spe...

Page 76: ...reflect the information of GPS receiver speed yaw angle and distance Fig 3 132 GPS Yaw While stakeout points or lines this window can display the stakeout information such as the yaw distance and angl...

Page 77: ...hull By mounting the transducer on the downward side the hull will tend to protect the transducer from this effect The transducer should be mounted on or adjacent to the ship s centerline Wherever pr...

Page 78: ...onsidering the length of pole and the operational needs At sea if measure under larger surge conditions transducer draft muse be deepened to avoid massive depth errors caused by surges When mounting t...

Page 79: ...0m 60m 120m 240m 300m Automatic shift Draft 0 0m 20m Gain Control AGC and TVG depth and gain a double door tracking Output data format KOLIDA SDH 13D DES025 INN455 ODOM etc Physical Operating Temperat...

Page 80: ...olid State Disk SSD supports to extend higher USB 3x standard USB2 0 Serial Port 2x RS 232 VGA Interface 1x VGA Display 12 1 inch color LCD touch screen Protection Interface protection Transducer Cabl...

Reviews: