A-61316 April 2010
2-1
2 Control Panel and Functions
Following are descriptions of the Control Panel functions. Some
functions are available by using the Shift key and some functions
provide access to optional accessories. This chapter provides an
overview of each function and a description of image processing
features. Chapter 3,
Using the Scanner
, provides procedures on how to
use each function.
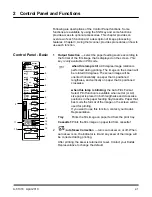
Control Panel - Basic
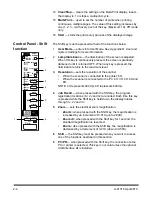
1
Output Selection
— select the paper feeding source according to
the format of the film image that is displayed on the screen.
This
key is only available in PR mode.
:
when this lamp is lit:
a 90 degree image rotation is
performed during printing. The image on the screen will
be rotated 90 degrees. The screen image will be
oriented horizontally on paper that is positioned
lengthwise, and vertically on paper that is positioned
crosswise.
when this lamp is blinking:
the Auto Film Format
Select Print function is available when Letter (or A4)
size paper is placed in both lengthwise and crosswise
positions in the paper feeding tray/cassette. Paper that
best suits the format of the image on the screen will be
used for printing.
If you want to use this function, contact your Kodak
Representative.
Tray
:
Prints the film image on paper fed from the print tray.
Cassette1
:Prints the film image on paper fed from cassette 1.
2
Auto Skew Correction
— turns auto skew on or off. When
auto skew is on, the indicator is lit and any skew of the image will
be corrected during printing.
After printing, the skew is retained or reset. Contact your Kodak
Representative to change the default.
Auto Skew Correction
Centering/Fit
Masking
Print Mode
Film Type
Darker
Auto
Lighter
Start
Auto
Photo
Fine
Text
Nega
Posi
C
Auto
Manual
Resolution
Job Recall
Zoom +
Zoom clr
Zoom -
PC/PR
Shift
User Mode
Output
Selection
Cassette1
Cassette2
Tray
1
2
3
4
5
6
7
8
9
10
11
12
13
14
15
16
7


