


Calibration
40
Keysight M9182A/M9183A Calibration and Verification Procedure
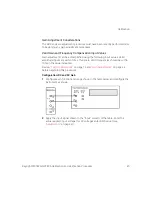
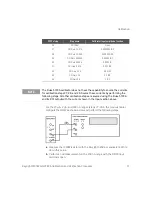
Calibration Adjustment Process
The following three steps comprise the general process for calibration adjustment
of the DMM.
1 Select the calibration adjustment step.
Calibration is done by performing each of the calibration steps. Each step can
be selected using the “setup step #” pulldown tab in the SFP. For remote
programming, use the AGM918X_ATTR_CALIBRATE_SETUP to declare the test
step to be performed. Setting this calibration step reconfigures the DMM in
preparation for the specified calibration step number.
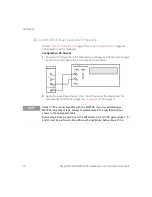
2 Apply the source.
Apply the source to the DMM and program the source to provide the function,
amplitude (and frequency) indicated with each step shown below.
3 Enter adjustment values.
The calibration can be performed without the exact amplitude of the signal
sourced to the DMM. One can measure the exact value and enter this value.
From the Soft Front Panel, simply type in the calibrate value and then press the
“perform calibration” button. To enter a calibration value from the remote
interface use the AgM918x Calibrate.Value property to enter the value
followed by a value where the value is a known value of the input attached to
the DMM and then execute the AgM918x_CalibratePerformCalibration
function. The calibration value is the actual value being supplied to the
instrument. This typically is within 10% of the nominal value required to
calibrate a specific step. This allows for the calibration to be made with less
accurate standard sources and bootstrapped up to accuracy a precision
multimeter such as a Keysight 3458A. The SFP returns “Cal Successful” when
each calibration step has been completed. Press “Close” to continue to the
next calibration step
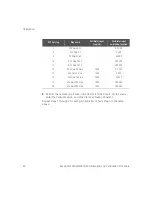
Repeat steps 1 through 3 above to perform calibration on all the calibration steps.


