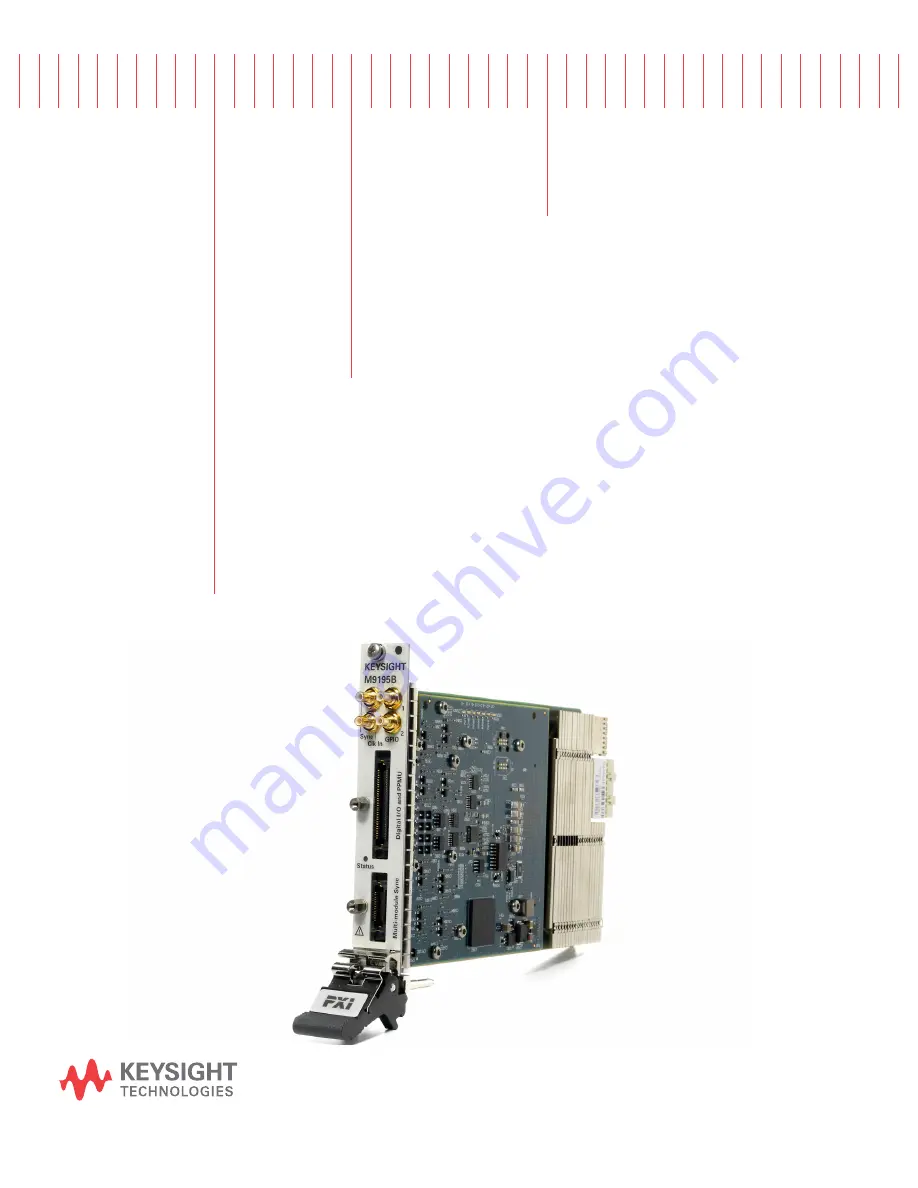
Keysight M9195A/B PXIe
Digital Stimulus/Response with
PPMU: 250 MHz, 16 channel
For the User Guide, software and other
important documentation, see the M9195A/B
Software and Product Information CD.
Startup Guide
Page 1: ...sight M9195A B PXIe Digital Stimulus Response with PPMU 250 MHz 16 channel For the User Guide software and other important documentation see the M9195A B Software and Product Information CD Startup Gu...
Page 2: ...rights in excess of these rights customarily provided to the public to use modify reproduce release per form display or disclose commercial computer software or commercial com puter software document...
Page 3: ...rform proce dures involving cover or shield removal unless you are qualified to do so Do Not Operate Damaged Equipment Whenever it is possible that the safety protection features built into this prod...
Page 4: ...tromagnetic environments outside of the home Waste Electrical and Electronic Equipment WEEE Directive 2002 96 EC This product complies with the WEEE Directive 2002 96 EC marking requirement The affixe...
Page 5: ...up the controller 10 Software installation overview 10 Software installation procedure 11 Where to Find the Documentation 11 Step 4 Install the Module 13 Chassis requirements for temperature control 1...
Page 6: ...al Stimulus Response Module Startup Guide Check Software Installation 30 Chassis Cooling Checks 31 Troubleshooting with the Soft Front Panel 31 Installing Hardware License Options 35 M9195A B Front Pa...
Page 7: ...t Unit PPMU for each channel Single site up to 16 channel and multi site up to four 4 channel configurations Edit patterns on the fly without recompiling and downloading the test Ability to execute pa...
Page 8: ...n rates up to 250 MHz per pin programming of voltage levels real time compare per pin parametric measurement unit PPMU deep vector memory and flexible pattern sequencing The 16 channel single slot PXI...
Page 9: ...e Startup Guide 3 Follow the Startup Sequence Follow the Startup Sequence Closely follow the startup process flow in this document Deviating from the sequence can cause unpredictable system behavior d...
Page 10: ...esented on the different pattern file types Programming Guide This help system provides overview material for programmers as well as detailed reference material on IVI C and IVI COM APIs for the M9195...
Page 11: ...go to Document Library All released M9195A B help systems and documents are there including the Introduction On the Software and Product Information CD Bring up the CD main menu to check all the M919...
Page 12: ...el of ESD protection Of the two only the table mat and wrist strap combination provides adequate ESD protection when used alone To ensure user safety the static safe accessories must provide at least...
Page 13: ...s Module serial number s The serial number label is located on the side panel of the module The serial number can also be read from the Soft Front Panel interface after the hardware and software is in...
Page 14: ...esponse 1 E2094 60003 CD ROM Keysight IO Libraries Media Suite 1 M9195 10002 CD ROM Software and Product Information 1 N A Certificate of Calibration including a calibration letter 1 N A Recommended d...
Page 15: ...B S04 Multi site enabled M9195B SR1 Maximum clock rate 250 MHz M9195B SR2 Maximum clock rate 250 MHz M9195B MMS Multi module sync Accessory Number M9195A M9195B Option Description Y1245A X X Single si...
Page 16: ...es the following Keysight IO Libraries Suite IOLS which includes the Keysight Connection Expert This software is included with your shipment CD part number E2094 60003 and is also available at www key...
Page 17: ...Install Wizard starts click the Next button c Follow the installer prompts Read and Accept the License Agreement Click Next d Choose a Complete installation to install all software and documentation...
Page 18: ...stall the Software For additional documentation go further down the Star button listing to Start All Programs Keysight Instrument Drivers KtMDsr Digital Stimulus Response The display will appear somet...
Page 19: ...ower and side vents should remain unobstructed Set the chassis fan speed to HIGH The fan switch is on the rear panel of the M9018A chassis The use of a Keysight M9018A Chassis and the above accessorie...
Page 20: ...ngs ensure that the fan switch is set to AUTO 3 Position the chassis to provide ample space between the chassis fan intake and exhaust vents Blockage by walls or obstructions affects the air flow need...
Page 21: ...ans are operable and free of dust and other contaminants that may restrict airflow 9 Install all filler panels after installing the module Missing filler panels may disrupt necessary air circulation a...
Page 22: ...ew moments after PXI enumeration takes place Depending on how the chassis is loaded with modules this may take up to a few minutes In general when the Status LED is solid green the module is working c...
Page 23: ...al Stimulus Response Startup Guide 17 Step 5 Verify Operation of the M9195A B Module The details on the M9195 should appear as shown Figure 2 below Filter Instruments box Figure 2 Bring Up M9195A B De...
Page 24: ...M9195A B Soft Front Panel SFP is required to run Self Test perform Automatic Corrections and more To run the SFP 1 Select Start All Programs Keysight MDsr MDsr SFP First the SFP banner will appear as...
Page 25: ...rify Operation of the M9195A B Module 2 From the Connect to Instrument dialog box select the M9195A B module that you want to verify then click Connect The SFP should now appear as shown below in Figu...
Page 26: ...with step 3 Does the M9195A B SFP connect Conduct a Self Test Now the M9195A B is ready to run Self Test from the Soft Front Panel 1 To start the Self Test click Utilities Self Test and the Run Self T...
Page 27: ...ulti module installations the Status LED will briefly turn green at the start and near the end of Self Test After the Self Test passes proceed to Step 6 Execute Automatic Corrections on page 22 Any fa...
Page 28: ...m the PPMU may not be within specifications You should runAutomatic Corrections at these times Keysight recommends yearly calibration to guarantee specifications and to maintain the highest level of p...
Page 29: ...sr MDsr SFP 4 The SFP will ask to connect to an instrument In the Connect to Instrument dialog see Figure 4 on page 19 connect to the M9195A B module for which you want to execute Automatic Correction...
Page 30: ...field contains False Automatic Corrections are not needed you can skip to the end of this procedure b If the Automatic Corrections Needed field contains True proceed to the next step to execute the au...
Page 31: ...ons the Status LED on the modules will change to green near the beginning and near the end of the process and will remain blue at the end 12 When Automatic Corrections completes Click the Update butto...
Page 32: ...t encompasses all for sites simultaneously the user only needs to focus on a single device The single device test can be easily replicated for the remaining test sites In addition to the digital pins...
Page 33: ...ront Panel check that the M919Bs in question are addressed by the driver Figure 12 Selecting M9195B to Check Licensing 2 Go to the SFP About Box and check to see the licenses listed Figure 13 Checking...
Page 34: ...e M9195A B make the following checks 1 What does the front panel Status LED look like Refer to Status LED Summary on page 30 Off indicates a power supply or other basic hardware problem Solid Red indi...
Page 35: ...lot If the module is not visible try shutting down the system cycling power and re starting If the M9195A B still does not show up in Connection Expert then power down the chassis and repeat the proce...
Page 36: ...card connections If no modules are visible in the SFP Connect to Instrument dialog start Keysight Connection Expert by selecting Start Keysight Connection Expert If the module is still not visible po...
Page 37: ...1214A All lower and side vents should remain unobstructed Set the chassis fan speed to HIGH The fan switch is on the rear panel of the M9018A chassis Troubleshooting with the Soft Front Panel This sub...
Page 38: ...ature remains over 85o C after doing the cooling checks then go to Run Self Test on page 33 If temperature remains over the acceptable range go to Returning a module for service on page 7 In the event...
Page 39: ...ation Fixture must not be connected but it is Check for no connections If problem persists see Returning a module for service on page 7 DDR3 memory test failed Reset system and re try test If problem...
Page 40: ...for service on page 7 Ltc3880 test failed See Chassis Cooling Checks on page 31 If problem persists see Returning a module for service on page 7 Max1031 test failed See Chassis Cooling Checks on page...
Page 41: ...1 With the M9195B installed in a chassis bring up the Software Front Panel on the module to be upgraded Go to the SFP Hardware Options Upgrade dialog to start the licensing process Figure 14 Hardware...
Page 42: ...he lower level M6 license Figure 15 Keysignt License Manger with Option M9195B M12 Installed 6 Once the license appears in the Keysight License Manager go the Hardware Options Upgrade dialog box and c...
Page 43: ...GND 42 41 HV23 HV21 40 39 GND GND 38 37 HV20 Channel 11 36 35 GND GND 34 33 Channel 10 Channel 09 32 31 GND GND 30 29 Channel 08 Channel 13 28 27 GND GND 26 25 Channel 12 Channel 15 24 23 GND GND_SEN...
Page 44: ...y with up to 3 secondary modules while the Y1251 connects up to 11 secondary modules Y1252A works with both A and B models This cable assembly supports M9195A B calibration Y1253A works with both A an...
Page 45: ......
Page 46: ...This information is subject to change without notice Keysight Technologies 2015 2020 Fifth Edition November 2020 Printed in Malaysia M9195 90002 www keysight com...