


Section 3 - 11
K
e
y
C
u
tti
n
g
&
P
in
n
in
g
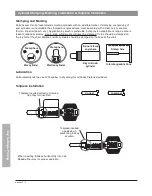
Rekeying Conventional Cylinders
Pry off and discard the spring cover. Rekey and apply a new spring cover. Since all Peaks products are
designed to be top loaded, use of a follower for rekeying is optional.
Mortise/rim cylinder screws have a Loctite
®
coating. If cams or plug retainers are removed, use new screws
and tighten them firmly.
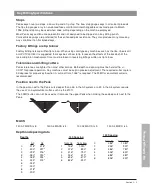
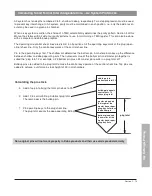
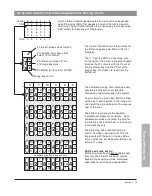
Pinning Conventional Cylinders
Pin to uniform pin stack height
Insert a key into the core and turn the plug 90 degrees. Extend the control lug into the locked position. Top
load the core. Let the bottom pins stop against the plug as shown in figure 1.
All the stacks should have a uniform height. Dump any incorrect chamber and repin it. When the pin stack
heights are uniform, turn the plug and let the pins drop into the plug.
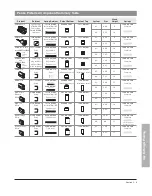
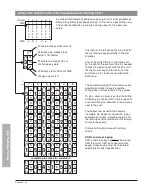
8800/3800 series capped small format interchangeable cores
140 and 150 cores require different capping blocks. Place the
core loaded with pins only, into the capping block. Insert a
tumbler spring, 3800-00-4010, into each chamber by dropping
them into the holes in the block.
One chamber at a time, place a cap on top of each spring
and tap it in place with the capping tool and a plastic or
rawhide mallet until the capping tool is flush against the block.
Do not use excessive force
.
Lubricate core with Poxylube
®
spray lubricant.
For high volume pinning, existing capping presses may be used for 150 cores.
For 140 cores, a capping press in .140" spacing is available from Kaba.
Rekeying
Place the ejector tool into the hole under the chamber(s) and drive out the pins,
spring, and cap with a light tap.
Discard the elements and repin. Always use new springs and caps.
1. Load pins
with plug turned.
3840-00-3540
140 capping block
(6 holes)
3850-00-3540
150 capping block
(7 holes)
3800-00-3547
capping tool
is used with
both blocks
3800-00-3548
ejector tool
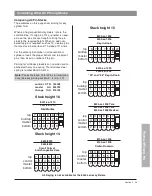
3. Errors in 4th and 5th chambers
Incorrect
2. Uniform pin stack heights
Correct
Pinning Interchangeable Cores
• Work on a firm bench surface.
• Strike tools gently with a
plastic or rawhide mallet.
• Do not use a metal hammer.
Summary of Contents for Peaks Classic
Page 1: ...Technical Manual Preferred Classic ...
Page 3: ...Peaks Preferred Classic Notes ...
Page 4: ...Technical Manual Section 1 Introduction Preferred Classic ...
Page 12: ...Technical Manual Section 2 Product Information Preferred Classic ...
Page 19: ...Section 2 7 Product Information Peaks Preferred Classic Notes ...
Page 41: ...Section 2 30 Product Information Peaks Preferred Classic Notes ...
Page 42: ...Section 2 31 Product Information Peaks Preferred Classic Notes ...
Page 43: ...Section 2 32 Product Information Peaks Preferred Classic Notes ...
Page 44: ...Technical Manual Section 3 Key Cutting and Pinning Preferred Classic ...
Page 66: ...Section 3 22 Key Cutting Pinning Peaks Preferred Classic Notes ...
Page 67: ...Section 3 23 Key Cutting Pinning Peaks Preferred Classic Notes ...
Page 68: ...Preferred Classic Technical Manual Section 4 Key Control Record Keeping ...
Page 79: ...Section 4 11 Key Control Record Keeping Peaks Preferred Classic Notes ...
Page 80: ...Preferred Classic Technical Manual Section 5 Cylinder Installation Guide ...
Page 91: ...Section 5 11 Cylinder Installation Guide Peaks Preferred Classic Notes ...