


45
use the FTP connection to copy still images and
animations to and from your switcher as well as copy
EDL (Edit Decision List) files from your switcher.
The procedure for creating an FTP connection varies
between operating systems and client software.
Consult with your IT department if you require
assistance with creating an FTP connection.
The following procedure describes how to create an
FTP connection using Microsoft® Windows® XP
Professional and the Windows Explorer.
To create an FTP connection to your switcher
from Windows XP Professional:
1.
On the taskbar, click that
Start
button.
2.
Select
All Programs > Accessories >
Windows Explorer
.
3.
In the Windows Explorer address bar, type
ftp://
<ip_addr>
• where
<ip_addr>
is the IP address of your
switcher).
4.
Enter the following when prompted for a user
name and password:
Live Edit Decision Lists (EDL)
Edit Decision Lists are files used by non-linear editing
(NLE) suites to aid in post-production. Your switcher
can capture EDL data in a file that you load into your
NLE suite.
Live EDL support requires a separate license.
Contact your dealer for information on purchasing a
Live EDL license.
Configuring Live EDL Behavior
You can configure your switcher to trigger multiple
GPI outputs at the start, end, or both of EDL data
capture. You can also set a pre-delay for each GPI
output. EDL data capture does not begin until the
highest pre-delay has passed. This is useful when the
switcher needs to wait for external equipment to
become ready. The example below shows the effects
of various triggering and pre-delay settings.
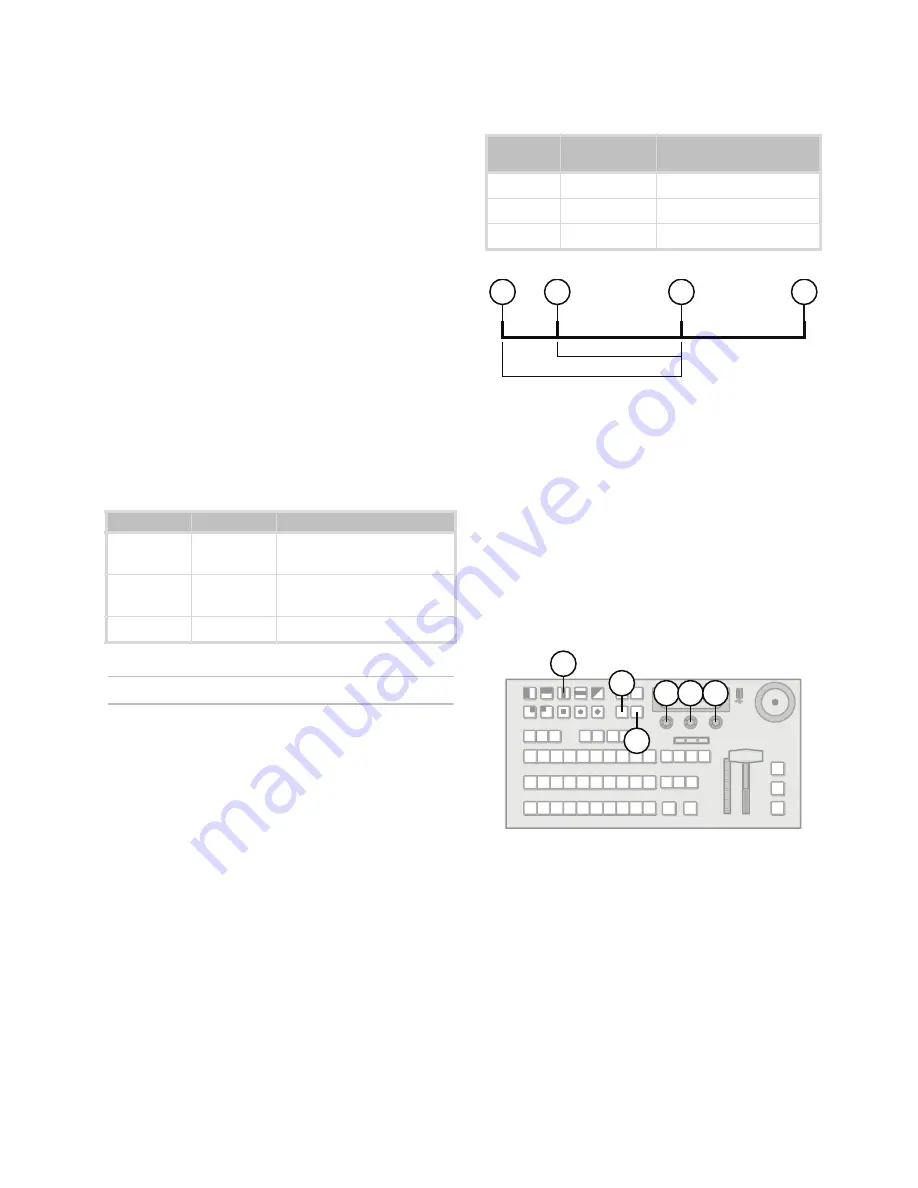
Figure 12
Live EDL Timeline
1.
EDL capture is manually started. GPI output 2 is
triggered.
2.
4 frames later, GPI output 1 is triggered.
3.
16 frames after EDL capture is manually
triggered, the switcher begins capturing EDL
data.
4.
EDL capture is manually stopped. GPI output 2
and 3 are triggered.
To configure Live EDL behavior:
1.
Press
MENU
.
2.
Press the
SYSTEM
Wipe Pattern button.
3.
Press
NEXT
until
LivEDL Config
is displayed.
4.
Press the
LiveEDL Config
knob to display the
EDL Configuration menu.
5.
Use the
GPO
knob to select a GPI output. You
can choose from any GPI bank and pin that has
been configured as a GPI output.
Table 10 FTP Account Information
User Name
Password
Account Type
xpression
password
Use for accssing
Media-Store storage.
liveedl
password
Use for accessing Live
EDL storage.
user
password
General storage access
Table 11 Live EDL GPI Output Triggers
GPI
Output
Triggered On
Pre-Delay (Frames)
1
Start
12
2
Both
16
3
Stop
—
1
4
2
3
16
12
5 4,6 7
2
3
1


