initial settings
18
Manual Channel Setup
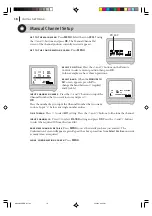
get to the main menu
Press
MENU
. Select the icon
PR SET
using
the
*
and
T
buttons and press
OK
. The Manual Channel Set
screen of the channel position currently received appears.
get to the confirmation screen
Press
MENU
.
select position
Press the
^
and
&
buttons on the Remote
Control to select a vacant position then press
OK
.
In this example, we have chosen position 6.
select band
When the
MANUAL CH
SET
screen appears, press
AV
to
change the band between C (regular)
and S (cable).
input channel number
Press the
^
and
&
buttons to input the
Channel Number that you want to store and press
T
.
OR
Press the number keys to input the Channel Number that you want
to store. Input “0” before any single number entries.
fine tuning
Press
T
to select
MFT
setting. Press the
^
and
&
buttons to fine-tune the channel.
input channel id
Press
T
to select
STATION
setting and press
OK
. Press the
^
and
&
buttons
to select the required ID from the stored list.
save new channel details
Press
MENU
to save the details you have just entered. The
Confirmation Screen will appear again. Repeat the above procedure from
Select Position
onwards
as many times as required.
close confirmation screen
Press
MENU
.
PR SET
MOVE:
DELETE:
01
C03
00
ARD
02
C02
00
ZDF
03
S11
BR3
04
S40
WDR3
05
C02
00
HR3
06
- -
- -
- - - - -
07
- -
- -
- -
- - - - -
08
- -
- - - - -
00
00
CHANNEL/CABLE : AV
PR
06 00
CH
MFT
STATION
C- -
HR-V505EK-EN/p17-22
2/12/03, 6:32 PM
18
Summary of Contents for HR-V505EK
Page 12: ...plug play setup 12 HR V505EK EN p08 12 2 12 03 6 32 PM 12 ...
Page 36: ...basic features 36 HR V505EK EN p31 36 2 12 03 6 34 PM 36 ...
Page 53: ...53 MEMO HR V505EK EN p48 55 2 12 03 6 35 PM 53 ...
Page 54: ...54 MEMO HR V505EK EN p48 55 2 12 03 6 35 PM 54 ...
Page 55: ...55 MEMO HR V505EK EN p48 55 2 12 03 6 35 PM 55 ...

