1-8
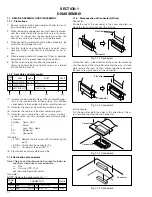
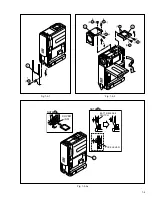
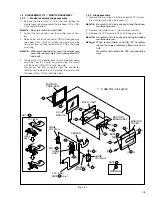
Fig. 1-4-1
1.4 DISASSEMBLY OF
5
MONITOR ASSEMBLY
1.4.1
5
Monitor assembly/Hinge assembly
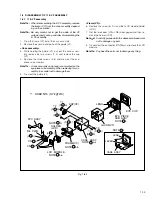
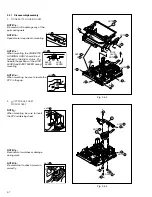
1. Remove the three screws (1 to 3) and then remove the
monitor cover by disengaging the two hooks (L
5
a, L
5
b)
at the top and bottom.
Note
5
a:
Be careful not to lose part (Rib).
2. Pull out the part (sensor) from the monitor case assem-
bly.
3. Release the lock of the connector CN
5
a. Disengage the
two hooks (L
5
c, L
5
d) to remove the hinge assembly
from monitor case, then remove the FPC from the hinge
assembly.
Note
5
b:
When removing the parts out of the monitor case
assembly, be very careful not to damage the FPC
and parts.
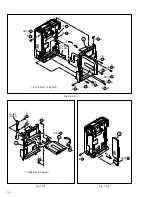
4. Take out the LCD module, back light and monitor board
assembly from the monitor case assembly. Be careful
with the hooks (L
5
e, L
5
f) on the two sides.
Disconnect the FPC assembly from the connector
(CN
5
b) and remove the LCD module. Be careful with
the hooks (L
5
g ,L
5
h) on the two sides.
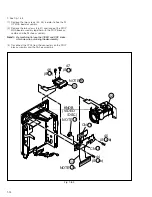
1.4.2 Hinge assembly
1. Remove the two screws (4,5) to take out the FPC assem-
bly while removing the hinge cover (L).
Note
5
c:
Be careful not to lose any part during the above-
mentioned process.
2. Remove the hinge cover (U) from hinge assembly.
3. Remove the FPC assembly from the hinge assembly.
Note
5
d:
Be careful not to lose any part during the abobe
mentioned process.
Note
5
e:
When reassembling, wind the FPC assembly
around the hinge assembly by three turns and a
half.
Be careful not to break the FPC wire during the
work.
a
a
c
c
b
(S
c)
4
LCD
MODULE
SENSOR
HINGE
COVER(L)
HINGE
COVER(U)
RIB
MARKING
HINGE
ASSY
BACK LIGHT
MONITOR
BOARD ASSY
FPC ASSY
MAGNET
5
(S
c)
5
5
(S
a)
2
5
(S
a)
3
5
(S
a)
1
5
CN
a
5
NOTE
c
5
NOTE
a
5
NOTE
c
5
NOTE
b,d,e,f
5
NOTE
d
5
CN
b
5
(L
f)
5
(L
b)
5
(L
a)
5
(L
g)
5
(L
e)
5
(L
h)
5
(L
c)
5
(L
d)
5
CN
c
5
MONITOR
COVER
MONITOR
CASE ASSY
NOTE
e
5
FPC ASSY
HINGE
ASSY
b
∗
∗
∗
: 0.058 N
•
m (0.6 kgf
•
cm)


