background image

Masterpage:Right+

EN


89

Filename [MV5SEK_13Subsidiary.fm]

SUBSIDIARY SETTINGS

Page 89Wednesday, 31 August 2005  19:58

Some DVD-RAM/RW discs are unformatted.
Format the disc when you use an unformatted disc or you want to 
delete all recordings and data on the disc.

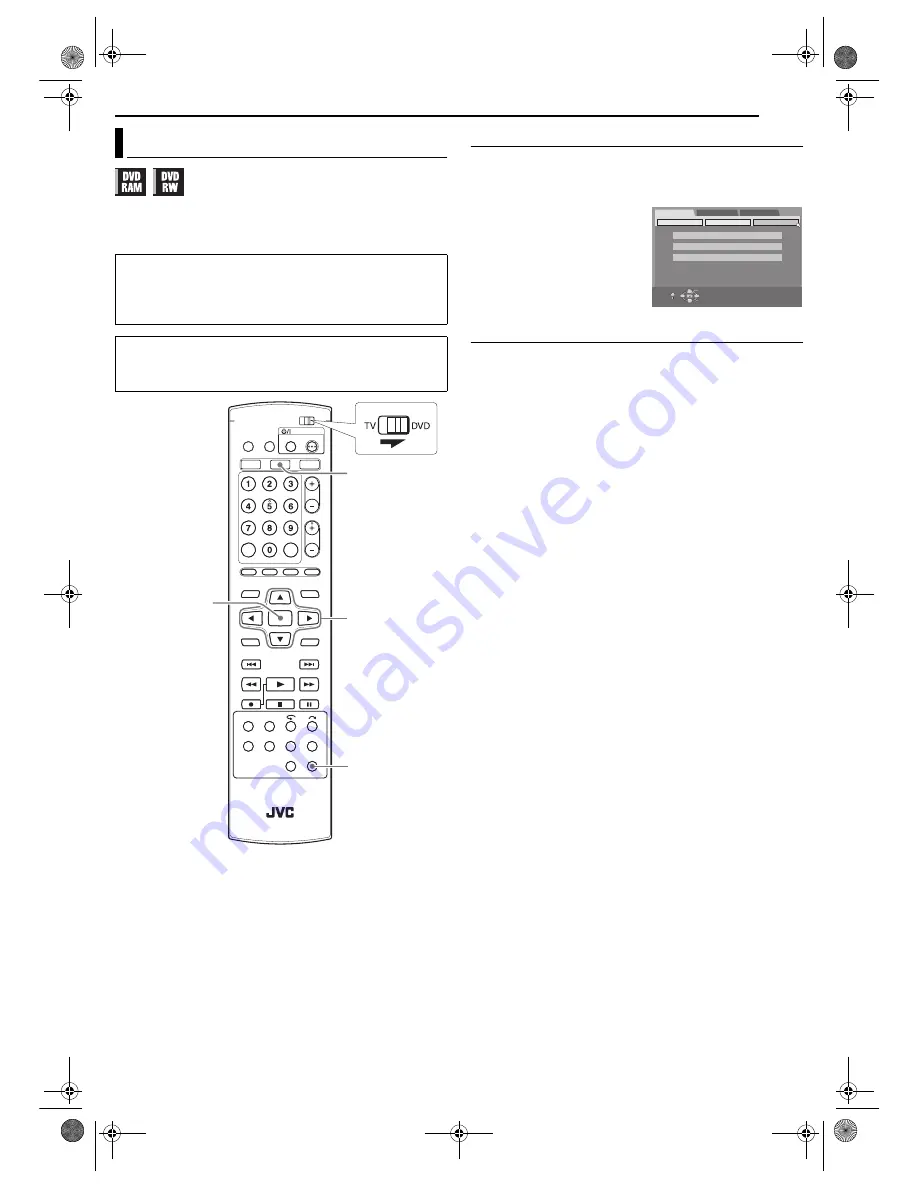
Format A DVD-RAM Disc

1

Press 

DVD

 so that the DVD lamp lights up on the unit.

2

Press 

SET UP

 to access the Main Menu screen.

3

Press 

w e

 to select “DVD SET UP”, then press 

t

.

4

Press 

w e

 to select “UTILITY”, 

then press 

t

.

5

Press 

rt w e

 to select 

“FORMAT”, then press 

ENTER

Press 

w e

 to select “YES”, then 

press 

ENTER

.

6

Press 

w e

 to select “OK”, then 

press 

ENTER

.

Format A DVD-RW Disc

1

Perform steps 

1

 to 

4

 of “Format A DVD-RAM Disc” as above 

before continuing.

2

Press 

rt w e

 to select “FORMAT”, then press 

ENTER

. Press 

w e

 to choose “VR MODE” or “VIDEO MODE”, then press 

ENTER


when “DISC WILL BE FORMATTED” appears on the TV screen.
“VR MODE”: To be chosen when you want to record, erase, or edit 
data on the disc repeatedly.
“VIDEO MODE”: To be chosen when you want to erase all the data 
on the disc once played back to record new data, or play back the 
disc on other DVD players.

3

Press 

w e

 to select “YES”, then press 

ENTER

.

NOTES:

It is impossible to format Version 1.0 DVD-RW discs in Video mode.

It is impossible to format DVD-R discs.

All the titles on a disc will be deleted once the disc is formatted even if 
they are protected titles. (

pg. 67)

Format A Disc (DVD Deck Only)

ATTENTION:

When a disc is formatted, all recordings and data are erased. It is 
impossible to restore them.

Never turn off the unit or disconnect the AC power cord while 
“NOW FORMATTING...” is displayed on the TV screen.

Turn on the unit.

Turn on the TV and select the AV mode.

Slide the 

TV/DVD

 switch to 

DVD

.

Load a DVD-RAM/RW disc to format.

rtwe

ENTER

SET UP

DVD

SELECT WITH [CURSORS]
THEN PRESS [ENTER]

EXIT

OK

SELECT

SET UP

DVD SET UP

FUNCTION SET UP

INITIAL SET UP

LANGUAGE SET

AUDIO OUTPUT

UTILITY

FORMAT

FINALISE

CANCEL DISC FINALISATION

MV5SEK_00.book  Page 89  Wednesday, August 31, 2005  7:58 PM

Summary of Contents for DR-MV5BEK

Page 1: ...DV IN S VIDEO VIDEO AUDIO VHS DVD DUBBING STANDBY ON Filename MV5SEK_01Cov1 fm LPT1037 001C DR MV5SEK DR MV5BEK EN DVD VIDEO RECORDER VIDEO CASSETTE RECORDER INSTRUCTIONS MV5SEK_00 book Page 1 Wednesday August 31 2005 7 58 PM ...

Page 2: ... fire or electric shock may be caused 5 DO NOT expose the apparatus to dripping or splashing 6 DO NOT use this equipment in a bathroom or places with water Also DO NOT place any containers filled with water or liquids such as cosmetics or medicines flower vases potted plants cups etc on top of this unit 7 DO NOT place any naked flame sources such as lighted candles on the apparatus 8 AVOID violent...

Page 3: ...f the fuse fails again consult your nearest JVC dealer If nonetheless the mains plug is cut off remove the fuse and dispose of the plug immediately to avoid a possible shock hazard by inadvertent connection to the mains supply If this product is not supplied fitted with a mains plug then follow the instructions given below DO NOT make any connection to the Larger Terminal coded E or Green The wire...

Page 4: ...ents Enjoying your life with DV Enjoying your life with DVD r Beautiful images Easy dubbing OH Great Beautifu Enjoy the vivid picture quality of DVD recording playback With the simple operation you can dub from DVD to tape or tape to DVD MV5SEK_00 book Page 4 Wednesday August 31 2005 7 58 PM ...

Page 5: ... Let s enjoy Basic playback 24 Basic recording 26 Using timer 29 All over dubbing 37 Advanced playback 47 Advanced recording 61 What s navigation 65 Arrange your style 1 remote control is good enough 74 For better sound 76 It can be more useful 78 Need help Tips for your trouble 91 Terms 99 Choose the disc type for recording from DVD RAM DVD RW and DVD R Navigation function helps you to find the d...

Page 6: ...le to record edit or delete the data either in video mode or in VR mode Either in video mode or in VR mode although the disc can be played back on DVD players from other manufacturers sometimes it may not be possible to play back depending on the disc and recording conditions It is impossible to record on CD R RW or DVD R discs used for authoring It is impossible to record onto DVD R RW Video mode...

Page 7: ...sing all the data on a disc once played back DVD R Can be played back on other DVD players after finalising Suitable when keeping a recorded disc for a long time File Structure Of Discs DVD VIDEO Typically DVD VIDEO discs are made up of larger units called titles Each title has a number title number that can be used to select desired titles Titles are further divided into units called chapters Eac...

Page 8: ...ack recorded tracks consecutively without activating the PBC function even when playing a PBC compatible disc 墌 pg 50 Regarding the contents recorded on discs Some files may not be played back depending on the file types and other factors DVD VIDEO Marks Sometimes marks are printed on a DVD disc and or on its packaging to indicate information regarding the contents and functions of the disc Check ...

Page 9: ...handling a disc do not touch the surface of the disc Since discs are made of plastic they are easily damaged If a disc gets dirty dusty scratched or warped the images and sound will not be picked up correctly and such a disc may cause the unit to malfunction Label side Do not damage the label side stick paper to or use any adhesives on its surface Recording side Make sure that discs are not scratc...

Page 10: ...ng inside the unit Do not remove it Install the unit so as not to block the area around the fan The cooling fan on the rear of the unit may be activated even if the unit is turned off in the following cases In the Automatic Satellite Programme Recording standby mode 墌 pg 36 slightly before the starting time of PDC recording 墌 pg 30 If you connect the decoder or the satellite receiver to the L 2 IN...

Page 11: ... 28 41 Page Buttons 墌 pg 66 70 71 a Memo Button MEMO 墌 pg 66 70 Mark Button MARK 墌 pg 49 b Timer Button TIMER 墌 pg 29 31 32 c Automatic Satellite Programme Recording Button SAT 墌 pg 36 d Navigation Button NAVIGATION 墌 pg 65 e Enter Button ENTER 墌 pg 20 f Return Button RETURN 墌 pg 29 57 g Forward Skip Button 6 墌 pg 47 49 54 Next Button 墌 pg 50 h Forward Search Button 5 DVD deck 墌 pg 47 54 Fast Forw...

Page 12: ...ng time When using Live Memory playback A Disc type B Current time C Bar meter for recording playback D Recording mode E Current playback time Elapsed recording time F Audio mode G Recording channel number DV Dubbing When capturing images from the external DV equipment A Disc type B Current time C Current recording point D Current status recording E Elapsed recording time F Sound mode G Recording ...

Page 13: ...tor appears on the TV screen when you press 3 or 5 from the Stop mode or perform an Index Search 墌 pg 59 The position of q in relation to 0 beginning or end shows you where you are on the tape NOTE Depending on the type of tape being used the tape position indicator may not appear correctly I VPS PDC Indicator 墌 pg 30 VPS Video Programme System recording is not currently available in the U K and n...

Page 14: ...s or group number being played back are displayed on the Multi Display TITLE Total number of titles or title number being played back are displayed on the Multi Display I Channel Recording Mode Indicator Indicates the channel received Or the recording mode SP LP of the VHS deck 墌 pg 28 J Track Chapter Indicator TRK CHAP TRK or CHAP lights depending on a disc loaded while the 3rd and 4th digits fro...

Page 15: ...l Set your TV to the VIDEO or AV Y C or RGB mode according to the type of your TV s SCART connector Select an appropriate option of L 1 OUTPUT as follows 墌 pg 44 5 Plug the end of the AC power cord into an AC outlet LOADING blinks on the front display panel when the AC plug of the power cord is connected into a AC outlet and no operation will be done for approximately 50 seconds This is not a malf...

Page 16: ...nection you can view the images in the progressive mode For switching to the progressive mode refer to Scan Mode Set 墌 pg 80 4 Plug the end of the AC power cord into an AC outlet LOADING blinks on the front display panel when the AC plug of the power cord is connected into an AC outlet and no operation will be done for approximately 50 seconds This is not a malfunction RF cable provided Back of un...

Page 17: ... may not function properly depending on the reception condition Auto Set Up After the 1 button on the unit or remote control is pressed for the first time to turn on the unit the Auto Set Up function sets the tuner channels clock and Guide Program numbers automatically Before starting make sure of the following The TV aerial cable should be connected to the unit The unit s AC power cord should be ...

Page 18: ...re no TV station transmits a PDC Programme Delivery Control signal the unit can perform neither Auto Clock Set nor Auto Guide Program Number Set If there is a power cut or if you press 1 or SET UP while downloading or set up is in progress it will be interrupted be sure to turn off the unit power once and try again from the beginning Auto Clock Set may not function properly depending on the recept...

Page 19: ...rform the VIDEO Plus Timer Programming 墌 pg 29 In certain reception conditions station names may not be stored correctly and auto Guide Program Number Set may not work properly If the Guide Program numbers are not set properly when you timer record a TV programme using the VIDEO Plus system the unit will record a TV programme of a different station When programming the timer using the VIDEO Plus s...

Page 20: ...t 4 Press w e to select LANGUAGE SET then press t 5 Press rt to select MENU LANGUAGE then press ENTER 6 Press rt to select your desired language then press ENTER See Language Code List 墌 pg 96 7 Press SET UP to complete the setting NOTE When the selected language is not available on the disc the disc s default menu language is played back Language Turn on the unit Turn on the TV and select the AV ...

Page 21: ... conversion Select this when the aspect ratio of your TV is 16 9 wide TV 16 9 FIX Wide television conversion Select this when the aspect ratio of your TV is fixed to 16 9 wide TV The unit automatically adjusts the screen width of the output signal correctly when playing back a picture whose aspect ratio is 4 3 Pan Scan Letter Box In general DVD VIDEO disc are produced for a wide screen TV with 16 ...

Page 22: ...9 58 Playback DVD 24 Playback of the programme being recorded Live Memory playback 51 How to search and manage the DVD titles Navigation 65 VHS 25 Recording DVD 26 About recording mode 27 VHS 28 About recording mode 28 hat do you w MV5SEK_00 book Page 22 Wednesday August 31 2005 7 58 PM ...

Page 23: ...005 19 58 Timer recording Using PlusCode number 29 Setting timer manually 31 How to record a satellite programme 36 Dubbing From VHS to DVD 37 From DVD to VHS 39 Dubbing from a digital equipment like a camcorder 41 u want to do MV5SEK_00 book Page 23 Wednesday August 31 2005 7 58 PM ...

Page 24: ... normal playback press 4 5 Press 8 to stop playback When a recordable disc is played playback stops and a programme received with the unit s tuner resumes on the TV screen When a playback only disc is played playback stops and the TV screen becomes all blue when you press 8 Pressing 8 again resumes a programme received with the unit s tuner If x OPEN CLOSE is pressed during playback playback stops...

Page 25: ...ress x EJECT Basic Playback VHS Turn on the unit Turn on the TV and select the AV mode Slide the TV DVD switch to DVD VHS DVD DVD VHS REC VHS DVD DUBBING PR DV IN STANDBY ON S VIDEO VIDEO AUDIO VHS lamp Usable cassettes Full Size VHS T 30 ST 30 T 60 ST 60 T 90 T 120 ST 120 T 160 ST 160 ST 210 Compact VHS TC 20 ST C20 TC 30 ST C30 TC 40 ST C40 Compact VHS camcorder recordings can be played on this ...

Page 26: ...0 FR420 FR480 Back to the beginning The value is selectable from 1 to 6 hours in 5 minutes interval by pressing w e repeatedly after selecting FR60 FR360 To change the value in 30 minutes interval press and hold w e For details on the recording mode see Recording Mode 墌 pg 27 5 Press 7 on the unit to start recording Or while holding 7 press 4 on the remote control 6 Press 9 to pause recording To r...

Page 27: ...EG2 format is used as recording format As a guide for picture quality the bps unit is used to represent how much data can be recorded per second The larger this value is the better the picture quality becomes but more capacity is required for the recording Select XP or SP for programmes where quick movement occurs such as sports programmes and LP or EP for talk shows etc with relatively less movem...

Page 28: ...the beginning of both the first SP and the first LP recording after inserting the cassette 墌 pg 64 If DIRECT REC is set to ON the programme that appears on the TV screen will be recorded 墌 pg 79 6 Press 9 to pause recording You can select channel during the Record Pause mode To resume recording press 4 7 Press 8 to stop recording Recording Mode Recording Resume Function If there is a power outage ...

Page 29: ...need to cancel some of the reserved programmes 墌 pg 34 5 The PlusCode number you entered and the matching timer recording information are displayed on the TV screen Check the programme data To cancel this setting press RETURN 6 Press w e to select the desired recording option as required Press rt to select the desired setting then press ENTER STOP To advance go back the stop time by 30 minutes pre...

Page 30: ...BC2 Ch 4 and Ch 5 except from a few small relay transmitters Ch 3 operates a PDC service in some areas All channels intend to offer this service in due course Check your TV programme listing guide for latest information If the channel you intend to record does not offer a PDC service your unit will not start recording if PDC has been selected Be sure to set PDC to OFF if PDC is not available on yo...

Page 31: ...me in 1 min increments To advance go back the start time in 30 min increments press and hold rt 7 Press w e to select STOP then press rt to set the desired stop time Each press of rt advances goes back the stop time in 1 min increments To advance go back the stop time in 30 min increments press and hold rt 8 Press w e to select TV PROG then press rt to select the desired channel 9 Press w e to sel...

Page 32: ...P LP EP or FR480 mode for REC MODE However you cannot select FR JUST FR60 FR360 and FR420 Refer to step 6 in VIDEO Plus Timer Programming 墌 pg 29 It is not possible to use the Free Rate function 墌 pg 62 11 Press ENTER to access the Programme Confirmation screen 12 Press ENTER to complete timer programming To programme another timer repeat steps 3 12 To Timer record The Programme With The Programme...

Page 33: ...1 hour serial drama every Friday in SP mode Example 2 To record a 15 minute serial drama every morning in XP mode Example 3 To record a 90 minute serial drama every Sunday in SP mode The first programme is overwritten by the third The second programme is overwritten by the forth Overwritten Blank Overwritten 1st 2nd 1st 2nd 3rd 4th 3rd 1st 2nd 3rd 4th 5th 6th 7th 8th Areas treated as blank cannot ...

Page 34: ...ogramming DVD deck only Press TIMER For Automatic Satellite Programme Recording Press SAT for 2 seconds or more The DVD timer indicator also lights up on the front display panel and the VHS deck is automatically selected When the VHS deck is in timer standby mode the unit is automatically turned off NOTE When you check cancel and change a On Disc Timer Programming be sure to insert the On Disc Tim...

Page 35: ...w e to select VHS or DVD then select the programme to be cancelled or changed To cancel the programme Press CANCEL THE TIMER PROGRAMMING SETTING WAS CANCELLED appears on the TV screen for about 5 seconds then the normal screen resumes To change the programme setting Press ENTER then go to step 3 3 Change the programme setting Refer to steps 5 10 in Manual Timer Programming 墌 pg 31 4 Press PROG to ...

Page 36: ...ore than one satellite programmes you wish to record with Automatic Satellite Programme Recording it is not possible to set different recording modes for each programme Depending on the type of satellite receiver the unit may not record a slight portion of the beginning of the programme or may record slightly longer than the actual length of the programme Just Clock 墌 pg 88 does not work when the ...

Page 37: ... Disc Timer programmed disc Either cancel the disc programming or use an unprogrammed disc If the index code VISS signal is found on a tape during One Touch Expert Dubbing a single title is created While creating a title the dubbing stops Dubbing starts again once the title is created When a tape contains multiple VISS signals separate titles are created for each VISS signal During still picture o...

Page 38: ... unit B Press REC MODE repeatedly to set the recording mode C Press and hold 7 then press 9 so that the DVD deck enters the Record Pause mode 6 Press and hold DUBBING for more than 2 seconds to start dubbing 7 Press 8 to stop recording on the DVD deck Both the VHS deck and the DVD deck are stopped After dubbing is completed press VHS so that lights off If it is not done recording on the DVD deck i...

Page 39: ... may be a discrepancy of several seconds between where you intend dubbing to start and where it actually starts The superimposed indication during the operation or dubbing is not recorded When the end of the tape is reached during dubbing dubbing is done and indicator on the front panel blinks When pressing x EJECT to eject the tape indicator on the front panel stops blinking When the progressive ...

Page 40: ...DVD so that lights off If it is not done recording on the VHS deck is not possible NOTES It is not possible to start dubbing if the unit retains a memory of the resume points Press 8 twice to clear the resume points There may be a discrepancy of several seconds between where you intend dubbing to start and where it actually starts The superimposed indication during the operation or dubbing is not ...

Page 41: ...NTER The dubbing starts Playback on the external DV equipment and recording on the unit should start simultaneously When the playback from the beginning is not possible the DV DUBBING controller cannot be used Perform dubbing without using the DV DUBBING controller 墌 below To pause dubbing press w e to select then press ENTER Both the unit and the external DV equipment pause dubbing Pressing 9 on ...

Page 42: ...repeatedly to set the recording mode 5 Start playback on the camcorder slightly before the actual point from where you wish to start dubbing 6 Press 7 on the unit to start recording Or while holding 7 press 4 on the remote control The dubbing starts 7 Press 8 on the unit then stop playback on the camcorder NOTES All necessary cables can be obtained from your dealer Refer to the camcorder s instruc...

Page 43: ... 44 When using the L 2 IN DECODER connector set L 2 SELECT to VIDEO RGB or S VIDEO RGB 墌 pg 45 4 Press REC MODE repeatedly to set the recording mode 5 Engage the Play mode of the source player 6 Engage the Record mode of the recording deck 7 Stop recording on the recording deck then stop playback on the source player NOTES All necessary cables can be obtained from your dealer For Y C signal input ...

Page 44: ...an obtain high quality picture For connection be sure to use a 21 pin SCART cable that is compatible with the Y C signal SCART RGB If a connected appliance s input is compatible with RGB signals set to SCART RGB You can obtain a high quality RGB picture COMPONENT If a connected appliance s input is compatible with Y PB PR signals set to COMPONENT You can obtain a high quality Y PB PR picture Switc...

Page 45: ...ing a satellite receiver or a decoder to the L 2 IN DECODER connector leave L 2 SELECT set to VIDEO RGB When L 2 SELECT is set to SAT VIDEO RGB SAT appears on the TV screen or front display panel instead of L 2 If L 1 OUTPUT is set to SCART S VIDEO it is not possible to set L 2 SELECT to DECODER or SAT VIDEO RGB If L 1 OUTPUT is set to SCART RGB it is not possible to set L 2 SELECT to DECODER If L...

Page 46: ...actual point from where you wish to start dubbing 5 Press 9 to pause playback 6 Select the input mode on the connected digital audio device 7 Press 4 to start playback on the unit 8 Start recording on the digital audio device 9 Stop recording on the digital audio device Then press 8 to stop playback on the unit NOTE There may be a discrepancy of several seconds between where you intend editing to ...

Page 47: ...ssing 2 locates the start point of the item or skips the item in the reverse direction then resumes playback When a DVD RAM RW R disc is played Example To locate the beginning of the next item press 6 once To locate the beginning of the current item press 2 once To locate the beginning of the previous item press 2 three times When a DVD VIDEO Audio CD or Video CD disc is played Example To locate t...

Page 48: ...to ON Press 1 to turn off the unit Press x OPEN CLOSE to take out the disc Press 8 in stop mode Press TOP MENU to display the top menu then start playback by selecting an item etc Press MENU to display the disc menu then start playback by selecting an item etc When RESUME is set to DISC RESUME Set RESUME to OFF 墌 pg 80 Press 8 in stop mode Press TOP MENU to display the top menu then start playback...

Page 49: ...op mode or during playback It is possible to check disc remaining time according to recording modes also by pressing REMAIN In FR mode it is possible to set recording time in detail While the recording mode and the disc remaining time are displayed by pressing REMAIN press rt to select FR then press w e to select the desired recording time 墌 pg 62 It is not possible to switch the recording mode du...

Page 50: ...o channel of a bilingual programme recorded on a DVD RAM or DVD RW VR mode disc 墌 pg 77 In this case perform the following steps using the remote control to switch DIGITAL AUDIO OUT from DOLBY DIGITAL PCM to PCM ONLY A Press SET UP to access the Main Menu screen B Press w e to select DVD SET UP then press t C Press w e to select AUDIO OUTPUT then press t D Press rt to select DIGITAL AUDIO OUT then...

Page 51: ...unit also allows you to play back from the beginning of a programme while continuing to record the same programme Recording Playback Status Display Press DISPLAY The current status is superimposed on the TV screen Live Memory Playback DVD Deck Only Turn on the unit Turn on the TV and select the AV mode Slide the TV DVD switch to DVD Press DVD so that the DVD lamp lights up on the unit Playback Hig...

Page 52: ...rives for the next timer programme It is impossible to perform ITR even if you press 7 during Live Memory Playback 墌 pg 51 Press 8 to display the programme being recorded then perform ITR settings Playback may be paused for a moment during Live Memory Playback which does not interfere with recording Live Memory Playback cannot be performed while recording the source from DV input 墌 pg 41 DV Dubbin...

Page 53: ...t displays the current recording playback status by the bar meter Example of bar meter display Recorded Total length of the programme being played Current playback position Not recorded While stopped During playback While recording Live Memory Playback Live Memory Playback of another programme Capacity of a disc Capacity of a disc Capacity of a disc Current playback position Current recording posi...

Page 54: ...atedly advances the still picture frame by frame H Pressing once skips forward for approximately 30 seconds and resumes playback Pressing repeatedly skips forward continuously as many times as pressed It is useful when skipping over unwanted sections I Pressing once skips back for approximately 30 seconds and resumes playback Pressing repeatedly skips back for approximately 7 seconds continuously ...

Page 55: ...this to control the switching interval of the slide show 墌 pg 58 NOTE Although examples of the on screen bar are provided here only for 3 types of discs the on screen bar will be displayed for whichever disc indicated in the left column Basic Operation On The On screen Bar Example When selecting Picture Control function of DVD During playback or while stopped 1 Press ON SCREEN twice to access the ...

Page 56: ...e elapsed playing time of the point A appears 4 Press ENTER at the end of the desired part you want to repeat point B The elapsed playing time of the point B appears The selected part of the disc between point A and B is played repeatedly To clear the on screen bar Press ON SCREEN To cancel A B Repeat Playback Press w e to select then press ENTER NOTES A B Repeat Playback may not work properly dep...

Page 57: ... cases X is displayed on the TV screen as well This function is not possible for a Video CD with PBC function Adjusting The Picture Quality You can obtain optimal picture quality by selecting an appropriate picture mode 1 Press ON SCREEN twice to access the on screen bar 2 Press w e to select then press ENTER The pop up window appears under the selected item 3 Press rt to select the desired option...

Page 58: ...n bar and the contents of the programme Press ON SCREEN To cancel Programme Playback Press w e to select PRGM then press ENTER NOTE Programme Playback is not possible depending on the type of disc Random Playback You can play back all the tracks on the disc in random order While stopped 1 Press ON SCREEN twice to access the on screen bar 2 Press w e to select RND then press ENTER Playback starts i...

Page 59: ...fast motion playback Normal playback resumes automatically To resume normal playback press 4 Index Search Your unit automatically marks index codes at the beginning of each recording This function gives you quick access to any one of the 9 index codes in either direction NOTE Before starting make sure the unit is in the Stop mode Press 2 or 6 to activate Index Search 2 1 or 6 1 is displayed on the...

Page 60: ... three soundtracks HI FI L HI FI R and NORM and will play back the one you select During Playback Pressing AUDIO changes the soundtrack as follows NOTES HI FI L j h R should normally be selected In this mode Hi Fi stereo tapes are played back in stereo and the normal audio track is played back automatically for tapes with only normal audio For instructions on recording stereo and bilingual program...

Page 61: ...he TV s input mode so that the programme selected on the TV appears 2 Slide the TV DVD switch to TV 3 Press PR repeatedly to select the desired channel NOTE If a decoder is connected to the unit 墌 pg 76 you can select a scrambled channel as well as other normal channels Elapsed Recording Time And Disc Remaining Time Indication During recording press DISPLAY repeatedly until the desired indication ...

Page 62: ...ete beyond these remaining times The maximum recording time of FR JUST mode is the same as the recording time of FR480 mode When timer programming a long programme in FR JUST mode on a disc whose remaining time is short it is recommended to check the disc remaining time in FR480 mode to see if the remaining time is enough for the programme Even if more than one programme are timer programmed in FR...

Page 63: ...he time Each press extends recording time by 30 minutes NOTES You can only perform ITR using the 7 button on the unit During Instant Timer Recording any other timer programmed recording won t start even if their start time has come In such a case the timer programmed recording starts if the end time of the timer programmed recording is set after the end of Instant Timer Recording after the Instant...

Page 64: ...rack NOTES If the quality of stereo sound being received is poor the broadcast will be received in monaural with better quality Before playing back a programme recorded in stereo or a bilingual programme refer to Soundtrack Selection on page 60 B E S T Picture System The B E S T Biconditional Equalised Signal Tracking system checks the condition of the tape in use during playback and recording and...

Page 65: ...ng or timer recording is performed then stored in an area specified on the unit index reduced still pictures to show programme titles programme title category date and time channel recording mode length of recording time The items marked with an asterisk can be easily modified and registered again after recording by using Library Database DVD Navi system About editing of titles Library Database DV...

Page 66: ...RIGINAL then press ENTER 3 Press rt w e to select one title you want to modify then press t 4 Press rt w e to select MODIFY then press ENTER 5 Press w e to select MODIFY INDEX 6 Search for the picture from the title by pressing the appropriate buttons 3 4 5 or 9 The pictures of the title appear on the left window 7 Confirm the arrow is on REPLACE then press ENTER to register new index New index ap...

Page 67: ...Press w e to select YES then press ENTER When you cancel the deletion select NO then press ENTER 5 Press NAVIGATION to return to the normal screen Delete Unwanted Part Of The Title DVD RAM DVD RW VR mode You can delete unwanted part of the title 1 Perform steps 1 to 2 of Modify Index 墌 pg 66 before continuing 2 Press w e to select one title whose unwanted part you want to delete then press t 3 Pre...

Page 68: ...intend to edit and the scene which is actually edited The title index and category of the play list can be modified in the same way as ORIGINAL 墌 pg 66 You can modify the play list that has just been created here by adding moving or deleting unwanted parts to create a digest edition etc Add Scenes To A Play List 1 Perform steps 1 to 3 of Create Play List 墌 pg 68 before continuing 2 Press w e to se...

Page 69: ... edited Delete Unwanted Part From Play List 1 Perform steps 1 to 3 of Create Play List 墌 pg 68 before continuing 2 Press w e to select a play list from which you wish to delete unwanted parts then press t 3 Press w e to select EDITING then press ENTER 4 Press w e to select DELETE SCENE then press ENTER 5 Press 4 to start playback The playback pictures appear in the window on the screen The elapsed...

Page 70: ...continuing 2 Press w e to select one play list you want to delete then press t 3 Press w e to select DELETE then press ENTER 4 Press w e to select YES then press ENTER When you cancel the deletion select NO then press ENTER 5 Press NAVIGATION to return to the normal screen NOTE Even if a play list is deleted the titles recorded on a DVD disc and the library information are not affected at all Modi...

Page 71: ...te properly Register Disc 1 Load a disc you want to register 2 Press NAVIGATION The Library Database DVD Navi screen appears 3 Press rt w e to select LIBRARY then press ENTER 4 Press w e to select REGISTER then press ENTER 5 Press w e to select REGISTER then press ENTER to confirm the registration 6 Press NAVIGATION to return to the normal screen NOTES It is not possible to register discs used for...

Page 72: ...s playback from the first file of the group JPEG files are played back as a slide show at the set intervals 墌 pg 58 If a file name includes any 2 byte character the unit may not show the file name correctly Press rt to select RETURN then press ENTER to return to the screen that shows the group s The order of the groups and items shown in steps 4 and 5 may differ from the order shown on your PC Pro...

Page 73: ...can be more useful by changing your settings For DVD operations 78 For VHS operations 81 Format 89 Before you start recording on a new disc Finalise 90 To play back a disc on other DVD players Tips for your trouble 91 Specifications 95 Appendix Language code list 96 Appendix TV station and ID list 97 Appendix TV station channel number guide 98 What do you want to know Terms 99 Arrange your style N...

Page 74: ...for 1 2 for 2 3 for 3 or 4 for 4 to change the remote control code then press ENTER 2 Press 1 on the unit to turn off the unit 3 Press 4 on the unit for over 5 seconds while the unit is turned off The code currently set appears on the front display panel 4 Press 8 on the remote control to change the unit s code The code currently set on the remote control blinks on the front display panel for appr...

Page 75: ...n the unit s remote control to turn on the TV and try operations 墌 step 3 Once you have set the remote control to operate the TV you do not have to repeat this step until you replace your remote control s batteries Some brands of TVs have more than one code If the TV does not function with one code try entering another 3 Press the corresponding buttons to operate the TV 1 TV VIDEO PR TV number but...

Page 76: ...led channels 1 Set L 2 SELECT to DECODER 墌 pg 45 2 Connect your unit s L 2 IN DECODER connector to the decoder s 21 pin SCART connector using a 21 pin SCART cable Connecting To A Satellite Receiver IMPORTANT When you set L 2 SELECT to SAT VIDEO RGB 墌 pg 45 it is possible to view a satellite broadcast with the TV set to its AV mode even if the unit is turned off When the unit is in Stop mode or rec...

Page 77: ...t to the TV set as this can adversely affect the playback picture When you can t switch the audio channel of a bilingual programme When the unit is connected with a digital audio device using an optional coaxial cable and DIGITAL AUDIO OUT is set to DOLBY DIGITAL PCM it is not possible to switch the audio channel of a bilingual programme recorded on a DVD RAM or DVD RW VR mode disc In this case pe...

Page 78: ...ventional two channel stereo audio with the unit s AUDIO OUTPUT connectors connected to a stereo amplifier receiver or TV set or in case you want to record the audio from a DVD VIDEO disc to a Mini Disc etc DOLBY SURROUND Select this when listening to multichannel surround audio with the unit s AUDIO OUTPUT connectors connected to an amplifier receiver with a built in surround decoder or a surroun...

Page 79: ...LAY SET 8 SUPERIMPOSE OFF AUTO When this function is set to AUTO various operational indicators appear on the TV screen OFF To turn off superimposed indications AUTO To superimpose operational indications for approximately five seconds just after the corresponding operation NOTES Even when SUPERIMPOSE is set to OFF you can display the various operational indicators by pressing ON SCREEN To clear t...

Page 80: ...progressive format for connection to a progressive display It dramatically increases the vertical resolution 1 Press DVD so that the DVD lamp lights up on the unit 2 Press PROGRESSIVE SCAN for 3 or more seconds Video output indicator lights on the front display panel if Progressive scan mode has been established 墌 pg 14 Each press of PROGRESSIVE SCAN for 3 or more seconds switches the scan mode NO...

Page 81: ...ecord mode is first initiated It does not work during recording The B E S T system does not work while Automatic Satellite Programme Recording is in progress 墌 pg 36 In the case of timer recordings the B E S T system works before recording is initiated Once the cassette is ejected the B E S T data is cancelled The next time the cassette is used for recording B E S T is re performed Pressing the un...

Page 82: ...he tape this feature may leave a slight non recorded section at the end of the tape There may be some noise and sound disturbance at the point on the tape where the unit switches from SP to LP mode The AUTO SP LP TIMER feature is not available during ITR Instant Timer Recording and the feature will not work properly on the following tapes T ST 30 T ST 60 T ST 90 and T ST 120 You can lock the disc ...

Page 83: ... assigned TV station numbers according to broadcast area for the VIDEO Plus timer recording The Guide Program numbers can be found in most TV listings VIDEO Plus System Setup IMPORTANT Normally Auto Set Up 墌 pg 17 Preset Download 墌 pg 18 or Auto Channel Set 墌 pg 84 sets the Guide Program numbers automatically You need to set the Guide Program numbers manually only in the following cases When timer...

Page 84: ... 87 for the procedures Depending on reception conditions the stations may not be stored in order and the station names may not be stored correctly NOTES Fine tuning is performed automatically during Auto Channel Set If you want to perform tuning manually refer to Fine Tuning Channels Already Stored 墌 pg 87 If you perform Auto Channel Set when the aerial cable is not connected properly SCAN COMPLET...

Page 85: ...be changed 墌 pg 45 9 Press ENTER to enter new channel information The Confirmation screen appears Repeat steps 4 9 as necessary 10 Press SET UP to close the Confirmation screen When Auto Channel Set is completed PLEASE WAIT will be displayed for about 90 seconds since channel data is exchanged between the DVD deck and the VHS deck No operations will be done during this time To change positions see...

Page 86: ...e then press ENTER 3 Press rt w e to select the new channel position then press ENTER Example If you moved the station in position 4 to position 2 the stations originally in positions 2 and 3 each move down one space Repeat steps 2 and 3 as necessary 4 Press SET UP twice to close the Confirmation screen ENTER SET UP CANCEL SELECT WITH CURSORS THEN PRESS ENTER OK SELECT SET UP DVD SET UP FUNCTION S...

Page 87: ...s A above before continuing 2 Press rt to select ID then press ENTER 3 Press ENTER twice 4 Press w e to locate the character insertion point 5 Press rt to cycle through the characters A Z 0 9 f I space and stop when the desired character is indicated then press e to enter Enter the remaining characters the same way maximum of 4 6 After entering all characters press w e to select OK then press ENTE...

Page 88: ...ellite Programme Recording mode 墌 pg 36 DVD deck only the unit is in the Power Save mode 墌 pg 79 L 2 SELECT is set to SAT VIDEO RGB 墌 pg 45 If Just Clock is set to ON the unit s clock is automatically adjusted at the start end of Summer Time Just Clock may not function properly depending on the reception condition Just Clock The Just Clock function provides accurate time keeping through automatic ...

Page 89: ...you want to record erase or edit data on the disc repeatedly VIDEO MODE To be chosen when you want to erase all the data on the disc once played back to record new data or play back the disc on other DVD players 3 Press w e to select YES then press ENTER NOTES It is impossible to format Version 1 0 DVD RW discs in Video mode It is impossible to format DVD R discs All the titles on a disc will be d...

Page 90: ...Depending on the DVD players and DVD R RW discs used and on the conditions of recording it may not be possible to play back the discs In this case play back the discs on this unit Additional recordings become impossible Finalise A DVD R RW Disc 1 Perform steps 1 to 4 of Format A DVD RAM Disc 墌 pg 89 before continuing 2 Press rt w e to select FINALISE then press ENTER For DVD R RW Video mode discs ...

Page 91: ...urn the power on The setting of the remote control code is inappropriate To operate the unit using a JVC TV remote control set the remote control code of the unit to 1 Default 3 墌 pg 74 Playback DVD Deck The DVD deck is not selected Press VHS DVD on the unit repeatedly or DVD on the remote control so that the DVD lamp lights up on the unit The TV receiver s channel selector is not set to the AV mo...

Page 92: ...The end of the tape was reached during recording The programme may not have been recorded in its entirety Next time make sure you have enough time on the tape to record the entire programme Timer Recording DVD Deck No disc is loaded Press TIMER so that the DVD timer lamp lights off Load a recordable disc then press TIMER again Date and time is not correct Set date and time correctly 墌 pg 88 Timer ...

Page 93: ... make sure you have enough time on the tape to record the entire program Date and time set on the unit is not correct Set date and time correctly 墌 pg 88 The channel position does not correspond to that in the receiving area Set the correct channel position for the receiving broadcast 墌 pg 85 The unit s channel positions have been set incorrectly Refer to VIDEO Plus System Setup 墌 pg 83 and reperf...

Page 94: ...maged Take out the disc clean it and retry 墌 pg 9 90 During Live Memory playback 8 has been pressed 墌 pg 54 Timer recording has finished during Live Memory playback Timer recording finished during Live Memory playback then the next timer recording is about to begin while playback continues An attempt has been made to record copy protected contents An attempt has been made to record copy once conte...

Page 95: ...deo recording compression system MPEG2 CBR VBR Signal system PAL colour signal and CCIR monochrome signal 625 lines 50 fields Recording system DA4 Double Azimuth head helical scan system Format VHS PAL standard Maximum recording time SP 180 min with E 180 video cassette LP 360 min with E 180 video cassette Signal to noise ratio 45 dB Horizontal resolution 230 lines Frequency range Normal audio 70 ...

Page 96: ... LN Lingala SS Siswati CO Corsican LO Laothian ST Sesotho CS Czech LT Lithuanian SU Sundanese CY Welsh LV Latvian Lettish SW Swahili DZ Bhutani MG Malagasy TA Tamil EL Greek MI Maori TE Telugu EO Esperanto MK Macedonian TG Tajik ET Estonian ML Malayalam TH Thai EU Basque MN Mongolian TI Tigrinya FA Persian MO Moldavian TK Turkmen FJ Fiji MR Marathi TL Tagalog FO Faroese MS Malay MAY TN Setswana FY...

Page 97: ...RTE BBC BBC1 BBC2 BBCW BLN1 BLN2 BORD BR1 BR3 BRT1 BRT2 CHLD CH CNN CHNL CNTR CH 4 CH 5 DISC DRS DRTV DSF EURN EURO EURS FR1 FR2 FR3 GRNA GRMP HR1 HR3 HRT HTV ITV1 KABL LNDN MDR MTV N3 NDR1 NDR3 NED1 NED2 NED3 NET2 NRK N TV OKAN ORF1 ORF2 ORF3 OWL3 PRMI PR07 RAI1 RAI2 RAI3 ID STATION NAME RB1 RB3 Rikisutvarpid S RTBF 1 RTBF 2 RTE 1 RTL RTL 2 RTP SAT SAT 1 Scottish TV SC4 SDR SDR1 SFB1 SFB3 SKY Sky...

Page 98: ...Tacolneston 62 55 59 65 52 Midlands Ridge Hill 22 28 25 32 35 Sutton Coldfield 46 40 43 50 37 The Wrekin 26 33 23 29 35 Waltham 58 64 61 54 35 North Belmont 22 28 25 32 56 Emley Moor 44 51 47 41 37 BBC1 BBC2 ITV CH4 CH5 North West Caldbeck 30 34 28 32 56 Winter Hill 55 62 59 65 48 North East Bilsdale West Moor 33 26 29 23 35 Chatton 39 45 49 42 Pontop Pike 58 64 61 54 68 Scotland Angus 57 63 60 53...

Page 99: ...5 Manual Tracking 60 Marking Positions To Play Back Again Later 49 Menu Audio Subtitle Language Set 20 N Next Function Memory 60 O On Disc Timer Programming 32 One Touch Replay Function 54 One Touch Expert Dubbing 37 On screen Bar 55 P Pan Scan 21 PDC recording 30 Play List 68 Playback Control PBC Function 50 Programme Playback 58 72 Progressive scan 80 Q Quick Rewind A Little 59 R Random Playback...

Page 100: ...EK DR MV5BEK Filename MV5SEK_15Cov4 fm Page 100Wednesday 31 August 2005 19 58 2005 Victor Company of Japan Limited EK EN Printed in China 0905TYH AL BJ MV5SEK_00 book Page 100 Wednesday August 31 2005 7 58 PM ...

Reviews: