E-72
Synchronous Recording
VIDEO
AUDIO
IN
IN
OUT
IN
OUT
CH1
CH2
REMOTE
USB
DV IN/OUT
SIGNAL
LAN
GND
DC 19V
4dB
8dB
INPUT
LEVEL
LINE
Y/C
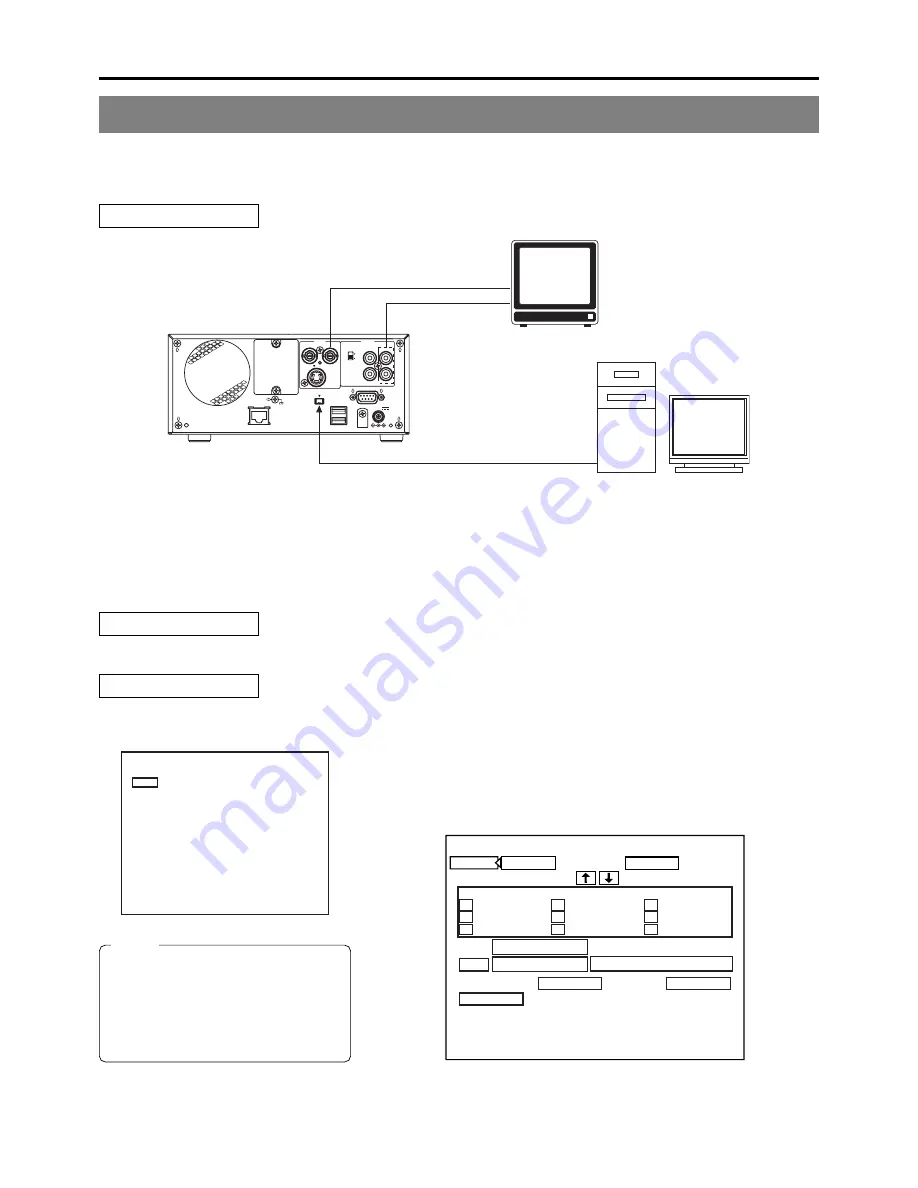
Recording Video & Audio from a Non-Linear Editor with DV Terminal
By connecting a non-linear editor featuring a DV terminal to this DVD recorder, audio and video processed using the editor can be
easily recorded to a disc. In this case, the BD-X200 will be controlled by commands from the non-linear editor, and these commands
will be communicated via the DV terminal.
Signal Connections
●
Connect the DV IN/OUT terminal on the rear of your BD-X200 to the DV terminal on the non-linear editor using a DV (IEEE1394)
cable. One of the commercially-available cables indicated above should be used for this purpose.
●
Connect the DVD recorder’s VIDEO LINE OUT and AUDIO OUT terminals to the monitor’s video in and audio in terminals.
●
The REMOTE CONTROL screen is operated from the keyboard or with a mouse. Connect the keyboard or mouse to the USB
terminal in the rear of this machine.
Setup Procedures
●
Insert a recordable disc into your BD-X200.
Settings
BD-X200
: Set REMOTE SELECT from the REMOTE MENU screen to DV (SLAVE).
●
When REMOTE SELECT is set to DV (SLAVE), the REMOTE CONTROL (DV
SLAVE) screen will appear. This screen can be used to set editing points and
chapter marks. Refer to page 74 for details regarding usage of the REMOTE
CONTROL (DV SLAVE) screen.
Monitor
REMOTE CONTROL (DV SLAVE) screen
Non-linear editor
AUDIO OUT
DV IN/OUT terminal
MENU
REMOTE SELECT
DV(SLAVE)
OFF
REC CONTROL
FF/REW
REM FF/REW MODE
REMOTE MENU
REMOTE MENU screen
IN POINT
OUT POINT
EXIT
REMOTE CONTROL SCREEN ( DV SLAVE )
1
:
4
7
h
:
m
:
s
f
2
:
5
8
3
6
9
h
:
m
:
s
f
:
h
:
m
:
s
f
CHAPTER
MANUAL
BITRATE
8.0 Mbps
DISC REMAIN
000 min
EDL
TC CANCEL
ADJ
FINALIZE
00:00:00:00
00:00:00:00
00:25:00:00
00:40:00:00
00:15:00:00
00:30:00:00
00:45:00:00
00:20:00:00
00:35:00:00
00:50:00:00
00:10:00:00
DV terminal
(video, audio, and control signals)
DV cables:
VC-VDV204 (2 m, 4P-4P) from JVC
VC-VDV206 (2 m, 4P-6P) from JVC
Rear panel
Notes
●
When pressing and holding the REC
button more than 2 seconds while the
DVD recorder is stopped, encoded
output images can be checked while the
button is being held.
●
Press the “R” key on the keyboard to
go to the EE screen.
VIDEO OUT


