background image

D-23

Deutsch

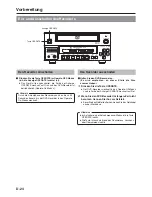
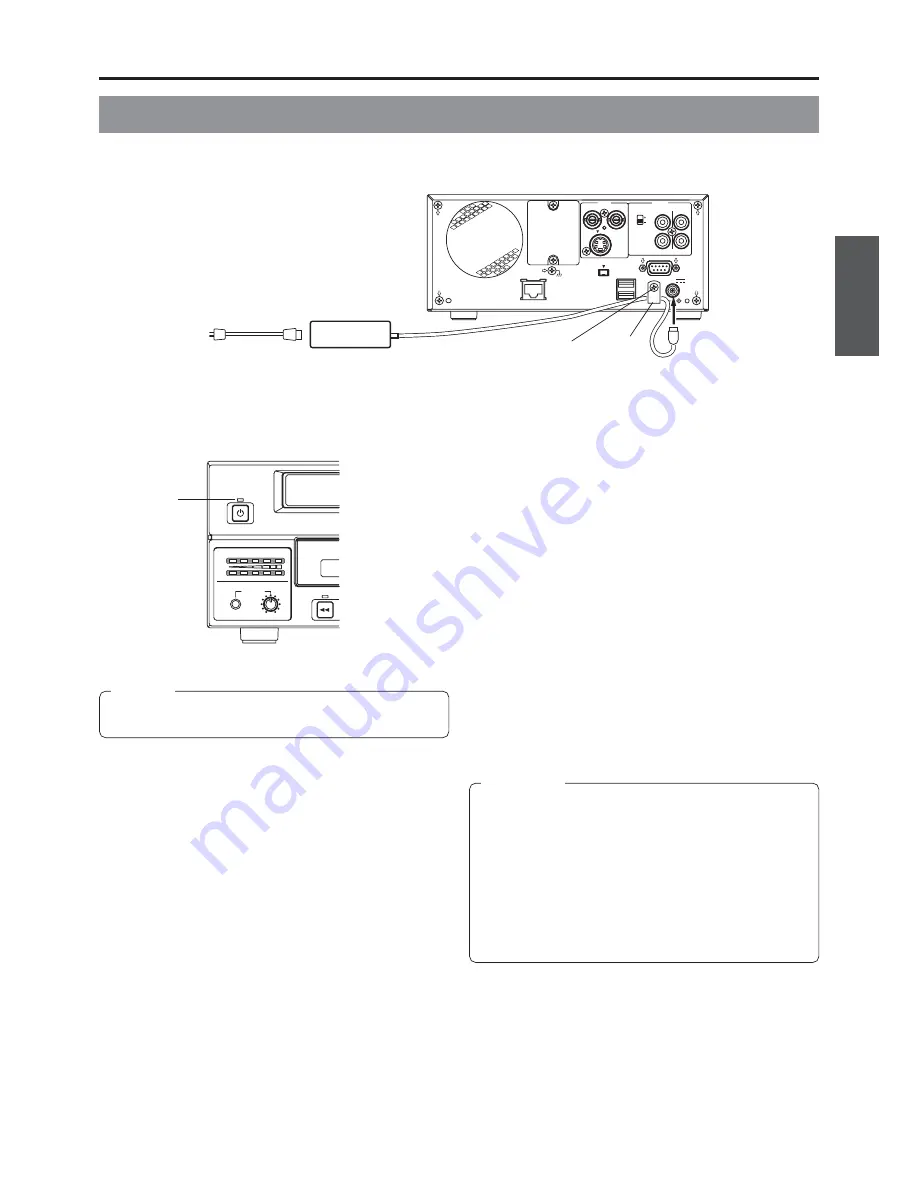
Stromanschlüsse

Schließen Sie das (mitgelieferte) Netzteil an den DVD-Recorder an.

VIDEO

AUDIO

IN

IN

OUT

IN

OUT

CH1

CH2

REMOTE

USB

DV IN/OUT

SIGNAL

LAN

GND

DC 19V

4dB

 8dB

INPUT

LEVEL

LINE

Y/C

Zugsicherung

DC IN

AC

OPERATE

PHONES

REV

AUDIO

CH1

CH2

Anzeige

OPERATE

1.

Schließen Sie das Gleichstromkabel des AC-
Adapters an den Anschluss DC IN am DVD-
Recorder an.

2.

Fixieren Sie das Gleichstromkabel mit der
Gleichstromkabel-Zugsicherung, um eine
unbeabsichtigte Unterbrechung zu vermeiden.

q

Entfernen Sie die Schraube und dann die Zugsicherung.

w

Stecken Sie das Gleichstromkabel in die Zugsicherung
und fixieren Sie dann die Zugsicherung am DVD-
Recorder.

3.

Stecken Sie das Netzkabel (mitgeliefert) in den
Anschluss AC IN des Netzteils.

4.

Stecken Sie das Netzkabel in die Steckdose.

Der DVD-Recorder wird mit Strom versorgt und die
Leuchtanzeige OPERATE leuchtet rot. (Operate-OFF-
Modus)

Netzteil

 (mitgeliefert)

Netzkabel

(mitgeliefert)

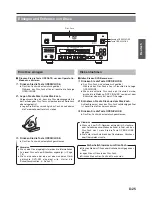
WARNUNG

Verwenden Sie immer das im Lieferumfang des DVD-
Recorders enthaltene Netzteil.
Verwenden Sie auf keinen Fall andere Stromquellen.

Trennen Sie während der Wiedergabe oder Aufnahme
nicht das Gleichstromkabel oder das Netzkabel vom
Recorder.
Wenn Sie diese Sicherheitshinweis nicht beachten,
werden die DVD-R-Discs unbrauchbar.
Bei DVD-RW-Discs müssen Sie in diesem Fall alle Daten
von der Disc löschen und die Aufnahme wieder von vorne
beginnen.

Hinweis

Der DVD-Recorder verbraucht eine geringe Menge Strom,
wenn er im Operate-Off-Modus ist.

Schraube

Summary of Contents for BD-X200E

Page 1: ...C LINE SET UP AUDIO CH1 CH2 TITLE DOLBY DIGITAL LPCMMPEG CHAPTER SET BD X200E INSTRUCTIONS A DVD RECORDER Deutsch English Français Español Italiano LLT0077 001B Thank you for purchasing this JVC product Before operating this unit please read the instructions carefully to ensure the best possible performance ...

Page 2: ...P Shielded Twist Pair cable 5 meters DV Shielded Twist Pair cable 4 meters PHONES Shielded Twist Pair cable 5 meters MIC Shielded Twist Pair cable 5 meters LAN Shielded Twist Pair cable 10 meters USB Shielded Twist Pair cable 5 meters DC 19V Shielded cable 1 2 meters The inrush current of this apparatus is 19 amperes Caution 5 Where there are strong electromagnetic waves or magnetism for example n...

Page 3: ... V to 240 V AC 50 Hz 60 Hz WARNING TO REDUCE THE RISK OF FIRE OR ELECTRIC SHOCK DO NOT EXPOSE THIS APPLIANCE TO RAIN OR MOISTURE CAUTION To prevent electric shock do not open the cabinet No user serviceable parts inside Refer servicing to qualified service personnel Note The rating plate and the safety caution are on the bottom of the unit The OPERATE button does not completely shut off mains powe...

Page 4: ... protected by US patents and intellectual property as owned by Macrovision and other copyright holders The permission of Macrovision is required in order to use this copyright protection technology and except in situations where special permission has been granted by that company said technology is restricted to domestic usage and for certain other viewing purposes The disassembly and or modificat...

Page 5: ...ames 55 Playback Playing Back a Disc before Finalizing 59 Playing Back a Finalized Disc 60 Fast Slow Playback 61 Playing the Previous or Next Chapter Title 61 Synchronous Recording Recording Playback Signals From a VCR with RS 422A 62 Recording Playback Signals From a DV Camera or VCR 63 Editing Operations on the REMOTE CONTROL 9PIN MASTER DV MASTER Screen 64 Saving and Reading Edit Lists on the E...

Page 6: ...non linear editor to a DVD In such a case the BD X200 must be setup as the control slave using menu settings The DVD recorder will be controlled by the non linear editor in this type of setup Page 73 䡵The title and chapter menus can be created either automatically or manually Page 45 Five different patterns have been provided as display styles for the title and chapter menus Each of these patterns...

Page 7: ...any other device 䡵 Before connecting the BD X200 to other devices turn those devices off and then carry out setup procedures as described in the corresponding user s manuals 䡵 The DVD drive unit is an expendable part Although the service life of the DVD drive unit differs depending on the usage environment of the customer replacement every 1000 hours as a guide is recommended Page 87 TOTAL RECORDI...

Page 8: ...cording surface when holding a disc Additional Notes on Disc Handling 䡵Never wipe a disc using paint thinners organic solvents alcohol or record cleaning fluid 䡵Do not use disc protectors or scratch guards 䡵Stickers and other types of paper label should not be applied 䡵Do not use discs from which stickers or labels have been removed 䡵Do not use discs on which illustrations or text has been printed...

Page 9: ... recording Finalizing When a DVD R or a DVD RW video mode has been finalized it can be played in the same way as any other DVD using a standard DVD player Page 44 䡵 Recording to unused sections of a disc and the modification of titles or display styles can be carried out as required before a disc is finalized In the case of both DVD Rs and DVD RWs it is impossible to overwrite previously recorded ...

Page 10: ...als CHAPTER CREATION menu settings will be required for this function Before a title is closed it will be possible to modify the style used for chapter menu display to change the thumbnails used and to input thumbnail names Before a disc is finalized it will be possible to modify the style used for the title menu and to input title names DVD R or DVD RW Title 1 Chapter 1 Chapter 2 Chapter 3 Title ...

Page 11: ...lit up or flashes when INPUT SELECT from the INPUT SELECT MENU screen has been set to OPTION This setting cannot be carried out using the DVD recorder alone 䡵 DV indicator This indicator is lit up or flashes when INPUT SELECT from the INPUT SELECT MENU screen has been set to DV Specifically the indicator is lit up when an input signal is present and it flashes when no signal is present 䡵 Y C indic...

Page 12: ...n low speed and high speed Press this button in still mode or during slow reverse play to start slow forward play If pressed during slow forward play this button toggles the speed of slow forward play between low speed and high speed The FWD indicator is lit up during fast forward and slow forward play PAUSE button and indicator When this button is pressed while recording the recorder enters the r...

Page 13: ...dio recording level for Channel 1 will decrease Similarly if the 7 button is pressed while the t button is being held the audio recording level for Channel 2 will decrease 8 button If a title menu or chapter menu is displayed this button can be used to select a menu number for playback Specifically pressing of this button moves the selection position to the left This button can be pressed while th...

Page 14: ...nnected to this terminal Status and alarm information is also displayed on screen The DISPLAY MENU screen can be used to indicate which items are to be displayed 4AUDIO INPUT LEVEL switch This switch is used to set the standard level for audio input 4dB The standard level is set to 4 dB 8dB The standard level is set to 8 dB 1 2 3 4 5 6 7 5AUDIO IN terminals RCA 2 These terminals allow analog audio...

Page 15: ... been installed Network settings must be carried out using the NETWORK MENU screen 0USB terminals 2 These terminals are used when connecting the DVD recorder to USB devices such as a keyboard or mouse A keyboard and mouse can be used as an alternative to the DVD recorder s buttons when using setting and control screens The input of text in setting screens is carried out using a keyboard It is not ...

Page 16: ...LCD display indicates the title number and chapter number currently being recorded in addition to either the elapsed title recording time or the remaining disc space The SET button can be pressed to toggle between display of the elapsed recording time and the remaining disc space in the counter area TITLE CHAP TITLE CHAP When in Playback mode the LCD display presents the title number and chapter n...

Page 17: ...rder is switching from Recording mode to Recording Pause mode REC STOP The DVD recorder is switching from Recording mode to Stop mode MENU EDIT A title menu or chapter menu is currently being edited EJECT The current disc is being ejected TITLE CLOSE The DVD recorder is performing title close processing FINALIZE The DVD recorder is finalizing the disc QUICK ERASE The DVD recorder is erasing data f...

Page 18: ...status information for display can be selected 䡵 If DISPLAY is set to OFF no status information will be displayed Status Messages 1 Data relevant to recording If the SET UP button is pressed while in Recording mode the video bit rate setting and the audio encoding format will be displayed If the SET UP button is then pressed once again this information is removed from the screen No Item Descriptio...

Page 19: ... are displayed OFF No information is displayed DATE Only the date is displayed TIME Only the time is displayed TIME DATE Both date and time are displayed The date display style can be changed using DATE STYLE from the DISPLAY MENU screen Recording mode The date and time from the internal clock are displayed Playback mode The date and time of disc finalizing are displayed Use REMAIN from the DISPLA...

Page 20: ... 0 00 00 CHAPTER 1 0 00 00 REC DVD RW The disc status is not displayed if DISPLAY from the DISPLAY MENU screen is set to OFF Status Description DVD R The current disc is a non finalized DVD R Approximately 3 seconds DVD RW The current disc is a non finalized DVD RW Approximately 3 seconds DVD The current disc is a finalized DVD R or DVD RW Approximately 3 seconds INVALID DISC The current disc is n...

Page 21: ...chapters NOT FINALIZE NoT FINAL An attempt was made to eject a disc before it was finalized A L xxxx R Set value is displayed when changing the recording level of analog audio d L xxxx R Set value is displayed when changing the recording level of digital audio DURATION OVER Auto Edit was carried out when the remaining disc space became insufficient during RS 422A or DV remote operation INVALID EDL...

Page 22: ...sult of setting ENCODE QUALITY to a low value i e 4 Mbps or lower recording content with little movement or other similar factors No error will be triggered when the time is within that set for the total content OVERHEATING oVERHEATING Displayed when the internal temperature of the set rises due to fan malfunction etc In this case immediately turn off the power and discontinue use The power will a...

Page 23: ...3 When the DVD recorder is in Stop or Recording mode the video input signal is output on the E E screen as a composite video signal In addition the Setup Menu and other setting screens are also displayed on the monitor connected to this terminal The DVD recorder s operation status and other relevant information are displayed on screen when DISPLAY from the DISPLAY MENU screen has been set to ON No...

Page 24: ...sert Delete End Home Page Up Page Down Enter 0 1 2 5 6 4 8 9 7 Num Lock 1 Q A Z X C V B N M S D F G H J K L U W E R T Y I O P 2 3 4 5 6 7 8 9 0 つ BD X200 BD X200 Note 1 In order to use the RS 422A REMOTE terminal set REMOTE SELECT from the REMOTE MENU screen to 9PIN MASTER 9PIN REC or 9PIN PLAY Note 2 In order to carry out control using the DV IN OUT terminal make the appropriate selection using R...

Page 25: ... to the DVD recorder 3 Connect the power cord included to the AC adaptor s AC IN terminal 4 Insert the power cord into an electrical outlet Power will be supplied to the DVD recorder and the OPERATE indicator will be lit up in red Operate Off mode Note A small amount of current will be required by the DVD recorder when in Operate Off mode CAUTION Always use the AC adaptor provided with the DVD rec...

Page 26: ... Note A period of 45 seconds may pass before the DVD recorder adopts Operate On mode as it prepares for operation Turning the Power Off 䡵 Stop the DVD recorder It is recommended that you eject the disc at this time 1 Press the OPERATE button The DVD recorder will adopt Operate Off mode and the colour of the OPERATE indicator will change to red 2 If the DVD recorder will not be used for an extended...

Page 27: ... DVD RW or one that has been erased on another machine is inserted quick erase starts up Page 31 Removing a Disc 䡵 Stop the DVD recorder 1 Press the OPEN CLOSE button The disc tray will open automatically While the disc tray is open the OPEN CLOSE indicator will be lit up If the current disc has not been finalized the message NOT FINALIZE will appear on both the monitor and LCD display 2 Remove th...

Page 28: ...Insert Delete End Home Page Up Page Down Enter 0 1 2 5 6 4 8 9 7 Num Lock 1 Q A Z X C V B N M S D F G H J K L U W E R T Y I O P 2 3 4 5 6 7 8 9 0 VIDEO AUDIO IN IN OUT IN OUT CH1 CH2 REMOTE USB DV IN OUT SIGNAL LAN GND DC 19V 4dB 8dB INPUT LEVEL LINE Y C 䡵 Procedure The following functions can be controlled using the keyboard and mouse USB terminals The entry of names and comments for the title an...

Page 29: ...played as highlighted w Press the SET button to open the CLOCK ADJUST MENU screen 3 Set the date and time as required q Use the 6 and 7 buttons to select either DATE or TIME Then press the SET button w Use the t and 8 buttons to select the digit to be changed The currently selected digit is displayed as highlighted text e Use the 6 and 7 buttons to change the value of the selected digit r Repeat s...

Page 30: ...ate or time are displayed TIME Only the time is displayed DATE Only the date is displayed TIME DATE Both date or time are displayed 䡵 DATE STYLE This parameter is used to select the way in which the date is to be displayed YY MM DD Year month day MM DD YY Month day year DD MM YY Day month year DISPLAY MENU screen Preparation To display date and time information on screen Set DISPLAY to ON Set TIME...

Page 31: ...rs and a single title can contain up to 99 different chapters Adding chapters A chapter mark is inserted automatically whenever recording is paused In addition CHAPTER CREATION from the RECORDER MENU 1 2 screen can also be used to setup the automatic or manual insertion of chapter marks Thumbnails i e the frame at the start of recording and backgrounds are automatically created for the title and c...

Page 32: ... starts from that title s first chapter Anew title is created in the unused section of the disc and recording starts from that title s first chapter DVD RW New content can be recorded A new title is created and recording starts from that title s first chapter Anew title is created in the unused section of the disc and recording starts from that title s first chapter Erase the recorded data as desc...

Page 33: ...is process Before starting therefore confirm that no important data is stored on this disc Under no circumstances should the power be turned off or the power cord disconnected while data is being erased Canceling the Finalization of a DVD RW When adding an extra recording to a finalized DVD RW cancel the finalization 1 Insert the DVD RW whose finalization you want to cancel 2 Press the SET UP butt...

Page 34: ...Insert a chapter TOTAL CONTENT TIME This parameter is used to make a setting relevant to the encoding or compression of video data This is used when the bit rate is automatically set using the recording time and the capacity of the disc when blank Specifically this parameter sets the recording time ENCODE QUALITY This parameter is used to manually set the bit rate for video data AUDIO ENCODE This ...

Page 35: ...ting Carry out either of the following operations Select the MENU item press the SET button to return to the set up top menu screen Press the SET UP button to return to the normal screen 䡵 DISC IN ACTION Item This is to set the operation when a finalized disc is inserted into this machine or a DVD player MENU Displays the Title menu TOP MENU screen TITLE Automatically playback title 1 䡵 TITLE END ...

Page 36: ...U INPUT SELECT LINE INPUT SELECT MENU INPUT SELECT MENU screen Video input indicators SET UP button SET button BUSY OPEN CLOSE TOP MENU MENU OPTION DV Y C LINE SET UP SET Item Description INPUT SELECT This parameter is used to select the audio and video input signals LINE The composite video signal from the VIDEO LINE IN terminal and the analog audio signals from the AUDIO IN terminals are to be u...

Page 37: ...ITY Mbps 8 0 AUDIO ENCODE DOLBY DIGITAL ASPECT AUTO RECORDER MENU 1 2 RECORDER MENU 1 2 screen SET UP button SET button BUSY OPEN CLOSE TOP MENU MENU OPTION DV Y C LINE SET UP SET Video Encoding Item Description TOTAL CONTENTS TIME If the recording time is already known in advance by setting the time with this item the BD X200 will determine the optimum encode bit rate from the remaining capacity ...

Page 38: ...e as a guide to the amount of time available for recording Notes If the SET UP button is pressed while in Recording mode the video bit rate setting and audio encoding format will be displayed on screen Press the SET UP button once again to hide this information When recording a music source it is recommended that the setting is either DOLBY DIGITAL or LPCM For MPEG there can be deterioration in th...

Page 39: ...C LINE SET UP AUDIO CH1 CH2 TITLE DOLBY DIGITAL LPCMMPEG CHAPTER SET 䡵Return from setting screens to the normal display 䡵Recording levels can be adjusted in either Stop or Recording mode Be sure to monitor the front panel s audio level indicator as the levels are being adjusted Adjust the level so that the LED on the far right does not light Buttons used Audio level indicator Adjusting both channe...

Page 40: ...Y DVD RECORDER BD X200 FWD PAUSE REC BUSY OPEN CLOSE TOP MENU MENU OPTION DV Y C LINE SET UP TITLE DOLBY DIGITAL LPCMMPEG CHAPTER SET Connect the VIDEO LINE OUT terminal to the monitor Procedure 䡵 Press and hold the REC button for at least 2 seconds while the DVD recorder is stopped or inserted with no disc While this button is being held input signal encoded decoded in MPEG will be output via the...

Page 41: ...s for thumbnails in addition to different backgrounds CHAPTER PATTERN The display pattern currently selected for chapter menus Each display pattern uses different numbers positions and sizes for thumbnails in addition to different backgrounds 4 Use the cursor buttons 6 7 t and 8 to select one of the eight style types and display the corresponding STYLE screen 5 To use a specific style select the c...

Page 42: ...3 Chapter 4 Title closing Finalizing Recording of a new title Chapter menu modification possible Title menu modification possible Processing time 30 seconds maximum Processing time several seconds several minutes Processing time 20 minutes maximum Playback possible Other DVD player Title 1 It is possible to select whether to automatically insert a chapter mark when there is a pause in the recordin...

Page 43: ...n The recording pause mode is entered When the AUTO CHAPTER REC PAUSE item of the RECORDER MENU 1 2 screen is set to ON a chapter mark is automatically inserted when the recording pause mode is entered A number of different methods can also be used for the manual or automatic insertion of chapter marks Page 42 4 Restart recording Press the PLAY or PAUSE button Recording will begin once again and a...

Page 44: ...erted by pressing the REC button while recording If chapter marks are to be inserted automatically first of all set CHAPTER CREATION to AUTO Then use SET INTERVAL to set a time in minutes for chapter mark insertion The DVD recorder will insert chapter marks at the corresponding intervals during recording 䡵Whether a chapter mark is automatically inserted or not during a recording pause is set with ...

Page 45: ...tandard settings i e the title is closed ENABLE The THUMBNAIL EDIT screen will appear This screen can be used to modify the chapter menu s display style to change the thumbnails used to input chapter names and to perform other similar functions For more details refer to page 49 䡵 If additional recording is to be carried out repeat steps 1 through 4 above In such a case each subsequent recording wi...

Page 46: ...tton The screen that will now be displayed depends on the setting of EDIT MENU from the SYSTEM MENU screen When DISABLE is set finalization starts If this is set to ENABLE a screen for editing title menus will appear Use this screen to confirm that the title menu is as required to modify the display style and to input title names Page 55 A bar showing the state of progress will be displayed during...

Page 47: ...of recording Title 2 Chapter mark Chapter mark Chapter mark Thumbnail Thumbnail Thumbnail Thumbnail Thumbnail Thumbnail Thumbnail Chapter 1 Chapter 2 Chapter 3 Chapter 1 Chapter 2 Recording Recording Notes This DVD recorder can store a total of six different display patterns for title and chapter menus At the time of purchase your BD X200 will contain five different template files Any of the store...

Page 48: ...r of the style currently selected 䡵Select STYLE and then press the SET button to display the corresponding STYLE screen TITLE PATTERN The display pattern currently selected for the title menu Each display pattern uses different numbers positions and sizes for thumbnails in addition to a different background CHAPTER PATTERN The display pattern currently selected for chapter menus Each display patte...

Page 49: ...new style will be displayed by TITLE PATTERN and CHAPTER PATTERN respectively 2 Change the display patterns for the title and chapter menus as required For example let s change the title menu s display pattern from 1 to 4 SelectTITLE PATTERN from the PRESET STYLE MENU screen and press the SET button The TITLE PATTERN screen will appear 3 Use the cursor buttons t 8 6 and 7 to select the fourth patt...

Page 50: ...to your BD X200 using a network cable thus allowing you to make imaginative and creative DVDs with the minimum of effort Easymenu can be downloaded from the following web page Please refer to the software manual for details regarding usage and precautions http www jvc victor co jp english pro prodv 䡵 Main Specifications Please refer to the above mentioned home page for the most up to date informat...

Page 51: ...HUMBNAIL EDITscreen will not be displayed In such a case title and chapter menus are created using preset settings 䡵 THUMBNAIL EDIT screen When initially displayed the THUMBNAIL EDIT screen contains thumbnails for up to six recorded chapters in the order that they were recorded The seventh and subsequent thumbnails are displayed on the following pages This initial screen can be used to change a ch...

Page 52: ...g the SET button the display moves backward by 10 frames 3 Select BACK and press the SET button to change that chapter s thumbnail The initial THUMBNAIL EDIT screen is displayed once again The thumbnail for the second chapter will have changed to that just selected Thumbnail of the title menu will be the top thumbnail of the chapter menu 1 AAA 2 BBBB 3 CCC 4 DDD 5 EEE 6 FFF TITLE CLOSE CHAPTER MEN...

Page 53: ...TLE INPUT CANCEL Enter a comment to be displayed on the chapter menu screen Enter a name for the chapter menu thumbnail Names can be up to 20 characters in length Select CANCEL and press the Enter key to close the text box without applying the name or comment that has been entered 4 After the required text has been entered press the Enter key The text box will close The field previously showing th...

Page 54: ...and press the SET button The CHAPTER MENU EDIT screen will appear 2 Select PRESET STYLE from the CHAPTER MENU EDIT screen and then press the SET button The PRESET STYLE MENU screen will appear The style number set using the PRESET STYLE parameter will be displayed in this screen 3 To change the display PATTERN Select PATTERN and then press the SET button Turn to page 46 for details regarding the e...

Page 55: ... button to return to the THUMBNAIL EDIT screen april AAA BBB CCC 4 DDD 5 EEE 6 FFF TITLE CLOSE CHAPTER MENU TEXT LOAD TEMP LOAD THUMBNAIL EDIT 1 6 2 3 THUMBNAIL EDIT START screen 1 BACK PRESET STYLE CHAPTER MENU PREVIEW CHAPTER MENU CHAPTER MENU EDIT screen 2 01 02 03 03 08 BACK 1 CHAPTER MENU PREVIEW screen 4 Notes Up to 20 seconds per page will be required to create preview displays More time ma...

Page 56: ...lectYES and then press the SET button Title closing will begin The state of progress during title closing is displayed using a progress bar TITLE CLOSE 䡵 When title closing has been completed the progress bar will disappear 1 2 Select NO and then press the SET button to close the confirmation window The title will not be closed in this case Notes A maximum of 10 minutes will be required to complet...

Page 57: ...BLE The TITLE MENU EDIT screen will be displayed when finalizing of the disc is started Changing the Display Style 1 Select PRESET STYLE from the TITLE MENU EDIT screen and press the SET button The PRESET STYLE screen will appear 2 To change the display PATTERN Select TITLE PATTERN and then press the SET button For more details regarding the editing procedure refer to page 47 The TITLE PATTERN cha...

Page 58: ...E MENU PREVIEW screen and press the SET button The TITLE MENU EDIT screen will reappear 4 If you wish to finalize the disc select FINALIZE from the TITLE MENU EDIT screen and then press the SET button Page 58 FINALIZE PRESET STYLE TITLE MENU PREVIEW EXIT TITLE TEXT INPUT TITLE MENU 01 02 03 03 08 BACK 1 FINALIZE PRESET STYLE TITLE MENU PREVIEW EXIT TITLE TEXT INPUT TITLE MENU 01 02 03 03 08 BACK 1...

Page 59: ...NPUT TITLE MENU AAA BBB CCC DDD BACK TEXT LOAD TITLE TEXT INPUT 1 6 AAA BBB CCC DDD BACK TEXT LOAD TITLE TEXT INPUT 1 6 august CANCEL TITLE INPUT AAA BBB CCC DDD BACK TEXT LOAD TITLE TEXT INPUT 1 6 august TITLE MENU EDIT screen TITLE TEXT INPUT screen Note If you select TEXT LOAD from the TITLE MENU screen and then press the SETbutton title text created using an external application will be read i...

Page 60: ...ALIZE Notes A maximum of 20 minutes will be required to complete finalizing When finalizing is carried out all of the disc s recorded video and audio are stored in accordance with the DVD Video Standard accordingly this content can then also be replayed as DVD video Although a disc finalized using this DVD recorder may in principle be played on other DVD players there is no guarantee that all of i...

Page 61: ...REV button for fast reverse playback 䡵During still or slow reverse playback press the FWD button for slow forward playback 䡵During still or slow forward playback press the REV button for slow reverse playback Every time the FWD or REV button is pressed the playback speed changes Page 61 for details CAUTION During playback of a disc if the input setting is DV then the sound can be delayed In this c...

Page 62: ...will behave as follows when title playback has ended These actions will depend on the setting made for TITLE END from the RECORDER MENU 2 2 screen during recording 6 Stop playback This is done by pressing the STOP button The DVD recorder enters Stop mode Playback starts automatically from the first title Set to MENU Enters stop mode and the title menu TOP MENU is displayed INTRODUCTION TITLE item ...

Page 63: ...䡵 Press the 8 button while the DVD recorder is playing to move playback to the start of the current chapter When the 8 button is pressed within 1 second of a chapter mark playback from the beginning of the previous chapter starts The t button is deactivated during playback of the final chapter TOP MENU MENU OPTION DV Y C LINE SET UP SET t button 8 button Note The DVD recorder can be returned to Pl...

Page 64: ...order s REMOTE CONTROL screen Signal Connections Connect the RS 422A REMOTE terminal on the rear of the DVD recorder to the remote RS 422A terminal on the VCR using an RS 422A cable Connect the DVD recorder s VIDEO LINE IN and AUDIO IN terminals to the VCR s video out and audio out terminals Connect the DVD recorder s VIDEO LINE OUT and AUDIO OUT terminals to the monitor s video in and audio in te...

Page 65: ...ard or mouse to the USB terminal in the rear of this machine Setup Procedures Insert the tape for playback into the camera or VCR Ensure that this tape contains an EBU time code Insert a recordable disc into your BD X200 Settings DV camera or VCR Enable control via DV BD X200 Set REMOTE SELECT from the REMOTE MENU screen to DV MASTER When REMOTE SELECT is set to DV MASTER the REMOTE CONTROL DV MAS...

Page 66: ...n existent number is specified it is set to 00 This item is ineffective when the DVD MENU TYPE item of the RECORDER MENU 2 2 screen is set to TOP or NONE Synchronous Recording EXIT REMOTE CONTROL SCREEN 9PIN MASTER 1 2 3 TC TC ADJ BITRATE 8 0 Mbps SET EDL FINALIZE EDIT END CANCEL No IN OUT ACTION MENU PAUSE 00 00 00 00 00 00 00 ⳮ 00 00 00 00 PAUSE 00 00 00 00 00 00 00 ⳮ 00 00 00 00 PAUSE 00 00 00 ...

Page 67: ...tton on the REMOTE CONTROL screen Select the operation button press the Enter key and the VCR starts to operate This machine is not controlled e Eject u Fast reverse or fast reverse play q Stop t Play w Pause y Fast forward or fast forward play Frame Reverse play Frame advance play The action to be taken by the DVD recorder in response to pressing of the y or u button i e FF REW or SEARCH is selec...

Page 68: ...are registered as chapters and CHAPTER is displayed in the ACTION item of the event t When necessary repeat the above procedures 3 4 y Playback the VCR and at the point where you want to finish inserting enter the still mode u Press the O key on the keyboard or select the TC SET item on the screen then press the Enter key The time code is registered in the OUT point of the final event line i The A...

Page 69: ...ION MENU STOP CHAPTER CHAPTER 00 01 01 01 02 01 03 00 00 00 00 00 01 30 00 00 02 30 00 ⳮ 00 03 30 00 ⳮ ⳮⳮⳮⳮⳮⳮⳮⳮ ⳮⳮⳮⳮⳮⳮⳮⳮ ⳮⳮ ⳮⳮ ⳮ 00h 030 min 03m 30s 00 03 30 00 CHAPTER MANUAL TOTAL DURATION DISC REMAIN SOURCE TIMECODE TC SET TC CANCEL EXIT REMOTE CONTROL SCREEN 9PIN MASTER 1 2 3 TC TC ADJ BITRATE 8 0 Mbps SET EDL FINALIZE EDIT END CANCEL No IN OUT ACTION MENU CHAPTER 01 01 01 02 01 03 00 00 00 00...

Page 70: ... Mbps SET RECORDING EDL FINALIZE EDIT END CANCEL No IN OUT ACTION MENU STOP CHAPTER CHAPTER 00 01 01 01 02 01 03 00 00 00 00 00 01 30 00 00 02 30 00 ⳮ 00 03 30 00 ⳮ ⳮⳮⳮⳮⳮⳮⳮⳮ ⳮⳮⳮⳮⳮⳮⳮⳮ ⳮⳮ ⳮⳮ ⳮ 00h 030 min 03m 30s 00 03 30 00 CHAPTER MANUAL TOTAL DURATION DISC REMAIN SOURCE TIMECODE EDIT END item EDL item 5 Saving event data Event data can be saved as an edit list EDL on the EDL MANAGER screen of thi...

Page 71: ...R MANUAL TOTAL DURATION DISC REMAIN SOURCE TIMECODE EDL EDL01 S M EDL02 EDL03 EDL04 EDL05 EDL06 EDL07 EDL08 EDL09 EDL10 BACK SAVE IMPORT LOAD DELETE NAME MANAGER 3 1 2 EDL item EDL MANAGER screen EDL item Function item Method of operation Select the EDL item to be used next select the function item then execute Example Save the current setting value of the REMOTE CONTROL screen as EDL08 1 Select t...

Page 72: ...ayed IMPORT When the EDL item is highlighted and this item is pressed EDL imported from EasyMenu or other external edit lists are registered Page 71 DELETE When the EDL item is highlighted and this item is pressed the selected EDL item is deleted About EDL In SLAVE mode CSV files and SONY format EDL files can be used In MASTER mode only CSV files can be used CSV files have the same file name for b...

Page 73: ... POINT OUT POINT EXIT REMOTE CONTROL SCREEN DV SLAVE 1 4 7 h m s f 2 5 8 3 6 9 h m s f h m s f CHAPTER MANUAL BITRATE 8 0 Mbps DISC REMAIN 000 min EDL TC CANCEL ADJ FINALIZE 00 00 00 00 00 10 00 00 00 40 00 00 00 20 00 00 00 30 00 00 01 10 00 00 00 50 00 00 JVC CSV IN POINT OUT POINT Chapter1 Chapter2 Chapter3 Chapter4 Chapter5 00 00 00 00 01 00 00 00 00 10 00 00 00 20 00 00 00 30 00 00 00 40 00 0...

Page 74: ...rocedures Insert a recordable disc into your BD X200 Settings BD X200 Set REMOTE SELECT from the REMOTE MENU screen to DV SLAVE When REMOTE SELECT is set to DV SLAVE the REMOTE CONTROL DV SLAVE screen will appear This screen can be used to set editing points and chapter marks Refer to page 74 for details regarding usage of the REMOTE CONTROL DV SLAVE screen Monitor REMOTE CONTROL DV SLAVE screen N...

Page 75: ...video audio output terminal of this machine with the video audio input terminal of the monitor The REMOTE CONTROL screen can be operated from either a keyboard or a mouse Connect the keyboard or the mouse to the USB terminal in the rear of this machine Preparation Insert a recordable disc into this machine Setting This machine s settings Set the REMOTE SELECT item of the REMOTE MENU screen to 9PIN...

Page 76: ...you want to finish recording hour minute second frame is input from the keyboard Scrolls the chapter list DISC REMAIN This field shows an estimate of the remaining space for recording on the disc FINALIZE This button is used to finalize the disc TC CANCEL This button is used to remove setting values for the In Point Out Point and chapter marks EDL Calls up the EDL MANAGER screen Edit lists can be ...

Page 77: ...2 Deleting the In Point Out Point and Chapter Marks q Press the cursor keys to move the cursor to the point you want to delete IN POINT OUT POINT or chapter point then press the Enter key w Press the cursor keys to move the cursor to the TC CANCEL item on the screen then press the Enter key The selected point i e In Point Out Point or a chapter mark from the chapter list will be deleted Whenever a...

Page 78: ...ress the Enter key and the EDL MANAGER screen will be displayed Refer to page 69 for details on how to use the EDL MANAGER screen Synchronous Recording 6 Ending the Record Process FINALIZE 䡵 If you intend to play the recorded disc on this DVD recorder or on another player select FINALIZE and press the SET button Once finalizing has been carried out no addition recordings can be made on the disc 䡵 ...

Page 79: ... One of the commercially available cables indicated above should be used for this purpose Connect the DVD recorder s VIDEO LINE OUT and AUDIO OUT terminals to the monitor s video in and audio in terminals Setup Procedures Insert a recordable disc into your BD X200 Settings GY DV5000 or GY DV5001 Set DV REC TRIGGER from the OTHERS MENU 1 2 screen to ON BD X200 Set REMOTE SELECT from the REMOTE MENU...

Page 80: ...EM VIDEO AUD 1 AUD 2 SPLIT TC SPLIT CANCEL LAST ED REC EE OUT IN OUT IN ENTRY PREVIEW AUTO EDIT GOTO REVIEW SHIFT ALL STOP MAX MIN MONITOR MAX MIN MONITOR FWD REV STILL X 1 X1 FWD REV STILL X 1 X1 RECORDER PLAYER HOUR MIN SEC FRAME HOUR MIN SEC FRAME P R VITC LTC CTL VITC LTC CTL BUMP PREROLL 7 5 3 ON OFF EVENT No V SPEED A SPLIT DURATION IN OUT IN OUT E D I T I N G C O N T R O L U N I T R M G 8 2...

Page 81: ...onnection and disconnection of cables should be carried out with the power turned off 䡵 Direct connection of two BD X200s Connect an Ethernet cable between the LAN terminals of the sender and receiver devices A Category 5 cross wired Ethernet cable should be used in this case VIDEO AUDIO IN IN OUT IN OUT CH1 CH2 REMOTE USB DV IN OUT SIGNAL LAN GND DC 19V 4dB 8dB INPUT LEVEL LINE Y C VIDEO AUDIO IN...

Page 82: ...s the SET button or the ENTER key 5 Press the SET UP button to return to the normal screen display Dubbing DVDs Using the LAN Terminal continued Network Settings Use the following procedure to carry out network settings on both the sender and receiver devices BUSY OPEN CLOSE TOP MENU MENU OPTION DV Y C LINE SET UP SET MENU HOST NAME bdx200 STATIC IP ADDRESS SETTING 255 255 255 0 192 168 0 254 192 ...

Page 83: ...ress of the sender device Use the t and 8 cursor buttons to select the digit to be changed Press the cursor 6 7 buttons to set the value of the selected digit Repeat the above for all digits select SET using the 8 t buttons and press the SET button The sender device IP address set using this dialog box will be registered as the most up to date address on the receiver device DVD DVD RECEIVER Search...

Page 84: ... SENDER RECEIVER Searching SENDER IP ADDRESS 192 168 000 002 ABORT DVD DVD SENDER DUBBING ABORT DVD DVD RECEIVER DUBBING ABORT MENU DVD DVD EXECUTE DUBBING DVD DVD SENDER DUBBING START SENDER IP ADDRESS 192 168 000 002 RECEIVER IP ADDRESS 192 168 000 003 EXECUTE CANCEL Notes Dubbing will not be carried out if CANCEL is selected from the confirmation box for the start of dubbing When dubbing a comp...

Page 85: ...F FACTORY SETTING CANCEL KEYBOARD STYLE ENGLISH EDIT MENU ENABLE TOTAL RECORDING TIME 5 Hour 30 Min SYSTEM MENU MENU CHAPTER CREATION MANUAL SET INTERVAL Every05Min TOTAL CONTENTS TIME 01Hour 08Min AUTO CHAPTER REC PAUSE ON ENCODE QUALITY Mbps 8 0 AUDIO ENCODE DOLBY DIGITL ASPECT AUTO RECORDER MENU 1 2 BACK Y C TERMINAL MODE S1 THUMBNAIL FORM NORMAL AUDIO CHANNEL DV AUDIO REC VOLUME MODE BOTH DISC...

Page 86: ...ccordingly r Repeat steps q through e until all of the required settings have been made 䡵 To return to the Setup Menu select MENU and press the SET button 䡵 To move to the next menu screen select the button at the top of the current screen and press the SET button 䡵 To return to the original menu screen select either MENU or BACK and press the SET button 4 Use either of the following methods to re...

Page 87: ...tyles This buttons opens a RECORDER MENU screen containing two different pages of parameters The RECORDER MENU 1 2 screen allows settings to be made for the chapter creation method and the encoding of audio and video The RECORDER MENU 2 2 screen allows the settings required for recording to be made This button opens a menu that allows settings to be made for remote operations via the DVD recorder ...

Page 88: ...ed is shorter than a full erase and the disc data is deleted CANCEL Do not do a quick erase EXECUTE Do a quick erase The disc can be newly recorded from the beginning Select whether to carry out a full erase on a DVD RW video mode All areas of a DVD RW disc are deleted If a disc is to be used repeatedly delete using this item CANCEL Do not do a full erase EXECUTE Do a full erase The disc can be ne...

Page 89: ...s used to indicate whether or not all setup menu parameters are to be returned to their default settings CANCEL Default settings are not to be restored EXECUTE Default settings are to be restored This parameter is set when using a USB keyboard and its purpose is to indicate the keyboard s layout or language as one of the following ENGLISH FRENCH ITALIAN GERMAN SPANISH JAPANESE Note The system must...

Page 90: ...ment This parameter is used to open the CHAPTER PATTERN screen That screen can then be used to select a display pattern for the chapter menus BACK Returns to the PRESET STYLE menu screen 6 cannot be selected when setting for factory shipment This button is used to return to the Setup Menu screen RECORDER MENU Screen The following table identifies and describes the parameters that may be set using ...

Page 91: ... that can be recorded reduces When the setting value of this item is changed the TOTAL CONTENTS TIME item is automatically set The setting range varies depending upon the AUDIO ENCODE item setting LPCM 4 0 to 7 8Mbps in 0 2 Mbps steps DOLBY DIGITAL 2 0 to 9 0Mbps in 0 2 Mbps steps MPEG 2 0 to 9 0 Mbps in 0 2 Mbps steps This parameter is used to set the encoding format for audio data LPCM Linear PC...

Page 92: ... this case the top bottom left and right of the video content is to be removed to form thumbnails LETTER BOX This parameter is to be set when recording an audio signal from the DV IN OUT terminal Specifically it indicates whether the signals from channels 1 and 2 or from channels 3 and 4 are to be recorded Only available for 32 kHz 1 2ch 1 2ch Channels 1 and 2 are to be recorded 3 4ch 3 4ch Channe...

Page 93: ...iggering function and it allows this DVD recorder to record video from the camera in response to operation of its trigger button Note When setting this item to 9PIN MASTER DV MASTER 9PIN REC or DV SLAVE the video output image becomes the REMOTE CONTROL screen display However video input can be checked by press and holding the REC button while DVD Recorder is stopped and viewing the encode output T...

Page 94: ...at nothing will be displayed when OFF has been set for the DISPLAY parameter This parameter is used to indicate whether or not the current date and or time are to be displayed on screen OFF No such information is to be displayed on screen DATE Only the date is to be displayed TIME Only the time is to be displayed TIME DATE Both date and time are to be displayed When the DVD recorder is stopped or ...

Page 95: ...return to the Setup Menu screen DUBBING Screen The following table identifies and describes the parameters that may be set using the DUBBING screen Top half Appearance on monitor screen Bottom half Appearance on LCD display Default setting Parameter Possible settings Description DVD DVD CANCEL EXECUTE dub CAN EXE MENU This parameter is to be selected to enable DVD to DVD dubbing via the LAN termin...

Page 96: ...th Alphanumerical characters and hyphen CANCEL Cancel setting the host name This parameter is used to set the IP address It is important to ensure that no two devices on a single network share the same IP address This parameter is used to set the subnet mask Connected BD X200s should have the same network setting This parameter is used to set the gateway address Connected BD X200s should have the ...

Page 97: ...bit Sampling rate 48 kHz Number of channels 2 䡵 DV Interface I O IEEE1394 䡵 External Dimensions Unit mm 䡵 General Network terminal RJ 45 Category5 100 BASE Tx USB terminal USB 1 1 2 Power supply 19 V DC Power consumption 31 W 1 63 A Weight 4 5 kg device only Dimensions 212 mm w 352 mm d 88 mm h not including feet and other protrusions Permissible operating temperature 5 C to 35 C Permissible opera...

Page 98: ...ANLEITUNG A DVD RECORDER Deutsch OPERATE PHONES REV STOP PLAY DVD RECORDER BD X200 FWD PAUSE REC BUSY OPEN CLOSE TOP MENU MENU OPTION DV Y C LINE SET UP AUDIO CH1 CH2 TITLE DOLBY DIGITAL LPCMMPEG CHAPTER SET LLT0077 001B ...

Page 99: ...Kabel 10 m REMOTE 9P Abgeschirmtes verdrilltes Doppelkabel 5 m DV Abgeschirmtes verdrilltes Doppelkabel 4 m PHONES Abgeschirmtes verdrilltes Doppelkabel 5 m MIC Abgeschirmtes verdrilltes Doppelkabel 5 m LAN Abgeschirmtes verdrilltes Doppelkabel 10 m USB Abgeschirmtes verdrilltes Doppelkabel 5 m DC 19V Abgeschirmtes Kabel 1 2 m Der Einschaltstoßstrom für dieses Gerät beträgt 19 Ampere Vorsicht 5 Be...

Page 100: ...m elektrische Schläge zu vermeiden das Gehäuse nie öffnen Im Innern befinden sich keine Teile die vom Benutzer gewartet werden können Überlassen Sie die Wartung qualifiziertem Service Personal Hinweis Das Typenschild und die Sicherheitshinweise befinden sich auf der Unterseite des Geräts Mit der Taste OPERATE wird nur die Betriebsspannung des Geräts ein und ausgeschaltet jedoch wird dadurch die Sp...

Page 101: ...eberrechtsschutz die durch Verfahrensansprüche gewisser US Patente und sonstiger Rechte geistigen Eigentums der Macrovision Corporation und anderer Rechtseigentümer geschützt sind Der Gebrauch dieser Kopierschutzverfahren muss von der Macrovision Corporation genehmigt werden und gilt nur für den privaten und anderen eingeschränkten Gebrauch es sei denn es liegt eine spezielle Genehmigung der Macro...

Page 102: ...lisierung 59 Wiedergeben einer finalisierten Disc 60 Schnelle und langsame Wiedergabe 61 Wiedergeben des vorherigen oder des nächsten Kapitels Titels 61 Synchronaufnahme Aufnehmen von Wiedergabesignalen eines Videorecorders mit RS 422A Anschluss 62 Aufnehmen von Wiedergabesignalen einer DV Kamera oder eines Videorecorders 63 Bearbeitungsvorgänge im Bildschirmmenü REMOTE CONTROL 9PIN MASTER DV MAST...

Page 103: ... Dazu muss der BD X200 für die Steuerung als Slave Gerät eingerichtet sein mithilfe der Menüeinstellungen Der DVD Recorder wird bei dieser Einstellung über den nicht linearen Editor gesteuert Seite 73 䡵DieTitel und Kapitelmenüs können entweder automatisch oder manuell erstellt werden Seite 45 Es stehen fünf verschiedene Vorlagen für die Darstellung der Titel und Kapitelmenüs zur Verfügung Jede die...

Page 104: ...n andere Geräte anschließen schalten Sie diese Geräte aus und befolgen Sie die Installationsanweisungen in den jeweiligen Benutzerhandbüchern 䡵 Die DVD Antriebseinheit ist ein Verschleißteil Da die Lebensdauer der DVD Antriebseinheit von der jeweiligen Benutzung durch den Kunden abhängt empfehlen wir als Richtlinie die Einheit alle 1000 Stunden auszutauschen Seite 87 TOTAL RECORDING TIME Sicherhei...

Page 105: ...isc niemals mit Farbverdünner organischen Lösungsmitteln Alkohol oder Schallplattenreiniger ab 䡵Benutzen Sie kein Disc Zubehör wie Reinigungs und Schutzflüssigkeiten 䡵Kleben Sie weder Etiketten noch anderen Klebefilm auf die Disc 䡵Verwenden Sie keine Discs von denen Etiketten oder anderer Klebefilm entfernt wurde 䡵Verwenden Sie keine Discs auf die Bilder oder Text mit einem handelsüblichen Etikett...

Page 106: ...ne DVD RW Video Modus finalisiert wurde kann sie wie jede andere DVD auch in einem herkömmlichen DVD Player abgespielt werden Seite 44 䡵 Das Bespielen von noch leeren Sektionen einer Disc und die Änderung der Titel oder Darstellungsweise kann vor dem Finalisieren einer Disc vorgenommen werden Bei DVD Rs und DVD RWs ist es nicht möglich vorher aufgenommene Daten mit neuen Daten zu überschreiben auc...

Page 107: ...elmäßigen Abständen einfügen Sie müssen dafür Einstellungen im CHAPTER CREATION Menü vornehmen Bevor Sie einen Titel abschließen können Sie noch die Darstellungsweise für das Kapitelmenü und die Vorschaubilder ändern sowie Namen für die Vorschaubilder eingeben Bevor Sie die Disc finalisieren können Sie noch die Darstellungsweise für die Titelmenüs ändern sowie Titelnamen eingeben DVD Rs oder DVD R...

Page 108: ...tellung ist nicht möglich wenn Sie den DVD Recorder ohne ein angeschlossenes Gerät betreiben 䡵 Anzeige DV Diese Anzeige leuchtet oder blinkt wenn Sie im Bildschirmmenü INPUT SELECT MENU im Menüpunkt INPUT SELECT die Option DV ausgewählt haben Diese Anzeige leuchtet insbesondere immer dann wenn ein Eingangssignal vorhanden ist Wenn kein Signal vorhanden ist blinkt die Anzeige 䡵 Anzeige Y C DieAnzei...

Page 109: ...während der Wiedergabe oder im Schnellrücklauf Modus drücken wechselt der DVD Recorder in den Schnellvorlauf Wird diese Taste während des Schnellvorlaufs gedrückt ändert sich die Geschwindigkeit des Schnellvorlaufs Wenn Sie diese Taste im Standbildmodus oder während des langsamen Rücklaufs drücken wechselt der DVD Recorder in den langsamen Vorlauf Wird diese Taste während des langsamen Vorlaufs ge...

Page 110: ... REC VOLUME MODE die Option INDEPENDENCE auswählen und dabei die Taste 7 drücken und gleichzeitig die Taste 8 gedrückt halten wird der Tonaufnahmepegel für Kanal 1 verringert Wenn Sie die Taste 7 drücken und dabei die Taste t gedrückt halten verringert sich der Tonaufnahmepegel für Kanal 2 8 links Taste Wenn ein Titel oder ein Kapitelmenü angezeigt wird können Sie mit dieser Taste die Menünummer f...

Page 111: ...tatus und Alarminformationen werden auch auf dem Bildschirm angezeigt Im Bildschirmmenü DISPLAY MENU können Sie auswählen welche Informationen Sie auf dem Bildschirm sehen möchten 1 2 3 4 5 6 7 4Schalter AUDIO INPUT LEVEL Mit diesem Schalter können Sie den Standard Pegel für den Audio Eingang einstellen 4dB Der Standard Pegel ist auf 4 dB eingestellt 8dB Der Standard Pegel ist auf 8 dB eingestellt...

Page 112: ...enus installiert ist Die Netzwerkeinstellungen können Sie im Bildschirmmenü NETWORK MENU vornehmen 0USB Anschlüsse 2 Mit diesen Anschlüssen können Sie den DVD Recorder an ein USB Gerät wie z B eine Tastatur oder eine Maus anschließen Anstelle der Tasten am DVD Recorder können Sie die Einstellungs und Steuerungsmenüs auch über die Tastatur und die Maus bedienen Mit der Tastatur können Sie Text in d...

Page 113: ...tel und Kapitelnummer die aktuell aufgenommen wird angezeigt Zusätzlich wird entweder die abgelaufene Titel Aufnahmezeit oder der noch freie Platz auf der Disc angezeigt Mit der Taste SET können Sie zwischen der Anzeige für die abgelaufene Aufnahmezeit und dem noch freien Speicherplatz auf der Disc im Zählerbereich wechseln TITLE CHAP TITLE CHAP Im Wiedergabemodus wird die Titel und Kapitelnummer ...

Page 114: ...m Aufnahmemodus zum Aufnahmepause Modus REC STOP Der DVD Recorder wechselt vom Aufnahmemodus zum Stoppmodus MENU EDIT Ein Titel oder Kapitelmenü wird gerade bearbeitet EJECT Die aktuelle Disc wird ausgeschoben TITLE CLOSE Der DVD Recorder schließt gerade einen Titel ab FINALIZE Der DVD Recorder finalisiert die Disc QUICK ERASE Der DVD Recorder löscht Daten von einer DVD RW Disc FULL ERASE Der DVD ...

Page 115: ...rmationen oder Statusanzeigen angezeigt werden sollen 䡵 Wenn Sie im Menüpunkt DISPLAY die Option OFF wählen werden keine Statusinformationen angezeigt Statusmeldungen 1 Informationen zur Aufnahme Wenn Sie die Taste SET UP im Aufnahmemodus drücken wird die Bitrate und das Audio Kodierungsformat angezeigt Wenn Sie die Taste SET UP dann erneut drücken werden diese Informationen nicht mehr angezeigt N...

Page 116: ...zeigt TIME Nur die Uhrzeit wird angezeigt TIME DATE Sowohl Datum als auch Uhrzeit werden angezeigt Das Anzeigeformat kann im Bildschirmmenü DISPLAY MENU im Menüpunkt DATE STYLE geändert werden Aufnahmemodus Das Datum und die Uhrzeit der integrierten Uhr werden angezeigt Wiedergabemodus Das Datum und die Uhrzeit der Disc Finalisierung werden angezeigt Stellen Sie im Bildschirmmenü DISPLAY MENU im M...

Page 117: ...C DVD RW Dieser Disc Status wird nicht angezeigt wenn Sie im Bildschirmmenü DISPLAY MENU im Menüpunkt DISPLAY die Option OFF gewählt haben Status Beschreibung DVD R Die aktuelle Disc ist eine nicht finalisierte DVD R Circa 3 Sekunden DVD RW Die aktuelle Disc ist eine nicht finalisierte DVD RW Circa 3 Sekunden DVD Die aktuelle Disc ist eine finalisierte DVD R oder DVD RW Circa 3 Sekunden INVALID DI...

Page 118: ...ohl sie noch nicht finalisiert wurde A L xxxx R Der gewählte Wert wird angezeigt wenn der Aufnahmepegel von analogen Audiodaten geändert wird d L xxxx R Der gewählte Wert wird angezeigt wenn derAufnahmepegel von digitalenAudiodaten geändert wird DURATION OVER Auto Edit wurde ausgeführt als bei einem RS 422A oder einem DV Remote Betrieb der verbleibende Speicherplatz auf der Disc nicht mehr ausreic...

Page 119: ...niedriger Wert d h 4 Mbps oder niedriger festgelegt wurde Inhalt mit wenig Bewegung aufgenommen wurde oder ähnliche Gründe bestanden Es wird kein Fehler ausgegeben wenn die Zeit innerhalb der festgelegten Gesamtzeit ist OVERHEATING oVERHEATING Wird angezeigt wenn die innere Temperatur der Einheit z B aufgrund einer Fehlfunktion des Lüfters ansteigt In diesem Fall schalten Sie den DVD Recorder sofo...

Page 120: ... im Aufnahmemodus befindet wird das Video Eingangssignal direkt als Composite Video Signal an diesen Ausgang weitergeleitet Zusätzlich werden die Anzeigen des Setup Menu und andere Einstellungsmenüs auf dem Bildschirm angezeigt der an diesenAnschluss angeschlossen ist Der Betriebzustand und andere relevante Informationen werden auf dem Bildschirm angezeigt wenn im Bildschirmmenü DISPLAY MENU im Me...

Page 121: ...2 5 6 4 8 9 7 Num Lock 1 Q A Z X C V B N M S D F G H J K L U W E R T Y I O P 2 3 4 5 6 7 8 9 0 つ BD X200 BD X200 Hinweis 1 Um den Anschluss RS 422A REMOTE zu verwenden setzen Sie REMOTE SELECT im Bildschirmmenü REMOTE MENU auf 9PIN MASTER 9PIN REC oder 9PIN PLAY Hinweis 2 Um die Steuerung über den Anschluss DV IN OUT durchzuführen wählen Sie die entsprechenden Einstellungen im Bildschirmmenü REMOT...

Page 122: ...rung am DVD Recorder 3 Stecken Sie das Netzkabel mitgeliefert in den Anschluss AC IN des Netzteils 4 Stecken Sie das Netzkabel in die Steckdose Der DVD Recorder wird mit Strom versorgt und die Leuchtanzeige OPERATE leuchtet rot Operate OFF Modus Netzteil mitgeliefert Netzkabel mitgeliefert WARNUNG Verwenden Sie immer das im Lieferumfang des DVD Recorders enthaltene Netzteil Verwenden Sie auf keine...

Page 123: ...s Hinweis Durch die Anlaufphase des Recorders kann es bis zu 45 Sekunden dauern bis der DVD Recorder in den Operate On Modus wechselt Den Recorder ausschalten 䡵 Halten Sie den DVD Recorder an Es wird empfohlen an dieser Stelle die Disc auszuschieben 1 Drücken Sie die Taste OPERATE Der DVD Recorder wechselt in den Operate Off Modus und die Farbe der Anzeige OPERATE wechselt auf Rot 2 Wenn Sie den D...

Page 124: ...enn eine neue oder eine auf einem anderen Gerät gelöschte DVD RW eingelegt wird startet die Schnelllöschfunktion Seite 31 Disk entnehmen 䡵 Halten Sie den DVD Recorder an 1 Drücken Sie die Taste OPEN CLOSE Das Disc Fach wird automatisch geöffnet Während das Disc Fach offen ist leuchte die Anzeige OPEN CLOSE Wenn die aktuelle Disc noch nicht finalisiert wurde erscheint die Meldung NOT FINALIZE sowoh...

Page 125: ...lt Alt Enter Back Space Insert Delete End Home Page Up Page Down Enter 0 1 2 5 6 4 8 9 7 Num Lock 1 Q A Z X C V B N M S D F G H J K L U W E R T Y I O P 2 3 4 5 6 7 8 9 0 VIDEO AUDIO IN IN OUT IN OUT CH1 CH2 REMOTE USB DV IN OUT SIGNAL LAN GND DC 19V 4dB 8dB INPUT LEVEL LINE Y C 䡵 Vorgehensweise Sie können die folgenden Funktionen mit der Tastatur und der Maus ausführen USB Anschlüsse Namen und Kom...

Page 126: ... ausgewählte Menüpunkt wird unterlegt angezeigt w Drücken Sie die Taste SET um das Bildschirmmenü CLOCK ADJUST MENU zu öffnen 3 Stellen Sie das gewünschte Datum und die Uhrzeit ein q Wählen Sie mit den Tasten 6 und 7 entweder die Option DATE oder TIME Drücken Sie dann die Taste SET w Wählen Sie mit den Tasten t und 8 die Zahl aus die Sie ändern wollen Die aktuell ausgewählte Zahl wird als hinterle...

Page 127: ... OFF Weder Datum noch Uhrzeit werden angezeigt TIME Nur die Uhrzeit wird angezeigt DATE Nur das Datum wird angezeigt TIME DATE Sowohl Datum als auch Uhrzeit werden angezeigt 䡵 DATE STYLE Mit diesem Parameter legen Sie fest wie das Datum angezeigt werden soll YY MM DD Jahr Monat Tag MM DD YY Monat Tag Jahr DD MM YY Tag Monat Jahr Bildschirmmenü DISPLAY MENU Vorbereitung Anzeigen des Datums und der ...

Page 128: ...apitel enthalten Kapitel hinzufügen Es wird automatisch eine Kapitelmarkierung einfügt wenn die Aufnahme unterbrochen wird Zusätzlich können Sie auch im Bildschirmmenü RECORDER MENU 1 2 im Menüpunkt CHAPTER CREATION das automatische oder manuelle Einfügen der Kapitelmarkierung einstellen Die Vorschaubilder d h die Bilder am Anfang der Aufnahme und die Hintergründe können für dieTitel und Kapitelme...

Page 129: ...r unbenutzten Sektion der Disc aufgenommen und die Aufnahme beginnt ab dem ersten Kapitel dieses Titels DVD RW Neue Daten können aufgenommen werden Ein neuer Titel wird aufgenommen und die Aufnahme beginnt ab dem ersten Kapitel dieses Titels Ein neuer Titel wird in der unbenutzten Sektion der Disc aufgenommen und die Aufnahme beginnt ab dem ersten Kapitel dieses Titels Löschen Sie die aufgenommene...

Page 130: ...aten gelöscht werden MENU FINALIZE CANCEL CANCEL CANCEL CANCEL DISC FINALIZATION EXECUTE DISC ERASE DISC ERASE DISC MENU QUICK FULL DISC ERASE QUICK HINWEIS Wenn eine neue oder eine auf einem anderen Gerät gelöschte DVD RW eingelegt wird startet die Schnelllöschfunktion Rückgängigmachen der Finalisierung einer DVD RW Wenn Sie eine weitere Aufnahme zu einer finalisierten DVD RW hinzufügen möchten m...

Page 131: ...atisch ein neues Kapitel beginnen soll OFF Es beginnt kein neues Kapitel ON Ein neues Kapitel beginnt TOTAL CONTENT TIME Mit diesem Parameter können Sie Einstellungen für die Kodierung oder Kompression der Videodaten vornehmen Wird verwendet wenn die Bitrate anhand der Aufnahmezeit und der Kapazität der leeren Disc automatisch gewählt wird Mit diesem Parameter können Sie insbesondere die Aufnahmez...

Page 132: ...ngs Führen Sie einen der folgenden Vorgänge aus Wählen Sie den Menüpunkt MENU und drücken Sie die Taste SET um zum obersten Setup Bildschirmmenü zurückzukehren Drücken Sie die Taste SET UP um zum normalen Bildschirm zurückzukehren 䡵 Menüpunkt DISC IN ACTION Dient zum Einstellen des auszuführenden Vorgangs wenn eine finalisierte Disc in dieses Gerät oder einen DVD Player eingelegt wird MENU Zeigt d...

Page 133: ... MENU INPUT SELECT LINE INPUT SELECT MENU Bildschirmmenü INPUT SELECT MENU Video Eingangssignal Anzeige Taste SET UP Taste SET BUSY OPEN CLOSE TOP MENU MENU OPTION DV Y C LINE SET UP SET Feld Beschreibung INPUT SELECT Mit diesem Parameter wählen Sie die Audio und Video Eingangssignale aus LINE Das Composite Video Signal desAnschlusses VIDEO LINE IN und das analoge Audiosignal des Anschlusses AUDIO...

Page 134: ... OPTION DV Y C LINE SET UP SET Video Kodierung Feld Beschreibung TOTAL CONTENTS TIME Ist dieAufnahmezeit bereits vorher bekannt können Sie mit diesem Menüpunkt die Zeit einstellen Der BD X200 bestimmt dann die optimale Codierungsbitrate anhand der verbleibenden Kapazität auf der leeren Disc sowie der Aufnahmezeit Wenn Sie dieAufnahmezeit mit diesem Parameter eingestellt haben wird die Funktion ENC...

Page 135: ...den Sie die folgende Liste als Leitfaden für die verfügbare Aufnahmezeit Audio Kodierungsformat Kodierungs Bitrate 9 Mbps 8 Mbps 7 Mbps 6 Mbps 5 Mbps 4 Mbps 3 Mbps 2 Mbps DOLBY DIGITAL 62 min 69 min 78 min 89 min 104 min 126 min 160 min 218 min MPEG 63 min 70 min 79 min 91 min 107 min 130 min 167 min 231 min LPCM 68 min 77 min 88 min 102 min Hinweise Wenn Sie die Taste SET UP im Aufnahmemodus drüc...

Page 136: ...auf dass Sie die Tonpegelanzeigen an der Vorderseite des DVD Recorders überwachen während Sie die Pegel anpassen Passen Sie den Pegel so an dass die LED am rechten Ende nicht leuchtet Verwendete Tasten Tonpegelanzeigen Beide Kanäle zusammen anpassen BOTH Beide Kanäle einzeln anpassen INDEPENDENCE 䡵Den Aufnahmepegel erhöhen 䡵Den Pegel für Kanal 1 anpassen 䡵Den Aufnahmepegel verringern 䡵Den Pegel fü...

Page 137: ...P MENU MENU OPTION DV Y C LINE SET UP TITLE DOLBY DIGITAL LPCMMPEG CHAPTER SET Verbinden Sie den Anschluss VIDEO LINE OUT mit dem Bildschirm Vorgehensweise 䡵 Halten Sie dieseTaste für mehr als 2 Sekunden gedrückt während der DVD Recorder angehalten wurde oder wenn sich keine Disc im DVD Recorder befindet Während Sie die Taste gedrückt halten wird das ins MPEG Format kodierte dekodierte Eingangssig...

Page 138: ...e Darstellungsweise die für das Kapitelmenü ausgewählt wurde Jede Darstellungsweise enthält eine unterschiedliche Anzahl Position und Größe für die Vorschaubilder sowie verschiedene Hintergründe 4 Mit den Cursortasten 6 7 t und 8 können Sie eine der acht Darstellungsweisen auswählen und das entsprechende Bildschirmmenü STYLE einblenden 5 Zur Auswahl einer bestimmten Darstellungsweise wählen Sie di...

Page 139: ...itel Abschluss Finalisieren Aufnahme eines neuen Titels Das Ändern des Kapitelmenüs ist möglich Das Ändern des Titelmenüs ist möglich Bearbeitungszeit max 30 Sekunden Bearbeitungszeit Einige Minuten Bearbeitungszeit max 20 Minuten Titel 1 Wiedergabe möglich auf einem anderen DVD Player Sie können auswählen ob automatisch eine Kapitelmarkierung eingefügt wird wenn die Aufnahme auf Pause geschaltet ...

Page 140: ...mepause Modus Wurde der MenüpunktAUTO CHAPTER REC PAUSE des Bildschirmmenüs RECORDER MENU 1 2 auf ON gesetzt und wird das Gerät in den Aufnahmepause Modus geschaltet wird automatisch eine Kapitelmarkierung eingefügt Es gibt noch eine Reihe anderer Verfahren um die Kapitelmarkierungen manuell oder automatisch einzufügen Seite 42 4 Aufnahme neu starten Drücken Sie die Taste PLAY oder PAUSE Die Aufna...

Page 141: ...stand für die Kapitelmarkierungen einzustellen Der DVD Recorder fügt dann die Kapitelmarkierungen in den entsprechendenAbständen während der Aufnahme ein 䡵Ob bei einerAufnahmepause automatisch eine Kapitelmarkierung eingefügt wird können Sie mit dem Menüpunkt AUTO CHAPTER REC PAUSE festlegen ON Eine neue Kapitelmarkierung wird eingefügt OFF Es wird keine neue Kapitelmarkierung eingefügt Hinweis We...

Page 142: ...itelmenü wird gemäß den Standardeinstellungen erstellt d h der Titel wird abgeschlossen ENABLE Die Bildschirmanzeige THUMBNAILEDIT wird angezeigt In diesem Menü können Sie die Darstellungsweise der Kapitelmenüs und die Vorschaubilder ändern sowie die Kapitelnamen eingeben und andere ähnliche Funktionen ausführen Weitere Informationen finden Sie auf Seite 49 䡵 Wenn Sie weitere Aufnahmen erstellen w...

Page 143: ... MENU gemacht haben Wurde die Option DISABLE gesetzt wird die Finalisierung gestartet Wenn Sie die Einstellung ENABLE eingestellt haben wird eine Bildschirmanzeige eingeblendet in der Sie die Titelmenüs bearbeiten können In dieser Bildschirmanzeige können Sie die Einstellung der Titelmenüs bestätigen die Darstellungsweise ändern und die Titelnamen eingeben Seite 55 Eine Statusleiste auf der Sie de...

Page 144: ...telmarkierung Vorschaubild Vorschaubild Vorschaubild Vorschaubild Vorschaubild Vorschaubild Vorschaubild Kapitel 1 Kapitel 2 Kapitel 3 Kapitel 1 Kapitel 2 Aufnahme Aufnahme 䡵Ändern der Kapitelmenüs Die Darstellungsweise und die Vorschaubilder der Kapitelmenüs können am Ende der Aufnahme bearbeitet werden d h während desAbschließens eines Titels Zusätzlich können zu diesem Zeitpunkt auch Titel und ...

Page 145: ... die aktuell für das Kapitelmenü ausgewählt wurde Jede Vorlage besteht aus einer unterschiedlichenAnzahl Position und Größe für die Vorschaubilder sowie verschiedenen Hintergründen 3 Mit den Cursortasten 6 7 t und 8 können Sie eine der acht Darstellungsweisen auswählen und das entsprechende Bildschirmmenü STYLE einblenden in dem Sie die Vorlagen für die Titel und Kapitel finden 4 Zur Auswahl einer...

Page 146: ...dern Sie die Vorlagen für die Darstellung der Titel und Kapitelmenüs nach Wunsch Wenn Sie z B die Vorlage für die Anzeige des Titelmenüs von 1 nach 4 ändern wollen gehen Sie wie folgt vor Wählen Sie im PRESET STYLE MENU den Menüpunkt TITLE PATTERN und drücken Sie die Taste SET Das Bildschirmmenü TITLE PATTERN wird angezeigt 3 Mit den Cursortasten t 8 6 und 7 können Sie in der Bildschirmanzeige TIT...

Page 147: ...n mit einem Netzwerkkabel an Ihren BD X200 übertragen werden Mit dieser Software können Sie fantasievolle und kreative DVDs mit wenig Aufwand erstellen Sie können Easymenü von der folgenden Website herunterladen Ausführliche Informationen zur Verwendung der Software und die dazugehörigen Sicherheitshinweise finden Sie im Benutzerhandbuch der Software http www jvc victor co jp english pro prodv 䡵 W...

Page 148: ...in der Reihenfolge in der sie aufgenommen wurden Das siebte und die folgenden Vorschaubilder werden auf den folgenden Seiten angezeigt In dieser ersten Bildschirmanzeige können Sie die Vorschaubilder der Kapitel ändern oder Namen oder Kommentare eingeben Sie können die Bedienschritte in dieser Bildschirmanzeige mit den Tasten an der Vorderseite des Geräts einer Tastatur oder einer Maus vornehmen V...

Page 149: ...n Sie den Menüpunkt wählen und die Taste SET drücken wird die Anzeige um 10 Einzelbilder zurück geschaltet 3 Wählen Sie BACK und drücken Sie die Taste SET um das Vorschaubild für dieses Kapitel zu ändern Die erste Bildschirmanzeige THUMBNAIL EDIT wird wieder angezeigt Das Vorschaubild des zweiten Kapitels wurde durch das ausgewählte Bild ersetzt Das Vorschaubild des Titelmenüs wird das erste Vorsc...

Page 150: ...r ein der auf der Bildschirmanzeige für das Kapitelmenü angezeigt werden soll Geben Sie einen Namen für das Vorschaubild des Kapitelmenüs ein Die Namen können bis zu 20 Zeichen lang sein Wählen Sie CANCEL und drücken Sie die Eingabetaste um das Textfeld ohne Eingabe eines Namens oder Kommentars zu schließen Hinweis Wenn Sie in der Bildschirmanzeige THUMBNAIL EDIT die Option TEXT LOAD und dann die ...

Page 151: ...rmanzeige CHAPTER MENU EDIT wird angezeigt 2 Wählen Sie in der Bildschirmanzeige CHAPTER MENU EDIT den Menüpunkt PRESET STYLE und drücken Sie die Taste SET Das Bildschirmmenü PRESET STYLE MENU wird angezeigt Die Vorlagennummer die mit dem Parameter PRESET STYLE eingestellt wurde wird auf dem Bildschirm angezeigt 3 Um die Darstellungsweise zu ändern Wählen Sie PATTERN und drücken Sie die Taste SET ...

Page 152: ...U EDIT den Menüpunkt BACK und drücken Sie die Taste SET um zur Bildschirmanzeige THUMBNAIL EDIT zurückzukehren Bildschirmanzeige THUMBNAIL EDIT START Bildschirmanzeige CHAPTER MENU EDIT Bildschirmanzeige CHAPTER MENU PREVIEW BACK PRESET STYLE CHAPTER MENU PREVIEW CHAPTER MENU 2 01 02 03 03 08 BACK 1 4 Hinweise Die Erstellung der Vorschau dauert bis zu 20 Sekunden pro Seite Je nachdem wie viele Vor...

Page 153: ...ert werden können 1 Wählen Sie in der Bildschirmanzeige THUMBNAIL EDIT den Menüpunkt TITLE CLOSE und drücken Sie die Taste SET Ein Bestätigungsfenster wird angezeigt 2 Wenn Sie mit dem Abschließen desTitels fortfahren wollen wählen Sie YES und drücken Sie die Taste SET Der Titel wird abgeschlossen Der Fortschritt des Abschließens wird in einer Statusleiste angezeigt TITLE CLOSE 䡵 Nach dem Abschlie...

Page 154: ...anzeige TITLE MENU EDIT wird beim Starten des Finalisierungsvorgangs der Disc angezeigt Ändern der Darstellungsweise 1 Wählen Sie in der Bildschirmanzeige TITLE MENU EDIT den Menüpunkt PRESET STYLE und drücken Sie die Taste SET Die Bildschirmanzeige PRESET STYLE wird angezeigt 2 Um die Bildschirmanzeige PATTERN zu ändern Wählen Sie STYLE und drücken Sie die Taste SET Weitere Informationen zum Bear...

Page 155: ...mit der Taste SET können zum Vor und Zurückspringen von jeweils 10 Seiten verwendet werden 3 Schließen Sie die Einstellungen ab Wählen Sie hierfür in der Bildschirmanzeige TITLE MENU PREVIEW die Taste BACK und drücken Sie die Taste SET Die Bildschirmanzeige TITLE MENU EDIT wird wieder angezeigt 4 Wenn Sie die Disc finalisieren möchten wählen Sie in der Bildschirmanzeige TITLE MENU EDIT die Funktio...

Page 156: ...E TEXT INPUT TITLE MENU AAA BBB CCC DDD BACK TEXT LOAD TITLE TEXT INPUT 1 6 AAA BBB CCC DDD BACK TEXT LOAD TITLE TEXT INPUT 1 6 august CANCEL TITLE INPUT AAA BBB CCC DDD BACK TEXT LOAD TITLE TEXT INPUT 1 6 august Bildschirmanzeige TITLE MENU EDIT Bildschirmanzeige TITLE TEXT INPUT 1 2 4 6 5 august CANCEL TITLE INPUT Geben Sie einen Namen für den Titel ein Die Namen können bis zu 20 Zeichen lang se...

Page 157: ...eige 1 2 FINALIZE Einstellungen für die Titel und Kapitelmenüs Hinweise Es dauert höchstens 20 Minuten bis das Finalisieren beendet ist Beim Finalisieren werden alle auf der Disc aufgenommen Daten gemäß DVD Video Standard gespeichert Die Daten können dann auch als DVD Video wieder abgespielt werden Eine Disc die mit diesem DVD Recorder finalisiert wurde kann normalerweise auch auf anderen DVD Play...

Page 158: ... in den Schnellrücklauf zu schalten 䡵Drücken Sie im Standbildmodus oder während des langsamen Rücklaufs die Taste FWD um in den langsamen Vorlauf zu schalten 䡵Drücken Sie im Standbildmodus oder während des langsamen Vorlaufs die Taste REV um in den langsamen Rücklauf zu schalten Bei jedem Drücken der Taste FWD oder REV ändert sich die Wiedergabegeschwindigkeit Einzelheiten dazu finden Sie auf Seit...

Page 159: ...Y DVD RECORDER BD X200 FWD PAUSE REC BUSY OPEN CLOSE TOP MENU MENU OPTION DV Y C LINE SET UP AUDIO CH1 CH2 TITLE DOLBY DIGITAL LPCMMPEG CHAPTER SET WARNUNG Wenn als Eingangseinstellung DV gewählt wurde kann bei der Wiedergabe einer Disc der Ton verschoben sein Setzen Sie in diesem Fall die Eingangseinstellung auf LINE oder Y C Wenn die Disc verschmutzt oder beschädigt ist kann u U keine einwandfre...

Page 160: ...ken Sie die Taste 8 während der Wiedergabe um die Wiedergabe am Anfang des aktuellen Kapitels wieder zu starten Wenn die Taste8 kurz hinter einer Kapitelmarkierung innerhalb einer 1 Sekunde gedrückt wird startet die Wiedergabe vom Anfang des vorherigen Kapitels Während der Wiedergabe des letzten Kapitels ist die Taste t deaktiviert TOP MENU MENU OPTION DV Y C LINE SET UP SET Taste t Taste 8 Hinwei...

Page 161: ...en Sie eine beschreibbare Disc in den BD X200 Einstellungen Videorecorder Aktivieren Sie die RS 422A Steuerung BD X200 Wählen Sie im Bildschirmmenü REMOTE MENU im Menüpunkt REMOTE SELECT die Option 9PIN MASTER Wenn Sie für REMOTE SELECT die Option 9PIN MASTER wählen wird das Bildschirmmenü REMOTE CONTROL 9PIN MASTER angezeigt Über dieses Bildschirmmenü werden Bearbeitungsvorgänge ausgeführt Die en...

Page 162: ...ungen Digitale Videokamera oder Videorecorder Aktivieren der Steuerung über DV BD X200 Wählen Sie im Bildschirmmenü REMOTE MENU im Menüpunkt REMOTE SELECT die Option DV MASTER Wenn Sie für REMOTE SELECT die Option DV MASTER wählen wird das Bildschirmmenü REMOTE CONTROL DV MASTER angezeigt Über dieses Bildschirmmenü werden Bearbeitungsvorgänge ausgeführt Die entsprechenden Bedienvorgänge werden auf...

Page 163: ...t vorhandene Nummer angegeben wird der Wert auf 00 gesetzt Dieser Menüpunkt hat keine Funktion wenn der Menüpunkt DVD MENU TYPE des Bildschirmmenüs RECORDER MENU 2 2 auf TOP oder NONE gesetzt wird EXIT REMOTE CONTROL SCREEN 9PIN MASTER 1 2 3 TC TC ADJ BITRATE 8 0 Mbps SET EDL FINALIZE EDIT END CANCEL No IN OUT ACTION MENU PAUSE 00 00 00 00 00 00 00 ⳮ 00 00 00 00 PAUSE 00 00 00 00 00 00 00 ⳮ 00 00 ...

Page 164: ...eorecorder seine Funktion ausführt Dieses Gerät wird nicht gesteuert e Auswerfen Eject u Schnellrücklauf oder Schnellrücklaufwiedergabe q Stopp t Wiedergabe w Pause y Schnellvorlauf oder Schnellvorlaufwiedergabe Einzelbild Rücklauf Einzelbild Vorlauf Der vom DVD Recorder nach Drücken der Taste y bzw u auszuführende Vorgang d h FF Schnellvorlauf REW Schnellrücklauf oder SEARCH Suchlauf wird mithilf...

Page 165: ...es Ereignisses wird CHAPTER angezeigt t Wiederholen Sie im Bedarfsfall die oben genannten Verfahren 3 4 y Geben Sie den Film auf dem Videorecorder wieder und schalten Sie an der Position an der Sie den Einfügevorgang beenden möchten in den Standbildmodus u Drücken Sie die Taste O auf der Tastatur oder wählen Sie den Menüpunkt TC SET im Bildschirmmenü Drücken Sie anschließend die Eingabetaste Der Z...

Page 166: ...n EXIT REMOTE CONTROL SCREEN 9PIN MASTER 1 2 3 TC TC ADJ BITRATE 8 0 Mbps SET EDL FINALIZE EDIT END CANCEL No IN OUT ACTION MENU STOP CHAPTER CHAPTER 00 01 01 01 02 01 03 00 00 00 00 00 01 30 00 00 02 30 00 ⳮ 00 03 30 00 ⳮ ⳮⳮⳮⳮⳮⳮⳮⳮ ⳮⳮⳮⳮⳮⳮⳮⳮ ⳮⳮ ⳮⳮ ⳮ 00h 030 min 03m 30s 00 03 30 00 CHAPTER MANUAL TOTAL DURATION DISC REMAIN SOURCE TIMECODE TC SET TC CANCEL EXIT REMOTE CONTROL SCREEN 9PIN MASTER 1 2 3...

Page 167: ...L SCREEN 9PIN MASTER 1 2 3 TC TC ADJ BITRATE 8 0 Mbps SET RECORDING EDL FINALIZE EDIT END CANCEL No IN OUT ACTION MENU STOP CHAPTER CHAPTER 00 01 01 01 02 01 03 00 00 00 00 00 01 30 00 00 02 30 00 ⳮ 00 03 30 00 ⳮ ⳮⳮⳮⳮⳮⳮⳮⳮ ⳮⳮⳮⳮⳮⳮⳮⳮ ⳮⳮ ⳮⳮ ⳮ 00h 030 min 03m 30s 00 03 30 00 CHAPTER MANUAL TOTAL DURATION DISC REMAIN SOURCE TIMECODE Menüpunkt EDIT END Menüpunkt EDL 5 Speichern von Ereignisdaten Ereignis...

Page 168: ...M EDL02 EDL03 EDL04 EDL05 EDL06 EDL07 EDL08 EDL09 EDL10 BACK SAVE IMPORT LOAD DELETE NAME MANAGER 3 1 2 Menüpunkt EDL Bildschirmmenü EDL MANAGER Menüpunkt EDL Menüpunkt Funktion Vorgehensweise Wählen Sie den zu verwendenden Menüpunkt EDL wählen Sie als nächstes die Menüpunkt Funktion und führen Sie diese dann aus Beispiel Speichern Sie den aktuellen Einstellwert des Menüpunkts REMOTE CONTROL als E...

Page 169: ...st und dieser Menüpunkt gedrückt wird werden über EasyMenu importierte EDL oder andere externe Bearbeitungslisten registriert Seite 71 DELETE Wenn der Menüpunkt EDL hervorgehoben ist und dieser Menüpunkt gedrückt wird wird der ausgewählte Menüpunkt EDL gelöscht Informationen über EDL Im SLAVE Modus können CSV Dateien und EDL Dateien des SONY Formats verwendet werden Im MASTER Modus können nur CSV ...

Page 170: ...EDL08 EDL09 EDL10 BACK SAVE IMPORT LOAD DELETE NAME MANAGER Menüpunkt EDL Menüpunkt IMPORT Menüpunkt LOAD 䡵 Beispiel 1 Laden einer EDL vom CSV Format Slave Modus IN POINT OUT POINT EXIT REMOTE CONTROL SCREEN DV SLAVE 1 4 7 h m s f 2 5 8 3 6 9 h m s f h m s f CHAPTER MANUAL BITRATE 8 0 Mbps DISC REMAIN 000 min EDL TC CANCEL ADJ FINALIZE 00 00 00 00 00 10 00 00 00 40 00 00 00 20 00 00 00 30 00 00 01...

Page 171: ... den BD X200 Einstellungen BD X200 Wählen Sie im Bildschirmmenü REMOTE MENU im Menüpunkt REMOTE SELECT die Option DV SLAVE Wenn Sie für REMOTE SELECT die Option DV SLAVE wählen wird das Bildschirmmenü REMOTE CONTROL DV SLAVE angezeigt In dieser Bildschirmanzeige können Sie die Bearbeitungspunkte und Kapitelmarkierungen einstellen Weitere Informationen zum Gebrauch der Bildschirmanzeige REMOTE CONT...

Page 172: ...Geräts befindlichen USB Anschluss an Vorbereitung Legen Sie eine beschreibbare Disc in dieses Gerät ein Einstellung Einstellung dieses Geräts Setzen Sie den Menüpunkt REMOTE SELECT des Bildschirmmenüs REMOTE MENU auf 9PIN REC Wenn der Menüpunkt REMOTE SELECT auf 9PIN REC gesetzt wurde wird das Bildschirmmenü REMOTE CONTROL 9PIN REC auf dem Monitor angezeigt Bearbeitungspunkte und Kapitelpunkte kön...

Page 173: ...elbild wird über die Tastatur eingegeben Dient zum Blättern durch die Kapitelliste DISC REMAIN Dieses Feld zeigt einen Annährungswert der verbleibendenAufnahmezeit der Disc an FINALIZE Mit dieser Taste können Sie die Disc finalisieren TC CANCEL Mit dieser Taste können Sie die Einstellungswerte für den In Point den Out Point und die Kapitelmarkierungen entfernen EDL Ruft das Bildschirmmenü EDL MANA...

Page 174: ...menüs zu setzen und drücken Sie anschließend die Eingabetaste Die ausgewählte Stelle d h der In Point der Out Point oder eine Kapitelmarkierung aus der Liste wird gelöscht Immer wenn Sie eine Kapitelmarkierung löschen wird die Kapitelliste neu sortiert IN POINT OUT POINT EXIT REMOTE CONTROL SCREEN DV SLAVE 1 4 7 h m s f 2 5 8 3 6 9 h m s f h m s f CHAPTER MANUAL BITRATE 8 0 Mbps DISC REMAIN 000 mi...

Page 175: ...l evtl nicht wie gewünscht erstellt Es wird daher empfohlen einen In Point immer anzugeben wenn Kapitel erstellt werden sollen Wenn Sie die automatische Kapiteleinstellfunktion verwenden werden die Kapitel in bestimmten Abständen erstellt 5 Speichern einer Bearbeitungsliste Menüpunkt EDL Bearbeitungslisten können auf diesem Gerät im Bildschirmmenü EDL MANAGER gespeichert werden Außerdem können im ...

Page 176: ...fgeführten handelsüblichen Kabel für diesen Zweck benutzen Verbinden Sie dieAnschlüsse VIDEO LINE OUT und AUDIO OUT am DVD Recorder mit den Video undAudioeingangsbuchsen am Bildschirm Vorgehensweise Legen Sie eine beschreibbare Disc in den BD X200 Einstellungen GY DV5000 oder GY DV5001 Wählen Sie im Bildschirmmenü OTHERS MENU 1 2 im Menüpunkt DV REC TRIGGER die Option ON BD X200 Wählen Sie im Bild...

Page 177: ...C EE OUT IN OUT IN ENTRY PREVIEW AUTO EDIT GOTO REVIEW SHIFT ALL STOP MAX MIN MONITOR MAX MIN MONITOR FWD REV STILL X 1 X1 FWD REV STILL X 1 X1 RECORDER PLAYER HOUR MIN SEC FRAME HOUR MIN SEC FRAME P R VITC LTC CTL VITC LTC CTL BUMP PREROLL 7 5 3 ON OFF EVENT No V SPEED A SPLIT DURATION IN OUT IN OUT E D I T I N G C O N T R O L U N I T R M G 8 2 0 Verwenden dieses Geräts als PLAYER mit RS 422 Steu...

Page 178: ...lüsse Das Anschließen und Entfernen der Kabel sollte immer bei abgeschaltetem Gerät erfolgen 䡵 Direkte Verbindung zweier BD X200 Verbinden Sie die beiden LAN Anschlüsse des Sende und Empfangsgeräts mit einem Ethernet Kabel Verwenden Sie hierfür ein gekreuztes Ethernet Kabel der Kategorie 5 VIDEO AUDIO IN IN OUT IN OUT CH1 CH2 REMOTE USB DV IN OUT SIGNAL LAN GND DC 19V 4dB 8dB INPUT LEVEL LINE Y C ...

Page 179: ...en 5 Drücken Sie dieTaste SET UP um zur normalen Bildschirmanzeige zurückzukehren Überspielen von DVDs über einen LAN Anschluss Fortsetzung Netzwerkeinstellungen Gehen Sie wie folgt vor um die Netzwerkeinstellungen sowohl am Sendegerät als auch am Empfangsgerät vorzunehmen BUSY OPEN CLOSE TOP MENU MENU OPTION DV Y C LINE SET UP SET MENU HOST NAME bdx200 STATIC IP ADDRESS SETTING 255 255 255 0 192 ...

Page 180: ...n legen Sie die IP Adresse für das Sendegerät fest Wählen Sie mit den Tasten t und 8 die Zahl aus die Sie ändern wollen Drücken Sie die Cursortasten 6 7 um den Wert für die gewählte Zahl auszuwählen Wiederholen Sie die Schritte für alle Zahlen wählen Sie SET mit den Cursortasten 8 t und drücken Sie die Taste SET Die IP Adresse des Sendegeräts die im Dialogfenster eingestellt wurde wird als die akt...

Page 181: ...sc cannot be re used 4 Sendegerät Das Sendegerät startet die Suche nach dem Empfangsgerät Nachdem die Verbindung hergestellt wurde wird ein Dialogfenster zur Bestätigung des Überspielvorgangs angezeigt Die IP Adresse des gefundenen Empfangsgeräts wird im Dialogfenster angezeigt um den Start des Überspielvorgangs zu bestätigen 5 Sendegerät Um den Überspielvorgang fortzusetzen wählen Sie EXECUTE im ...

Page 182: ...LECT OFF OFF REC CONTROL REMOTE MENU MENU FINALIZE CANCEL CANCEL CANCEL DISC FINALIZATION CANCEL DISC ERASE QUICK CANCEL DISC ERASE FULL DISC MENU MENU DUBBING EXIT DISC MENU INPUT SELECT SYSTEM PRESET STYLE RECORDER REMOTE DISPLAY CLOCK ADJUST DUBBING NETWORK MENU INPUT SELECT LINE INPUT SELECT MENU MENU TEST SIGNAL OFF FACTORY SETTING CANCEL KEYBOARD STYLE ENGLISH EDIT MENU ENABLE TOTAL RECORDIN...

Page 183: ...ET Wählen Sie Option EXIT um zur normalen Bildschirmanzeige zurückzukehren 3 Nehmen Sie die gewünscht Einstellung im Einstellungsmenü vor q Wählen Sie mit den Tasten 6 und 7 den gewünschten Parameter w Drücken Sie die Taste SET Eine Liste der Einstellwerte wird angezeigt e Wählen Sie mit den Tasten 6 und 7 den entsprechende Wert aus der Liste aus und drücken Sie die Taste SET Der Einstellwert wird...

Page 184: ...dschirmmenü RECORDER MENU das aus zwei verschiedenen Seiten mit Parametern besteht Im Bildschirmmenü RECORDER MENU 1 2 können Sie Einstellungen zur Kapitelerstellung und der Kodierung von Audio und Videodaten vornehmen Im Bildschirmmenü RECORDER MENU 2 2 können Sie Einstellungen für die Aufnahme vornehmen Mit dieser Taste öffnen Sie ein Menü in dem Sie Einstellungen für den Remote Betrieb über den...

Page 185: ...rglichen mit dem vollständigen Löschen geht dieses Verfahren zum Löschen der Disc Daten schneller CANCEL Es wird keine Schnelllöschfunktion ausgeführt EXECUTE Es wird eine Schnelllöschfunktion ausgeführt Die Disc kann von Anfang an neu aufgenommen werden Wählen Sie aus ob Sie eine DVD RW Videomodus vollständig löschen möchten Sämtliche Bereiche einer DVD RW werden gelöscht Wenn eine Disc wiederhol...

Page 186: ... ihre werkseitigen Standardeinstellungen zurückgesetzt werden sollen oder nicht CANCEL Die Standardeinstellungen sollen nicht wiederhergestellt werden EXECUTE Die Standardeinstellungen sollen wiederhergestellt werden Diesen Parameter stellen Sie bei Verwendung einer USB Tastatur ein Mit diesem Parameter können Sie eine der folgenden Sprachen für die Tastatur einstellen ENGLISH FRENCH ITALIAN GERMA...

Page 187: ...en Sie eine Vorlage für das Kapitelmenü auswählen BACK Kehrt zum Bildschirmmenü PRESET STYLE zurück Bei der Auslieferungseinstellung ab Werk kann 6 nicht gewählt werden Mit dieser Taste kehren Sie zum Setup Menu zurück TYPE 1 2 3 4 5 6 7 8 TITLE PATTERN 1 2 3 4 5 1 2 3 CHAPTER PATTERN 1 2 3 4 5 1 2 3 Standardeinstellungen Bildschirmmenü RECORDER MENU Das Bildschirmmenü RECORDER MENU besteht aus zw...

Page 188: ...ng stehende Kapazität Wenn Sie den Einstellwert dieses Menüpunkts ändern wird der Menüpunkt TOTAL CONTENTS TIME automatisch eingestellt Der Einstellbereich variiert in Abhängigkeit von der Einstellung des Menüpunkts AUDIO ENCODE LPCM 4 0 bis 7 8 MBit s in Schritten von 0 2 MBit s DOLBY DIGITAL 2 0 bis 9 0 MBit s in Schritten von 0 2 MBit s MPEG 2 0 bis 9 0 MBit s in Schritten von 0 2 MBit s Mit di...

Page 189: ... Teil der Videobilder für die Erstellung der Vorschaubilder entfernt LETTER BOX Diesen Parameter müssen Sie einstellen wenn Sie ein Audio Signal über den Anschluss DV IN OUT aufnehmen Sie können mit diesem Parameter insbesondere einstellen ob die Signale von Kanal 1 und 2 oder von Kanal 3 und 4 aufgenommen werden sollen Nur für 32kHz verfügbar 1 2ch 1 2ch Kanal 1 und 2 sollen aufgenommen werden 3 ...

Page 190: ...d die Bildschirmanzeige Remote Slave Mode angezeigt Der BD X200 wird jetzt zum Slave Gerät und kann über den nicht linearen Editor gesteuert werden DV TRIGGER Wählen Sie diese Einstellung wenn der BX X200 an eine digitale Videokamera mit einer DV Aufnahme Steuerung angeschlossen ist um die Videodaten der Kamera mithilfe der Trigger Taste an der Kamera auf diesem DVD Recorder aufzunehmen Hinweis Wi...

Page 191: ...und die Uhrzeit des Disc Finalisierens angezeigt Wenn für den Parameter DISPLAY die Option OFF eingestellt wurde werden keine Informationen angezeigt auch wenn DATE TIME oder DATE TIME gewählt wurde Mit diesem Parameter können Sie auswählen ob die Restzeit der Disc in Minuten auf dem Bildschirm angezeigt werden soll oder nicht OFF Es sollen keine Informationen angezeigt werden ON Es sollen diese I...

Page 192: ...u zurück Bildschirmmenü DUBBING In der folgenden Tabelle finden Sie die Bezeichnung und Beschreibung der Parameter die in der Bildschirmanzeige DUBBING eingestellt werden können Obere Hälfte Anzeige auf dem Bildschirm Untere Hälfte Anzeige auf der LCD Anzeige Standardeinstellung Parameter Mögliche Einstellungen Beschreibung DVD DVD CANCEL EXECUTE dub CAN EXE MENU Mit diesem Parameter können Sie da...

Page 193: ...tellung des Hostnamens ab Mit diesem Parameter können Sie die IP Adresse einstellen Es ist jedoch wichtig dass in einem Netzwerk nicht zwei Geräte mit derselben IP Adresse vorhanden sind Mit diesem Parameter können Sie die Teilnetzmaske einstellen Zwei miteinander verbundene BD X200 sollten dieselben Netzwerkeinstellungen haben Mit diesem Parameter können Sie die Gateway Adresse einstellen Zwei mi...

Page 194: ...6 Bit Abtastfrequenz 48 kHz Anzahl der Kanäle 2 䡵 DV Schnittstelle I O IEEE1394 䡵 Äußere Abmessungen Einheit mm 䡵 Allgemeines Netzwerkanschluss RJ 45 Kategorie 5 100 BASE Tx USB Anschluss USB 1 1 2 Stromversorgung 19 V DC Stromverbrauch 31 W 1 63 A Gewicht 4 5 kg nur das Gerät Abmessungen 212 mm Breite 352 mm Tiefe 88 mm Höhe ohne Füße und andere Vorsprünge Zulässige Betriebstemperatur 5 C bis 35 ...

Page 195: ...CTIONS A ENREGISTREUR DE DVD Français OPERATE PHONES REV STOP PLAY DVD RECORDER BD X200 FWD PAUSE REC BUSY OPEN CLOSE TOP MENU MENU OPTION DV Y C LINE SET UP AUDIO CH1 CH2 TITLE DOLBY DIGITAL LPCMMPEG CHAPTER SET LLT0077 001B ...

Page 196: ... à paire torsadée blindé 5 mètres DV Câble à paire torsadée blindé 4 mètres PHONES Câble à paire torsadée blindé 5 mètres MIC Câble à paire torsadée blindé 5 mètres LAN Câble à paire torsadée blindé 10 mètres USB Câble à paire torsadée blindé 5 mètres DC 19V Câble blindé 1 2 mètres L appel de courant de cet appareil est de 19 ampères Attention 5 Dans les endroits où il y a des ondes électromagnéti...

Page 197: ...NTION Pour éviter les chocs électriques ne pas ouvrir le coffret Aucune pièce à l intérieur n est à régler par l utilisateur Confier les opérations d entretien au personnel de service qualifié Remarque La plaque d identification et les précautions de sécurité se trouvent à l arrière de l appareil La touche OPERATE ne coupe pas complètement l alimentation secteur de l appareil mais commute le coura...

Page 198: ...par des brevets américains et dont la propriété intellectuelle appartient à Macrovision et à d autres détenteurs L autorisation de Macrovision est nécessaire pour pouvoir utiliser cette technologie de protection du copyright et à l exception des situations où une autorisation spéciale a été accordée par la société cette technologie est réservée à un usage domestique et à certains visionnages parti...

Page 199: ... Modification et contrôle des styles et des noms du menu des titres 55 Lecture Lecture d un disque avant finalisation 59 Lecture d un disque finalisé 60 Lecture accélérée et ralentie 61 Lecture du chapitre titre précédent ou suivant 61 Enregistrement synchrone Enregistrement de signaux en provenance d un magnétoscope RS 422A 62 Enregistrement de signaux lus par un caméscope ou un magnétoscope numé...

Page 200: ...ée pour enregistrer le son et l image en provenance d une source non linéaire sur un DVD Dans ce cas le BD X200 doit être configuré comme esclave paramétrage dans le menu Dans ce type de configuration l enregistreur de DVD sera commandé par la source non linéaire Page 73 䡵Les menus des titres et des chapitres peuvent être créés automatiquement ou manuellement Page 45 Cinq modèles différents de sty...

Page 201: ...X200 à d autres appareils mettre ceux ci hors tension et effectuer les procédures d installation telles qu elles sont décrites dans les manuels d utilisation correspondants 䡵 Le lecteur graveur de DVD est un élément indispensable Bien que la durée de vie du lecteur graveur de DVD varie en fonction de l utilisation et des conditions ambiantes il est recommandé de le remplacer toutes les 1000 heures...

Page 202: ... de la manipulation des disques 䡵Ne jamais essuyer un disque avec des diluants pour peinture des solvants organiques de l alcool ou un liquide de nettoyage pour disque vinyle 䡵Ne pas utiliser de produits de protection ou anti rayures pour disques 䡵Il ne faut pas y appliquer d étiquettes autocollantes ou tout autre type d étiquette en papier 䡵Ne pas utiliser les disques dont l étiquette a été retir...

Page 203: ...ler la finalisation et d ajouter un enregistrement Finalisation Après avoir finalisé un DVD R ou un DVD RW mode vidéo il peut être lu de la même façon que tout autre DVD sur un lecteur de DVD standard Page 44 䡵 Tant que le disque n a pas été finalisé il est possible d enregistrer sur les sections non utilisées de celui ci et de modifier les titres ou les styles d affichage Dans le cas des DVD R et...

Page 204: ...PTER CREATION seront nécessaires à cet effet Avant de clôturer un titre il sera possible de modifier le style utilisé pour l affichage du menu des chapitres de modifier les miniatures utilisées et de saisir des noms pour les miniatures Avant de finaliser un disque il sera possible de modifier le style utilisé pour le menu des titres et de saisir des noms pour les titres DVD R ou DVD RW Titre 1 Cha...

Page 205: ...cran INPUT SELECT MENU est réglée sur OPTION il est impossible d effectuer ce paramétrage uniquement avec l enregistreur de DVD 䡵 Voyant DV Ce voyant s allume ou clignote lorsque l option INPUT SELECT de l écran INPUT SELECT MENU est réglée sur DV Plus précisément ce voyant s allume lorsqu un signal d entrée est présent et clignote en l absence de signal 䡵 Voyant Y C Ce voyant s allume ou clignote...

Page 206: ...ccélérée en avant entre la vitesse lente et la vitesse rapide Une pression sur cette touche en mode arrêt sur image ou pendant une lecture ralentie en arrière lance la lecture ralentie en avant Une nouvelle pression pendant la lecture ralentie en avant fait basculer la lecture ralentie en avant entre la vitesse lente et la vitesse rapide Le voyant FWD est allumé pendant la lecture accélérée ou ral...

Page 207: ... 1 De même une pression sur la touche 7 en maintenant la touche t enfoncée diminue le niveau d enregistrement audio du canal 2 Touche 8 Si un menu de titres ou de chapitres est affiché cette touche permet de sélectionner le numéro du menu pour la lecture Plus précisément une pression sur cette touche déplace le curseur de sélection vers la gauche Une pression sur cette touche pendant que l enregis...

Page 208: ...ur raccordé à cette prise Les informations d état et d alarme apparaissent également à l écran l écran DISPLAY MENU peut être utilisé pour indiquer les éléments à afficher 4Commutateur AUDIO INPUT LEVEL Ce commutateur est utilisé pour régler le niveau standard d entrée audio 4dB Le niveau standard est réglé à 4 dB 8dB Le niveau standard est réglé à 8 dB 1 2 3 4 5 6 7 5Prises AUDIO IN 2 RCA Ces pri...

Page 209: ...pérations telles que la création des menus des titres et des chapitres Les paramètres du réseau sont à définir dans l écran NETWORK MENU 0Prises USB 2 Ces prises sont utilisées pour raccorder l enregistreur de DVD à des périphériques USB tels qu un clavier ou une souris Il existe la possibilité d utiliser un clavier et une souris à la place des touches de l enregistreur de DVD pour l utilisation d...

Page 210: ...ent Affichage du format de codage défini avec l optionAUDIO ENCODE de l écran RECORDER MENU 1 2 Mode de lecture Affichage du format de codage audio utilisé sur le disque courant 2 Informations relatives au mode courant 䡵Numéro de titre numéro de chapitre compteur En mode enregistrement l afficheur LCD indique le numéro du titre et le numéro du chapitre en cours d enregistrement en plus du temps d ...

Page 211: ...egistreur de DVD passe du mode enregistrement au mode pause d enregistrement REC STOP l enregistreur de DVD passe du mode enregistrement au mode arrêt MENU EDIT édition en cours d un menu des titres ou d un menu des chapitres EJECT éjection du disque courant TITLE CLOSE l enregistreur de DVD effectue une opération de clôture de titre FINALIZE l enregistreur de DVD finalise le disque QUICK ERASE l ...

Page 212: ... information d état ne sera affichée si l option DISPLAY est désactivée OFF Messages d état 1 Données importantes pour l enregistrement Une pression sur la touche SET UP en mode enregistrement affiche le débit binaire vidéo et le format de codage audio Une nouvelle pression sur la touche SET UP fait disparaître ces informations N Élément Description 1 Mode de fonctionnement Cette zone indique le m...

Page 213: ...F aucune information n est affichée DATE seule la date est affichée TIME seule l heure est affichée TIME DATE la date et l heure sont toutes deux affichées La fonction DATE STYLE de l écran DISPLAY MENU permet de modifier le style d affichage de la date Mode enregistrement la date et l heure affichées sont celles de l horloge interne Mode lecture la date et l heure affichées sont celles de la fina...

Page 214: ...00 CHAPTER 1 0 00 00 REC DVD RW Le statut du disque n apparaît pas si l option DISPLAY de l écran DISPLAY MENU est désactivée OFF Statut Description DVD R Le disque actuel est un DVD R non finalisé environ 3 secondes DVD RW Le disque actuel est un DVD RW non finalisé environ 3 secondes DVD Le disque actuel est un DVD R ou un DVD RW finalisé environ 3 secondes INVALID DISC Le disque actuel n est ni...

Page 215: ...NAL Tentative d éjection d un disque avant sa finalisation A L xxxx R La valeur réglée est affichée en modifiant le niveau d enregistrement audio analogique d L xxxx R La valeur réglée est affichée en modifiant le niveau d enregistrement audio numérique DURATION OVER Opération Auto Edit alors que l espace disque restant est devenu insuffisant pendant une opération externe par RS 422A ou DV INVALID...

Page 216: ...E QUALITY est faible par exemple 4 Mb s ou moins lors de l enregistrement d informations avec peu de mouvements ou des facteurs similaires Aucune erreur ne sera signalée si le temps est dans les limites fixées pour le contenu total OVERHEATING oVERHEATING Affiché lorsque la température interne de l appareil augmente en raison d un mauvais fonctionnement du ventilateur etc Dans ce cas il faut imméd...

Page 217: ...DVD se trouve en mode enregistrement le signal d entrée vidéo est transféré directement à l écran E E sous la forme d un signal vidéo composite Le menu Setup et les autres écrans de paramétrage sont également affichés sur le moniteur raccordé à cette prise Le statut de fonctionnement de l enregistreur de DVD et les autres informations importantes s affichent à l écran lorsque l option DISPLAY de l...

Page 218: ...nter 0 1 2 5 6 4 8 9 7 Num Lock 1 Q A Z X C V B N M S D F G H J K L U W E R T Y I O P 2 3 4 5 6 7 8 9 0 つ BD X200 BD X200 Remarque 1 Pour utiliser la prise RS 422A REMOTE définissez REMOTE SELECT dans l écran REMOTE MENU sur 9PIN MASTER 9PIN REC ou 9PIN PLAY Remarque 2 Pour commander l appareil à l aide de la prise DV IN OUT sélectionnez l option appropriée pour REMOTE SELECT dans l écran REMOTE M...

Page 219: ...Raccorder le cordon secteur fourni à la prise AC IN de l adaptateur secteur 4 Brancher le cordon secteur à une prise murale L enregistreur de DVD est alors sous tension et le voyant OPERATE s allume en rouge mode Operate Off Adaptateur secteur fourni Cordon d alimentation fourni Remarque L enregistreur de DVD consomme une petite quantité d énergie électrique lorsqu il est en mode Operate Off ATTEN...

Page 220: ...streur de DVD Il est recommandé d éjecter le disque à ce moment là 1 Appuyer sur la touche OPERATE L enregistreur de DVD passe en mode Operate Off et le voyant OPERATE devient rouge 2 Si l enregistreur de DVD n est pas utilisé pendant une période prolongée débrancher l adaptateur secteur Débrancher le cordon secteur de la prise avant de débrancher l adaptateur secteur Remarque Environ 45 secondes ...

Page 221: ...RW neuf ou un qui a été effacé sur un autre appareil est inséré Page 31 Retrait d un disque 䡵 Arrêter l enregistreur de DVD 1 Appuyer sur la touche OPEN CLOSE Le tiroir du disque s ouvre automatiquement Le voyant OPEN CLOSE est allumé pendant que le tiroir du disque est ouvert Si le disque n a pas encore été finalisé le message NOT FINALIZE s affiche sur le moniteur et sur l afficheur LCD 2 Retire...

Page 222: ...Shift Shift Ctrl Ctrl Alt Alt Enter Back Space Insert Delete End Home Page Up Page Down Enter 0 1 2 5 6 4 8 9 7 Num Lock 1 Q A Z X C V B N M S D F G H J K L U W E R T Y I O P 2 3 4 5 6 7 8 9 0 VIDEO AUDIO IN IN OUT IN OUT CH1 CH2 REMOTE USB DV IN OUT SIGNAL LAN GND DC 19V 4dB 8dB INPUT LEVEL LINE Y C 䡵 Procédure Le clavier et la souris permettent de commander les fonctions suivantes Prises USB La ...

Page 223: ...ouches 6 et 7 l option actuellement sélectionnée dans le menu apparaît en surbrillance w Appuyer sur SET pour afficher l écran CLOCK ADJUST MENU 3 Régler la date et de l heure correctes q Sélectionner DATE ou TIME Heure avec les touches 6 et 7 Appuyer ensuite sur la touche SET w Sélectionner le chiffre à modifier avec les touches t et 8 le chiffre actuellement sélectionné dans le menu apparaît en ...

Page 224: ...la date ni l heure ne sont affichées TIME Seule l heure est affichée DATE Seule la date est affichée TIME DATE La date et l heure sont toutes deux affichées 䡵 DATE STYLE Ce paramètre est utilisé pour définir le format d affichage de la date YY MM DD année mois jour MM DD YY mois jour année DD MM YY jour mois année Écran DISPLAY MENU Préparation Procéder comme suit pour afficher la date et l heure ...

Page 225: ...de chapitres Une marque de chapitre est insérée automatiquement à chaque pause d enregistrement Le paramètre CHAPTER CREATION de l écran RECORDER MENU 1 2 peut également être utilisé pour configurer l insertion automatique ou manuelle des marques de chapitre Les miniatures c est à dire l image au début de l enregistrement et les arrières plans sont créés automatiquement pour les menus des titres e...

Page 226: ...ommence à partir du premier chapitre de ce titre Un nouveau titre est créé dans la section non utilisée du disque et l enregistrement commence à partir du premier chapitre de ce titre DVD RW De nouvelles informations peuvent être enregistrées Un nouveau titre est créé et l enregistrement commence à partir du premier chapitre de ce titre Un nouveau titre est créé dans la section non utilisée du dis...

Page 227: ...cun cas il ne faut couper l alimentation ou débrancher le cordon d alimentation pendant l effacement des données MENU FINALIZE CANCEL CANCEL CANCEL CANCEL DISC FINALIZATION EXECUTE DISC ERASE DISC ERASE DISC MENU QUICK FULL Annulation de la finalisation d un DVD RW Annuler la finalisation lors de l ajout d un enregistrement supplémentaire à un DVD RW finalisé 1 Insérer le DVD RW dont vous souhaite...

Page 228: ...E Définir d insérer ou non automatiquement un chapitre lorsque l enregistrement est mis en pause OFF ne pas insérer de chapitre ON insérer un chapitre TOTAL CONTENT TIME Ce paramètre permet de régler le codage ou la compression des données vidéo Utilisé lorsque le débit est défini automatiquement à l aide de le temps d enregistrement et la capacité du disque lorsqu il est vierge Plus précisément c...

Page 229: ...tes Sélectionner l élément MENU appuyer sur la touche SET pour revenir à l écran du menu principal de réglage Appuyer sur la touche SET UP pour revenir à l écran normal 䡵 Élément DISC IN ACTION Utilisé pour définir l opération lorsqu un disque finalisé est inséré dans cet appareil ou un lecteur de DVD MENU affiche l écran de menu du titre TOP MENU TITLE lit automatiquement le titre 1 䡵 Élément TIT...

Page 230: ...SET UP Touche SET BUSY OPEN CLOSE TOP MENU MENU OPTION DV Y C LINE SET UP SET Élément Description INPUT SELECT Ce paramètre est utilisé pour sélectionner les signaux d entrée audio et vidéo LINE Les signaux utilisés seront le signal vidéo composite en provenance de la prise VIDEO LINE IN et les signaux audio analogiques en provenance des prises AUDIO IN Y C Les signaux utilisés seront le signal Y ...

Page 231: ...aissez déjà le temps d enregistrement le réglage de cet élément permet au BD X200 de déterminer le débit binaire optimal pour le codage à partir de la capacité restante du disque vierge et du temps d enregistrement Si vous réglez le temps d enregistrement avec ce paramètre la qualité de codage ENCODE QUALITY sera fixée automatiquement ENCODE QUALITY Mbps Plus précisément il permet de régler direct...

Page 232: ...e guide pour connaître le temps d enregistrement disponible Remarques Une pression sur la touche SET UP en mode enregistrement affiche à l écran le débit binaire vidéo et le format de codage audio Une nouvelle pression sur la touche SET UP fait disparaître ces informations Lors de l enregistrement d une source musicale il est recommandé de définir ce paramètre sur DOLBY DIGITAL ou LPCM Pour le for...

Page 233: ...n réglant les niveaux Régler le niveau de manière à ce que la LED tout à droite ne s allume pas Touches utilisées Vumètres audio Réglage simultané des deux canaux BOTH Réglage séparé des deux canaux INDEPENDENCE 䡵Augmentation du niveau d enregistrement 䡵Réglage du niveau du canal 1 䡵Diminution du niveau d enregistrement 䡵Réglage du niveau du canal 2 SET SET SET SET Appuyer sur la touche 6 tout en ...

Page 234: ...EC BUSY OPEN CLOSE TOP MENU MENU OPTION DV Y C LINE SET UP TITLE DOLBY DIGITAL LPCMMPEG CHAPTER SET Raccorder la prise VIDEO LINE OUT au moniteur Procédure 䡵 Maintenir la touche REC enfoncée pendant au moins 2 secondes alors que l enregistreur de DVD est à l arrêt ou qu aucun disque n y est inséré Pendant que cette touche est enfoncée le signal d entrée ayant subi un codage décodage MPEG sera déli...

Page 235: ... nombres des positions et des tailles de miniatures ainsi que des arrières plans différents CHAPTER PATTERN Le modèle d affichage actuellement sélectionné pour le menu des chapitres Chaque modèle d affichage emploie des nombres des positions et des tailles de miniatures ainsi que des arrières plans différents 4 Sélectionner l un des huit styles à l aide des touches du curseur 6 7 t et 8 et affiche...

Page 236: ...3 Chapitre 4 Clôture du titre Finalisation Enregistrement d un nouveau titre Modification possible du menu des chapitres Modification possible du menu des titres Temps de traitement 30 secondes maximum Temps de traitement plusieurs minutes Temps de traitement 20 minutes maximum Lecture possible Sur d autres lecteurs de DVD Titre 1 Il est possible de choisir d insérer ou non automatiquement une mar...

Page 237: ... enregistrement est activé Lorsque l élément AUTO CHAPTER REC PAUSE de l écran RECORDER MENU 1 2 est activé ON une marque de chapitre est automatiquement insérée lorsque le mode pause d enregistrement est activé Il existe également différentes méthodes d insertion manuelle ou automatique des marques de chapitre Page 42 4 Reprendre l enregistrement Appuyer sur la touche PLAY ou PAUSE L enregistreme...

Page 238: ... en minutes d insertion des marques de chapitre L enregistreur de DVD insérera des marques de chapitre aux intervalles correspondants pendant l enregistrement 䡵L insertion automatique ou non d une marque de chapitre lors d une pause d enregistrement est définie avec l élément AUTO CHAPTER REC PAUSE ON insérer une marque de chapitre OFF ne pas insérer de marque de chapitre Remarques L image à laque...

Page 239: ...rmine et le menu des chapitres est créé en employant les paramètres par défaut ce qui veut dire que le titre est clôturé ENABLE L écran THUMBNAIL EDIT s affiche Celui ci permet de modifier le style d affichage du menu des chapitres de modifier les miniatures utilisées de saisir des noms de chapitre et d effectuer d autres fonctions similaires Reportez vous à la page 49 pour plus d informations 䡵 S...

Page 240: ...ie sur l écran SYSTEM MENU Si DISABLE est défini la finalisation démarre Si elle est activée ENABLE l écran qui s affiche permet de modifier les menus des titres Utiliser cet écran pour vérifier si le menu des titres est correct pour modifier le style d affichage et pour saisir les noms des titres Page 55 Une barre indiquant la progression s affiche pendant la finalisation La barre de progression ...

Page 241: ...t Titre 1 Marque de chapitre Marque de chapitre Marque de chapitre Miniature Miniature Miniature Miniature Miniature Miniature Miniature Chapitre 1 Chapitre 2 Chapitre 3 Chapitre 1 Chapitre 2 Enregistrement Enregistrement Remarques La miniature du menu des titres sera la première miniature du menu des chapitres Il sera impossible de modifier le menu des chapitres après avoir clôturé un titre Aucun...

Page 242: ...nt sélectionné Le paramètre STYLE indique le numéro du style actuellement sélectionné 䡵Sélectionner STYLE et appuyer sur SET pour afficher l écran STYLE correspondant TITLE PATTERN Le modèle d affichage actuellement sélectionné pour le menu des titres Chaque modèle d affichage emploie des nombres des positions et des tailles de miniatures ainsi que des arrières plans différents CHAPTER PATTERN Le ...

Page 243: ...ilisés pour les menus des titres et des chapitres dans le nouveau style apparaîtront respectivement dans TITLE PATTERN et CHAPTER PATTERN 2 Modifier les modèles d affichage des menus des titres et des chapitres suivant le besoin Modifions par exemple le modèle d affichage du menu des titres de 1 à 4 Sélectionner TITLE PATTERN dans l écran PRESET STYLE MENU et appuyer sur SET L écran TITLE PATTERN ...

Page 244: ... par le biais d un câble réseau ce qui vous permet de créer des DVD originaux et créatifs avec un minimum d effort Easymenu peut être téléchargé depuis le site Web ci après Reportez vous au manuel du logiciel pour plus d informations sur son utilisation et les précautions à prendre http www jvc victor co jp english pro prodv 䡵 Principales caractéristiques Consultez le site Web ci dessus pour des i...

Page 245: ...SYSTEM MENU L écran THUMBNAILEDIT apparaîtra automatiquement quand l appareil passera en mode Stop depuis le mode enregistrement ou pause d enregistrement Remarque L écran THUMBNAIL EDIT ne s affichera pas si l option EDIT MENU de l écran SYSTEM MENU est désactivée DISABLE Les menus des titres et des chapitres sont alors créés en utilisant les paramètres présélectionnés 䡵 Écran THUMBNAIL EDIT Lors...

Page 246: ... sélectionnant l élément et en effectuant une pression sur la touche SET permet de déplacer l affichage de 10 images en arrière 3 Sélectionner BACK et appuyer sur SET pour modifier la miniature de ce chapitre L écran THUMBNAIL EDIT initial s affiche une nouvelle fois La miniature du deuxième chapitre a été modifiée par celle qui vient d être sélectionnée La miniature du menu des titres sera la pre...

Page 247: ...XT LOAD dans l écran THUMBNAIL EDIT et appuyez sur SET le texte du titre créé avec une application externe sera chargé dans l enregistreur de DVD pour être utilisé comme nom de miniature Remarques La marque deviendra une barre de fraction inverse Si la saisie de texte est impossible appuyer sur la touche Ctrl à droite du clavier TITLE INPUT CANCEL Saisir le commentaire à afficher dans le menu des ...

Page 248: ...APTER MENU dans l écran THUMBNAIL EDIT et appuyer sur SET L écran CHAPTER MENU EDIT apparaît 2 Sélectionner PRESET STYLE dans l écran CHAPTER MENU EDIT et appuyer sur SET L écran PRESET STYLE MENU apparaît Le numéro de style défini par le paramètre PRESET STYLE s affiche sur cet écran 3 Pour modifier le PATTERN d affichage Sélectionner PATTERN et appuyer sur SET Voir les détails de la procédure d ...

Page 249: ... touche SET permettent de sauter dix pages à la fois 4 Terminer la prévisualisation Pour ce faire sélectionner BACK dans l écran CHAPTER MENU PREVIEW et appuyer sur SET L écran CHAPTER MENU EDIT réapparaît 5 Sélectionner BACK dans l écran CHAPTER MENU EDIT et appuyer sur SET pour revenir à l écran THUMBNAIL EDIT Écran THUMBNAIL EDIT START BACK PRESET STYLE CHAPTER MENU PREVIEW CHAPTER MENU Écran C...

Page 250: ...éfinitivement fixés après la clôture du titre 1 Sélectionner TITLE CLOSE dans l écran THUMBNAIL EDIT et appuyer sur SET Une fenêtre de confirmation apparaît 2 Sélectionner YES et appuyer sur SET pour clôturer le titre La clôture du titre commence Une barre indique la progression de la clôture pendant le processus TITLE CLOSE 䡵 Une fois que la clôture du titre est terminée la barre de progression d...

Page 251: ... MENU de l écran SYSTEM MENU L écran TITLE MENU EDIT s affichera au lancement de la finalisation du disque Modification du style d affichage 1 Sélectionner PRESET STYLE dans l écran TITLE MENU EDIT et appuyer sur SET L écran PRESET STYLE apparaît 2 Pour modifier le PATTERN d affichage Sélectionner TITLE PATTERN et appuyer sur SET Reportez vous à la page 47 pour plus d informations sur la procédure...

Page 252: ...ouches et utilisés en combinaison avec la touche SET permettent de sauter dix pages à la fois 3 Terminer la prévisualisation Pour ce faire sélectionner BACK dans l écran TITLE MENU PREVIEW et appuyer sur SET L écran TITLE MENU EDIT réapparaît 4 Pour finaliser le disque sélectionner FINALIZE dans l écran TITLE MENU EDIT et appuyer sur SET Page 58 FINALIZE PRESET STYLE TITLE MENU PREVIEW EXIT TITLE ...

Page 253: ...U AAA BBB CCC DDD BACK TEXT LOAD TITLE TEXT INPUT 1 6 AAA BBB CCC DDD BACK TEXT LOAD TITLE TEXT INPUT 1 6 august CANCEL TITLE INPUT AAA BBB CCC DDD BACK TEXT LOAD TITLE TEXT INPUT 1 6 august Écran TITLE MENU EDIT Écran TITLE TEXT INPUT Remarque Si vous sélectionnez TEXT LOAD sur l écran TITLE MENU et appuyez sur SET le texte du titre créé avec une application externe sera chargé dans l enregistreu...

Page 254: ...cran de progression 1 2 FINALIZE Remarques La finalisation complète peut durer jusqu à 20 minutes Lors de la finalisation toutes les données audio et vidéo enregistrées sur le disque seront stockées conformément à la norme DVD Vidéo et pourront ainsi être lues sous la forme d une vidéo Bien qu un disque finalisé avec cet enregistreur de DVD puisse en principe être lu sur d autres lecteurs de DVD i...

Page 255: ...our une lecture accélérée en arrière 䡵Pendant l arrêt sur image ou la lecture ralentie en arrière appuyer sur la touche FWD pour une lecture ralentie en avant 䡵Pendant l arrêt sur image ou la lecture ralentie en avant appuyer sur la touche REV pour une lecture ralentie en arrière La vitesse de lecture change à chaque pression de la touche FWD ou REV Page 61 pour plus d informations ATTENTION Penda...

Page 256: ...ion DISC IN ACTION choisie pendant l enregistrement MENU TITLE Le menu des titres s affiche 2 Sélectionner le numéro du titre à lire Sélectionner le numéro du titre à lire avec les touches t 8 7 et 6 3 Appuyer sur SET pour commencer la lecture La lecture commence automatiquement à partir du premier titre 4 Définir en mode arrêt sur image Cette action est effectuée en appuyant sur PAUSE L enregistr...

Page 257: ...n mode lecture pour poursuivre la lecture au début du chapitre suivant 䡵 Appuyer sur la touche 8 pendant que l enregistreur de DVD est en mode lecture pour reprendre la lecture au début du chapitre courant Une pression sur la touche 8 1 seconde après une marque de chapitre et la lecture démarre à partir du début du chapitre précédent La touche t est désactivée pendant la lecture du dernier chapitr...

Page 258: ...ient un code de durée EBU Insérer un disque enregistrable dans le BD X200 Réglages Magnétoscope Activer la commande par RS 422A BD X200 Sélectionner l option 9PIN MASTER pour REMOTE SELECT dans l écran REMOTE MENU L écran REMOTE CONTROL 9PIN MASTER s affiche si l option définie pour REMOTE SELECT est 9PIN MASTER Cet écran est utilisé pour réaliser des opérations d édition Les opérations correspond...

Page 259: ...s Caméscope ou magnétoscope DV Activer la commande par DV BD X200 Sélectionner l option DV MASTER pour REMOTE SELECT dans l écran REMOTE MENU L écran REMOTE CONTROL DV MASTER s affiche si l option définie pour REMOTE SELECT est DV MASTER Cet écran est utilisé pour réaliser des opérations d édition Les opérations correspondantes sont décrites à la page 64 Moniteur Écran REMOTE CONTROL DV MASTER Cam...

Page 260: ...le lorsque l élément DVD MENU TYPE de l écran RECORDER MENU 2 2 est défini sur TOP ou NONE EXIT REMOTE CONTROL SCREEN 9PIN MASTER 1 2 3 TC TC ADJ BITRATE 8 0 Mbps SET EDL FINALIZE EDIT END CANCEL No IN OUT ACTION MENU PAUSE 00 00 00 00 00 00 00 ⳮ 00 00 00 00 PAUSE 00 00 00 00 00 00 00 ⳮ 00 00 00 00 PAUSE 00 00 00 00 00 00 00 ⳮ 00 00 00 00 00h 000 min 00m 00s 00 00 00 00 CHAPTER MANUAL TOTAL DURATI...

Page 261: ...r la touche Entrée et le magnétoscope commence à fonctionner Cet appareil n est pas contrôlé e Ejecter u Accélérée en arrière ou lecture accélérée en arrière q Arrêt t Lecture w Pause y Accélérée en avant ou lecture accélérée en arrière Lecture par trame inversée Lecture par trame L action à entreprendre par l enregistreur de DVD en réponse à une pression de la touche y ou u c est à dire FF REW ou...

Page 262: ...suivante Les événements sans point OUT enregistré sont enregistrés en tant que chapitres et CHAPTER apparaît dans l élément ACTION de l événement t Si nécessaire répéter les procédures 3 4 ci dessus y Lire le magnétoscope et à la position où vous souhaitez terminer l insertion passer en mode arrêt sur image u Appuyer sur la touche O du clavier ou sélectionner l élément TC SET à l écran et appuyer ...

Page 263: ... SCREEN 9PIN MASTER 1 2 3 TC TC ADJ BITRATE 8 0 Mbps SET EDL FINALIZE EDIT END CANCEL No IN OUT ACTION MENU STOP CHAPTER CHAPTER 00 01 01 01 02 01 03 00 00 00 00 00 01 30 00 00 02 30 00 ⳮ 00 03 30 00 ⳮ ⳮⳮⳮⳮⳮⳮⳮⳮ ⳮⳮⳮⳮⳮⳮⳮⳮ ⳮⳮ ⳮⳮ ⳮ 00h 030 min 03m 30s 00 03 30 00 CHAPTER MANUAL TOTAL DURATION DISC REMAIN SOURCE TIMECODE TC SET TC CANCEL EXIT REMOTE CONTROL SCREEN 9PIN MASTER 1 2 3 TC TC ADJ BITRATE 8 ...

Page 264: ... SCREEN 9PIN MASTER 1 2 3 TC TC ADJ BITRATE 8 0 Mbps SET RECORDING EDL FINALIZE EDIT END CANCEL No IN OUT ACTION MENU STOP CHAPTER CHAPTER 00 01 01 01 02 01 03 00 00 00 00 00 01 30 00 00 02 30 00 ⳮ 00 03 30 00 ⳮ ⳮⳮⳮⳮⳮⳮⳮⳮ ⳮⳮⳮⳮⳮⳮⳮⳮ ⳮⳮ ⳮⳮ ⳮ 00h 030 min 03m 30s 00 03 30 00 CHAPTER MANUAL TOTAL DURATION DISC REMAIN SOURCE TIMECODE Élément EDIT END Élément EDL 5 Sauvegarde des données d événement Les do...

Page 265: ...ION DISC REMAIN SOURCE TIMECODE EDL EDL01 S M EDL02 EDL03 EDL04 EDL05 EDL06 EDL07 EDL08 EDL09 EDL10 BACK SAVE IMPORT LOAD DELETE NAME MANAGER 3 1 2 Élément EDL Écran EDL MANAGER Méthode d opération Sélectionner l élément EDL à utiliser sélectionner l élément de fonction puis exécuter Exemple sauvegarder la valeur de paramètre en cours de l écran REMOTE CONTROL sur EDL08 1 Sélectionner l élément ED...

Page 266: ...ent être utilisés 16 caractères maximum sont affichés IMPORT Lorsque l élément EDL est mis en surbrillance et qu une pression est effectuée sur cet élément les éléments EDL importés via EasyMenu ou d autres listes d édition externes sont enregistrés Page 71 DELETE Lorsque l élément EDL est mis en surbrillance et qu une pression est effectuée sur cet élément l élément EDL sélectionné est supprimé À...

Page 267: ...nt EDL Élément IMPORT Élément LOAD 䡵 Exemple 1 chargement d une liste d édition EDL au format CSV mode Slave IN POINT OUT POINT EXIT REMOTE CONTROL SCREEN DV SLAVE 1 4 7 h m s f 2 5 8 3 6 9 h m s f h m s f CHAPTER MANUAL BITRATE 8 0 Mbps DISC REMAIN 000 min EDL TC CANCEL ADJ FINALIZE 00 00 00 00 00 10 00 00 00 40 00 00 00 20 00 00 00 30 00 00 01 10 00 00 00 50 00 00 JVC CSV IN POINT OUT POINT Chap...

Page 268: ...n disque enregistrable dans le BD X200 Réglages BD X200 Sélectionner l option DV SLAVE pour REMOTE SELECT dans l écran REMOTE MENU L écran REMOTE CONTROL DV SLAVE s affiche si l option définie pour REMOTE SELECT est DV SLAVE Cet écran peut être utilisé pour définir les points et les marques de chapitre Reportez vous à la page 74 pour plus d informations sur l utilisation de l écran REMOTE CONTROL ...

Page 269: ...de cet appareil Préparation Insérer un disque enregistrable dans cet appareil Réglage Réglages de l appareil Définir l élément REMOTE SELECT de l écran REMOTE MENU sur 9PIN REC Lorsque l élément REMOTE SELECT est défini sur 9PIN REC l écran REMOTE CONTROL 9PIN REC apparaît sur le moniteur Les points d édition et les points de chapitres peuvent être définis dans l écran REMOTE CONTROL 9PIN REC Repo...

Page 270: ...seconde image est entré à l aide du clavier Fait défiler la liste des chapitres DISC REMAIN Ce champ affiche une estimation de l espace restant pour l enregistrement sur le disque FINALIZE Cette touche permet de finaliser le disque TC CANCEL Ce bouton est utilisé pour effacer les valeurs saisies pour le point d entrée le point de sortie et les marques de chapitre EDL Appelle l écran EDL MANAGER De...

Page 271: ...à l écran et appuyer sur la touche Entrée Le point sélectionné c est à dire le point d entrée le point de sortie ou une marque de chapitre dans la liste des chapitres sera supprimé Le tri de la liste des chapitres est mis à jour dès qu une marque de chapitre est supprimée IN POINT OUT POINT EXIT REMOTE CONTROL SCREEN DV SLAVE 1 4 7 h m s f 2 5 8 3 6 9 h m s f h m s f CHAPTER MANUAL BITRATE 8 0 Mbp...

Page 272: ...cun enregistrement supplémentaire ne sera possible sur ce disque après la finalisation 䡵 Sélectionner l élément EXIT à l écran appuyer sur la touche Entrée et l écran REMOTE CONTROL disparaît 䡵 Appuyer sur la touche OPEN CLOSE en face avant pour sortir le disque du BD X200 5 Sauvegarde d une liste d édition Élément EDL Des listes d édition peuvent être sauvegardées dans l écran EDL MANAGER de cet ...

Page 273: ...à cet effet l un des câbles standard indiqués ci dessus Raccorder les prises VIDEO LINE OUT et AUDIO OUT de l enregistreur de DVD aux prises d entrée audio et vidéo du moniteur Procédures de configuration Insérer un disque enregistrable dans le BD X200 Réglages GY DV5000 ou GY DV5001 Activer ON l option DV REC TRIGGER dans l écran OTHERS MENU 1 2 BD X200 Sélectionner l option DV TRIGGER pour REMOT...

Page 274: ... 1 AUD 2 SPLIT TC SPLIT CANCEL LAST ED REC EE OUT IN OUT IN ENTRY PREVIEW AUTO EDIT GOTO REVIEW SHIFT ALL STOP MAX MIN MONITOR MAX MIN MONITOR FWD REV STILL X 1 X1 FWD REV STILL X 1 X1 RECORDER PLAYER HOUR MIN SEC FRAME HOUR MIN SEC FRAME P R VITC LTC CTL VITC LTC CTL BUMP PREROLL 7 5 3 ON OFF EVENT No V SPEED A SPLIT DURATION IN OUT IN OUT E D I T I N G C O N T R O L U N I T R M G 8 2 0 Utilisati...

Page 275: ...le DVD Branchement des signaux Les câbles doivent être branchés et débranchés lorsque les appareils sont éteints Raccordement direct de deux BD X200 Brancher un câble Ethernet entre les prises LAN des appareils émetteur et récepteur Il faut ici utiliser un câble Ethernet croisé de catégorie 5 VIDEO AUDIO IN IN OUT IN OUT CH1 CH2 REMOTE USB DV IN OUT SIGNAL LAN GND DC 19V 4dB 8dB INPUT LEVEL LINE Y...

Page 276: ...appuyer sur SET ou sur Entrée 5 Appuyer sur la touche SET UP pour revenir à l écran normal Duplication de DVD avec la prise LAN suite Paramétrage du réseau Procéder comme suit pour paramétrer le réseau sur les appareils émetteur et récepteur BUSY OPEN CLOSE TOP MENU MENU OPTION DV Y C LINE SET UP SET MENU HOST NAME bdx200 STATIC IP ADDRESS SETTING 255 255 255 0 192 168 0 254 192 168 0 2 IP ADDRESS...

Page 277: ...e l émetteur Sélectionner le chiffre à modifier avec les touches t et 8 Appuyer sur les touches du curseur 6 7 pour régler la valeur du chiffre sélectionné Répéter l opération ci dessus pour tous les chiffres sélectionner SET avec les touches 8 t et appuyer sur la touche SET L adresse IP de l émetteur définie avec cette boîte de dialogue sera enregistrée dans le récepteur comme adresse la plus réc...

Page 278: ... RECEIVER Searching SENDER IP ADDRESS 192 168 000 002 ABORT DVD DVD SENDER DUBBING ABORT DVD DVD RECEIVER DUBBING ABORT MENU DVD DVD EXECUTE DUBBING DVD DVD SENDER DUBBING START SENDER IP ADDRESS 192 168 000 002 RECEIVER IP ADDRESS 192 168 000 003 EXECUTE CANCEL Remarques La duplication ne sera pas effectuée si vous sélectionnez CANCEL dans la boîte de confirmation du lancement de la duplication L...

Page 279: ...ANCEL CANCEL CANCEL DISC FINALIZATION CANCEL DISC ERASE QUICK CANCEL DISC ERASE FULL DISC MENU MENU DUBBING EXIT DISC MENU INPUT SELECT SYSTEM PRESET STYLE RECORDER REMOTE DISPLAY CLOCK ADJUST DUBBING NETWORK MENU INPUT SELECT LINE INPUT SELECT MENU MENU TEST SIGNAL OFF FACTORY SETTING CANCEL KEYBOARD STYLE ENGLISH EDIT MENU ENABLE TOTAL RECORDING TIME 5 Hour 30 Min SYSTEM MENU MENU CHAPTER CREATI...

Page 280: ...ns la liste avec les touches 6 et 7 et appuyer sur SET La valeur sera modifiée en conséquence r Répéter les étapes q à e pour effectuer tous les réglages nécessaires 䡵 Sélectionner MENU et appuyer sur SET pour revenir au menu Setup 䡵 Pour passer à l écran suivant sélectionner le bouton en bas de l écran et appuyer sur SET 䡵 Pour revenir à l écran initial du menu sélectionner MENU ou BACK et appuye...

Page 281: ...nus des titres et des chapitres Ce bouton affiche l écran RECORDER MENU qui contient deux pages de paramètres différentes L écran RECORDER MENU 1 2 permet de définir les paramètres pour la méthode de création de chapitre et pour le codage audio et vidéo L écran RECORDER MENU 2 2 permet de définir les paramètres nécessaires à l enregistrement Ce bouton affiche un menu qui permet de définir les para...

Page 282: ...pprimées CANCEL Ne pas réaliser un effacement rapide EXECUTE Réaliser un effacement rapide Le disque peut de nouveau être enregistré depuis le début Choisir de réaliser un effacement complet sur un DVD RW mode vidéo Toutes les zones d un DVD RW sont supprimées Si un disque doit être utilisé plusieurs fois supprimer à l aide de cet élément CANCEL Ne pas réaliser un effacement complet EXECUTE Réalis...

Page 283: ...eur Ce paramètre est utilisé pour indiquer s il faut rétablir ou non la valeur par défaut de tous les paramètres du menu de configuration CANCEL Il ne faut pas rétablir les valeurs par défaut EXECUTE Il faut rétablir les valeurs par défaut Ce paramètre est utilisé conjointement avec un clavier USB et il a pour but d indiquer la disposition ou la langue du clavier parmi les suivantes ENGLISH FRENCH...

Page 284: ...e est utilisé pour afficher l écran CHAPTER PATTERN Cet écran permet de sélectionner un modèle d affichage pour le menu des chapitres BACK revient à l écran de menu PRESET STYLE 6 ne peut pas être sélectionné lors du réglage d usine Ce bouton permet de revenir à l écran Setup Menu TYPE 1 2 3 4 5 6 7 8 TITLE PATTERN 1 2 3 4 5 1 2 3 CHAPTER PATTERN 1 2 3 4 5 1 2 3 Réglages par défaut Écran RECORDER ...

Page 285: ...pendant la quantité de données augmente et la durée pouvant être enregistrée diminue Lorsque la valeur de cet élément est modifiée l élément TOTAL CONTENTS TIME est automatiquement défini La plage du paramètre varie en fonction de l élément AUDIO ENCODE LPCM 4 0 à 7 8 Mb s par étapes de 0 2 Mb s DOLBY DIGITAL 2 0 à 9 0 Mb s par étapes de 0 2 Mb s MPEG 2 0 à 9 0 Mb s par étapes de 0 2 Mb s Ce param...

Page 286: ... supprimer des miniatures SQUEEZE V H CUT Les côtés gauche et droit ainsi que le haut et le bas du contenu vidéo sont alors à supprimer des miniatures LETTER BOX Il faut régler ce paramètre pour enregistrer un signal depuis la prise DV IN OUT Plus précisément il indique s il faut enregistrer les signaux en provenance des canaux 1 et 2 ou des canaux 3 et 4 Seulement disponible pour 32 kHz 1 2ch 1 2...

Page 287: ... l écran REMOTE CONTROL DV SLAVE Le BD X200 devient en outre l esclave et sera commandé par la source non linéaire DV TRIGGER Cette option est sélectionnée lorsque le BD X200 est raccordé à un caméscope numérique disposant d une fonction de déclenchement DV et permet à l enregistreur de DVD d enregistrer un signal vidéo en provenance du caméscope suite à l actionnement du déclencheur Remarque Le r...

Page 288: ...ra affiché si le paramètre DISPLAY est désactivé OFF Ce paramètre indique s il faut afficher ou non la date et ou l heure courantes à l écran OFF Ces informations ne seront pas affichées à l écran DATE Seule la date doit être affichée TIME Seule l heure doit être affichée TIME DATE La date et l heure seront toutes deux affichées Lorsque l enregistreur de DVD est à l arrêt ou en enregistrement ce s...

Page 289: ...écran Setup Menu Écran DUBBING Le tableau suivant indique et décrit les paramètres qui peuvent être définis dans l écran DUBBING Moitié supérieure Aspect sur l écran du moniteur Moitié inférieure Aspect sur l afficheur de l appareil Réglage par défaut Paramètre Réglages possibles Description DVD DVD CANCEL EXECUTE dub CAN EXE MENU Il faut sélectionner ce paramètre pour permettre la duplication de ...

Page 290: ...ctères Caractères alphanumériques et tiret CANCEL annuler le réglage du nom de l hôte Ce paramètre est utilisé pour définir l adresse IP Il faut veiller à ce que deux appareils d un même réseau ne possèdent pas la même adresse IP Ce paramètre est utilisé pour définir le masque de sous réseau Les BD X200 doivent posséder les mêmes paramètres de réseau Ce paramètre est utilisé pour définir l adresse...

Page 291: ... d échantillonnage 48 kHz Nombre de canaux 2 䡵 Interface DV E S IEEE1394 䡵 Dimensions externes Unité mm 䡵 Généralités Prise réseau RJ 45 Catégorie 5 100 BASE Tx Prise USB USB 1 1 2 Alimentation 19 V DC Consommation électrique 31 W 1 63 A Poids 4 5 kg appareil seul Dimensions 212 mm L 352 mm P 88 mm H pieds et autres éléments en saillie non compris Température de fonctionnement autorisée 5 C à 35 C...

Page 292: ...ONES A GRABADORA DE DVD Español OPERATE PHONES REV STOP PLAY DVD RECORDER BD X200 FWD PAUSE REC BUSY OPEN CLOSE TOP MENU MENU OPTION DV Y C LINE SET UP AUDIO CH1 CH2 TITLE DOLBY DIGITAL LPCMMPEG CHAPTER SET LLT0077 001B ...

Page 293: ... DV Cable recubierto de par trenzado 4 metros PHONES Cable recubierto de par trenzado 5 metros MIC Cable recubierto de par trenzado 5 metros LAN Cable recubierto de par trenzado 10 metros USB Cable recubierto de par trenzado 5 metros DC 19V Cable recubierto 1 2 metros El flujo de corriente adecuado para este aparato es de 19 amperios Precaución 5 En aquellos lugares en los que haya ondas electroma...

Page 294: ...ARGAS ELÉCTRICAS NO EXPONGA ESTE APARATO A LA LLUVIA O A LA HUMEDAD ATENCIÓN Para evitar descargas eléctricas no abra el aparato El interior no contiene ninguna pieza para su utilización por parte del usuario Consulte el mantenimiento con técnicos de mantenimiento cualificados Recuerde La placa de datos de servicio e instrucciones de seguridad se encuentran en la parte del fondo de la unidad El bo...

Page 295: ...EE UU y la ley de protección intelectual como propiedad de Macrovision y otros titulares de copyright Se requiere el permiso de Macrovision para utilizar esta tecnología de protección del copyright y salvo en aquellas situaciones en que esta empresa haya concedido un permiso especial dicha tecnología está restringida al uso doméstico y para otros fines determinados de visualización También están p...

Page 296: ... de los menús de títulos 55 Reproducción Reproducción de un disco antes de finalizarlo 59 Reproducción de un disco finalizado 60 Reproducción rápida y lenta 61 Reproducción del capítulo título anterior o siguiente 61 Grabación sincrónica Grabación de señales de reproducción desde una grabadora de cinta de vídeo con RS 422A 62 Grabación de señales de reproducción desde una cámara DV o una grabadora...

Page 297: ...desde un editor no lineal En tal caso la BD X200 debe configurarse como esclavo del control mediante la configuración de menú La grabadora de DVD es controlada por el editor no lineal en este tipo de configuración Página 73 䡵Los menús de títulos y capítulos se pueden crear de forma automática o manual Página 45 Hay disponibles cinco diseños distintos como estilos de visualización de los menús de t...

Page 298: ...s dispositivos desconecte estos dispositivos y siga después los procedimientos de preparación descritos en los manuales de usuario correspondientes 䡵 La unidad de DVD es una pieza de desgaste Aunque la vida útil de la unidad de DVD difiere en función del entorno de uso del cliente de forma orientativa se recomienda su reemplazo cada 1 000 horas página 87 TOTAL RECORDING TIME Precauciones relativas...

Page 299: ...os Notas adicionales sobre el manejo de discos 䡵Nunca limpie un disco empleando diluyentes de pintura disolventes orgánicos alcohol o líquido para limpiar discos analógicos 䡵No utilice protectores de discos ni películas protectoras 䡵No deberían aplicarse adhesivos ni otro tipo de etiquetaje de papel 䡵No utilice discos de los que se hayan retirado adhesivos o etiquetas 䡵No utilice discos en los que...

Page 300: ...finalizado un DVD R o un DVD RW modo de vídeo se puede reproducir igual que cualquier otro DVD mediante un reproductor de DVD estándar Página 44 䡵 Se puede grabar en secciones no utilizadas de un disco y modificar títulos o estilos de visualización según sea necesario antes de finalizar un disco Tanto en el caso del DVD R como del DVD RW es imposible sobrescribir con nuevos datos el contenido grab...

Page 301: ...ción Antes de cerrar un título se puede modificar el estilo utilizado para la visualización del menú de capítulos cambiar las miniaturas empleadas y asignar nombres a las miniaturas Antes de finalizar un disco se puede modificar el estilo utilizado para el menú de títulos y asignar nombres a los títulos DVD R o DVD RW Título 1 Capítulo 1 Capítulo 2 Capítulo 3 Título 2 Capítulo 1 Capítulo 2 Códigos...

Page 302: ...dor OPTION Este indicador se ilumina o parpadea cuando INPUT SELECT de la pantalla INPUT SELECT MENU se ha ajustado a OPTION Esta configuración no se puede realizar utilizando la grabadora de DVD sola 䡵 Indicador DV Este indicador se ilumina o parpadea cuando INPUT SELECT de la pantalla INPUT SELECT MENU se ha ajustado a DV Concretamente el indicador se ilumina cuando se detecta una señal y parpad...

Page 303: ...ucción o el modo de retroceso rápido para iniciar la reproducción de avance rápido Si se pulsa durante la reproducción de avance rápido este botón cambia la velocidad de la reproducción de avance rápido entre baja velocidad y alta velocidad Pulse este botón en modo de imagen fija o durante la reproducción de retroceso lento para iniciar la reproducción de avance lento Si se pulsa durante la reprod...

Page 304: ...l canal 2 Si AUDIO REC VOLUME MODE de la pantalla RECORDER MENU 2 2 está ajustado a INDEPENDENCE y se pulsa este botón mientras se mantiene pulsado el botón 8 disminuirá el nivel de grabación de audio del canal 1 Igualmente si se pulsa el botón 7 mientras se mantiene pulsado el botón t disminuirá el nivel de grabación de audio del canal 2 Botón 8 Si se visualiza un menú de títulos o un menú de cap...

Page 305: ...tor conectado a este terminal También se muestra en pantalla información de estado y de alarma Se puede emplear la pantalla DISPLAY MENU para indicar los datos que se desean ver 4Conmutador AUDIO INPUT LEVEL Este conmutador sirve para ajustar el nivel estándar de entrada de audio 4dB El nivel estándar se ajusta a 4 dB 8dB El nivel estándar se ajusta a 8 dB 1 2 3 4 5 6 7 5Terminales AUDIO IN RCA 2 ...

Page 306: ... instalado el software de utilidad de la BD X200 para realizar operaciones como crear menús de títulos y capítulos Deberá configurarse la red mediante la pantalla NETWORK MENU 0Terminales USB 2 Estos terminales se emplean para conectar la grabadora de DVD a dispositivos USB como un teclado o un ratón Se puede emplear un teclado y un ratón como alternativa a los botones de la grabadora de DVD al ut...

Page 307: ... capítulo que se están grabando en este instante además del tiempo transcurrido en la grabación del título o el espacio restante en el disco Se puede pulsar el botón SET para alternar en el área del contador entre la indicación del tiempo de grabación transcurrido y la del el espacio restante en el disco TITLE CHAP TITLE CHAP Durante el modo de reproducción el display LCD presenta el número de tít...

Page 308: ...odo de grabación en pausa REC STOP La grabadora de DVD está pasando del modo de grabación al modo de detención MENU EDIT Se está editando un menú de títulos o un menú de capítulos EJECT Se está expulsando el disco actual TITLE CLOSE La grabadora de DVD está cerrando un título FINALIZE La grabadora de DVD está finalizando el disco QUICK ERASE La grabadora de DVD está borrando los datos de un disco ...

Page 309: ...ón de distintos datos de estado 䡵 Si se ajusta DISPLAY a OFF no se mostrará información de estado Mensajes de estado 1 Datos relativos a la grabación Si se pulsa el botón SET UP durante el modo de grabación se mostrará el valor de la tasa de bits de vídeo y el formato de codificación de audio Si se vuelve a pulsar el botón SET UP desaparecerá de la pantalla esta información Nº Elemento Descripción...

Page 310: ...a información de fecha y hora OFF No se muestra información DATE Sólo se muestra la fecha TIME Sólo se muestra la hora TIME DATE Se muestran tanto la fecha como la hora El estilo de indicación de fecha se puede modificar mediante DATE STYLE de la pantalla DISPLAY MENU Modo de grabación Se muestran la fecha y la hora del reloj interno Modo de reproducción Se muestran la fecha y la hora de la finali...

Page 311: ... TITLE 1 0 00 00 CHAPTER 1 0 00 00 REC DVD RW El estado del disco no se muestra si DISPLAY de la pantalla DISPLAY MENU está ajustado a OFF Estado Descripción DVD R El disco actual es un DVD R no finalizado Aproximadamente 3 segundos DVD RW El disco actual es un DVD RW no finalizado Aproximadamente 3 segundos DVD El disco actual es un DVD R o un DVD RW finalizado Aproximadamente 3 segundos INVALID ...

Page 312: ... de que se finalizara A L xxxx R Se muestra el valor ajustado cuando se cambia el nivel de grabación del audio analógico d L xxxx R Se muestra el valor ajustado cuando se cambia el nivel de grabación del audio digital DURATION OVER Se ha realizado una autoedición cuando el espacio restante en el disco se ha vuelto insuficiente durante el funcionamiento remoto mediante RS 422A o DV INVALID EDL Se h...

Page 313: ...ODE QUALITY a un valor bajo es decir 4 Mbps o inferior por grabar contenido con poco movimiento u otros factores similares No se generará ningún error cuando el tiempo se encuentre dentro del ajustado para el contenido total OVERHEATING oVERHEATING Se muestra cuando la temperatura interna del aparato aumenta debido al mal funcionamiento del ventilador etc En tal caso apague inmediatamente el apara...

Page 314: ...de vídeo se emite por la pantalla E E como señal de vídeo compuesto Además el menú de configuración y otras pantallas de configuración también se visualizan en el monitor conectado a este terminal El estado de funcionamiento de la grabadora de DVD y otra información relevante se visualizan en pantalla cuando DISPLAY de la pantalla DISPLAY MENU se ha ajustado a ON Nota 4 La especificación del termi...

Page 315: ... 6 4 8 9 7 Num Lock 1 Q A Z X C V B N M S D F G H J K L U W E R T Y I O P 2 3 4 5 6 7 8 9 0 つ BD X200 BD X200 Nota 1 Para poder utilizar el terminal RS 422A REMOTE ajuste REMOTE SELECT de la pantalla REMOTE MENU a 9PIN MASTER 9PIN REC o 9PIN PLAY Nota 2 Para utilizar el control remoto mediante el terminal DV IN OUT seleccione la opción correspondiente en REMOTE SELECT de la pantalla REMOTE MENU No...

Page 316: ...azadera en la grabadora de DVD 3 Conecte el cable de alimentación incluido al terminal AC IN del adaptador de CA 4 Enchufe el cable de alimentación en una toma de corriente eléctrica Se suministrará corriente a la grabadora de DVD y el indicador OPERATE se encenderá en rojo Modo de espera Nota Se requiere una pequeña cantidad de corriente cuando la grabadora de DVD está en modo de espera PRECAUCIÓ...

Page 317: ...abadora de DVD Se recomienda que expulse el disco en este momento 1 Pulse el botón OPERATE La grabadora de DVD pasará al modo de espera y el color del indicador OPERATE cambiará a rojo 2 Si la grabadora de DVD no se va a utilizar durante un período de tiempo prolongado desconecte el adaptador de CA Antes de desconectar el adaptador de CA asegúrese de desenchufar el cable de alimentación de la toma...

Page 318: ...tras esté abierta la bandeja del disco el indicador OPEN CLOSE estará encendido Si no se ha finalizado el disco actual aparecerá el mensaje NOT FINALIZE en el monitor y en el display LCD 2 Retire el disco de la bandeja del disco Antes de retirar el disco espere a que la bandeja del disco se haya abierto por completo 3 Pulse el botón OPEN CLOSE La bandeja del disco se cerrará automáticamente Indica...

Page 319: ...e End Home Page Up Page Down Enter 0 1 2 5 6 4 8 9 7 Num Lock 1 Q A Z X C V B N M S D F G H J K L U W E R T Y I O P 2 3 4 5 6 7 8 9 0 VIDEO AUDIO IN IN OUT IN OUT CH1 CH2 REMOTE USB DV IN OUT SIGNAL LAN GND DC 19V 4dB 8dB INPUT LEVEL LINE Y C 䡵 Procedimiento Se pueden controlar las siguientes funciones mediante el teclado y el ratón Terminales USB Para introducir nombres y comentarios para los men...

Page 320: ...y 7 para seleccionar CLOCK ADJUST La opción de menú seleccionada se visualiza en forma resaltada w Pulse el botón SET para abrir la pantalla CLOCK ADJUST MENU 3 Ajuste la fecha y la hora según sea necesario q Utilice los botones 6 y 7 para seleccionar DATE o TIME Acontinuación pulse el botón SET w Utilice los botones t y 8 para seleccionar el dígito que desea cambiar El dígito seleccionado se visu...

Page 321: ...ha y la hora OFF No se muestran ni la fecha ni la hora TIME Sólo se muestra la hora DATE Sólo se muestra la fecha TIME DATE Se muestran tanto la fecha como la hora 䡵 DATE STYLE Este parámetro sirve para seleccionar el modo en que debe aparecer en pantalla la fecha YY MM DD Año mes día MM DD YY Mes día año DD MM YY Día mes año Pantalla DISPLAY MENU Preparación Para visualizar en pantalla la informa...

Page 322: ... asignan números exclusivos a los capítulos Un título puede contener hasta 99 capítulos distintos Adición de capítulos Siempre que se pone en pausa la grabación se inserta automáticamente una marca de capítulo Además en CHAPTER CREATION de la pantalla RECORDER MENU 1 2 se puede configurar la inserción automática o manual de marcas de capítulo Se crean automáticamente miniaturas es decir el fotogra...

Page 323: ... la grabación empieza desde el primer capítulo de este título Se crea un título nuevo en la sección no utilizada del disco y la grabación empieza desde el primer capítulo de este título DVD RW Pueden grabarse nuevos datos Se crea un título nuevo y la grabación empieza desde el primer capítulo de este título Se crea un título nuevo en la sección no utilizada del disco y la grabación empieza desde e...

Page 324: ...tancia debe apagarse el aparato ni desconectarse el cable de alimentación mientras se están borrando datos MENU FINALIZE CANCEL CANCEL CANCEL CANCEL DISC FINALIZATION EXECUTE DISC ERASE DISC ERASE DISC MENU QUICK FULL DISC ERASE QUICK MENU FINALIZE CANCEL CANCEL CANCEL CANCEL DISC FINALIZATION EXECUTE DISC ERASE DISC ERASE DISC MENU QUICK FULL Nota Si se inserta un DVD RW nuevo o uno que se haya b...

Page 325: ... PAUSE Especifique si desea insertar automáticamente un capítulo cuando se ponga en pausa la grabación OFF No se inserta un capítulo ON Se inserta un capítulo TOTAL CONTENT TIME Este parámetro sirve para configurar un valor relativo a la codificación o compresión de los datos de vídeo Se utiliza cuando la tasa de bits se ajusta automáticamente de acuerdo con el tiempo de grabación y la capacidad d...

Page 326: ...detención No se muestra el menú de títulos TOP MENU NEXT TITLE Reproduce el siguiente título Cuando se termina de reproducir el último título se reproduce el primer título Se repite la reproducción del disco 䡵 Opción DVD MENU TYPE Sirve para seleccionar si desea crear un menú de títulos TOP MENU o un menú de capítulos MENU al finalizarse un disco o al cerrar un título TOP MENU Crea un menú de capí...

Page 327: ...ECT MENU Pantalla INPUT SELECT MENU Indicadores de entrada de vídeo Botón SET UP Botón SET BUSY OPEN CLOSE TOP MENU MENU OPTION DV Y C LINE SET UP SET Elemento Descripción INPUT SELECT Este parámetro sirve para seleccionar las señales de entrada de audio y vídeo LINE Se va a utilizar la señal de vídeo compuesto del terminal VIDEO LINE IN y las señales de audio analógico de los terminales AUDIO IN ...

Page 328: ...TIME Si ya se conoce de antemano el tiempo de grabación y se ajusta el tiempo con esta opción la BD X200 determinará la tasa de bits de codificación óptima a partir de la capacidad restante del disco virgen y el tiempo de grabación Si se ajusta el tiempo de grabación con este parámetro ENCODE QUALITY se ajustará automáticamente a un valor que no se podrá modificar manualmente ENCODE QUALITY Mbps C...

Page 329: ...er una guía sobre la cantidad de tiempo de grabación disponible Notas Si se pulsa el botón SET UP durante el modo de grabación se mostrará en pantalla el valor de la tasa de bits de vídeo y el formato de codificación de audio Pulse de nuevo el botón SET UP para ocultar esta información Al grabar una fuente de música se recomienda que el valor sea DOLBY DIGITAL o LPCM Con MPEG se puede dar un deter...

Page 330: ... medidores de nivel de audio del panel frontal mientras se ajustan los niveles Ajuste el nivel de forma que el LED de más a la derecha no se encienda Botones utilizados Indicadores de nivel de audio Ajuste de ambos canales juntos BOTH Ajuste de ambos canales por separado INDEPENDENCE 䡵Para aumentar el nivel de grabación 䡵Para ajustar el nivel del canal 1 䡵Para reducir el nivel de grabación 䡵Para a...

Page 331: ...P PLAY DVD RECORDER BD X200 FWD PAUSE REC BUSY OPEN CLOSE TOP MENU MENU OPTION DV Y C LINE SET UP TITLE DOLBY DIGITAL LPCMMPEG CHAPTER SET Conecte el terminal VIDEO LINE OUT al monitor Procedimiento 䡵 Mantenga pulsado el botón REC durante al menos 2 segundos estando detenida la grabadora de DVD o sin tener ésta un disco insertado Mientras se mantiene pulsado este botón la señal de entrada codifica...

Page 332: ...í como distintos fondos CHAPTER PATTERN El diseño de visualización seleccionado actualmente para los menús de capítulos Cada diseño de visualización tiene distintos números posiciones y tamaños para las miniaturas así como distintos fondos 4 Utilice los botones de cursor 6 7 t y 8 para seleccionar uno de los ocho tipos de estilo y visualizar la pantalla STYLE correspondiente 5 Para utilizar un est...

Page 333: ...lo Finalización Grabación de un nuevo título Posibilidad de cambiar el menú de capítulos Posibilidad de cambiar el menú de títulos Tiempo de procesamiento 30 segundos como máximo Tiempo de procesamiento Varios minutos Tiempo de procesamiento 20 minutos como máximo Se puede reproducir Otros reproductores de DVD Título 1 Botón REC botón PLAY Puede seleccionar si desea insertar automáticamente una ma...

Page 334: ...UTO CHAPTER REC PAUSE de la pantalla RECORDER MENU 1 2 se ajusta a ON se insertará automáticamente una marca de capítulo cuando se pase al modo de grabación en pausa También existen varios métodos para la inserción manual o automática de marcas de capítulo Página 42 4 Vuelva a iniciar la grabación Pulse el botón PLAY o PAUSE Se empezará a grabar otra vez y se creará un nuevo capítulo en el título ...

Page 335: ...ertará marcas de capítulo en los intervalos correspondientes durante la grabación 䡵Para seleccionar si desea insertar o no automáticamente una marca de capítulo cuando la grabación esté en pausa utilice la opción AUTO CHAPTER REC PAUSE ON Se inserta una marca de capítulo OFF No se inserta una marca de capítulo Notas En el menú de capítulos se utilizará el fotograma en el que se ha insertado cada m...

Page 336: ...ISABLE Se termina la grabación y se crea el menú de capítulos según la configuración estándar es decir se cierra el título ENABLE Aparece la pantalla THUMBNAIL EDIT En esta pantalla se puede modificar el estilo de visualización del menú de capítulos cambiar las miniaturas empleadas introducir nombres de capítulo y realizar otras funciones similares Para más información consulte la página 49 䡵 Si d...

Page 337: ... para confirmar la configuración del menú de títulos modificar el estilo de visualización y asignar nombres a los títulos Página 55 Durante la finalización aparecerá una barra que muestra el estado de progreso La barra de progreso desaparecerá una vez terminada la finalización y se restablecerá la visualización de pantalla normal No aparecerá el panel REC CONTROL 䡵 Seleccione NO en la pantalla de ...

Page 338: ...abación Inicio de la grabación Título 2 Marca de capítulo Marca de capítulo Marca de capítulo Miniatura Miniatura Miniatura Miniatura Miniatura Miniatura Miniatura Capítulo 1 Capítulo 2 Capítulo 3 Capítulo 1 Capítulo 2 Grabación Grabación 䡵Modificación de menús de capítulos El estilo de visualización y las miniaturas de un menú de capítulos se pueden editar al finalizar la grabación es decir duran...

Page 339: ...El diseño de visualización seleccionado actualmente para los menús de capítulos Cada diseño de visualización tiene distintos números posiciones y tamaños para las miniaturas así como un fondo distinto 3 Utilice los botones de cursor 6 7 t y 8 para seleccionar uno de los ocho tipos de estilo y visualizar la pantalla STYLE correspondiente que contiene diseños de títulos y capítulos 4 Para utilizar u...

Page 340: ...ilizados para los menús de títulos y capítulos en el nuevo estilo aparecerán en TITLE PATTERN y CHAPTER PATTERN respectivamente 2 Cambie los diseños de visualización de los menús de títulos y capítulos según sea necesario Puede cambiar por ejemplo el diseño de visualización del menú de títulos del 1 al 4 SeleccioneTITLE PATTERN en la pantalla PRESET STYLE MENU y pulse el botón SET Aparecerá la pan...

Page 341: ...n se pueden transferir a continuación a la BD X200 mediante un cable de red lo cual permite realizar DVDs imaginativos y creativos con el mínimo esfuerzo Easymenu se puede descargar en la siguiente página Web Consulte el manual del software para informarse sobre el uso y las precauciones http www jvc victor co jp english pro prodv 䡵 Especificaciones principales Visite la página Web arriba menciona...

Page 342: ... los menús de títulos y capítulos se crearán con la configuración preajustada 䡵 Pantalla THUMBNAIL EDIT Cuando aparece al principio la pantalla THUMBNAIL EDIT contiene las miniaturas de hasta seis capítulos grabados dispuestos por orden de grabación A partir de la séptima las miniaturas aparecen en las páginas siguientes Esta pantalla inicial puede utilizarse para cambiar la miniatura de un capítu...

Page 343: ...pción y pulsando el botón SET la visualización retrocede en 10 fotogramas 3 Seleccione BACK y pulse el botón SET para cambiar la miniatura del capítulo en cuestión Aparecerá de nuevo la pantalla inicial THUMBNAIL EDIT La miniatura para el segundo capítulo habrá cambiado a la que se acaba de seleccionar La miniatura del menú de títulos será la miniatura superior del menú de capítulos Comprobación d...

Page 344: ... mostrará el nombre o comentario del primer capítulo Nota Si selecciona TEXT LOAD en la pantalla THUMBNAIL EDIT y luego pulsa el botón SET la grabadora de DVD leerá el texto de título creado con una aplicación externa y lo utilizará como nombre de miniatura TEXT LOAD TITLE INPUT CANCEL Introduzca un comentario para que aparezca en la pantalla del menú de capítulos Introduzca un nombre para la mini...

Page 345: ...ualización 1 Seleccione CHAPTER MENU en la pantalla THUMBNAIL EDIT y pulse el botón SET Aparecerá la pantalla CHAPTER MENU EDIT 2 Seleccione PRESET STYLE en la pantalla CHAPTER MENU EDIT y pulse el botón SET Aparecerá la pantalla PRESET STYLE MENU El número de estilo ajustado en el parámetro PRESET STYLE aparecerá en esta pantalla 3 Para modificar PATTERN de visualización Seleccione PATTERN y puls...

Page 346: ...DIT y pulse el botón SET para volver a la pantalla THUMBNAIL EDIT Pantalla THUMBNAIL EDIT START BACK PRESET STYLE CHAPTER MENU PREVIEW CHAPTER MENU Pantalla CHAPTER MENU EDIT 2 01 02 03 03 08 BACK 1 Pantalla CHAPTER MENU PREVIEW 4 Notas Se necesitan hasta 20 segundos por página para generar una vista previa Puede que se necesite más tiempo según el número de miniaturas por página Durante la genera...

Page 347: ...nfiguración del menú de capítulos será ya permanente 1 Seleccione TITLE CLOSE en la pantalla THUMBNAIL EDIT y pulse el botón SET Aparecerá una pantalla de confirmación 2 Si desea continuar con el cierre del título seleccioneYES y pulse el botón SET Se iniciará el cierre del título Una barra de progreso mostrará el estado de progreso del cierre del título TITLE CLOSE 䡵 Cuando se haya terminado de c...

Page 348: ...SYSTEM MENU a ENABLE La pantalla TITLE MENU EDIT aparecerá cuando se inicie la finalización del disco Modificación del estilo de visualización 1 Seleccione PRESET STYLE en la pantalla TITLE MENU EDIT y pulse el botón SET Aparecerá la pantalla PRESET STYLE 2 Para modificar PATTERN de visualización Seleccione TITLE PATTERN y pulse el botón SET Para más información sobre el procedimiento de edición c...

Page 349: ...ina anterior y pueden emplearse en combinación con el botón SET para avanzar o retroceder de diez en diez páginas 3 Complete el proceso de vista previa Para ello seleccione BACK en la pantalla TITLE MENU PREVIEW y pulse el botón SET Volverá a aparecer la pantalla TITLE MENU EDIT 4 Si desea finalizar el disco seleccione FINALIZE en la pantalla TITLE MENU EDIT y pulse el botón SET Página 58 FINALIZE...

Page 350: ...NPUT TITLE MENU AAA BBB CCC DDD BACK TEXT LOAD TITLE TEXT INPUT 1 6 AAA BBB CCC DDD BACK TEXT LOAD TITLE TEXT INPUT 1 6 august CANCEL TITLE INPUT AAA BBB CCC DDD BACK TEXT LOAD TITLE TEXT INPUT 1 6 august Pantalla TITLE MENU EDIT Pantalla TITLE TEXT INPUT Nota Si selecciona TEXT LOAD en la pantalla TITLE MENU y luego pulsa el botón SET la grabadora de DVD leerá el texto de título creado con una ap...

Page 351: ... 1 2 FINALIZE Configuración de los menús de títulos y capítulos Notas Se requiere un máximo de 20 minutos para completar la finalización Cuando se realiza la finalización todo el vídeo y audio grabados en el disco se almacenan de acuerdo con la norma del vídeo DVD por consiguiente el contenido se puede volver a reproducir como vídeo DVD Aunque en principio un disco finalizado con esta grabadora de...

Page 352: ...el botón REV para reproducir en modo de retroceso rápido 䡵Durante el modo de imagen fija o la reproducción de retroceso lento pulse el botón FWD para reproducir en modo de avance lento 䡵Durante el modo de imagen fija o la reproducción de avance lento pulse el botón REV para reproducir en modo de retroceso lento Cada vez que se pulsa el botón FWD o REV cambia la velocidad de reproducción Página 61 ...

Page 353: ...NE o Y C Si el disco está sucio o dañado no se podrá reproducir correctamente En tal caso limpie el disco o cámbielo por otro 1 Inserte un disco Dependiendo del ajuste de la opción INTRODUCTION TITLE y de la opción DISC IN ACTION de la pantalla RECORDER MENU 2 2 durante la grabación el funcionamiento será diferente Consulte la siguiente tabla para ver cómo es el funcionamiento Para conocer el func...

Page 354: ... del capítulo siguiente 䡵 Pulse el botón 8 mientras la grabadora de DVD está reproduciendo la reproducción salta al inicio del capítulo actual Si se pulsa el botón 8 dentro del primer segundo después de la marca de capítulo se iniciará la reproducción desde el principio del capítulo anterior El botón t se desactiva durante la reproducción del último capítulo TOP MENU MENU OPTION DV Y C LINE SET UP...

Page 355: ...grabadora de cinta de vídeo Asegúrese de que la cinta contenga un código de tiempo EBU Inserte un disco grabable en la BD X200 Configuración Grabadora de cinta de vídeo Habilite el control mediante RS 422A BD X200 Ajuste REMOTE SELECT de la pantalla REMOTE MENU a 9PIN MASTER Cuando REMOTE SELECT se ajusta a 9PIN MASTER aparece la pantalla REMOTE CONTROL 9PIN MASTER Esta pantalla sirve para realiza...

Page 356: ...nga un código de tiempo EBU Inserte un disco grabable en la BD X200 Configuración Cámara o grabadora de cinta de vídeo DV Habilite el control mediante DV BD X200 Ajuste REMOTE SELECT de la pantalla REMOTE MENU a DV MASTER Cuando REMOTE SELECT se ajusta a DV MASTER aparece la pantalla REMOTE CONTROL DV MASTER Esta pantalla sirve para realizar operaciones de edición las operaciones correspondientes ...

Page 357: ...bilitada cuando la opción DVD MENU TYPE de la pantalla RECORDER MENU 2 2 está ajustada a TOP o NONE EXIT REMOTE CONTROL SCREEN 9PIN MASTER 1 2 3 TC TC ADJ BITRATE 8 0 Mbps SET EDL FINALIZE EDIT END CANCEL No IN OUT ACTION MENU PAUSE 00 00 00 00 00 00 00 ⳮ 00 00 00 00 PAUSE 00 00 00 00 00 00 00 ⳮ 00 00 00 00 PAUSE 00 00 00 00 00 00 00 ⳮ 00 00 00 00 00h 000 min 00m 00s 00 00 00 00 CHAPTER MANUAL TOT...

Page 358: ... y la grabadora de cinta de vídeo empezará a funcionar No se controla este aparato e Expulsión u Retroceso rápido o reproducción de retroceso rápido q Detención t Reproducción w Pausa y Avance rápido o reproducción de avance rápido Reproducción de retroceso de fotogramas Reproducción de avance de fotogramas La acción que ejecuta la grabadora de DVD al pulsar el botón y o u es decir FF REW o SEARCH...

Page 359: ...ea de evento Los eventos que no tienen registrado un punto OUT se registran como capítulos y se indica CHAPTER en la opción ACTION del evento t Si es necesario repita los procedimientos anteriores 3 4 y Ponga a reproducir la grabadora de cinta de vídeo y a continuación pase al modo de imagen fija en la posición en la que desee finalizar la inserción u Pulse la tecla O del teclado o seleccione la o...

Page 360: ...SET EDL FINALIZE EDIT END CANCEL No IN OUT ACTION MENU STOP CHAPTER CHAPTER 00 01 01 01 02 01 03 00 00 00 00 00 01 30 00 00 02 30 00 ⳮ 00 03 30 00 ⳮ ⳮⳮⳮⳮⳮⳮⳮⳮ ⳮⳮⳮⳮⳮⳮⳮⳮ ⳮⳮ ⳮⳮ ⳮ 00h 030 min 03m 30s 00 03 30 00 CHAPTER MANUAL TOTAL DURATION DISC REMAIN SOURCE TIMECODE TC SET TC CANCEL EXIT REMOTE CONTROL SCREEN 9PIN MASTER 1 2 3 TC TC ADJ BITRATE 8 0 Mbps SET EDL FINALIZE EDIT END CANCEL No IN OUT ACT...

Page 361: ...ítulo No aparece la pantalla de edición de miniaturas EXIT REMOTE CONTROL SCREEN 9PIN MASTER 1 2 3 TC TC ADJ BITRATE 8 0 Mbps SET RECORDING EDL FINALIZE EDIT END CANCEL No IN OUT ACTION MENU STOP CHAPTER CHAPTER 00 01 01 01 02 01 03 00 00 00 00 00 01 30 00 00 02 30 00 ⳮ 00 03 30 00 ⳮ ⳮⳮⳮⳮⳮⳮⳮⳮ ⳮⳮⳮⳮⳮⳮⳮⳮ ⳮⳮ ⳮⳮ ⳮ 00h 030 min 03m 30s 00 03 30 00 CHAPTER MANUAL TOTAL DURATION DISC REMAIN SOURCE TIMECODE...

Page 362: ...RATION DISC REMAIN SOURCE TIMECODE EDL EDL01 S M EDL02 EDL03 EDL04 EDL05 EDL06 EDL07 EDL08 EDL09 EDL10 BACK SAVE IMPORT LOAD DELETE NAME MANAGER 3 1 2 Opción EDL Pantalla EDL MANAGER Opción EDL Opciones de función Método de funcionamiento Seleccione la opción EDL que desee utilizar seleccione la opción de función y ejecútela Ejemplo Guardado del valor de configuración actual de la pantalla REMOTE ...

Page 363: ...está resaltada la opción EDL y se pulsa este elemento se registran las EDL importadas desde EasyMenu u otras listas de edición externas Página 71 DELETE Cuando está resaltada la opción EDL y se pulsa este elemento se elimina la opción EDL seleccionada Acerca de EDL En modo SLAVE pueden utilizarse archivos CSV y archivos EDL en formato SONY En modo MASTER sólo se pueden utilizar archivos CSV Los ar...

Page 364: ... Opción IMPORT Opción LOAD 䡵 Ejemplo 1 Carga de una EDL en formato CSV modo SLAVE IN POINT OUT POINT EXIT REMOTE CONTROL SCREEN DV SLAVE 1 4 7 h m s f 2 5 8 3 6 9 h m s f h m s f CHAPTER MANUAL BITRATE 8 0 Mbps DISC REMAIN 000 min EDL TC CANCEL ADJ FINALIZE 00 00 00 00 00 10 00 00 00 40 00 00 00 20 00 00 00 30 00 00 01 10 00 00 00 50 00 00 JVC CSV IN POINT OUT POINT Chapter1 Chapter2 Chapter3 Chap...

Page 365: ...ación Inserte un disco grabable en la BD X200 Configuración BD X200 Ajuste REMOTE SELECT de la pantalla REMOTE MENU a DV SLAVE Cuando REMOTE SELECT se ajusta a DV SLAVE aparece la pantalla REMOTE CONTROL DV SLAVE Esta pantalla se puede utilizar para establecer puntos de edición y marcas de capítulo Consulte en la página 74 la información sobre el uso de la pantalla REMOTE CONTROL DV SLAVE Monitor ...

Page 366: ... posterior de este aparato Preparación Inserte un disco grabable en este aparato Ajuste Ajustes de este aparato Ajuste la opción REMOTE SELECT de la pantalla REMOTE MENU a 9PIN REC Si se ajusta la opción REMOTE SELECT a 9PIN REC aparece en el monitor la pantalla REMOTE CONTROL 9PIN REC Los puntos de edición y los puntos de capítulo se pueden ajustar en la pantalla REMOTE CONTROL 9PIN REC Consulte ...

Page 367: ...egundos fotogramas se introduce mediante el teclado Permite desplazarse por la lista de capítulos DISC REMAIN Este campo muestra un valor aproximativo del espacio restante disponible para grabar en el disco FINALIZE Este botón sirve para finalizar el disco TC CANCEL Este botón sirve para eliminar los valores ajustados para el punto In el punto Out y las marcas de capítulo EDL Permite acceder a la ...

Page 368: ...la tecla Intro Se eliminará el punto seleccionado es decir el punto In el punto Out o una marca de capítulo de la lista de capítulos Siempre que se elimine una marca de capítulo se ordenará la lista de capítulos IN POINT OUT POINT EXIT REMOTE CONTROL SCREEN DV SLAVE 1 4 7 h m s f 2 5 8 3 6 9 h m s f h m s f CHAPTER MANUAL BITRATE 8 0 Mbps DISC REMAIN 000 min EDL TC CANCEL ADJ FINALIZE 00 00 00 00 ...

Page 369: ...no se podrán grabar datos adicionales en el disco 䡵 Seleccione la opción EXIT en la pantalla pulse la tecla Intro y desaparecerá la pantalla REMOTE CONTROL 䡵 Para retirar el disco grabado de la BD X200 pulse el botón OPEN CLOSE del panel frontal 5 Guardado de una lista de edición Opción EDL Las listas de edición se pueden guardar en la pantalla EDL MANAGER de este aparato Además las listas de edic...

Page 370: ...emplearse uno de los cables disponibles en el mercado indicados arriba Conecte los terminales VIDEO LINE OUT y AUDIO OUT de la grabadora de DVD a los terminales de entrada de vídeo y entrada de audio del monitor Procedimientos de preparación Inserte un disco grabable en la BD X200 Configuración GY DV5000 o GY DV5001 Ajuste DV REC TRIGGER de la pantalla OTHERS MENU 1 2 a ON BD X200 Ajuste REMOTE SE...

Page 371: ...OUT IN ENTRY PREVIEW AUTO EDIT GOTO REVIEW SHIFT ALL STOP MAX MIN MONITOR MAX MIN MONITOR FWD REV STILL X 1 X1 FWD REV STILL X 1 X1 RECORDER PLAYER HOUR MIN SEC FRAME HOUR MIN SEC FRAME P R VITC LTC CTL VITC LTC CTL BUMP PREROLL 7 5 3 ON OFF EVENT No V SPEED A SPLIT DURATION IN OUT IN OUT E D I T I N G C O N T R O L U N I T R M G 8 2 0 Uso de este aparato como REPRODUCTOR con control RS 422 Este a...

Page 372: ...nes de señal Cualquier conexión o desconexión de cables deberá realizarse con los aparatos apagados 䡵 Conexión directa de dos BD X200s Conecte un cable Ethernet entre los terminales LAN de los dispositivos emisor y receptor En este caso deberá utilizarse un cable Ethernet de tipo cruzado de la categoría 5 VIDEO AUDIO IN IN OUT IN OUT CH1 CH2 REMOTE USB DV IN OUT SIGNAL LAN GND DC 19V 4dB 8dB INPUT...

Page 373: ...ecla Intro 5 Pulse el botón SET UP para volver a la visualización de pantalla normal Duplicado de DVDs mediante el terminal LAN continuación Configuración de red Siga el siguiente procedimiento para ajustar la configuración de red en los dispositivos emisor y receptor BUSY OPEN CLOSE TOP MENU MENU OPTION DV Y C LINE SET UP SET MENU HOST NAME bdx200 STATIC IP ADDRESS SETTING 255 255 255 0 192 168 0...

Page 374: ...ón IP del dispositivo emisor Utilice los botones de cursor t y 8 para seleccionar el dígito que desea cambiar Pulse los botones de cursor 6 7 para ajustar el valor del dígito seleccionado Repita el paso anterior para todos los dígitos seleccione SET con los botones 8 t y pulse el botón SET La dirección IP ajustada para el dispositivo emisor mediante este cuadro de diálogo se registrará como la dir...

Page 375: ...ositivo receptor DVD DVD SENDER RECEIVER Searching SENDER IP ADDRESS 192 168 000 002 ABORT DVD DVD SENDER DUBBING ABORT DVD DVD RECEIVER DUBBING ABORT MENU DVD DVD EXECUTE DUBBING DVD DVD SENDER DUBBING START SENDER IP ADDRESS 192 168 000 002 RECEIVER IP ADDRESS 192 168 000 003 EXECUTE CANCEL Notas No se realizará el duplicado si se selecciona CANCEL en el cuadro de confirmación para iniciar el du...

Page 376: ...ROL REMOTE MENU MENU FINALIZE CANCEL CANCEL CANCEL DISC FINALIZATION CANCEL DISC ERASE QUICK CANCEL DISC ERASE FULL DISC MENU MENU DUBBING EXIT DISC MENU INPUT SELECT SYSTEM PRESET STYLE RECORDER REMOTE DISPLAY CLOCK ADJUST DUBBING NETWORK MENU INPUT SELECT LINE INPUT SELECT MENU MENU TEST SIGNAL OFF FACTORY SETTING CANCEL KEYBOARD STYLE ENGLISH EDIT MENU ENABLE TOTAL RECORDING TIME 5 Hour 30 Min ...

Page 377: ...n la lista y pulse el botón SET El valor de configuración se modificará correspondientemente r Repita los pasos del q al e hasta haber realizado todos los ajustes necesarios 䡵 Para volver al menú de configuración seleccione MENU y pulse el botón SET 䡵 Para ir a la siguiente pantalla de menú seleccione el botón que hay en la parte superior de la pantalla actual y pulse el botón SET 䡵 Para volver a ...

Page 378: ... RS 422A o DV de la grabadora de DVD Además este menú también permite indicar si se debe mostrar o no el panel REC CONTROL Este botón abre un menú que permite configurar la visualización de información de estado y de alarma en la pantalla del televisor o del monitor Este botón abre un menú que permite ajustar la fecha y la hora del reloj interno Este botón abre un menú que permite configurar el du...

Page 379: ...minan los datos del disco CANCEL No se realiza el borrado rápido EXECUTE Se realiza el borrado rápido El disco se puede grabar de nuevo desde el principio Seleccione si desea realizar un borrado completo en un DVD RW modo de vídeo Se borran todas las áreas del disco DVD RW Si se va a utilizar un disco varias veces bórrelo con esta opción CANCEL No se realiza el borrado completo EXECUTE Se realiza ...

Page 380: ...s los parámetros de los submenús de configuración se deben restaurar o no a su configuración predeterminada CANCEL No se restaurará la configuración predeterminada EXECUTE Se restaurará la configuración predeterminada Este parámetro se ajusta cuando se utiliza un teclado USB y sirve para indicar la disposición o idioma del teclado que puede ser una de las siguientes ENGLISH FRENCH ITALIAN GERMAN S...

Page 381: ...o sirve para abrir la pantalla CHAPTER PATTERN En esta pantalla se puede seleccionar un diseño de visualización para el menú de capítulos BACK Vuelve a la pantalla PRESET STYLE MENU 6 no se puede seleccionar al realizar la configuración para el envío de fábrica Este botón sirve para volver a la pantalla del menú de configuración TYPE 1 2 3 4 5 6 7 8 TITLE PATTERN 1 2 3 4 5 1 2 3 CHAPTER PATTERN 1 ...

Page 382: ...tiempo de grabación disminuye Si se cambia el valor de configuración de esta opción la opción TOTAL CONTENTS TIME se ajusta automáticamente La gama de configuración varía en función del valor de la opción AUDIO ENCODE LPCM de 4 0 a 7 8 Mbps en pasos de 0 2 Mbps DOLBY DIGITAL de 2 0 a 9 0 Mbps en pasos de 0 2 Mbps MPEG de 2 0 a 9 0 Mbps en pasos de 0 2 Mbps Este parámetro sirve para ajustar el form...

Page 383: ...turas SQUEEZE V H CUT En este caso la parte superior inferior izquierda y derecha del contenido de vídeo se debe eliminar para formar las miniaturas LETTER BOX Este parámetro debe ajustarse al grabar una señal de audio del terminal DV IN OUT Concretamente indica si se deben grabar las señales de los canales 1 y 2 o de los canales 3 y 4 Sólo disponible para 32 kHz 1 2ch 1 2ch Se grabarán los canale...

Page 384: ...ás la BD X200 se convierte en el dispositivo esclavo y es controlada por el editor no lineal DV TRIGGER Este valor se ajusta cuando la BD X200 se conecta a una cámara DV que disponga de una función de disparo de grabación DV y permite que la grabadora de DVD grabe vídeo desde la cámara en respuesta al accionamiento del disparador de ésta Nota Si se ajusta esta opción a 9PIN MASTER DV MASTER 9PIN R...

Page 385: ...e mostrará en pantalla Tenga en cuenta no obstante que no se mostrará nada si se ha ajustado a OFF el parámetro DISPLAY Este parámetro sirve para indicar si se debe visualizar en pantalla la fecha y u hora actuales OFF Esta información no se mostrará en pantalla DATE Sólo se mostrará la fecha TIME Sólo se mostrará la hora TIME DATE Se mostrarán tanto la fecha como la hora Cuando la grabadora de DV...

Page 386: ...la del menú de configuración Pantalla DUBBING En la siguiente tabla se identifican y describen los parámetros que se pueden configurar mediante la pantalla DUBBING Mitad superior Aparece en la pantalla del monitor Mitad inferior Aparece en el display LCD Valor predeterminado Parámetro Valores posibles Descripción DVD DVD CANCEL EXECUTE dub CAN EXE MENU Este parámetro debe seleccionarse para habili...

Page 387: ...ANCEL Se cancela el ajuste del nombre de host Este parámetro sirve para ajustar la dirección IP Es importante asegurarse de que no haya dos dispositivos en una misma red que tengan la misma dirección IP Este parámetro sirve para ajustar la máscara de subred Las BD X200s conectadas deberían tener el mismo valor de red Este parámetro sirve para ajustar la dirección de la pasarela Las BD X200s conect...

Page 388: ...Hz Número de canales 2 䡵 Interfaz DV E S IEEE1394 䡵 Dimensiones externas unidad mm 䡵 General Terminal de red RJ 45 categoría 5 100 BASE Tx Terminal USB USB 1 1 2 Fuente de alimentación 19 V CC Consumo de corriente 31 W 1 63 A Peso 4 5 kg sólo el dispositivo Dimensiones 212 mm an 352 mm p 88 mm al sin incluir pies y otras protuberancias Temperatura de funcionamiento admisible De 5 C a 35 C Humedad ...

Page 389: ... sesión en la FTP introduciendo los siguientes datos en la unidad y consulte el archivo readme txt Usuario anonymous Contraseña Ninguna Si la dirección IP de la unidad se ajusta a 192 168 0 2 se puede establecer una conexión a la FTP introduciendo ftp 196 168 0 2 en la barra de direcciones de Internet Explorer Varios ...

Page 390: ...77 001B 2004 Victor Company of Japan Limited is a registered trademark owned by Victor Company of Japan Limited is a registered trademark in Japan the U S A the U K and other countries BD X200E DVD Recorder ...

Page 391: ...ISTRUZIONI A MASTERIZZATORE DVD OPERATE PHONES REV STOP PLAY DVD RECORDER BD X200 FWD PAUSE REC BUSY OPEN CLOSE TOP MENU MENU OPTION DV Y C LINE SET UP AUDIO CH1 CH2 TITLE DOLBY DIGITAL LPCMMPEG CHAPTER SET LLT0077 001B ...

Page 392: ...UDIO LINE Cavo schermato 10 metri REMOTE 9P Doppino schermato 5 metri DV Doppino schermato 4 metri PHONES Doppino schermato 5 metri MIC Doppino schermato 5 metri LAN Doppino schermato 10 metri USB Doppino schermato 5 metri DC 19V Cavo schermato 1 2 metri La corrente interna dell apparecchio è 19 ampere Precauzioni 5 Qualora vi siano forti onde elettromagnetiche o magnetismo per esempio vicino a tr...

Page 393: ...l pannello di copertura o la parte posteriore All interno non vi sono componenti che possono essere riparati dall utente Affidare la manutenzione a personale qualificato NOTA La potenza e le norme di sicurezza sono riportate sul fondo dell apparecchio Il tasto OPERATE non elimina completamente la corrente principale dall apparecchio ma semplicemente permette o meno la circolazione della corrente A...

Page 394: ...logia di protezione del copyright ed è protetto da brevetti registrati negli USA e da proprietà intellettuale di altri titolari del copyright di Macrovision L utilizzo di questa tecnologia di protezione del copyright deve essere autorizzato dalla Macrovision ed è inteso solo per uso domestico e per altri usi limitati a meno che non autorizzato diversamente dalla Macrovision Sono vietati il disasse...

Page 395: ...one di un disco prima della finalizzazione 59 Riproduzione di un disco finalizzato 60 Riproduzione veloce e lenta 61 Riproduzione del titolo capitolo precedente o successivo 61 Registrazione sincrona Registrazione dei segnali di riproduzione da un videoregistratore mediante il terminale RS 422A 62 Registrazione dei segnali di riproduzione da una videocamera o da un videoregistratore digitale 63 Op...

Page 396: ...non lineare su un DVD In questo caso il BD X200 deve essere configurato come periferica di destinazione mediante le impostazioni dei menu Il masterizzatore DVD sarà quindi controllato dall editor non lineare Pagina 73 䡵I menu dei titoli e dei capitoli possono essere creati automaticamente o manualmente Pagina 45 Sono disponibili cinque tipologie diverse di stili di visualizzazione per i menu dei t...

Page 397: ...descritte nei corrispondenti manuali per gli utenti 䡵 Il motore elettrico del masterizzatore DVD è un componente soggetto ad usura Sebbene la sua durata dipenda dal tipo e dall ambiente di utilizzo che si fa del masterizzatore si consiglia di sostituirlo ogni 1000 ore di registrazione Vedere TOTAL RECORDING TIME a pagina 87 Precauzioni relative alla condensa 䡵Condensa Per condensa si intende la pa...

Page 398: ...ne un disco le mani o le dita non devono entrare in contatto con la superficie di registrazione Altre informazioni 䡵Non pulire mai un disco utilizzando diluenti per pittura solventi organici alcol o fluidi per la pulizia di supporti analogici 䡵Non utilizzare pellicole per la protezione dei dischi o antigraffio 䡵Non applicare adesivi o altri tipi di etichette 䡵Non utilizzare dischi dai quali siano ...

Page 399: ...eriale Finalizzazione Quando un DVD R o un DVD RW modalità video è stato finalizzato può essere riprodotto come qualsiasi altro DVD utilizzando un lettore DVD standard Pagina 44 䡵 Prima di finalizzare un disco è possibile registrare le sezioni inutilizzate di un disco e modificare i titoli o gli stili di visualizzazione Sia nel caso dei DVD R che dei DVD RW non è possibile sovrascrivere il materia...

Page 400: ... Per questa funzione occorrerà utilizzare impostazioni CHAPTER CREATION menu Prima che un titolo venga chiuso sarà possibile modificare lo stile utilizzato per visualizzare i menu dei capitoli cambiare le miniature utilizzate e assegnare loro dei nomi Prima della finalizzazione di un disco sarà possibile modificare lo stile utilizzato per il menu dei titoli e assegnare loro dei nomi DVD R o DVD RW...

Page 401: ... 4 5Indicatore del livello dell audio Questi indicatori mostrano il livello attuale dell audio su canali 1 e 2 In particolare indicano i livelli di registrazione dell audio quando il masterizzatore DVD è in modalità di registrazione e i livelli di riproduzione dell audio quando il masterizzatore è in modalità di riproduzione Per la regolazione dei livelli di registrazione dell audio Pagina 37 6Dis...

Page 402: ...nzamento Premere questo pulsante mentre è attiva la modalità di fermo immagine o di riavvolgimento lento per attivare la modalità di avanzamento lento Successive pressioni di tale pulsante consentiranno di aumentare o diminuire la velocità di avanzamento L indicatore FWD si accende durante l avanzamento veloce e lento Pulsante e indicatore PAUSE Premendo questo pulsante durante la registrazione il...

Page 403: ...e premuto il pulsante 8 il livello di registrazione dell audio del canale 1 diminuirà Allo stesso modo se si preme il pulsante 7 mentre si tiene premuto il pulsante t il livello di registrazione dell audio del canale 2 diminuirà Pulsante 8 sinistra Se è visualizzato un menu dei titoli o dei capitoli questo pulsante consente di selezionare un numero del menu per eseguirne la riproduzione Premere qu...

Page 404: ...ssaggi di stato e di avviso Nella schermata DISPLAY MENU è possibile specificare gli elementi da visualizzare 4Interruttore AUDIO INPUT LEVEL Questo interruttore serve per impostare il livello standard per l input audio 4dB il livello standard è impostato su 4 dB 8dB il livello standard è impostato su 8 dB 1 2 3 4 5 6 7 5Terminali AUDIO IN RCA 2 Questi terminali consentono l ingresso dei segnali a...

Page 405: ...toli Le impostazioni di rete devono essere eseguite dalla schermata NETWORK MENU 0Terminali USB 2 Questi terminali servono per collegare il masterizzatore DVD a periferiche USB come tastiera o mouse In alternativa ai pulsanti del masterizzatore DVD è possibile usare una tastiera o un mouse quando si utilizzano le schermate delle impostazioni e dei comandi La digitazione del testo nelle schermate d...

Page 406: ...trazione il display LCD indica il numero di titolo e di capitolo attualmente registrato oltre al tempo trascorso per la registrazione del titolo o lo spazio rimanente su disco Premere il pulsante SET per passare nell area del contatore dalla visualizzazione del tempo di registrazione trascorso a quella dello spazio rimanente su disco TITLE CHAP TITLE CHAP Se il masterizzatore è in modalità di ripr...

Page 407: ...ione REC STOP il masterizzatore DVD sta passando dalla modalità di registrazione a quella di arresto MENU EDIT si sta modificando un menu dei titoli o dei capitoli EJECT il disco in uso sta per essere estratto TITLE CLOSE il masterizzatore DVD sta elaborando l operazione di chiusura di un titolo FINALIZE il masterizzatore DVD sta finalizzando il disco QUICK ERASE il masterizzatore DVD sta cancella...

Page 408: ... sullo stato da visualizzare 䡵 Se l opzione DISPLAY è impostata su OFF non verrà mostrata alcuna informazione sullo stato del masterizzatore Messaggi di stato 1 Dati relativi alla registrazione Premendo il pulsante SET UP in modalità di registrazione compaiono l impostazione del video bit rate e il formato di codifica dell audio Premendo di nuovo il pulsante SET UP queste informazioni vengono rimo...

Page 409: ...mazione DATE viene visualizzata solo la data TIME viene visualizzata solo l ora TIME DATE vengono visualizzate sia la data che l ora Utilizzare l opzione DATE STYLE nella schermata DISPLAY MENU per cambiare lo stile di visualizzazione della data Modalità di registrazione vengono visualizzate la data e l ora dell orologio interno Modalità di riproduzione vengono visualizzate la data e l ora del dis...

Page 410: ...5 04 11 20 00 TITLE 1 0 00 00 CHAPTER 1 0 00 00 REC DVD RW Lo stato del disco non viene visualizzato se l opzione DISPLAY nella schermata DISPLAY MENU è impostata su OFF Stato Descrizione DVD R Il disco in uso è un DVD R non finalizzato circa tre secondi DVD RW Il disco in uso è un DVD RW non finalizzato circa tre secondi DVD disco in uso è un DVD R o un DVD RW finalizzato circa tre secondi INVALI...

Page 411: ...fosse finalizzato A L xx R xx A L xxxx R Il valore impostato viene visualizzato quando si cambia il livello di registrazione dell audio analogico D L xx R xx d L xxxx R Il valore impostato viene visualizzato quando si cambia il livello di registrazione dell audio digitale DURATION OVER Si è eseguita la modifica automatica ma lo spazio rimanente su disco è terminato durante un operazione di control...

Page 412: ...il parametro ENCODE QUALITY sia stato impostato su un valore troppo basso ad esempio 4 Mbps o inferiore se è stato registrato del contenuto con pochi movimenti o per via di altri fattori simili Non verrà generato alcun errore se il tempo rientra nei limiti impostati per i contenuti totali OVERHEATING oVERHEATING Visualizzato quando la temperatura interna aumenta a causa ad esempio di un malfunzion...

Page 413: ...o o di registrazione il segnale di input video viene inviato alla schermata E E sotto forma di segnale video composito Inoltre sul monitor collegato a questo terminale compaiono il menu delle impostazioni e altre schermate delle impostazioni Lo stato di funzionamento del masterizzatore DVD e altre informazioni correlate vengono visualizzate sullo schermo se l opzione DISPLAY nella schermata DISPLA...

Page 414: ...4 8 9 7 Num Lock 1 Q A Z X C V B N M S D F G H J K L U W E R T Y I O P 2 3 4 5 6 7 8 9 0 つ BD X200 BD X200 Nota 1 per utilizzare il terminale RS 422A REMOTE impostare l opzione REMOTE SELECT nella schermata REMOTE MENU su 9PIN MASTER 9PIN REC o 9PIN PLAY Nota 2 per controllare l apparecchiatura mediante il terminale DV IN OUT selezionare la relativa funzione mediante l opzione REMOTE SELECT nella ...

Page 415: ...nale AC IN dell adattatore CA 4 Inserire il cavo di alimentazione a una presa della corrente Il masterizzatore DVD verrà alimentato e l indicatore OPERATE diventerà rosso modalità di funzionamento disattivato Nota Il masterizzatore DVD consuma una quantità minima di corrente quando è in modalità di funzionamento disattivato ATTENZIONE Utilizzare sempre l adattatore CA fornito con il masterizzatore...

Page 416: ...ento 䡵 Fermare il funzionamento del masterizzatore DVD Si consiglia di estrarre il disco 1 Premere il pulsante OPERATE Il masterizzatore DVD passerà in modalità di funzionamento disattivato e l indicatore OPERATE diventerà rosso 2 Nel caso in cui il masterizzatore DVD non venga usato per lungo tempo scollegare l adattatore CA Prima di scollegare l adattatore CA togliere il cavo di alimentazione da...

Page 417: ...maticamente Quando il vassoio del disco è aperto si accende l indicatore OPEN CLOSE Se il disco in uso non è stato finalizzato sullo schermo e sul display LCD comparirà il messaggio NOT FINALIZE 2 Togliere il disco dal vassoio Assicurarsi che il vassoio sia completamente aperto prima di togliere il disco 3 Premere il pulsante OPEN CLOSE Il vassoio del disco si chiuderà automaticamente Precauzioni ...

Page 418: ... Page Down Enter 0 1 2 5 6 4 8 9 7 Num Lock 1 Q A Z X C V B N M S D F G H J K L U W E R T Y I O P 2 3 4 5 6 7 8 9 0 VIDEO AUDIO IN IN OUT IN OUT CH1 CH2 REMOTE USB DV IN OUT SIGNAL LAN GND DC 19V 4dB 8dB INPUT LEVEL LINE Y C 䡵 Procedura Con tastiera e mouse è possibile controllare le seguenti funzioni Terminali USB Utilizzare la tastiera per digitare nomi e commenti per i menu dei titoli e dei cap...

Page 419: ...are CLOCK ADJUST La voce di menu attualmente selezionata compare evidenziata w Premere il pulsante SET per accedere alla schermata CLOCK ADJUST MENU 3 Impostare la data e l ora q Utilizzare i pulsanti 6 e 7 per selezionare DATE data o TIME ora Premere il pulsante SET w Utilizzare i pulsanti t e 8 per selezionare il valore da cambiare Il valore attualmente selezionato compare come testo evidenziato...

Page 420: ...IME viene visualizzata solo l ora DATE viene visualizzata solo la data TIME DATE vengono visualizzate sia la data che l ora 䡵 DATE STYLE questo parametro serve per selezionare la visualizzazione della data YY MM DD anno mese giorno MM DD YY mese giorno anno DD MM YY giorno mese anno Schermata DISPLAY MENU Preparazione Per visualizzare sullo schermo le informazioni relative a data e ora Impostare l...

Page 421: ...pitoli Mettendo in pausa la registrazione viene inserito automaticamente un marcatore di capitolo È inoltre possibile usare l opzione CHAPTER CREATION nella schermata RECORDER MENU 1 2 per impostare l inserimento automatico o manuale dei marcatori di capitoli Le miniature ad esempio il fotogramma all inizio della registrazione e gli sfondi vengono creati automaticamente per i menu dei titoli e dei...

Page 422: ...modalità video e per questo motivo non possono essere utilizzati con questo masterizzatore DVD 䡵Di seguito si riportano le differenze di registrazione tra DVD R e DVD RW modalità video DVD R ogni disco può essere registrato un unica volta Non è possibile cancellare i dati né registrare di nuovo DVD RW modalità video dopo aver visualizzato un disco è possibile cancellare tutti i dati in esso conten...

Page 423: ...l cavo di alimentazione mentre i dati vengono cancellati MENU FINALIZE CANCEL CANCEL CANCEL CANCEL DISC FINALIZATION EXECUTE DISC ERASE DISC ERASE DISC MENU QUICK FULL DISC ERASE QUICK Schermata DISC MENU MENU FINALIZE CANCEL CANCEL CANCEL CANCEL DISC FINALIZATION EXECUTE DISC ERASE DISC ERASE DISC MENU QUICK FULL DISC ERASE QUICK Schermata DISC MENU Nota Se si inserisce un DVD RW cancellato su un...

Page 424: ...ente di associare l inserimento automatico di un capitolo ad ogni sospensione della registrazione OFF inserimento di capitoli disattivo ON inserimento di capitoli attivo TOTAL CONTENT TIME Questo parametro serve per definire un impostazione relativa alla codifica o compressione dei dati video Da utilizzare quando il bit rate viene automaticamente impostato in base al tempo di registrazione e allo ...

Page 425: ...lsante SET UP per tornare alla normale visualizzazione dello schermo 䡵 Opzione DISC IN ACTION Questa opzione consente di definire l azione da eseguire quando viene inserito un disco finalizzato in questa unità o in un lettore DVD MENU visualizza la schermata del menu dei titoli TOP MENU TITLE riproduce automaticamente il titolo 1 䡵 Opzione TITLE END Questa opzione consente di definire l azione da ...

Page 426: ... MENU INPUT SELECT LINE INPUT SELECT MENU Schermata INPUT SELECT MENU Indicatori di input video Pulsante SET UP Pulsante SET BUSY OPEN CLOSE TOP MENU MENU OPTION DV Y C LINE SET UP SET Voce Descrizione INPUT SELECT Questo parametro serve per selezionare i segnali di input audio e video LINE occorre utilizzare il segnale video composito dal terminale VIDEO LINE IN e i segnali audio analogici dai te...

Page 427: ...L CONTENTS TIME Se già si conosce il tempo di registrazione è possibile impostarlo mediante questa opzione che consentirà al BD X200 di determinare il miglior bit rate di codifica in base allo spazio disponibile sul disco vuoto e il tempo di registrazione Se il tempo di registrazione viene impostato mediante questo parametro verrà impostato automaticamente il parametro ENCODE QUALITY ENCODE QUALIT...

Page 428: ...re da riferimento per stabilire il tempo di registrazione disponibile Note Premendo il pulsante SET UP in modalità di registrazione sullo schermo compaiono l impostazione del video bit rate e il formato di codifica dell audio Premere di nuovo il pulsante SET UP per nascondere queste informazioni Quando si registra una fonte audio si consiglia di impostare DOLBY DIGITAL o LPCM Impostando MPEG infat...

Page 429: ...ori del livello dell audio sul pannello frontale mentre si regolano i livelli Regolare il livello in modo che il LED più a destra non si accenda Pulsanti utilizzati Indicatori del livello dell audio Regolazione contemporanea dei due canali BOTH Regolazione separata dei due canali INDEPENDENCE 䡵Per aumentare il livello di registrazione 䡵Per regolare il livello del canale 1 䡵Per ridurre il livello d...

Page 430: ... DVD RECORDER BD X200 FWD PAUSE REC BUSY OPEN CLOSE TOP MENU MENU OPTION DV Y C LINE SET UP TITLE DOLBY DIGITAL LPCMMPEG CHAPTER SET Collegare il terminale VIDEO LINE OUT allo schermo Procedura 䡵 Tenendo premuto il pulsante REC per almeno due secondi mentre il masterizzatore DVD è fermo o non contiene dischi il segnale di input codificato decodificato in formato MPEG verrà inviato attraverso il te...

Page 431: ...se per le miniature come anche sfondi diversi CHAPTER PATTERN il tipo di visualizzazione attualmente selezionato per i menu dei capitoli Ogni tipo di visualizzazione utilizza dei numeri posizioni e dimensioni diverse per le miniature come anche sfondi diversi 4 Utilizzare i cursori 6 7 t e 8 per selezionare uno degli otto stili e accedere alla corrispondente schermata STYLE 5 Per utilizzare uno st...

Page 432: ...olo 2 Capitolo 3 Capitolo 4 Chiusura del titolo Finalizzazione Registrazione di un nuovo titolo È possibile modificare i menu dei capitoli È possibile modificare il menu dei titoli Tempo di elaborazione massimo 30 secondi Tempo di elaborazione alcuni minuti Tempo di elaborazione massimo 20 minuti È possibile riprodurre il disco Altri lettori DVD Titolo 1 È possibile associare l inserimento di un m...

Page 433: ...omento verrà automaticamente inserito un marcatore di capitolo se l opzione AUTO CHAPTER REC PAUSE della schermata RECORDER MENU 1 2 è stata impostata su ON Ci sono molti modi per inserire manualmente o automaticamente i marcatori di capitoli Pagina 42 4 Riavviare la registrazione Premere il pulsante PLAY o PAUSE La registrazione riprenderà e nel titolo attuale verrà creato un nuovo capitolo 5 Ter...

Page 434: ...la registrazione il masterizzatore DVD inserirà i marcatori di capitoli in base agli intervalli di tempo stabiliti 䡵L opzioneAUTO CHAPTER REC PAUSE consente di definire un associazione tra l inserimento di un marcatore di capitolo e l attivazione della modalità di sospensione della registrazione ON inserimento marcatori attivo OFF inserimento di marcatori disattivo Nota Quando si interrompe la reg...

Page 435: ...e EDIT MENU nella schermata SYSTEM MENU DISABLE la registrazione termina e il menu dei capitoli viene creato utilizzando impostazioni predefinite In pratica il titolo viene chiuso ENABLE compare la schermata THUMBNAIL EDIT Utilizzare questa schermata per modificare lo stile del menu dei capitoli cambiare le miniature utilizzate inserire i nomi dei capitoli ed eseguire altre operazioni simili Per u...

Page 436: ...modificare lo stile di visualizzazione e inserire i nomi dei titoli Pagina 55 Durante questa operazione è visualizzata una barra che mostra l avanzamento della finalizzazione Una volta completata la finalizzazione la barra di avanzamento scomparirà e verrà ripristinata la normale visualizzazione dello schermo Il pannello REC CONTROL non verrà visualizzato 䡵 Selezionare NO dalla schermata di confer...

Page 437: ...izio della registrazione Titolo 2 Marcatore di capitolo Marcatore di capitolo Marcatore di capitolo Miniatura Miniatura Miniatura Miniatura Miniatura Miniatura Miniatura Capitolo 1 Capitolo 2 Capitolo 3 Capitolo 1 Capitolo 2 Registrazione 䡵Modifica dei menu dei capitoli Alla fine della registrazione ovvero durante la chiusura dei titoli è possibile modificare lo stile di visualizzazione e le minia...

Page 438: ...e anche sfondi diversi CHAPTER PATTERN il tipo di visualizzazione attualmente selezionato per i menu dei capitoli Ogni tipo di visualizzazione utilizza dei numeri posizioni e dimensioni diverse per le miniature come anche sfondi diversi 3 Utilizzare i cursori 6 7 t e 8 per selezionare uno degli otto stili e accedere alla corrispondente schermata STYLE che contiene i vari tipi di titolo e capitolo ...

Page 439: ...R PATTERN 2 Apportare le necessarie modifiche ai tipi di visualizzazione dei menu dei titoli e dei capitoli Si supponga di voler cambiare il tipo di visualizzazione del menu dei titoli da 1 a 4 Selezionare TITLE PATTERN dalla schermata PRESET STYLE MENU e premere il pulsante SET Comparirà la schermata TITLE PATTERN 3 Utilizzare i cursori t 8 6 e 7 per selezionare il quarto tipo di visualizzazione ...

Page 440: ...200 utilizzando un cavo di rete in questo modo è possibile arricchire i DVD con soluzioni creative e in maniera molto semplice Per scaricare il programma Easymenu visitare il sito Web all indirizzo riportato di seguito Consultare il manuale del programma per le informazioni relative all uso e alle precauzioni http www jvc victor co jp english pro prodv 䡵 Specifiche principali Visitare il sito Web ...

Page 441: ...Dalla schermata iniziale è possibile cambiare le miniature del capitolo o inserire nomi e commenti Le operazioni in questa schermata si possono eseguire utilizzando i pulsanti nel pannello frontale una tastiera o un mouse Pannello frontale eseguire la selezione mediante i pulsanti t 8 6 e 7 quindi premere il pulsante SET per confermare la selezione Tastiera eseguire la selezione mediante i pulsant...

Page 442: ...do l opzione e premendo il pulsante SET viene visualizzata l immagine registrata 10 fotogrammi prima 3 Selezionare BACK e premere il pulsante SET per cambiare la miniatura del capitolo Compare di nuovo la schermata THUMBNAIL EDIT iniziale La miniatura per il secondo capitolo sarà stata sostituita da quella appena selezionata La miniatura del menu dei titoli diventerà la prima miniatura del menu de...

Page 443: ...e in precedenza mostrava il numero di capitolo sarà evidenziato e mostrerà il testo inserito Il testo inserito verrà visualizzato nella schermata del menu dei capitoli 5 Selezionare BACK e premere il tasto Enter Invio Comparirà di nuovo la schermata THUMBNAIL EDIT iniziale e verrà visualizzato il nome o il commento del primo capitolo Note Il segno diventerà una barra rovesciata Se non è possibile ...

Page 444: ...mere il pulsante SET Comparirà la schermata CHAPTER MENU EDIT 2 Selezionare PRESET STYLE dalla schermata CHAPTER MENU EDIT e premere il pulsante SET Comparirà la schermata PRESET STYLE MENU Il numero dello stile impostato con il parametro PRESET STYLE verrà visualizzato in questa schermata 3 Per cambiare lo stile di visualizzazione PATTERN Selezionare PATTERN e premere il pulsante SET Per ulterior...

Page 445: ...APTER MENU EDIT e premere il pulsante SET per tornare alla schermata THUMBNAIL EDIT Note Per creare delle anteprime occorrono al massimo 20 secondi per pagina Potrebbe essere necessario più tempo a seconda del numero di miniature per pagina Durante la creazione delle anteprime è possibile passare direttamente solo alla pagina creata premendo il pulsante Schermata THUMBNAIL EDIT START BACK PRESET S...

Page 446: ...ranno più essere cambiati 1 Selezionare TITLE CLOSE dalla schermata THUMBNAIL EDIT e premere il pulsante SET Comparirà una finestra di conferma 2 Per proseguire nella procedura di chiusura del titolo selezionare YES e premere il pulsante SET La chiusura del titolo avrà inizio Lo stato di avanzamento del processo di chiusura del titolo è indicato da un apposita barra di stato TITLE CLOSE 䡵 Una volt...

Page 447: ...a schermata TITLE MENU EDIT verrà visualizzata quando inizia la finalizzazione del disco Modifica dello stile di visualizzazione 1 Selezionare PRESET STYLE dalla schermata TITLE MENU EDIT e premere il pulsante SET Comparirà la schermata PRESET STYLE 2 Per cambiare lo stile di visualizzazione PATTERN Selezionare TITLE PATTERN e premere il pulsante SET Per ulteriori dettagli sulla procedura di modif...

Page 448: ...i insieme al pulsante SET per andare avanti o indietro di dieci pagine alla volta 3 Completare il processo di anteprima Per fare ciò selezionare BACK nella schermata TITLE MENU PREVIEW e premere il pulsante SET Comparirà di nuovo la schermata TITLE MENU EDIT 4 Per finalizzare il disco selezionare l opzione FINALIZE nella schermata TITLE MENU EDIT e premere il pulsante SET Pagina 58 Visualizza la p...

Page 449: ... TEXT INPUT TITLE MENU AAA BBB CCC DDD BACK TEXT LOAD TITLE TEXT INPUT 1 6 AAA BBB CCC DDD BACK TEXT LOAD TITLE TEXT INPUT 1 6 august CANCEL TITLE INPUT AAA BBB CCC DDD BACK TEXT LOAD TITLE TEXT INPUT 1 6 august Schermata TITLE MENU EDIT Schermata TITLE TEXT INPUT august CANCEL TITLE INPUT Digitare un nome per il titolo I nomi possono avere una lunghezza massima di 20 caratteri Selezionare CANCEL ...

Page 450: ...ostazioni dei menu dei titoli e dei capitoli Note Per completare la finalizzazione occorrono al massimo 20 minuti Una volta completata la finalizzazione tutti i dati video e audio registrati sul disco vengono memorizzati secondo lo standard DVD Video di conseguenza il contenuto del disco può essere riprodotto come DVD video Sebbene un disco finalizzato con questo masterizzatore DVD possa essere ri...

Page 451: ...are l avanzamento veloce 䡵Durante la riproduzione premere il pulsante REV per attivare il riavvolgimento veloce 䡵Durante il riavvolgimento lento o il fermo immagine premere il pulsante FWD per attivare l avanzamento lento 䡵Durante l avanzamento lento o il fermo immagine premere il pulsante REV per attivare il riavvolgimento lento Ad ogni successiva pressione dei pulsanti FWD e REV la velocità di a...

Page 452: ... PHONES REV STOP PLAY DVD RECORDER BD X200 FWD PAUSE REC BUSY OPEN CLOSE TOP MENU MENU OPTION DV Y C LINE SET UP AUDIO CH1 CH2 TITLE DOLBY DIGITAL LPCMMPEG CHAPTER SET AVVERTENZA Durante la riproduzione di un disco se l impostazione di input è DV il suono può risultare ritardato In questo caso passare all impostazione di input LINE o Y C Se il disco è sporco o danneggiato sarà impossibile ottenere...

Page 453: ...tore DVD è in fase di riproduzione per passare all inizio del capitolo attuale La riproduzione riparte dall inizio del capitolo precedente se si preme il pulsante 8 entro un secondo dal marcatore di capitolo Durante la riproduzione dell ultimo capitolo il pulsante t è disattivato TOP MENU MENU OPTION DV Y C LINE SET UP SET Pulsante t Pulsante 8 Nota Per riportare il masterizzatore DVD in modalità ...

Page 454: ...sicurarsi che questa videocassetta contenga un codice orario EBU Inserire un disco registrabile nel BD X200 Impostazioni Videoregistratore abilitare il controllo via RS 422A BD X200 impostare l opzione REMOTE SELECT nella schermata REMOTE MENU su 9PIN MASTER Impostando l opzione REMOTE SELECT su 9PIN MASTER viene visualizzata la schermata REMOTE CONTROL 9PIN MASTER In questa schermata è possibile ...

Page 455: ...n disco registrabile nel BD X200 Impostazioni Videocamera o videoregistratore digitale abilitare il controllo via DV BD X200 impostare l opzione REMOTE SELECT nella schermata REMOTE MENU su DV MASTER Impostando l opzione REMOTE SELECT su DV MASTER viene visualizzata la schermata REMOTE CONTROL DV MASTER In questa schermata è possibile eseguire le operazioni di editing descritte a pagina 64 Monitor...

Page 456: ...e verrà automaticamente convertito in 00 Questa opzione non produce effetti quando l opzione DVD MENU TYPE della schermata RECORDER MENU 2 2 viene impostata su TOP o su NONE EXIT REMOTE CONTROL SCREEN 9PIN MASTER 1 2 3 TC TC ADJ BITRATE 8 0 Mbps SET EDL FINALIZE EDIT END CANCEL No IN OUT ACTION MENU PAUSE 00 00 00 00 00 00 00 ⳮ 00 00 00 00 PAUSE 00 00 00 00 00 00 00 ⳮ 00 00 00 00 PAUSE 00 00 00 00...

Page 457: ...one desiderata e premere il tasto Enter Invio il videoregistratore eseguirà il comando inviato Questi pulsanti non controllano il masterizzatore DVD e estrazione del disco u riavvolgimento veloce q arresto t riproduzione w pausa y avanzamento veloce riavvolgimento dei fotogrammi avanzamento dei fotogrammi L azione effettuata da questo masterizzatore DVD in seguito alla pressione del pulsante y o u...

Page 458: ...ono registrati come capitoli in questo caso nell opzione ACTION relativa all evento viene visualizzato CHAPTER t Se necessario ripetere le procedure 3 4 appena illustrate y Avviare la riproduzione nel videoregistratore e attivare la modalità di fermo immagine una volta raggiunta la posizione in cui si desidera far terminare la registrazione u Premere il tasto O sulla tastiera o selezionare l opzio...

Page 459: ... 9PIN MASTER 1 2 3 TC TC ADJ BITRATE 8 0 Mbps SET EDL FINALIZE EDIT END CANCEL No IN OUT ACTION MENU STOP CHAPTER CHAPTER 00 01 01 01 02 01 03 00 00 00 00 00 01 30 00 00 02 30 00 ⳮ 00 03 30 00 ⳮ ⳮⳮⳮⳮⳮⳮⳮⳮ ⳮⳮⳮⳮⳮⳮⳮⳮ ⳮⳮ ⳮⳮ ⳮ 00h 030 min 03m 30s 00 03 30 00 CHAPTER MANUAL TOTAL DURATION DISC REMAIN SOURCE TIMECODE TC SET TC CANCEL EXIT REMOTE CONTROL SCREEN 9PIN MASTER 1 2 3 TC TC ADJ BITRATE 8 0 Mbps ...

Page 460: ...TC ADJ BITRATE 8 0 Mbps SET RECORDING EDL FINALIZE EDIT END CANCEL No IN OUT ACTION MENU STOP CHAPTER CHAPTER 00 01 01 01 02 01 03 00 00 00 00 00 01 30 00 00 02 30 00 ⳮ 00 03 30 00 ⳮ ⳮⳮⳮⳮⳮⳮⳮⳮ ⳮⳮⳮⳮⳮⳮⳮⳮ ⳮⳮ ⳮⳮ ⳮ 00h 030 min 03m 30s 00 03 30 00 CHAPTER MANUAL TOTAL DURATION DISC REMAIN SOURCE TIMECODE Opzione EDIT END Opzione EDL 5 Salvataggio dei dati relativi agli eventi I dati relativi agli eventi ...

Page 461: ...ANUAL TOTAL DURATION DISC REMAIN SOURCE TIMECODE EDL EDL01 S M EDL02 EDL03 EDL04 EDL05 EDL06 EDL07 EDL08 EDL09 EDL10 BACK SAVE IMPORT LOAD DELETE NAME MANAGER 3 1 2 Opzione EDL Schermata EDL MANAGER Utilizzo Selezionare l opzione EDL da utilizzare quindi selezionare l opzione di funzione ed eseguire Esempio salvataggio dei valori attualmente impostati nella schermata REMOTE CONTROL nell opzione ED...

Page 462: ... caratteri IMPORT Utilizzando questa opzione sarà registrata la lista di editing EDL importata da EasyMenu o eventuali altre liste di editing esterne nell opzione EDL che appare evidenziata Pagina 71 DELETE Utilizzando questa opzione verrà eliminata l opzione EDL che appare evidenziata INFORMAZIONI SULLE LISTE DI EDITING EDL Nella modalità SLAVE è possibile utilizzare file EDL di formato CSV e SON...

Page 463: ...AME MANAGER Opzione EDL Opzione IMPORT Opzione LOAD 䡵 Esempio 1 caricamento di una EDL in formato CSV modalità Slave IN POINT OUT POINT EXIT REMOTE CONTROL SCREEN DV SLAVE 1 4 7 h m s f 2 5 8 3 6 9 h m s f h m s f CHAPTER MANUAL BITRATE 8 0 Mbps DISC REMAIN 000 min EDL TC CANCEL ADJ FINALIZE 00 00 00 00 00 10 00 00 00 40 00 00 00 20 00 00 00 30 00 00 01 10 00 00 00 50 00 00 JVC CSV IN POINT OUT PO...

Page 464: ...OTE SELECT nella schermata REMOTE MENU su DV SLAVE Impostando l opzione REMOTE SELECT su DV SLAVE viene visualizzata la schermata REMOTE CONTROL DV SLAVE Da questa schermata è possibile impostare i punti di inizio e fine editing IN POINT e OUT POINT e i marcatori di capitoli Per ulteriori dettagli sull uso della schermata REMOTE CONTROL DV SLAVE andare a pagina 74 Monitor Schermata REMOTE CONTROL ...

Page 465: ...l unità Preparazione Inserire un disco registrabile nell unità Impostazione Impostazioni del masterizzatore DVD impostare l opzione REMOTE SELECT della schermata REMOTE MENU su 9PIN REC Impostando l opzione REMOTE SELECT su 9PIN REC sul monitor viene visualizzata la schermata REMOTE CONTROL 9PIN REC in cui è possibile impostare punti di inserimento capitoli e punti di editing Consultare pagina 74 ...

Page 466: ...l tasto sinistro sul pulsante desiderato L impostazione di IN POINT OUT POINT e marcatori di capitoli può essere eseguita solo utilizzando la tastiera DISC REMAIN Questo campo mostra una stima del tempo di registrazione rimanente su disco FINALIZE Questo pulsante serve per finalizzare il disco TC CANCEL Questo pulsante serve per rimuovere i valori impostati per IN POINT OUT POINT e marcatori di ca...

Page 467: ... Utilizzare i tasti freccia per portare il cursore sull opzione TC CANCEL della schermata quindi premere il tasto Enter Invio Il punto selezionato IN POINT OUT POINT o un marcatore di capitolo nell elenco verrà eliminato L elenco dei capitoli verrà riordinato ogni volta che si elimina un marcatore di capitolo IN POINT OUT POINT EXIT REMOTE CONTROL SCREEN DV SLAVE 1 4 7 h m s f 2 5 8 3 6 9 h m s f ...

Page 468: ...stati per i marcatori di capitoli come valori relativi rispetto all IN point Si consiglia pertanto di specificare sempre un IN point quando si devono creare dei capitoli Se si usa la funzione di creazione automatica dei capitoli questi verranno creati a intervalli specifici 5 Salvataggio di una lista di editing Opzione EDL Le liste di editing possono essere salvate nella schermata EDL MANAGER di q...

Page 469: ...tilizzare uno dei cavi indicati in precedenza Collegare i terminali VIDEO LINE OUT e AUDIO OUT del masterizzatore DVD ai terminali di input audio e video dello schermo Impostazione Inserire un disco registrabile nel BD X200 Impostazioni GY DV5000 o GY DV5001 impostare l opzione DV REC TRIGGER nella schermata OTHERS MENU 1 2 su ON BD X200 impostare l opzione REMOTE SELECT nella schermata REMOTE MEN...

Page 470: ...HIFT ALL STOP MAX MIN MONITOR MAX MIN MONITOR FWD REV STILL X 1 X1 FWD REV STILL X 1 X1 RECORDER PLAYER HOUR MIN SEC FRAME HOUR MIN SEC FRAME P R VITC LTC CTL VITC LTC CTL BUMP PREROLL 7 5 3 ON OFF EVENT No V SPEED A SPLIT DURATION IN OUT IN OUT E D I T I N G C O N T R O L U N I T R M G 8 2 0 Utilizzo di questa unità come lettore mediante il controllo RS 422 Questa unità può essere utilizzata come...

Page 471: ...i destinazione per la registrazione del DVD Collegamenti dei segnali Quando si collegano e scollegano i cavi le apparecchiature devono essere spente 䡵 Collegamento diretto di due BD X200 Collegare i terminali LAN delle due apparecchiature con un cavo Ethernet Utilizzare un cavo Ethernet incrociato di categoria 5 VIDEO AUDIO IN IN OUT IN OUT CH1 CH2 REMOTE USB DV IN OUT SIGNAL LAN GND DC 19V 4dB 8d...

Page 472: ...asto Enter Invio 5 Premere il pulsante SET UP per tornare alla normale visualizzazione dello schermo Duplicazione dei DVD mediante terminale LAN segue Impostazioni di rete Attenersi alla procedura descritta di seguito per effettuare le impostazioni di rete sulle apparecchiature di origine e di destinazione BUSY OPEN CLOSE TOP MENU MENU OPTION DV Y C LINE SET UP SET MENU HOST NAME bdx200 STATIC IP ...

Page 473: ...zo IP dell apparecchiatura di origine Utilizzare i cursori t e 8 per selezionare il valore da cambiare Premere i cursori 6 7 per impostare il valore della cifra selezionata Ripetere l operazione descritta in precedenza per tutte le cifre selezionare SET con i pulsanti 8 t e premere il pulsante SET L indirizzo IP dell apparecchiatura di origine impostato mediante questa finestra di dialogo verrà re...

Page 474: ...BING MENU 4 6 5 Apparecchiatura di origine Apparecchiatura di destinazione DVD DVD SENDER RECEIVER Searching SENDER IP ADDRESS 192 168 000 002 ABORT DVD DVD SENDER DUBBING ABORT DVD DVD RECEIVER DUBBING ABORT MENU DVD DVD EXECUTE DUBBING DVD DVD SENDER DUBBING START SENDER IP ADDRESS 192 168 000 002 RECEIVER IP ADDRESS 192 168 000 003 EXECUTE CANCEL Note La duplicazione non verrà eseguita se si se...

Page 475: ...OFF REC CONTROL REMOTE MENU MENU FINALIZE CANCEL CANCEL CANCEL DISC FINALIZATION CANCEL DISC ERASE QUICK CANCEL DISC ERASE FULL DISC MENU MENU DUBBING EXIT DISC MENU INPUT SELECT SYSTEM PRESET STYLE RECORDER REMOTE DISPLAY CLOCK ADJUST DUBBING NETWORK MENU INPUT SELECT LINE INPUT SELECT MENU MENU TEST SIGNAL OFF FACTORY SETTING CANCEL KEYBOARD STYLE ENGLISH EDIT MENU ENABLE TOTAL RECORDING TIME 5 ...

Page 476: ...o quindi premere il pulsante SET Il valore dell impostazione verrà modificato di conseguenza r Ripetere le operazioni descritte dal punto q al punto e per definire le impostazioni necessarie 䡵 Per tornare al menu delle impostazioni selezionare MENU e premere il pulsante SET 䡵 Per passare alla successiva schermata di menu selezionare il pulsante in alto nella schermata corrente e premere il pulsant...

Page 477: ...e la schermata RECORDER MENU composta da due pagine di parametri Nella schermata RECORDER MENU 1 2 è possibile definire le impostazioni per il metodo di creazione dei capitoli e per la codifica di audio e video Nella schermata RECORDER MENU 2 2 è possibile definire le impostazioni per la registrazione Questo pulsante apre un menu che consente di definire le impostazioni per le operazioni di contro...

Page 478: ...rispetto all opzione di cancellazione completa e i dati del disco vengono eliminati CANCEL la cancellazione rapida non viene eseguita EXECUTE la cancellazione rapida viene eseguita Sarà nuovamente possibile registrare sul disco Questo parametro determina se eseguire la cancellazione completa di un disco DVD RW modalità video Tutte le aree di un disco DVD RW vengono cancellate Si consiglia di utili...

Page 479: ... indicare se tutti i parametri dei menu delle impostazioni devono essere riportati sulle impostazioni predefinite o no CANCEL le impostazioni predefinite non devono essere ripristinate EXECUTE le impostazioni predefinite devono essere ripristinate Impostare questo parametro per indicare la lingua utilizzata dalla tastiera ENGLISH FRENCH ITALIAN GERMAN SPANISH JAPANESE Nota Occorre riavviare il sis...

Page 480: ...alla schermata CHAPTER PATTERN Utilizzare questa schermata per selezionare il tipo di visualizzazione per i menu dei capitoli BACK ritorna alla schermata PRESET STYLE MENU non è possibile selezionare 6 se si adottano le impostazioni predefinite Utilizzare questo pulsante per tornare alla schermata del menu delle impostazioni TYPE 1 2 3 4 5 6 7 8 TITLE PATTERN 1 2 3 4 5 1 2 3 CHAPTER PATTERN 1 2 3 ...

Page 481: ...ibile sul disco Le modifiche apportate a questo parametro determinano un adattamento automatico dei parametri relativi all opzione TOTAL CONTENTS TIME L impostazione effettiva dipende da come è stata impostata l opzione AUDIO ENCODE LPCM da 4 0 a 7 8 Mbps con intervalli di 0 2 Mbps DOLBY DIGITAL da 2 0 a 9 0 Mbps con intervalli di 0 2 Mbps MPEG da 2 0 a 9 0 Mbps con intervalli di 0 2 Mbps Questo p...

Page 482: ...provenienti dai canali 1 e 2 o dai canali 3 e 4 disponibile solo a 32 kHz 1 2ch 1 2ch devono essere registrati i canali 1 e 2 3 4ch 3 4ch devono essere registrati i canali 3 e 4 Questo parametro serve per selezionare il metodo di regolazione dei livelli di registrazione dell audio In particolare è possibile regolare entrambi i canali mantenendo lo stesso livello oppure regolare ogni canale indipen...

Page 483: ... diventerà l apparecchiatura di destinazione e verrà controllato dall editor non lineare DV TRIGGER questa impostazione viene definita quando il BD X200 è collegato a una videocamera digitale con funzione di azionamento della registrazione digitale Consente al masterizzatore DVD di registrare il segnale video proveniente dalla videocamera in seguito all attivazione del pulsante di azionamento Nota...

Page 484: ...a data TIME viene visualizzata solo l ora TIME DATE vengono visualizzate sia la data che l ora Quando il masterizzatore DVD è in modalità di arresto o di registrazione vengono visualizzati i dati dell orologio interno Durante la riproduzione di un disco vengono visualizzate la data e l ora del disco finalizzato Anche se si seleziona DATE TIME o DATE TIME non comparirà alcun tipo di informazione se...

Page 485: ...postazioni Schermata DUBBING La tabella riportata di seguito identifica e descrive i parametri che possono essere impostati nella schermata DUBBING Parte superiore voce visualizzata sullo schermo del monitor Parte inferiore voce visualizzata sul display LCD impostazione predefinita Parametro Impostazioni possibili Descrizione DVD DVD CANCEL EXECUTE D TO D CAN EXE MENU Selezionare questo parametro ...

Page 486: ... annulla l impostazione adottata per l HOST NAME Questo parametro serve per impostare l indirizzo IP Assicurarsi che due apparecchiature su una singola rete non condividano lo stesso indirizzo IP Questo parametro serve per impostare la subnet mask I masterizzatori BD X200 collegati devono avere la stessa configurazione di rete Questo parametro serve per impostare l indirizzo del gateway I masteriz...

Page 487: ...M DOLBY DIGITAL MPEG Quantizzazione 16 bit Frequenza di campionamento 48 kHz N di canali 2 䡵 Dimensioni esterne in mm 䡵 Interfaccia DV I O IEEE1394 䡵 Generale Terminale di rete RJ 45 categoria 5 100 BASE Tx Terminale USB USB 1 1 2 Alimentazione 19 V CC Consumo elettrico 31 W 1 63 A Peso 4 5 kg solo l apparecchiatura Dimensioni 212 mm L 352 mm P 88 mm H esclusi i piedini di appoggio e altre protube...

Page 488: ... FTP inserendo nell apparecchiatura le credenziali riportate di seguito per visualizzare il file readme txt Utente anonymous Password None Se l indirizzo IP dell apparecchiatura è impostato su 192 168 0 2 la connessione FTP può essere stabilita digitando ftp 196 168 0 2 nella barra degli indirizzi di Internet Explorer Altro ...

Page 489: ...77 001B 2004 Victor Company of Japan Limited is a registered trademark owned by Victor Company of Japan Limited is a registered trademark in Japan the U S A the U K and other countries BD X200E DVD Recorder ...

Page 490: ...se connecter via FTP en saisissant les informations suivantes et consulter le fichier readme txt Utilisateur anonymous Mot de passe Aucun Si l adresse IP de l appareil est 192 168 0 2 la connexion FTP peut être établie en saisissant ftp 196 168 0 2 dans la barre d adresse d Internet Explorer Divers ...

Page 491: ...77 001B 2004 Victor Company of Japan Limited is a registered trademark owned by Victor Company of Japan Limited is a registered trademark in Japan the U S A the U K and other countries BD X200E DVD Recorder ...

Page 492: ...ie wenn Sie sich am FTP Server mit den folgenden Daten anmelden Lesen Sie dort die Datei readme text User anonymous Password None Wenn die IP Adresse des Geräts 192 168 0 2 lautet können Sie die Verbindung herstellen indem Sie ftp 196 168 0 2 in die Adresszeile des Internet Explorers eingeben Zusatzinformationen ...

Page 493: ...77 001B 2004 Victor Company of Japan Limited is a registered trademark owned by Victor Company of Japan Limited is a registered trademark in Japan the U S A the U K and other countries BD X200E DVD Recorder ...

Page 494: ...e software used login via FTP by inputting the following into the unit and view the readme txt file User anonymous Password None If the IP address of the unit is set to 192 168 0 2 FTP connection can be established by entering ftp 196 168 0 2 in the address bar of Internet Explorer ...

Page 495: ...77 001B 2004 Victor Company of Japan Limited is a registered trademark owned by Victor Company of Japan Limited is a registered trademark in Japan the U S A the U K and other countries BD X200E DVD Recorder ...

Reviews: