background image

15 


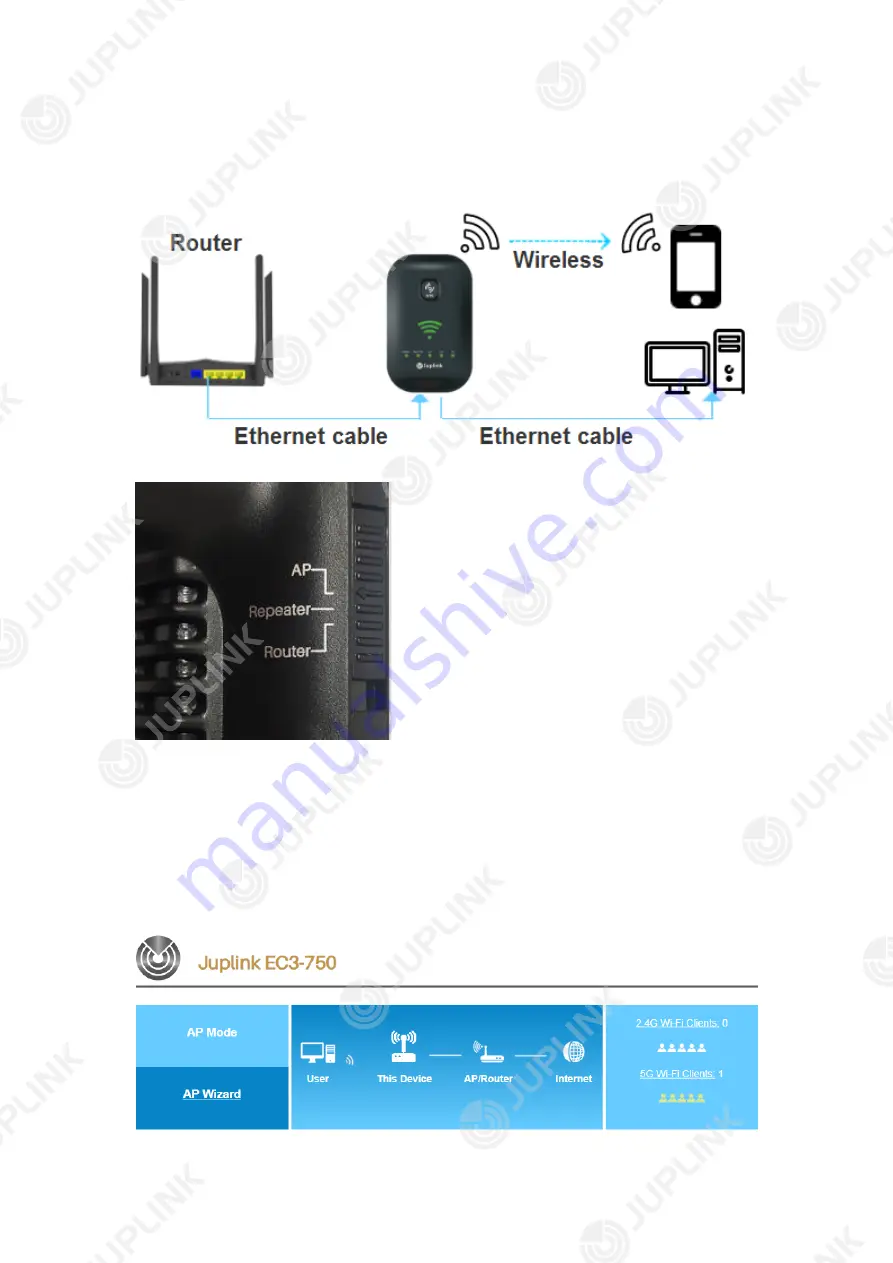
4.2. Set up the Extender as an Access Point 

  Connect your mobile device to the Extender with an Ethernet cable or wirelessly and log 

in to the Extender. 


Note: Before setting, make sure that the left Mode switch is in 

AP

 mode. 


Note: Before completing setting up as AP, do NOT connect an Ethernet cable to the Ethernet port 

located at the bottom of the Extender; otherwise, you can only use 

router.juplink.com

 to log in to the 

Extender

s settigs page, and will not be able to access using the default IP address 

192.168.3.1

 any 

more. 

  Both Ethernet ports on the Extender are automatically adaptive in AP mode.


You can use 

either port to connect to your original router. 


  Click 

AP Wizard


Summary of Contents for EC3-750

Page 1: ...1 ...

Page 2: ...Extender 10 Chapter 4 Set Up Internet Connection 12 4 1 Set up the Extender as an Repeater Client default 13 4 2 Set up the Extender as an Access Point 15 4 3 Set up the Extender as a Router 17 Chapter 5 Maintaining the Extender 20 5 1 Changing the User Name and Password of the Range Extender 21 5 2 Save Import your settings 21 5 3 Upgrade Firmware 22 5 4 Change LAN IP Address 23 5 5 View connecte...

Page 3: ...tion only Maximum wireless signal rates are the physical rates derived from IEEE Standard 802 11 specifications Actual wireless data throughput and wireless coverage are not guaranteed and will vary as a result of network conditions client limitations and environmental factors including building materials obstacles volume and density of traffic and client location More Info The latest software man...

Page 4: ...4 Chapter 1 Get to Know About Your Wi Fi Range Extender This chapter introduces what the Extender can do and shows its appearance It contains the following sections Product Overview Panel Layout ...

Page 5: ...e Home Office SOHO networks and users demanding higher networking performance Three powerful internal antennas ensure continuous Wi Fi signal to all your devices while boosting coverage throughout your home and the built in Ethernet ports supply high speed wired connection to your devices 1 2 Panel Layout 1 2 1 Front View 1 2 2 Buttons Interfaces ...

Page 6: ...6 LED Indicators ...

Page 7: ...7 Chapter 2 Connect the Hardware This chapter contains the following sections Connect Your Extender Position Your Extender ...

Page 8: ...Wireless devices that support WPS including Android phones tablets and most USB network adapters can be connected to your Extender through this method Tap the WPS icon on the device Then immediately press the WPS button on the Extender for more than 5 seconds Note WPS is not supported by iOS devices The WPS function CANNOT be configured if the wireless function of your original router is disabled ...

Page 9: ... zone The location you choose must be within the range of your existing Wi Fi network 2 Wait until the 2 4G or 5G signal LED turns solid green or the Wi Fi Signal Strength Indicator shows at least Two LEDs on Note Keep the Extender away from devices with strong electromagnetic interference such as Bluetooth devices cordless phones and microwaves ...

Page 10: ...10 Chapter 3 Log In to Your Extender ...

Page 11: ...a Firefox Follow the steps below to log in to your Extender 1 Set up the TCP IP Protocol in Obtain an IP address automatically mode on your computer 2 Open a browser and visit 192 168 3 1 or router juplink com 3 Enter the default username and password admin in the corresponding fields 4 Click the Login button to enter the settings page Note If the Login window does not appear please refer to the F...

Page 12: ...nect your Extender to the internet The Wi Fi signal indicator can help quickly determine whether the setup is successful It contains the following sections Set up the Extender as a Repeater Client default Set up the Extender as an Access Point Set up the Extender as a Router ...

Page 13: ...ISP Follow the steps below to check or modify your internet connection settings You don t know how to choose the way to connect please check with your ISP for the internet access method before setting Connect your mobile device to the Extender with an Ethernet cable or wirelessly and log in to the Extender Note Before setting make sure that the left Mode switch is in Repeater mode Click Repeater W...

Page 14: ...e Default password is automatically copied from your original router s Wi Fi network Default SSID is SSID of your original router suffix of 2 4GEXT or suffix of 5GEXT depending on the band the Extender is connected to your router You can also modify the SSID of the extended s network to the same as that of the existing network you choose to extend ...

Page 15: ...completing setting up as AP do NOT connect an Ethernet cable to the Ethernet port located at the bottom of the Extender otherwise you can only use router juplink com to log in to the Extender s settigs page and will not be able to access using the default IP address 192 168 3 1 any more Both Ethernet ports on the Extender are automatically adaptive in AP mode You can use either port to connect to ...

Page 16: ...ge the Encrypted mode and enter your Wi Fi password in the Key field Then click Save to complete the settings Note It is recommended to keep the default channel settings Do not change the Wi Fi channels unless you have relevant knowledge and think it necessary ...

Page 17: ... please use an Ethernet cable to connect the WAN port on the Extender and LAN port of a modem Select Fixed IP DHCP or PPPoE according to the actual connection type you are using which you can check with your ISP Below is the detailed method of setting in Router mode Click Intelligent detection This will solve most of the problems you may meet when connecting to the modem Click Router Wizard There ...

Page 18: ...rom Encrypted drop down list and set your Wi Fi password in the Wi Fi key filed then click Save to complete the settings 4 3 2 Router Mode DHCP Select PPPoE in Connection Type Fill in the Username and Password fileds according to the information provided by your ISP Set your Wi Fi name and password then click Save to complete the settings ...

Page 19: ...ing to the information provided by your ISP Set your Wi Fi name and password then click Save to complete the settings Note You can take a screenshot to keep the information for the next time or for others to use After completing the settings the Extender will reboot and you can reconnect to the extended network in about 30 seconds ...

Page 20: ...Maintaining the Extender This chapter guides you how to configure common settings Change User Name and Password of the Extender Save Import Your Settings Upgrade Firmware Change LAN IP Address View Connected Devices ...

Page 21: ...you to save current settings to a file or reload the settings from a file that was saved previously You can also reset the current configuration to factory defaults After logging in to the Extender click Save Import Settings To save current settings to a file click the Export button next to Export Settings to File and then save it to your local device The browser extracts the configuration file fr...

Page 22: ...d select the firmware The firmware is usually a file with the extension of img Click the Upload button to upload the file Note The upgrade process takes about 2 minutes to complete and your Extender will reboot automatically After that press the RESET button to reboot the Extender again Please do NOT change the file name including the extension name of the file ...

Page 23: ... in Router mode and only when necessary In AP or Repeater mode the LAN IP address is assigned by your original router in that case please do NOT modify it otherwise the network extension may fail 5 5 View Connected Devices After logging in to the Extender click 2 4G Wi Fi Clients or 5 G Wi Fi Clients You can view the information of devices connected to this EC3 750 Extender ...

Page 24: ...close the browser not just return to the previous page and open a new page to try again If it still failed please clear all the browser cache or reboot your mobile device If none of the above solutions work it is recommended to restore factory settings or recharge the plug in the socket then try connecting and logging in again b After extension Method 1 Make sure you are connected to the correct S...

Page 25: ...correct password of the uplink router is entered during network extension Q7 How do I know if the network extension is successful A7 Check if the SSID is still the default one If yes the network extension fails Check the status of the wireless signal indicator On or flashing indicates successful network extension while off indicates network extension failure Log in to the settings page of the Exte...

Page 26: ...Q11 Why does a mobile device lose connection to the Extender after extension A11 If the signal indicator becomes off the Extender is disconnected from the router Please check if any changes have been made on the Extender or the mobile device Access the settings page of the router to view the operation log and check the status of the router If the router is normal adjust the location of the Extende...

Page 27: ...f it still does not work reset the Extender and try connecting the Extender to the router again Q14 Why is there only one band either 2 4G or 5G of Wi Fi network displayed after successful network extension A14 The signal may be hidden Please check the following If the encryption mode is WPA WPA2 or mixed of the above If the wireless key contains special characters If the Wi Fi channel is changed ...

Page 28: ...nnect the equipment into an outlet on a circuit different from that to which the receiver is connected Consult the dealer or an experienced Radio TV technician for help This device is restricted to be used in the indoor Operation is subject to the following two conditions 1 This device may not cause harmful interference and 2 This device must accept any interference received including interference...

Reviews: