− 29 −
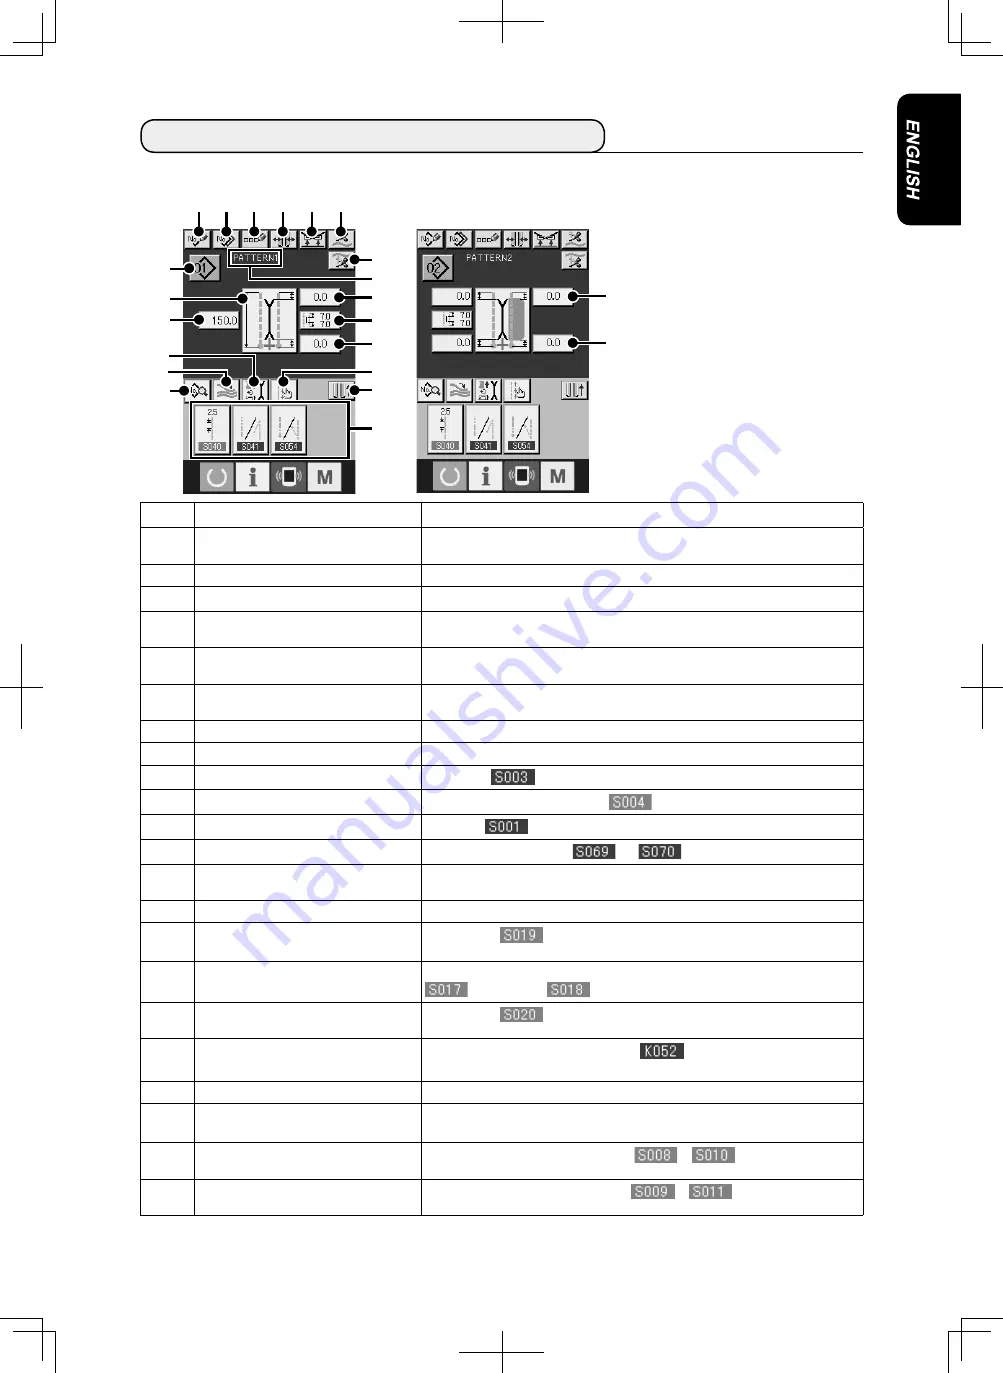
(1) Input screen (Independent sewing mode)
3. EXPLANATION OF THE BASIC SCREEN
U
V
Symbol
Name of button
Description
A
NEW CREATION button
Independent sewing pattern new creation screen is displayed and new register of the pattern
data can be performed.
B
COPY button
Independent sewing copy source pattern list screen is displayed and the pattern can be copied.
C
CHARACTER INPUT button
Character input screen is displayed and the name can be inputted to the pattern data.
D
TYPE OF WELT CHANGE-OVER button
Type of welt change-over screen is displayed, and change-over of type of welt and adjust
-
ment of parallelism of the binder can be performed.
E
CLAMP UP PROHIBITION AT SEWING END
button
When this button is pressed, the clamp is returned in the lowered state at sewing end.
It is convenient to use this button at the time of adjusting the marking light or trial sewing.
F
NEEDLE THREAD TRIMMING button
When this button is pressed, needle thread trimming knife comes down and the needle
thread trimming operating screen is displayed.
G
BOBBIN THREAD TRIMMING button
Bobbin thread trimming knife opens while this button is pressed.
H
PATTERN NO. LIST button
Pattern No. list screen is displayed and the pattern data can be selected.
I
SEWING MODE CHANGE-OVER button
Sewing mode
is selected.
J
L SIZE LENGTH SETTING button
In case of L size sewing, sewing length
is set.
K
MOTION MODE SETTING button
With/without
of motion of sewing machine motor, center knife and corner knife.
L
STACKER MOTION/STOP CHANGE-OVER button This button selects motion/stop
and
of stacker.
M
SEWING DATA DISPLAY button
Sewing pattern edit screen is displayed. Detailed sewing data that are not displayed in the
input screen can be selected and edited.
N
PATTERN NAME display
Names that are inputted in pattern Nos. are displayed.
O
CORNER KNIFE MOTION POSITION AT
SEWING START SETTING button
Cutting position
of corner knife at sewing start is set.
P
CENTER KNIFE SETTING button
Center knife data edit screen is displayed, and center knife cutting position of sewing start
and sewing end
is set.
Q
CORNER KNIFE MOTION POSITION AT
SEWING END SETTING button
Cutting position
of corner knife at sewing end is set.
R
MARKING LIGHT SETTING button
Sewing baseline can be selected by changing
to the conventional operation mode.
(It should be noted, however, the marking light can only be adjusted manually.)
S
CLAMP FOOT MOVE button
Clamp foot is moved to the front or to the back.
T
SEWING DATA SHORTCUT button
Shortcut buttons (max. 4 items) of the sewing data that are set in customizing in the sewing
screen are displayed.
U
FLAP DROP DATA AT SEWING START SET
-
TING button
Flap concealed stitching data at sewing start
or
is set.
V
FLAP DROP DATA AT SEWING END SET
-
TING button
Flap concealed stitching data at sewing end
or
is set.
* It is possible to customize display/non-display of the respective buttons.
For the details, refer to
"VI-12. CUSTOMIZING THE DATA INPUT SCREEN" p. 73
.
O
P
Q
S
A B C D E F
H
J
M
I
L
K
R
T
N
G
Summary of Contents for APW-895NE
Page 2: ......
Page 3: ...APW 895NE IP 420 CompactFlash TM is the registered trademark of SanDisk Corporation U S A ...
Page 4: ......
Page 12: ...viii ...
Page 13: ...ix ...
Page 130: ......
Page 131: ...APW 895NE IP 420 CompactFlash TM 是美国 SanDisk 公司的注册商标 ...
Page 147: ... 7 6 线架的组装和往主机的安装 请按照左图所示那样 请用螺母和垫片把线架固定 到主机机架 上 垫片 弹簧座 螺母 ...
Page 168: ... 28 F 此时 错误画面被显示出来 通知停止开关被按 按了复位按 钮 F 之后 错误被解除 然后返回到输入画面 ...
Page 254: ......
Page 255: ......


