The mounting bracket is used to mount the unit inside the cab. Normally it is mounted onto the
driver's A-post. However, it is also possible to mount it onto the driver's right arm rest (an extra
cable is required to do this). This is ideal for vehicles equipped with a snow plough. Refer to
"Appendix 2 - APC Transfer Kit ", on page 79
for further information about this.
A split setup is also possible with the control-stick mounted next to the driver's seat and the dis-
play on the A-post. This however is not ideal for snow ploughs.
User Interface
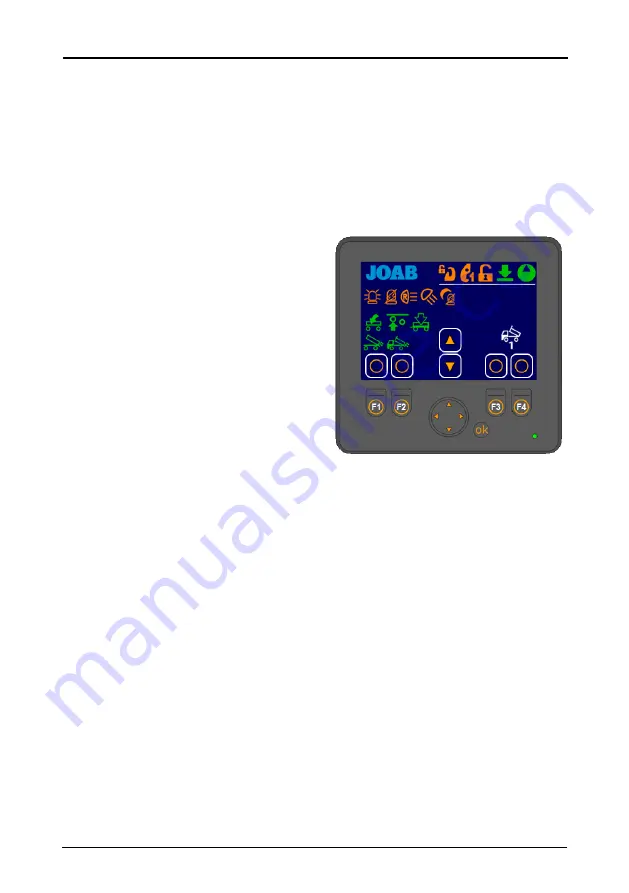
Shown opposite is an overview of the user
interface.
The areas marked with a white rectangle on
the screen are programmable. The user can
set which functions are placed there. These
functions are activated by pressing the cor-
responding buttons: F1–F4 and the
UP/DOWN arrows. For further information on
how to set these functions, refer to
below.
The function icons (F1–F4 and the UP/DOWN
arrow buttons) that are displayed in the user
interface is dependent upon which page setup
is selected. There are five different page
setups. To switch between these press either
the left or right arrow button located below the screen. For more information see
All other icons that are displayed on the screen (not the user defined functions) simply provide
feedback to the user regarding the status of the hooklift, which page setup is active, and active
functions, such as lights on etc.
See
, below for a list of the icons and their function.
Icon Definitions
Provided below is a list of the functions available in the user interface and their meaning. Note,
not all functions listed below are activated for all installations. Some of the functions are
optional extras, these are marked with an asterisk (*).
Functions that can be selected for the programmable areas (F1–F4 and the UP and DOWN
buttons) are coloured white. All other buttons (orange and green) simply provide feedback to
the user as to whether or not they are active.
12
Operation | CBW controller
EcoDrive 2.0 manual: 1021970 Edition 1 | 2022-02-04
Summary of Contents for EcoDrive LA
Page 2: ...EcoDrive 2 0 manual 1021970 Edition 1 2022 02 04 ...
Page 6: ...Table of Contents vi EcoDrive 2 0 manual 1021970 Edition 1 2022 02 04 ...
Page 8: ...viii Introduction Software Version EcoDrive 2 0 manual 1021970 Edition 1 2022 02 04 ...
Page 18: ...10 Safety EcoDrive 2 0 manual 1021970 Edition 1 2022 02 04 ...
Page 48: ...40 Radio Controllers Operation EcoDrive 2 0 manual 1021970 Edition 1 2022 02 04 ...
Page 56: ...48 Loading a Body EcoDrive 2 0 manual 1021970 Edition 1 2022 02 04 ...
Page 62: ...54 Unloading a Body EcoDrive 2 0 manual 1021970 Edition 1 2022 02 04 ...
Page 68: ...60 Shunting a Body Risk of Damage EcoDrive 2 0 manual 1021970 Edition 1 2022 02 04 ...
Page 80: ...72 Technical Data EcoDrive 2 0 manual 1021970 Edition 1 2022 02 04 ...
Page 82: ...74 Fault Tracing the Hook Lift EcoDrive 2 0 manual 1021970 Edition 1 2022 02 04 ...


