


NT-2000 REF Manual
Customizing Operation via Menu System
4-27
4 . 1 3 . Tu r n i n g o n / o f f M e ss a g e A l arm s
The alarm function for types A, B and L messages is initially disabled unless it was set
otherwise by your dealer. If you wish to enable some or all of the message alarms, follow
the steps given below. The alarm for type–D messages cannot be disabled due to the
relevant IMO resolutions.
(1) Press
, opening the system menu.
(2) Using
/
, highlight “
9: TURN ON/OFF MESSAGE ALARMS
” and then press
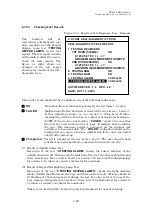
. The current alarm on/off status will then be displayed on a submenu as in the
example below.
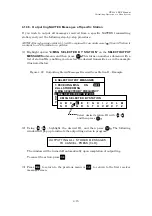
Figure 4-39 Initial Alarm Status
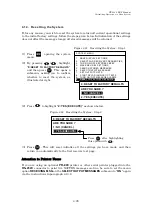
(3) Highlight the desired message type with
/
, and then highlight status
indication “
ON
”
by pressing
, as in the example below.
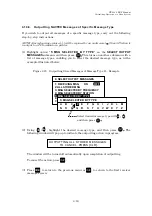
Figure 4-40 Enabling Alarm for Type–B Messages
Be sure to press
after selecting the desired setting.
(4) Press
to return to the previous submenu or
to return to the first receiver
text page.
S Y S T E M M E N U
1:
MAKE DISPLAY SETTINGS
2: SELECT 2ND RECEIVER FREQUENCIES
3: TURN ON / OFF KEYPRESS BEEP
4: MAKE SEL / REJ SETTINGS
5: SEARCH STORED MESSAGES
6. SELECT OUTPUT MESSAGES
7. SET OUTPUT PORTS
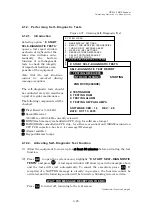
8. START SELF–DIAGNOSTIC TESTS
9: TURN ON
/
OFF MESSAGE ALARMS
0. RESET TO FACTORY DEFAULTS
9: TURN ON / OFF MESSAGE ALARMS
1: MESSAGE A:
I
ON
i
OFF
2: MESSAGE B:
ON
i
OFF
3: MESSAGE D:
ON
4: MESSAGE L:
ON
i
OFF
Enabled/Disabled Status
9: TURN ON / OFF MESSAGE ALARMS
1: MESSAGE A:
ON
i
OFF
i
2: MESSAGE B:
i
i
ON
i
OFF
3: MESSAGE D:
ON
4: MESSAGE L:
ON
i
OFF
i
Press
to highlight
ON
.