Jetboil MIGHTYMO Instructions Manual Download Page 5

Preparation: 

1. 

Add contents to cookware, but do not put the cookware  on the 

stove yet. Now you are ready to light the burner.

                   Never use cookware larger than 1.5L capacity or 8in

                   [20cm] diameter.

2. 

Test igniter by depressing igniter button (7.2) until click 

is heard. If it does not spark, refer to Maintenance and 

Troubleshooting sections.

                Performance may be suboptimal if used in extreme 

                conditions (cold, hot, wind, altitude).

                   Do not use stove to warm fuel canister. Can result in explosion.

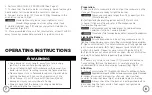
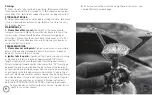
Lighting the Burner: 

                   Ensure burner base is free of any cookware  prior to 

lighting. Gas build-up can occur, resulting in increased flame eruption.


1. 

Open control valve (7.1) counterclockwise until fully opened and 

gas flow can be heard.  

2. 

To light, depress Igniter Button (7.2) 

until click is heard.  Repeat as necessary until ignition (Fig 8).

3. 

If ignition does not occur within 5 seconds, close control valves 

and wait 5 minutes before repeating the procedure. 

Usage: 

1. 

If necessary, rotate control valve (7.1) clockwise to decrease 

flame setting.

  2. 

Once the burner is lit, carefully place the 

cookware with its contents on the pot support legs (Figs 9-10).

After Use:  

1. 

Turn off control valve (7.1) (tighten clockwise) to extinguish flame. 


Exposed metal parts will be hot and may cause injury if touched.

2. 

Always disconnect fuel canister after use. Unscrew fuel 

canister from burner base (Fig 4), and replace plastic fuel cap.

                   Always check that the burner is extinguished before 

disconnecting the fuel canister. Fuel vapors can ignite and 

cause serious injury.

• Keep burner at arm’s length, away from face, during 

   ignition. Flame can flare during ignition. 

• Do not attempt to light with cookware on the burner. Gas

   build-up can occur, resulting in increased flame eruption. 

• Never expose stove to flammable vapors or liquids while 

   lighting the burner. It can cause an explosion or fire. 

• Do not move, lift, or tilt stove with lit burner. Product 

   damage or injury can occur due to flaring. 

• Always check that the burner is extinguished before 

   disconnecting the fuel canister. 

6. Perform LEAK CHECK PROCEDURE (See Page 4).

7. To check that the fuel canister is not empty, liquid fuel may be 

heard and/or felt inside when the canister is shaken.

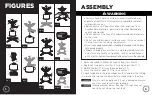
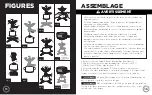
8. Connect fuel canister (3.1) to valve (3.2) by threading in the 

orientation shown in Fig 4. 

                  Hand tighten only, do not over-tighten or cross-

                  thread. May damage seals resulting in fuel leak.

9. Unfold stabilizer legs (1.5) and securely attach stabilizer to 

fuel canister (Figs 5-6). 

10. Place assembled stove on a flat, level surface, at least 1m/3.3ft 

away from any combustible materials or ignition sources. 
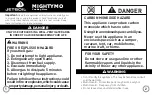
 WARNING

OPERATING INSTRUCTIONS

8

7

Summary of Contents for MIGHTYMO

Page 1: ...Cooking Stove Instructions MIGHTYMO...

Page 2: ...infireorexplosion whichcouldcause propertydamage personalinjury ordeath ONLY USE OUTDOORS IN A WELL VENTILATED AREA IN ORDER TO AVOID ENDANGERING YOUR LIFE 2 1 FOR YOUR SAFETY Do not store or use gaso...

Page 3: ...ister 3 1 to valve 3 2 by threading in the orientation shown in Fig 4 3 Put soapy water on the gas connection between fuel canister and the valve Formation of bubbles indicate a gas leakage Do not che...

Page 4: ...sources of ignition such as naked flames pilot electric heaters equipment and away from other people WARNING ASSEMBLY 1 Remove packed contents from pack bag not shown 2 Deploy pot support arms 3x to f...

Page 5: ...edmetalpartswillbehotandmaycauseinjuryiftouched 2 Always disconnect fuel canister after use Unscrew fuel canister from burner base Fig 4 and replace plastic fuel cap Always check that the burner is ex...

Page 6: ...ssible blow out flame and immediately detach fuel source See your dealer or contact Jetboil for service 2 Igniter fails to spark If igniter will not spark check positioning of electrode in relation to...

Page 7: ...ntra nerlamort UTILISEZUNIQUEMENT L EXT RIEURDANSUNEZONE BIENA R EAFIND VITERDEVOUSMETTREENDANGER 12 11 POUR VOTRE S CURIT N entreposez pas ou n utilisez pas d essence ou d autre liquide et vapeurs in...

Page 8: ...combustible 3 1 lasoupape 3 2 enla vissantdanslesensindiqu surlaFig 4 3 Mettezdel eausavonneusesurlaconnexiondugazentrelacartouchede combustibleetlasoupape Laformationdebullesindiqueunefuitedegaz AVER...

Page 9: ...s veilleuses radiateurs et autre quipement lectrique et l cart de la pr sence d autrui AVERTISSEMENT ASSEMBLAGE 15 16 Fig 9 Fig 1 Fig 2 Fig 3 Fig 4 Fig 5 Fig 6 Fig 7 Fig 8 Fig 10 1 1 1 3 1 2 1 4 1 5 2...

Page 10: ...NT Les pi ces m talliques expos es seront chaudes et peuvent causer des blessures en cas de contact 2 Toujours d brancher le contenant de gaz apr s l utilisation D visser le contenant de gaz de la bas...

Page 11: ...pour le nettoyer Lavez les uniquement la main avec de l eau savonneuse D PANNAGE 1 La flamme ne s teint pas Resserrez la soupape autant que possible teignez la flamme en soufflant dessus et d tachez...

Page 12: ...t dichten die O Ringe m glicherweise nicht vollst ndig ab was zum Austreten von Brennstoff f hren kann 6 AUF UNDICHTE STELLEN PR FEN siehe Seite 4 7 Um sicherzustellen dass der Brennstoffkanister nich...

Page 13: ...er Anz nden der Brenner befolgen Wenn mit dem Z nder aus einem beliebigen anderen Grund kein Funke entfacht wird Ihren H ndler oder Jetboil f r Hilfe kontaktieren 3 Wenn ein Problem durch Befolgen die...

Page 14: ...io a las agujas del reloj La llama debe ser de color azul sin toques amarillos a m xima intensidad La llama no debe desplazarse hacia el interior del quemador ni sobresalir de la parte superior del mi...

Page 15: ...arsi un accumulo di gas con conseguente aumento della fiamma 1 Ruotare la valvola di regolazione 7 1 in senso antiorario fino all apertura completa e fino a sentire il flusso del gas 2 Per accendere i...

Page 16: ...tkoppelt Niet gebruiken voor het koken van olie of frituren Het product kan beschadigen of er kan letsel optreden door oververhitting Voorbereiding 1 Doe het te koken product in het kookgerei maar pla...

Page 17: ...der kan potentielt g ild i det Flyt l ft eller vip ikke komfuret n r br nderen er t ndt Der kan ske skade p produktet eller personer som f lge af opblussen M ikke fyldes over maksimumsmarkering Det ka...

Page 18: ...ainevuodon 9 K nn vakauttimen jalat 1 5 auki ja kiinnit vakautin tukevasti polttoaines ili n kuvat 5 6 10 Sijoita koottu keitin tasaiselle alustalle v hint n 1 m n et isyydelle kaikista palavista mate...

Page 19: ...lekkasjesjekk ute i et godt ventilert omr de 2 Koble drivstoffbeholderen 3 1 til ventilen 3 2 ved skru den inn den retningen som vises i fig 4 3 Ha s pevann p gassforbindelsen mellom drivstoffbeholde...

Page 20: ...nder den h r produkten Bekanta dig helt med den h r produkten innan du ansluter den till en gasbeh llare Spara denna bruksanvisning f r framtida referens FARA ANV ND ENDAST UTOMHUS P EN V LVENTILERAD...

Page 21: ...laren fr n br nnarbasen Fig 4 och s tt p plastlocket Kontrollera alltid att br nnaren r sl ckt innan du kopplar loss gasbeh llaren Br nsle nga kan ant ndas och orsaka allvarliga personskador Packa iho...

Page 22: ...1 4 O O 8 6 4 7 8 4 3 1 3 2 9 1 5 5 6 10 1 3 3 1 1 5L 8 20 2 7 2 1 7 1 2 7 2 8 3 5 5 1 7 1 2 9 10 1 7 1 2 4 1 2 2 1 3 2 2 4 2 3 1 2 7 1 7 2 3 1 2 4 1 3 5 12 1 4 6 1 1 2 3 1 Jetboil 2 1 Jetboil 2 1 8 3...

Page 23: ...0 0 39 11 215 3 10 000 1 2 3 1 3 2 4 3 4 1 3 3 1 2 3 1 1 3 1 2 1 3 4 7 1 5 1 4 6 4 7 8 3 1 3 2 4 9 1 5 5 6 10 1 3 3 1 1 5 20 8 2 7 2 1 7 1 2 7 2 8 3 5 5 1 7 1 2 9 10 1 7 1 2 4 1 2 2 1 3 2 2 4 2 3 1 Je...

Page 24: ...wid owo powoduj c wyciek paliwa 6 Sprawd czy nie ma wyciek w ZGODNIE Z PROCEDUR patrz strona 4 7 W celu sprawdzenia czy zbiornik paliwa jest pusty potrz nij nim lekko Przemieszczanie si paliwa p ynneg...

Page 25: ...Na m sto styku n dr e a ventilu naneste m dlovou vodu Vznik n bublin znamen nik plynu VAROV N nik plynu nehledejte otev en m plamenem VAROV N Pokud zaznamen te nik plynu p stroj nezapalujte Od roubujt...

Page 26: ...mu obra te se na sv ho prodejce nebo zna ku Jetboil 2 i t n n doby p ed ulo en v p pad pot eby P ed myt m nechte vychladnout K i t n nepou vejte my ku n dob ani abrazivn prost edky p sek s l atd Myjt...

Page 27: ...istributer or Jetboil for parts and or service Please visit https www jetboil com warranty for product warranty information Jetboil Jetboil Johnson Outdoors Gear Inc Johnson Outdoors Gear Inc 540 N Co...

Reviews: