24
58
5
Index 0
Proceed as follows to install or remove the mast on your own:
BEFORE STEPPING THE MAST:
- Protect the mast from chafing from the hook and hoist cable,
- Secure the shrouds and lines to the mast base with a hitch of sufficient length to
guide the mast foot during handling,
- Protect the spreader end pieces,
- Install a 1.50 m line around the mast with a thimble on each end and wrapped
with
rags. Install the line below the second tier of spreaders. Connect both thimbles
by means of a sufficiently strong shackle and attach to the crane hook, ahead of the
mast. Raise the assembly until it is taut under the spreader base.
DURING MAST STEPPING:
- Take all steps necessary to avoid damaging the equipment on the mast head,
- Control the handling by means of the backstay and mast base hitch,
- Ensure that the mast base rests fully on its support plate.
AFTER MAST STEPPING:
- Check the spreaders for safety and position: they must always be above the
horizontal,
- Lubricate all bottlescrews (refer to “Hints”, chapter 5),
- Make the shrouds fast (refer to chapter 5 for “Settings”),
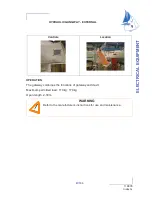
- Insert the wires in the cable glands, re-feed the cable glands and connect the
electric cables (refer to chapter 8 “Electricity”),
- Carefully check that the bottlescrew securing pins are locked and protected by
adhesive tape.
- Re-install the boom and refit all lines,
- Carefully check that the mast collar sleeve is waterproof; Seal the mast groove
with silicone.
Adjust the mast again after a few trips out to sea.
UNSTEPPING THE MAST:
Proceed in reverse order taking care to mark the line locations with stickers.
D A N G E R
D A N G E R
Before mast installation, be sure to have enough room to move.
Contact or closeness of electric wires may incur electrocution.
STANDING RIGGING
rig and sails
Summary of Contents for sun odyssey 54 DS
Page 4: ...index 0...
Page 5: ...3 58 SPECIFICATIONS WARRANTY 1 5 1 3 5 2 iso 10240 Index 0 YOUR BOAT GENERAL TERMS OF WARRANTY...
Page 8: ...index 0...
Page 10: ...index 0...
Page 12: ...index 0...
Page 20: ...index 0...
Page 22: ...5 3 3 h iso 10240 index 0 EMERGENCY TILLER...
Page 24: ...index 0...
Page 26: ...index 0...
Page 30: ...index 0...
Page 32: ...index 0...
Page 36: ...index 0...
Page 38: ...index 0...
Page 40: ...index 0...
Page 44: ...index 0...
Page 62: ...index 0...
Page 63: ...32 58 ACCOMMODATIONS 6 5 3 5 4 5 5 iso 10240 Index 0 MAINTENANCE FABRICS BLINDS...
Page 72: ...index 0...
Page 82: ...index 0...
Page 90: ...index 0...
Page 102: ...index 0...
Page 103: ...52 58 LAUNCHING 10 5 2 5 3 5 4 iso 10240 Index 0 LAUNCHING HINTS MAST INSTALLATION...
Page 104: ...index 0...
Page 106: ...index 0...
Page 108: ...index 0...
Page 110: ...index 0...
Page 112: ...index 0...
Page 114: ...index 0...