


www.javad.com
www.javad.com
61
60
Hybrid RTK with DPOS
Hybrid RTK with DPOS
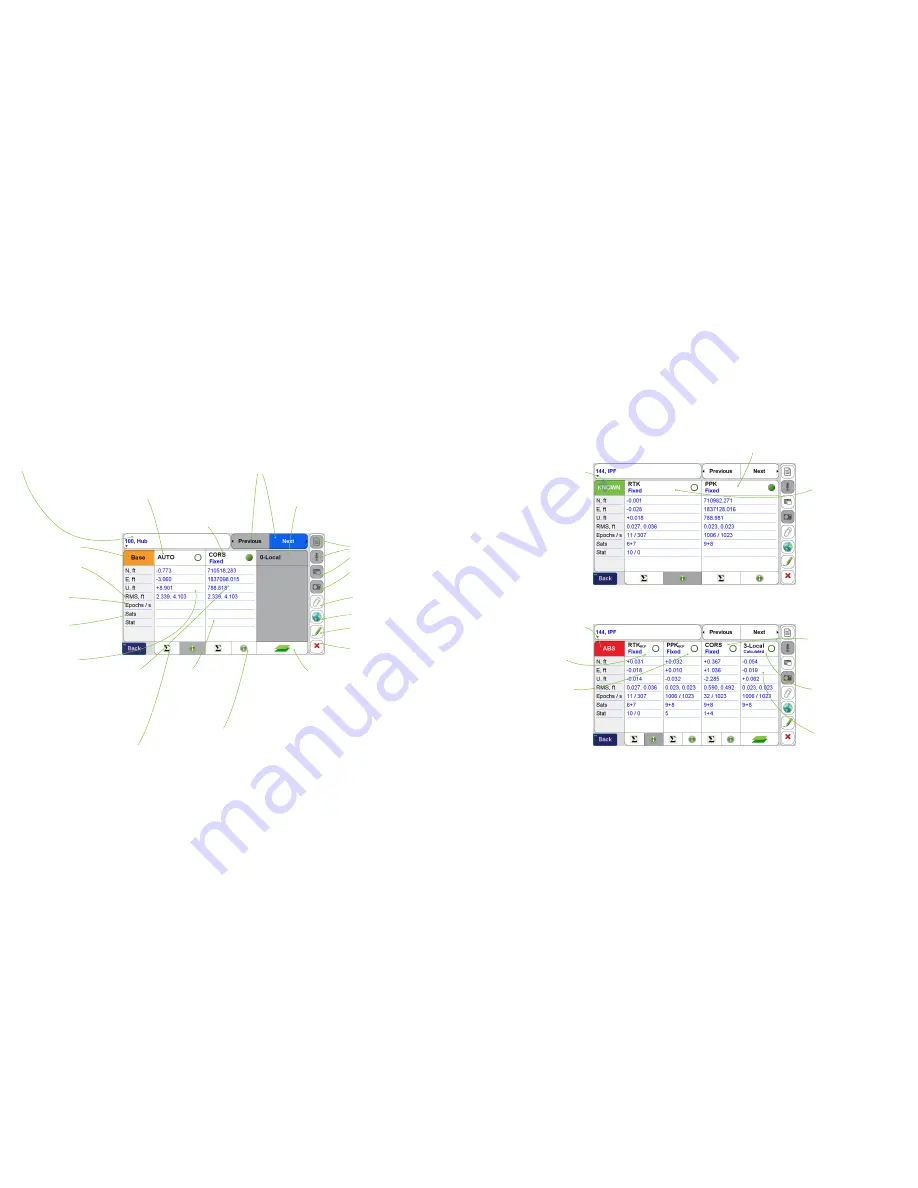
Screen Anatomy - Processed Point Info Screen
Example of a Screenshot for a Base Point
Screen Anatomy - Processed Point Info Screen
Example Screenshots for a Rover Point
Point Name
- The name of the current point being reviewed, this box can be
formated to also display the Code and Description with a long click (notice
the arrow in the bottom left corner)
Use
Previous
and
Next
to cycle through the list of surveyed points
Note, Audio, Screenshots
and
Photos
- Tapping these button will
display the point’s
Note, Audio,
Screenshots
or
Photos.
These
buttons will only be active when
the point has these attachments.
Attach
- Use this button to attach
new media to the point
Edit
- Open the
Edit Point
screen
Delete
- Delete this point
Map
- View this point on the map
M-Local
- The
Multiple Local
coordinate/residuals are displayed in
this column.
M-Local
coordinates shift the associated surveyed
points with the same base station session to known coordinates.
(This point does not currently have
M-Local
coordinates.)
Add M-Local
- Use this button to add the current displayed point
as a
M-Local
point. Once tapped, you be prompted to select or
enter a coordinate. The translation from the displayed point
(100 in this example) to the enter coordinate will be calculated.
Multiple pairs of points can be added in
M-Local
to calculate a
best fit translation; hence the term
Multiple Local (0-Local
has 0
pairs of points,
1-Local
has 1 pair,
2-Local
has 2, etc.)
.
Select the
M-Local
coordinate (radio button set to this column) for any point
to then apply this translation to the selected point and all other
associated points with the base station session.
Info
- The info button opens a
text report for the post-processed
solution shown in this column.
Base Rover Statistics
- View the
Base
Rover Statics
screen for the solution
shown in this column.
Number of stations used
in this CORS solution
Number of GPS +
GLONASS satellites
Number of Epochs /
Duration (time between
first and last epoch in
seconds)
Horizontal and Vertical RMS
The current (radio button is selecting this column) coordinate type for the base and
associated rover points is
KNOWN
(base station was started from a known coordinate). If
the base station was started from an autonomous position this would be labeled
AUTO
.
The post-processed CORS solution
for the base station (currently not
selected as the current coordinate)
The current coordinates; the
coordinates in the selected
column will be used
throughout J-Field as the
current coordinates. These
are the coordinates that will
be displayed in map, points
list, exports, etc.
Residuals
from the current
coordinate
Indicates this is a Base point
Base Type
- This box is painted green
when the current coordinate has the base
reference from this type of coordinate.
KNOWN
indicates that the base was
started from a known position. If the base
station was started from an autonomous
position this would be labeled
AUTO
. Tap
this button to view the
ABS
coordinates
(absolute coordinates, shown in the
bottom screenshot).
RTK Solution with
KNOWN
Base, tap this
box to set the current coordinate to this
coordinate. You will be prompted with
several options:
Base-Rover Post-Processed Solution with
KNOWN
Base
(current coordinate in this screenshot)
Base Type
- This box is painted red when
the current coordinate down not have the
base reference from this type of coordinate.
ABS
(absolute) coordinates indicate that
the base station coordinates are reference
from a CORS adjusted solution or from local
control points when the
M-Local
coordinate
is chosen. Tap this button to view the
AUTO/KNOWN referenced coordinates.
RTK Solution with
BCP (Base CORS
Processed)
Solution
Base-Rover Post-Processed with
BCP (Base
CORS Processed) S
olution
CORS
Post-Processed Solution
M-Local
Solution - 3 pairs of
coordinates used in this example. This
solution is always M-Local base-RTK
rover solution.
Tap this column to view the setup
properties of the calculated
M-Local
for
this point
Yes, For All
- This option select this
coordinate type for all points with
associated with this base station
session.
Yes, For All (Auto RTK/PPK)
- This
option will use an algorithm to
automatically select the best RTK
or post-processed coordinate for all
points with associated with this base
station session.


